Turquoise
Energy Ltd. News #108
covering January 2017 (posted February 5th 2017)
Victoria BC
by Craig Carmichael
www.TurquoiseEnergy.com
= www.ElectricCaik.com
= www.ElectricHubcap.com
= www.ElectricWeel.com
Month In Brief
(Project Summaries)
- Improved CNC Router - CNC Gardening Machine - Electric Suzuki Swift
Notes - Moving to Haida Gwaii Halts Projects - Improved Solar Panel
Cover Glasses? - Solar Cells & Panels for Electric Truck
In Passing
(Miscellaneous topics, editorial comments & opinionated rants)
- Replacing Plastic Bags - Shower Nozzles - Pro-baa-baa-ly not Funny
- In Depth
Project Reports -
Electric
Transport - Electric Hubcap Motor Systems (no reports)
Other "Green"
Electric Equipment Projects (see Month in Brief)
Electricity Generation
* Making Piggott Generator - continued
Electricity Storage - Turquoise Battery
Project (NiMn, NiNi, O2-Ni), etc. (no reports)
January in Brief
As expected, I did a lot more packing than project work in
January. There's only one short "Detailed Project Report", so I'm
sending it in the e-mail as well as posting it online. Details are there.
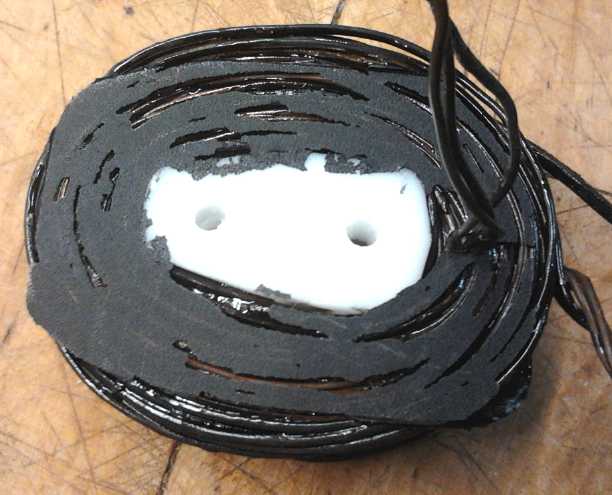
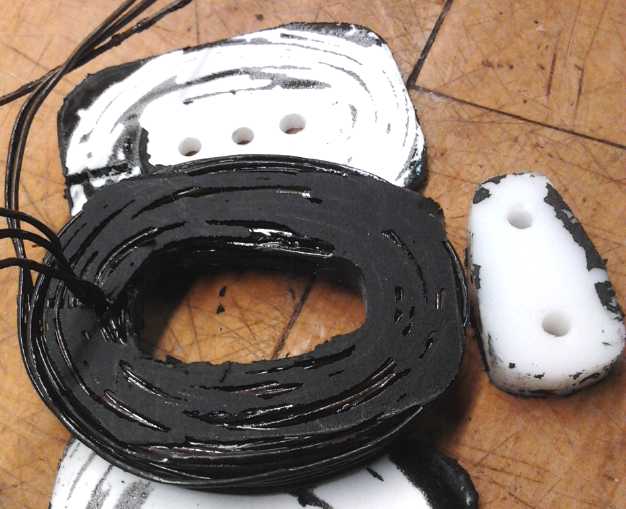 A wound coil, sitting on the former it was
wound on
A wound coil, sitting on the former it was
wound on
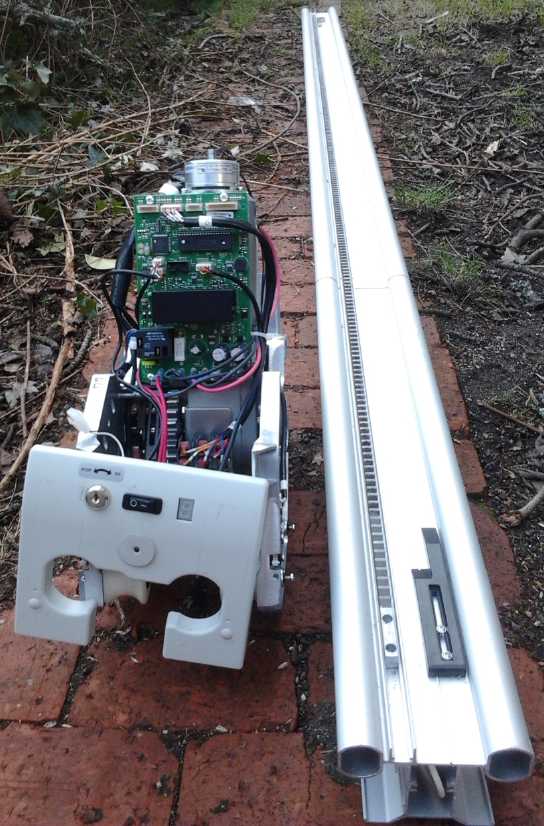
Improved CNC Router
My friend Bill who made the CNC drill/router which I
bought from him and have been employing for several years now, phoned
me on the 23rd and said he had
acquired a commercially made CNC router in an estate sale. He was
interested in swapping it with me for his creation. I had already
packed his in the container, but it wasn't buried behind anything yet.
The next day I went out to his farm to have a look. It was smaller and
lighter, but I decided it would probably suit my purposes better. (And
it would take less space in the shipping container!) The big machine,
priceless to have but used only occasionally, had taken up 1/4 of my
entire machine shop floor space, counting the computer and a place to
work at it. And with all the struts low to the floor it was almost
impossible to clean up the shavings under and behind it. It would do
work up to about 30" * 30", where the new one was only about 22" * 22".
But after my experience with the "Electric Weel" and all the tolerance
and fitting problems with a machine that size, I don't think I'll want
to create any machine that large again anyway. A double size "Electric
Hubcap" would be about tops, and that would be about 21".
A major hitch with all the equipment Bill had acquired at
this sale was that all the cables were missing, doubtless along with
many other bits and pieces. Those handling the estate were very
careless, considering that everybody has had things that have become
garbage because of a missing cable or power adapter (or some 'trivial'
broken piece), and should know enough to keep everything together. It
will be a headache to set it up and get it working. But perhaps good
practice, for the next item below, CNC Gardening.
Once it is working, the controller has 4 stepper motor
drivers instead of 2, so it can can have proper "Z" axis - programmable
up & down travel - instead of just a pneumatic 'up' or 'down'
switch.
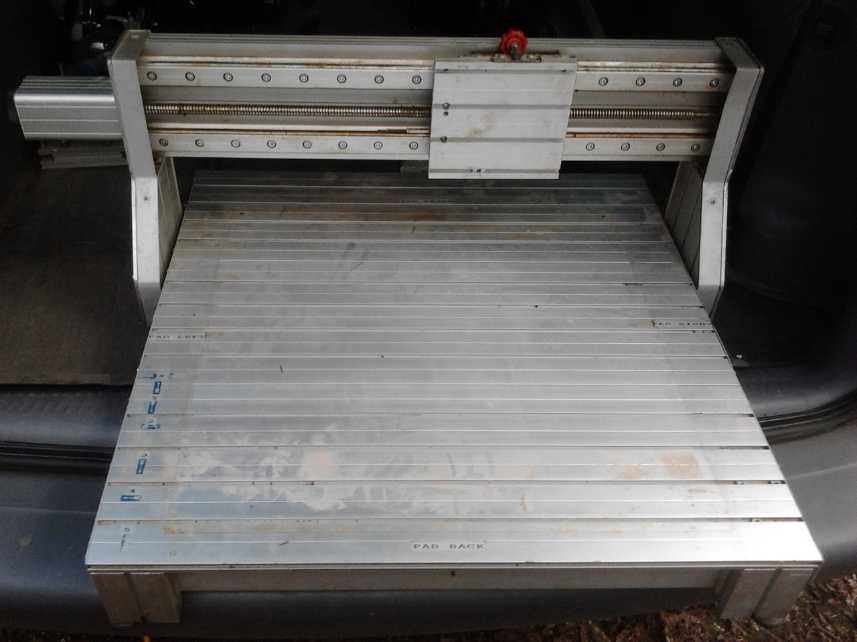 CNC Router table.
The router too (not shown) is smaller than the old one, but adequate I
trust.
There is no special drill came with it, but it's been a long time since
I
used the drill, and holes can be made in plastic with the router.)
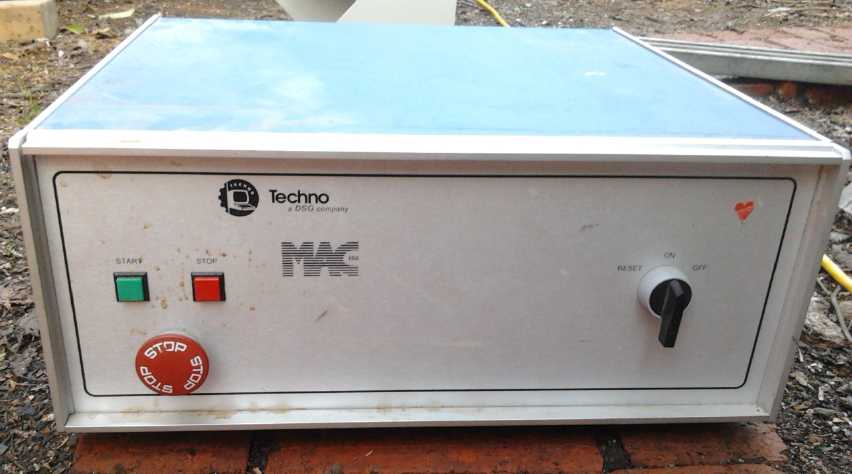
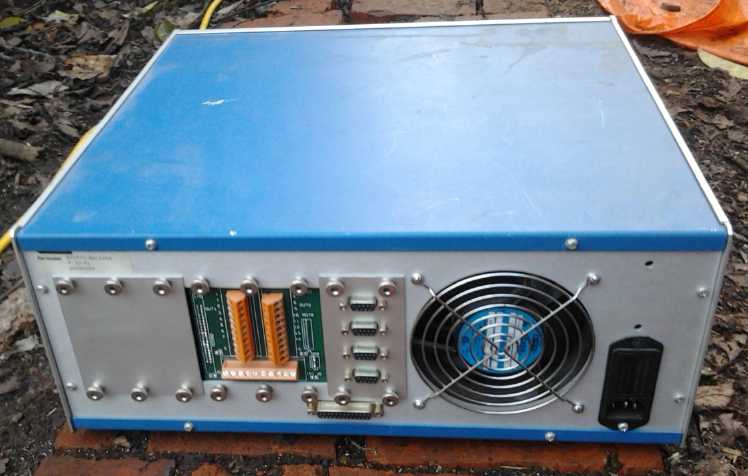 The stepper motor controller for the 'new'
router. Front, Rear views.
The stepper motor controller for the 'new'
router. Front, Rear views.
CNC Gardening Machine
 This project idea, long set aside, came suddenly to the fore again on
the 24th when I went to look at the 'new' CNC router. Bill had acquired
a stair lift used for the handicapped, and asked, "Can you think of a
use for this?" The track was about 11 feet long with a housing having a
motor and gear that drove the housing along the track's linear rail
gear. I immediately said I would use it as a gantry and turret for a
CNC gardening machine. Although they were in fact doing market
gardening where Bill was living, he didn't think they'd be interested
in that. Their garden was too large anyway. But it coincided with my
thoughts that I might want to do just a bit of market gardening myself
once I was settled in my new location - especially if a machine made it
as easy to do a big garden as a small one. He gave it to me as part of
the deal. I know someone who was in the business... I wonder if I can
get another extension piece(s) to make it twice or three times as long?
This project idea, long set aside, came suddenly to the fore again on
the 24th when I went to look at the 'new' CNC router. Bill had acquired
a stair lift used for the handicapped, and asked, "Can you think of a
use for this?" The track was about 11 feet long with a housing having a
motor and gear that drove the housing along the track's linear rail
gear. I immediately said I would use it as a gantry and turret for a
CNC gardening machine. Although they were in fact doing market
gardening where Bill was living, he didn't think they'd be interested
in that. Their garden was too large anyway. But it coincided with my
thoughts that I might want to do just a bit of market gardening myself
once I was settled in my new location - especially if a machine made it
as easy to do a big garden as a small one. He gave it to me as part of
the deal. I know someone who was in the business... I wonder if I can
get another extension piece(s) to make it twice or three times as long?
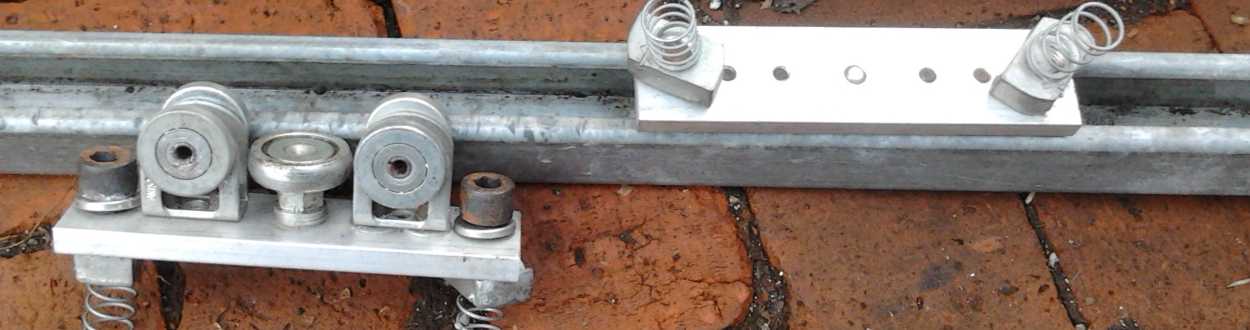
Then Bill showed me some
"Unistrut" steel tubes, and sets of wheels that fit inside them. The
tops of the square "U" shape were bent in at 90 degrees, so things can
be locked into place with special nuts on the inside. The wheel sets
made to fit inside this system, attached to the gantry on the top, can
only come out at the ends. This would be an advantage over the angle
iron wheels because they couldn't derail. If bumpy rototilling caused
the turret to bounce, the wheels in the track had to stay in the track
instead of potentially jumping off the rail. I took two sets of the
wheels and some short pieces of the unistruts to use for track.
That leaves needing something to move the tools up and
down, the "Z" axis. Then I could see making a garden maybe 20' x 60' or
30' x 60', with the hard work (tilling) and tedious operations (like
watering) exactly where the plants were planted, being done for me.
Once programmed, of course.
Electric Suzuki Swift Notes
Checking distances, I decided I shouldn't try driving the
Swift 60 Km out to Bill's farm and back. Theoretically doable, but one
wants a reserve to be sure not to harm the batteries. I'd have wanted
to charge it at Bill's for at least 2 hours to be safe before
returning, and I didn't know how long I would be there. It's a great
car for around town, but for trips over about 40 kilometers it comes up
short. (This decision turned out to be fortunate. I took my "new" Dodge
Caravan, which I bought for towing my electric vehicles to Haida Gwaii,
and I needed all its considerable space to bring home all my CNC booty!)
Now I'm considering that I'll be between towns on Haida
Gwaii, and that it'll be about 50 Km to Queen Charlotte town (where
there are some stores including a building supply) and back. It would
be nice to have more than the 10 KWH of battery storage on board. No
doubt I can charge for an hour in town somewhere to make the trip
doable. But I think I'll give thought to putting more capacity than
that in the Sprint assuming I ever get it running. Ideally it would be
great to have the run of the island by EV, or at least to be able to
drive to Masset and fully recharge there somewhere.
Performance-wise, one does notice in both the Sprint and
in the Miles truck that take-off from a stop is more gradual than with
a DC motor. Once moving along, that sluggishness disappears.
Moving to Haida Gwaii Halts Projects
In addition to taking up most of my time, as I pack things
away in the shipping container, I don't have available what I need to
do projects. I packed up the milling machine, rotary table et al, so
there'll be no more gear cutting until I'm set up in the new location.
And I packed up the chemicals et al so there can be no
more new chemistry battery experiments. But Leonardo sent an e-mail
suggesting a way to dope graphite felt with nitrogen (heat in microwave
10 minutes in urea) to make it a catalyst for oxygen reduction for the
air side of the battery. If it would also eliminate the self discharge
it would change everything.
Along with the CNC equipment, Bill also gave me an
ultrasonic plastic welder that he had acquired along with the other
things. If I can get it to work, it could be useful for various cases
potentially including battery cases. But it's just a box with
connectors - there must be vital parts missing that connect to it, that
I might or might not be able to buy from the manufacturer if I decide I
want to weld plastic.
Improved Solar Panel Cover Glasses?
When I emptied out the cupboard with my early (2010?)
experiments with creating a nanocrystalline titanium dioxide
borosilicate glaze for solar panel cover glass, I gave it some thought.
Solar panels have only become cheaper and far more widespread since
then. I still had a couple of the little final "glaze mix 9" tiles. How
close was I to having improved the state of the art for solar panels?
All I needed to do was to grind some glaze off the tile, sprinkle it
onto a piece of glass, and put it in the kiln so the high refractive
index glass powder melted into the surface of the glass, making
something like a microscopic version of pebbly concrete texture.
This would result in far less reflection of light coming
from angles other than straight on. Instead most of it would be
refracted to a steeper angle before it went through the glass to hit
the photo surface behind it. Indications were it might improve
collection over a day by 20% to as much as 40%, with perhaps the
biggest increase occurring in diffuse light on cloudy days.
The problems at the time were first that I had had no real
plan and didn't even realize the obvious best use of what I had created
until later when I had moved on to other things, and second that I was
trying to make dye sensitized solar cells at the same time, with an
idea or two for improving those. That involved trying to coat a glass
surface (the under side) with titanium dioxide. (Yes the same substance
as in the glaze.) Trying to coat both sides of the piece of glass, both
involving kiln operations, it would be risky trying to do the second
side without wrecking the first side. Theoretically, the conductive
coating on the back is done at a lower temperature, but it would risk
ruining the "pebbly" glaze doing it. I was definitely trying to do too
many things at once! Another factor was that I didn't know one could
buy the silicon solar PV cell elements without a glass cover. I've
heard since that you can, tho I never looked for them.
Perhaps I'll get back to this: grind the frit and coat a
glass to the pebbly texture, then order
some solar panel elements and set them behind glasses with and without
the texture, and measure relative performance at various angles of
sunlight, and in diffuse sky light with clouds. It would seem to be a
shame to pass up a chance to improve the state of the art in this
increasingly widespread field. Then again, one can only take on so much.
On February 3rd I looked them up at AliExpress and
found some sources for raw, uncovered solar cells. Small ones were
"dirt cheap" and I ordered a package of 100, 38mm x 19mm. (I should
probably have ordered some of the special flat solar cell connector
wire, too.)
Solar Cells & Panels for Miles Electric Truck
While I was at AliExpress, I checked for whole panels and
found 100 watt panels listed "on sale" for 141$ Canadian, free
shipping. The price seemed good and I ordered 5 for the Miles Electric
Truck. The plan is, as described in testing in an earlier issue, that 2
panels doesn't quite have the voltage to charge 36 volt batteries,
which need up to 42 volts to charge, even for a trickle charge. (It
might just work if they are straight on to bright sunlight with no
haze.) Likewise 4 panels isn't quite enough for the truck's 72 volts.
The 5th panel raises the voltage enough to ensure the truck will charge
under most typical sunny conditions (if it's not parked in the shade).
Maximum power point in full sunlight is about 18.6 volts. Mostly the
sun will be at an angle so call it 17 volts. 5 * 17 = 85 volts; 84 is
required for strong charging.
The size of the panels was 997mm * 665mm. If 3 of the
panels are placed side by side from front to back, that's 2 meters long
and a meter wide. If the other 2 are placed end to end, that's 2 meters
long by 2/3 of a meter wide for a 'perfect' rectangle of 1-2/3 meters
by 2 meters. The truck roof is just big enough with two panels
overhanging one side a bit. Up to 500 watts of charging even while
driving will actually increase the driving range a little on sunny
days. (It's a pity the roof of the Swift is too small to hold more than
a couple of hundred watts of panels.)
To continue with the truck, I expect it to be useful at
Lawn Hill, and I hope to disassemble the transmission once I'm there
and make it able to shift into a higher gear to do higher speeds, with
a two-speed stick shift - maybe going between 2nd and 4th. (Of course
if I get the efficient variable transmission working and some sort of
production, I'll replace the present transmission entirely and get more
range as well as more effective power and speed.)
I also hope to buy a set of replacement golf cart
batteries for it, not filled with acid, and have them there to install
and fill after the current set wears out. The present ones are only 180
amp-hours, while most new ones are 220-245 amp-hours, so the present
range (whatever it is) will be increased when they are changed.
In Passing
(Miscellaneous topics, editorial comments & opinionated rants)
Replacing Plastic Bags
I saw a video article somewhere (RT?) about a new type of
organically derived material invented in India, created to replace
plastic bags. These bags, which are for sale and in use, are more or
less like plastic bags to use, but if they get wet they disintegrate.
If I recall correctly, they're even edible. I don't know what they
cost, but a few cents more would be worth it for the reduced litter.
I tried to find the article again. Instead I found
multiple efforts here and there of people trying to find ways to
replace plastic bags, mostly with organic substances. But the only ones
in use were the Indian ones.
Given the huge and increasing amount of plastic littering
the environment, any sensible alternatives should be carefully
examined. I can stoop down most anywhere in my yard and see little bits
of plastic. I've been picking each little bit up of late, but it's
everywhere. My favorite technique is to reuse clean plastic bags - keep
some in the car or stuff a couple in my pocket when I'm walking to a
grocery. My other favorite is to put wood chips or sawdust in them and
burn them, since polyethylene burns clean. The wood bits would make a
mess around the wood stove if they were shoveled into the stove instead
of being contained in a bag. Occasionally I actually run short of
plastic grocery bags, but I confess it's usually a surplus from
forgetting to bring them into the grocery.
Shower Nozzles
A while back I did a short video about the "Waltec 10C"
shower
nozzle. It seemed to me to be the most water conserving one. Thinking
to take these nozzles with me when I move (as they don't seem to be
available any more), I bought a cheapest shower nozzle at Wallmart to
try out and replace one of them. The package made no claims, but it
didn't seem half bad compared to many.
I check shower flow rate by having a shower with the plug
in the tub
and a clock in sight, then emptying out the water in a large 11.4 liter
ice cream bucket that scoops it up nicely even to the last cup. It
doesn't have gradations, but I figure I estimate the water in it pretty
well, and of course the shower is averaged over several minutes. For
myself, I ended up using about 5-1/2 liters of water a minute instead
of 4 to 4-1/2 - still less than the 9 liters per minute advertised as
being "water conserving".
I didn't like it much at any lower flow. I put the Walltec
10C back
on and figured out that its spray was more coarse, with each little
stream of water delivering hitting the skin with some pressure. The
Wallmart one gave a finer, more 'misty' spray - more streams of water
but with no pressure behind them, where one didn't feel any individual
jets of spray - more like rain. The Waltec spray had more force than
the Wallmart even
when turned down to about 3-1/2 liters a minute.
But the 10C is only water conserving when adjusted to its
smallest
opening. Otherwise, it can easily be adjusted to gush a lot of water.
And that's just how my renters used it. So I put the Wallmart one in
the other shower. The report was that it worked fine, but any harsher
would be too much. There's probably something to be said for something
that can only adjust to within reasonable limits: if you want less
power, turn the taps down instead of opening the spray nozzle wide like
a fire hose! How it's used makes a lot of difference.
Pro-baa-bly not Funny
They talk of "bears" and "bulls" on Wall Street. But I
have observed that Wall Street is mainly occupied by packs of wolves,
who are experts at fleecing the many flocks of sheep who come by
thinking they can make some money by investing in the stock market, or
at least have their savings keep up with inflation. Too bad about your
"bad luck" in the markets, sheep. Sorry your mutual fund "didn't
perform". Please come back and try again when you have some more money.
Newsletters Index/Highlights: http://www.TurquoiseEnergy.com/news/index.html
Construction Manuals and information:
- Electric Hubcap Family Motors - Turquoise Motor Controllers
- Preliminary Ni-Mn, Ni-Ni Battery Making book
Products Catalog
(Will accept BITCOIN digital currency)
...all at: http://www.TurquoiseEnergy.com/
(orders: e-mail craig@saers.com)
Electricity
Generation
Improved
High-Powered Hugh Piggott Frictionless Axial Flux Alternators
STATOR
On the 7th I decided
to wind the coils with 3 #14 AWG wires. I started by unwinding three
#14 coils from an old Electric Hubcap motor from before the times of
using the iron powder cores, one wrapped around a core of nail gun nail
strips. It was the first one I had coated with rutile to complete the
magnetic circuits within each coil, which had so improved the
efficiency. (Ilmenite worked even better and better ways of applying it
were found and are in TE News issues somewhere.) They unwound rather
easily, and with gloves on I manage to wipe off most of the epoxy
shards from along most of the lengths.
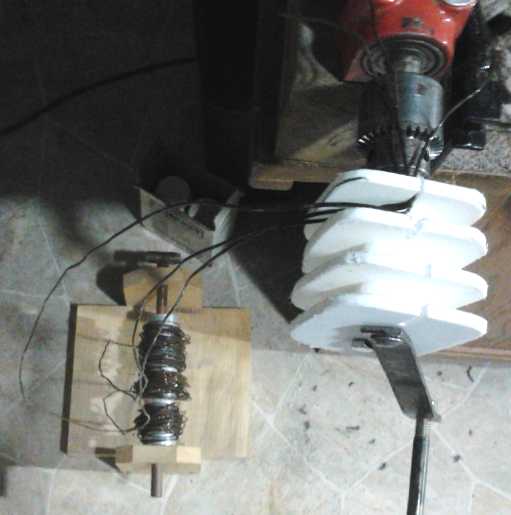
Having no spools to wind
them onto, I wound them onto a piece of aluminum pipe in three separate
places to wind onto the coils together. I mixed 32g of heat conductive
epoxy to glue them together with. As I had anticipated, there wasn't
enough wire to wind all 3 coils of a phase, but it did two coils of 21
triple turns with a few turns to spare. I was however vainly wiping the
epoxy off the walls of the little cup before I was done trying to get
enough. Maybe count on using 20 grams of epoxy per coil.
Wound 2 coils
 A coil
 with the center removed. The hollow
center will provide more cooling surface,
A coil
A coil with the center removed. The hollow
center will provide more cooling surface,
but not so much more as I had imagined beforehand. The fact that the
epoxy came
out not completely solid will actually help cooling more - I hope the
wires never vibrate loose.
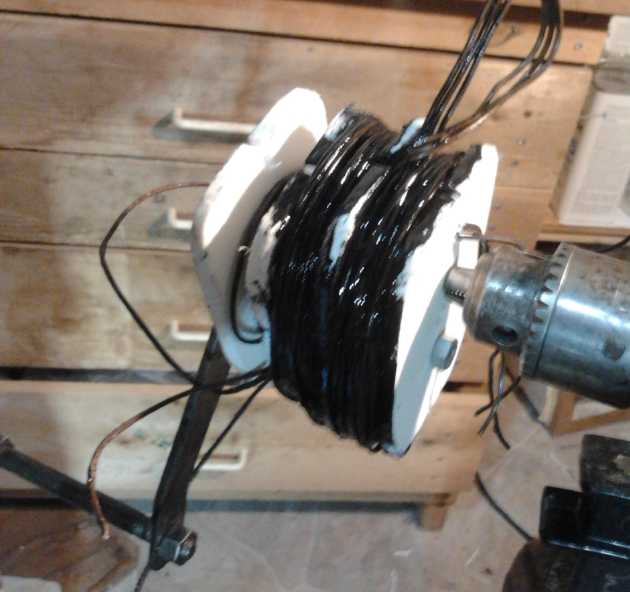
After removing the coils and setting them into place, they
were too fat with 21 turns, nearly an inch instead of 3/4". 4 wires of
#15 would have been as large or larger. I could either try gain with 3
wires of #15 AWG, or unwind a couple of turns, making them 19 turns, so
that they would fit. The wire connecting the coils seemed a bit short,
but a turn unwound form the first coil made it far too long. I decided
winding them one at a time and soldering the connections would be
easier after all.
I had no luck finding boron nitride powder to make epoxy
heat conductive at the pottery supply, nor did Queale Electronics seem
to have heat conductive epoxy any more. I might have to try a lab
chemicals company for the BN powder - that'd be a pricey source!
Rotor
On the 8th I checked to see how effective the weight
saving measures I'd tried were - the holes and the "scalloped" outer
edge. The rotor, about 6 millimeters smaller diameter than the old one,
weighed 2560g. (another was 2660.) The old one, even with its larger
center hole, was 3390g. At least 1-1/2 pounds or so were saved. I'll
call that successful!
As the month wore on realized I wasn't getting packed
quickly enough for my move. I decided I just didn't have time to
continue, and finally I packed up the coil winding tools, wire and
epoxy. To be continued, at Lawn Hill!
http://www.TurquoiseEnergy.com
Victoria BC Canada