Turquoise Energy Ltd. News #130
covering March
2019 (Posted April 5th 2019)
Lawnhill BC Canada
by Craig Carmichael
www.TurquoiseEnergy.com
= www.ElectricCaik.com
= www.ElectricHubcap.com
Month In Brief
(Project Summaries etc.)
- Finishing the solar PV system infrastructure - 36 volt HAT
Plugs, sockets, wall plates and driving any lower voltage appliances
from 36 volts - Thermal Pane Window disassembly & glass cleaning -
Gardening and greenhouse.
In
Passing
(Miscellaneous topics, editorial comments & opinionated rants)
- The Value of Social
Ratings
- Self, Other and Together
Interest - Climate Disasters, Chapter One - On and Off Beefs - More on
Recycling Plastics into Valuable
Products, Recycled Transparent Plastic for Greenhouses? - ESD
- Project Reports
-
Electric
Transport - Electric Hubcap Motor Systems
* Ground Effect Vehicle (R/C Model): Beginnings
Other "Green"
Electric Equipment Projects
* "Off Grid" (etc): 38 (33-45) Volt DC "HAT" Plugs & Sockets ...and
other 40 volt components.
- Instructions for making plugs, sockets, wall
plates (with 3D printer) - Revised HAT plugs and sockets - Wall Triple
Outlet & Cover - 36-40 V DC System Breaker Box - Special Duplex
Outlet with Switch - Hole Caps and Glands with 3D printer - Power
Monitor - Anderson
Connectors (70 Amp) - More Wall Plates - Weak NiMH Battery Repairs
* Disassembly and Cleaning of Thermal Glass
- Disassembly: "Success by 1000 Cuts" - Cleaning: Magic Baking
Soda
Electricity Generation
* My Solar Power System - Crappy Alligator Clips! - Energy collection
readings for March - Winter Solar Panel Reflectors? - All the Angles -
Power Outage Power From Grid Tie Inverters? - For America to go 100%
Solar...
Electricity Storage -
Turquoise Battery
Project (Mn-Zn, Ni-Zn or Pb-Zn in Methyl
Hydroxide electrolyte) (no reports)
The weather continued on from February, sunny and right
around freezing without let up. In late afternoon on the 8th it clouded
over. On the 9th it stayed cloudy and the temperature broke +5°C
for the first time since January.
I monitored the solar panels daily all month. Often they
still
collected around half as much through the clouds as in the sunshine,
but occasionally they were quite low. The 10th in particular had rain
and heavier cloud and the collection went to under 10%; .8 KWH instead
of 8+. As spring progressed, total daily energy collection rose from 8
to over 12 KWH per day when it was sunny. Power hit 1.95 KW at noon on
one sunny day. The mornings lengthened, but afternoon cutoff stayed at
around 4 PM (PST) owing to tree shadows. It's somewhat irksome to see
that the sun is still in the sky, but behind the trees. for the garden
as well as the solar. ...cut down the forest to the west of the house?
But there is only one row of nice spruce trees, near the house. Behind
that is just thin, densely packed alders because it was all clearcut in
the 1960s. No sign of sustainable forestry in that!
Naturally I wanted to get on with the new battery
development, the ground effect vehicle, the reluctance motor and
controller for electric cars, HE ray energy, and maybe a large VAWT
(must wind new stator coils for higher generator voltage at lower RPM)
and
a CNC garden digger-upper, and solar panels on my electric Sprint car
and Miles van vehicles. Not to mention milling more of my spruce and
getting the greenhouse up and beds dug and vegetables planted. As a
precursor to some of that and to plastic
recycling, I wanted to get my CNC router/drill/plasma cutter up and
running.
But having started in on the solar power and some home
infrastructure for it, it seemed advisable to finish that to a
relatively completed state.
What had been done in previous recent
months (see previous issues) was:
* I argued that 36 volts is the best voltage for a DC power system for
RVs, boats, off-grid homes, etc. The logic was that it's about the
highest "human-safe" voltage, wiring only needs to be 1/3 as heavy as
for 12 volts, and it's a good "in between" voltage, being about 3 times
12 volts and 1/3 of 120 volts. (One recognizes that this an unregulated
"nominal" battery voltage.) Cheap DC to DC down converters can turn it
into 12 volts as needed - or any other lower voltage like 5, 18 or 24.
* 4 (last summer) and then 6 more (total 10) solar panels were
installed in two roof
sites, providing 1.6 and 1.2 KW nameplate capacity - or 1.2 + .9 = 2.1
KW with the 75% "realism" factor. (Owing to the low angle of the roofs,
collection may not even hit 75%. It's over 60% now.)
* The 10 amp programmable DC to DC converter/charge controller was
connected and programmed to provide 41 volts to charge a 36 volt DC
system. (I've been calling it "38 volts +/- 15%" but that's probably
just confusing and I should stick to calling it "36 volts" like
everybody else. But really by the time three 12
volt NiMHs or lithiums are down to 36 volts, they're largely drained of
their energy.)
* Three 12 volt, 100 amp-hour NiMH batteries made up of "D" cells gave
some storage capacity. But two of them, and especially one, seemed
surprisingly weak. This month I checked them over and replaced 18 bad
or weak cells - 13 of 100 on the weakest one and 5 of 100 on the other.
One cell was actually shorted, 0.0 volts.
* Plug-in grid tie inverters ensured that excess power didn't go to
waste. (even if I was giving much of it to the power company for free)
* I designed and made 36 volt "HAT" plugs and in-line sockets. (Plastic
shell designs to be uploaded to "thingiverse.com" for 3D printers.)
Lack of standard plugs and sockets has held back development of both 12
and 36 volt systems, so now there are 12 V "CAT Std." and 36 V "HAT"
plugs, sockets, wall plates, etc.
* I wired a low cost, compact little adjustable 5 amp DC to DC down
converter with a HAT plug to accept 36 volts and a CAT socket to power
the more common 12 volt DC equipment. Being well regulated they can
power 12 volt electronic and computer equipment that you might not dare
to power from an unregulated 12 volt battery system. And
being completely adjustable a single stock unit can replace most every
"wall wart" 120 VAC power adapter, reducing the headaches for finding
the right one. They can be adjusted to 5 volts with a USB socket
output, or to 18 or 19.5 volts for laptop computers with a round
socket/plug.)
So... now, ALL KINDS OF THINGS can be powered from 36
volts DC with its much thinner distribution wires than 12 volts would
need. And the HAT and CAT plugs and sockets make it easy to connect
things up. No wiring - everything plugs in. That is of course once the
appliance cord has the plug on it.
After realizing all these good points, I found the
converters I bought ran rather hot driving any considerable 12 volt
load, and this month I ordered some similar but higher power capacity
units with good heatsinks for twice the price - 5$ instead of 2.50$.
That's still cheaper than most AC adapters - or even a replacement AC
appliance plug in a hardware store. And there are still other DC to DC
converters on which both the voltage and the current limit are
completely adjustable - better for LED lights and for charging
batteries.
What was done this month, March, was:
 * I improved
the shells for the HAT 36 volt plugs and sockets a little.
* I improved
the shells for the HAT 36 volt plugs and sockets a little.
 * I designed
and made on the 3D printer HAT triple receptacle wall plates for house
wiring, and a special duplex one to cover a round hole. They seem to
work well and so the specs for HAT plug
pins and spacings from last month may be considered final:
* I designed
and made on the 3D printer HAT triple receptacle wall plates for house
wiring, and a special duplex one to cover a round hole. They seem to
work well and so the specs for HAT plug
pins and spacings from last month may be considered final:
HAT Plug Blade Specifications (36 volts nominal, maximum 15 amps)
Thickness: 1.35 mm +/- .15 mm (1.2 to 1.5 mm)
Width: 3.75 mm +/- .25 mm (3.5 to 4.0 mm)
Length: 10.0 mm +/- 1.0 mm (9 to 11 mm)
Pins Center Spacing: 7.5 mm
Negative pin is "in line" (lower pins in image), positive pin is
"across" (upper pins).
Just as with 120 volt plugs and sockets, there can be a wide variety of
designs as long as the blades/pins matching this size and spacing fit
in and connect. See TE News #129 for construction details of basic
plugs and sockets with 3D printer printed shells.
I intend to put all HAT connector OpenSCAD designs onto www.thingiverse.com
for anyone with a 3D printer. (The CAT 12 volt designs are
already there.)
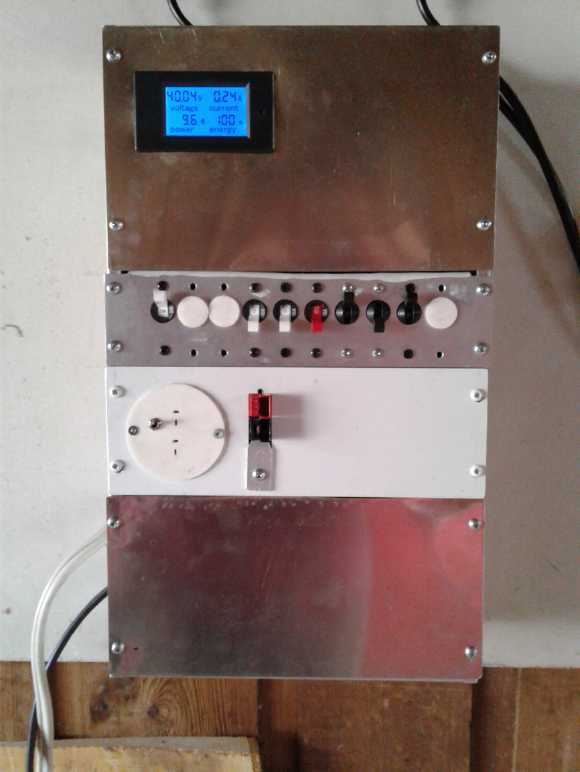 * I assembled
a breaker box with "Blue Sea Systems" type circuit
breakers for the 36 volt house distribution system. Of course I used
the breakers and box I made previously in Victoria, but with
modifications. In it I installed:
* I assembled
a breaker box with "Blue Sea Systems" type circuit
breakers for the 36 volt house distribution system. Of course I used
the breakers and box I made previously in Victoria, but with
modifications. In it I installed:
- a 50 amp main breaker from the batteries (biggest breaker I
had)
- 6 branch circuit breakers: 40, 20, 20, 15, 15, 5 amps
- an LCD digital DC voltage, current, power and total energy use
meter on the front panel. And for this, a 100 amp shunt "resistor"
(.00075 ohm) inside, on the "-" side.
- a duplex HAT socket with a small switch on one outlet. (on the
5 amp breaker.)
- One 15 amp breaker went to the wire crossing the house to far
end of the
(huge) living room, where the triple HAT outlet plate was connected.
(Still to do: another outlet in the bedroom and one in the livingroom
by the computer tables.)
- a 70 amp Anderson APP connector, "+" and "-" (on the 40 amp
breaker - especially to power the 36 V to 120 V or the 36 V to 230 V AC
inverters [2500 W for the well pump]).
* Some Anderson plug cables were made up to connect the Sprint car (11
KWH @
"36" V batteries), the 35 V to 120 V inverter. (Still to do: One APP
"extension cord" to connect the car to the breaker box.)
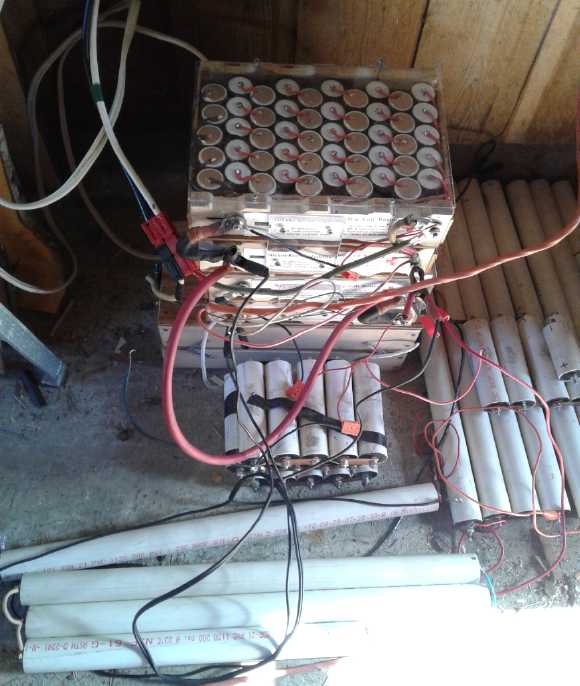 * As mentioned I repaired
two 100 AH, 12 V NiMH "D" cell box batteries
by replacing bad or weak cells. Then I started delving into the 12 V
pipe batteries, finding the good ones and replacing bad cells in
others.
Then adding them into the system for more energy storage. It should
total at least 160 AH, ~6 KWH when they're all done.
* As mentioned I repaired
two 100 AH, 12 V NiMH "D" cell box batteries
by replacing bad or weak cells. Then I started delving into the 12 V
pipe batteries, finding the good ones and replacing bad cells in
others.
Then adding them into the system for more energy storage. It should
total at least 160 AH, ~6 KWH when they're all done.
* I ordered a 60 amp charge controller. 10 amps won't be enough in an
extended power outage since it would take over 16 hours to charge 160
amp-hours of batteries. Just the four old solar panels should do over
30 amps.
Since I haven't made a high amperage HAT plug and socket
yet but
didn't want to hard-wire everything together and limit versatility, the
70 amp Anderson connectors were really the only choice for the high
current stuff. And they are versatile because the "plug" and the
"socket" are identical. This means I can plug in a 36 volt, 1.7 KW
inverter as a load (to run, especially, the fridge and freezer, or the
well water pump), or perhaps the "36" [AKA 40] volt Sprint car
[batteries]
either to charge them or to supply the system from them. One might also
plug the inverter into the car batteries, completely separate from the
breaker box.
They are also dangerous in that being all the same, one
can easily plug in incompatible things. Like a 12 volt appliance into
36 volts -- or one appliance into another appliance -- or even a 12
volt
battery into a 36 volt battery. And you can clip the two single pin
housings together backward and fry valuable equipment with reverse
polarity. They aren't for household use where someone who may not know
exactly what they are doing may do something wrong.
Since no one else had done it, this is why I made the CAT
12V and HAT 36V connector
systems with defined voltage specs for house, boat, RV... wiring. I
hope 36 VDC will become a standard wiring voltage.
 * Later I put a 36 volt
panel light on a bracket on the garage wall to light the solar
equipment area. I put a HAT plug on its cord and plugged it into the
switched outlet on the breaker panel, so putting in the switch came in
really handy.
* Later I put a 36 volt
panel light on a bracket on the garage wall to light the solar
equipment area. I put a HAT plug on its cord and plugged it into the
switched outlet on the breaker panel, so putting in the switch came in
really handy.
I had thought to finish the
DC power and solar systems up
in the first half of the month and then get to battery experiments
again, but I was also determined to do a decent job of it and finish
each
individual part "properly". On the 18th I was still working on
various aspects.
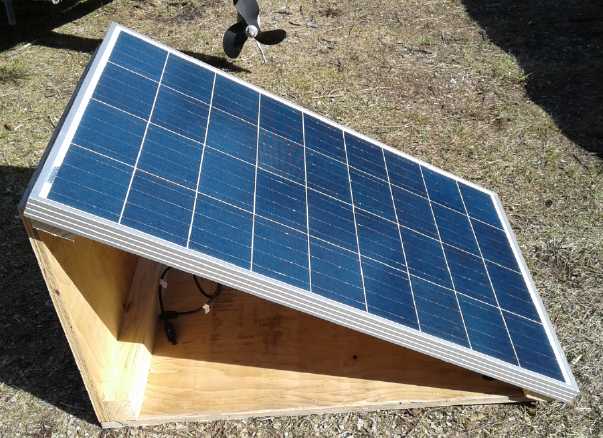
Then I got a small job to make angled mountings and
wire up 100 watt solar panels for two tug boats. I didn't even get to
that until near the end of the month, when I put one together, a
30-60-90 triangle, with plywood. I took it to the customer's house to
make sure it was what he wanted, but he was at sea. It is so now I have
to do the rest of the work - the second one, painting the plywood, the
wiring on the boat...
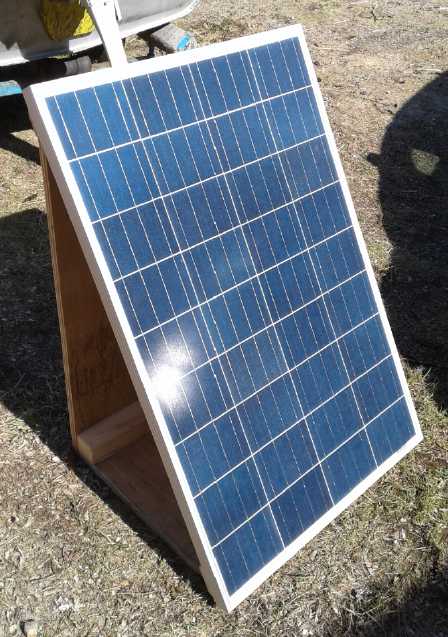 A triangular 100 watt solar panel frame.
This might be useful in a number of situations where a panel might be
carted around to get the best sunlight.
In addition to being turned during the day to keep pointed at the sun,
it can be set more vertical in winter and more horizontal in summer.
Then I was offered another
small
installation job at a nearby off-grid house. When will I get to that
one?
---
In the meantime near the end of the month I was inspired
to do just a bit of work on the radio controlled model for the ground
effect vehicle, intended to cross open water at aircraft speeds. I cut
out the sides for the hulls from 2" styrene foam, and then split them
down the middle on the bandsaw. (To my surprise they warped more than
any board when split.)
In view of the vast flooding of the center of America with
the vast loss to water of stored grains (and a million(?) drowned
calves) and indeed of the high percentage of bankrupt farms which
may not reopen for years and then under new ownership, and the
inevitable vast crop failures for at least
two or three years to come - along with all the other huge global food
disasters - I started thinking food might become a
priority and worked some on the redoing of the greenhouse. It wasn't
much good with half the walls wide open. I planted a few things indoors
(but not enough either in variety or in quantity). I bought some
chicken feed while it's still available looking ahead to getting a
chicken or two. (I also bought extra flour and groceries on "sale day"
at the co-op grocery.) I wished I had the CNC gardening machine done to
turn
some lawn into a small wheat or barley field. And some more fence to
keep the deer out of a larger growing area. (Perhaps I should go buy
that?)
And I finally dug up the bulk of last year's potatoes. On
the 25th, with the main patch done, I weighed just 12 Kg of small
potatoes - red, purple & white skin, white, and purple haida. I
might have
eaten another Kg or two over the winter, and there were a few soggy,
spoiled ones from near or on the surface that had got frozen in the
cold a month earlier. And a small patch I hadn't dug up yet. Maybe 40
pounds total? Not a huge crop considering the area devoted to
them, but decent considering the very sandy soil. (Some red potatos at
one end were a good size. Better variety for the climate? Better spot
with
a bit more sun? Better soil? I dug a little deeper so as not to cut
up potatoes with the shovel, and I was turning up pretty much pure
sand. Thinking
back, it was mostly sand when we started in 2017. Tom brought several
wheelbarrow loads of black organic dirt from the forest when we were
starting, and I've added spruce sawdust from the milling operations,
eel grass from the beach, and some crunched up clam shells for
calcium/lime. I should probably do some more before I plant again.
Potatos are easy to grow, but now I hear (on youtube) are heavy feeders
to get good size spuds.
Here's my hard luck story with yukon
yellow potatoes. (What, you don't care? Well, just skip to the next
heading.) The stores were always sold out when I happened along. "Oh
well, next year."
In 2016 in exasperation I finally bought some at a grocery store, but
predictably they had been treated not to grow. Finally some of them
started
coming up toward the end of the summer, and I hoped for at least a few
small but good seed potatoes for the next year. But a deer came along
and ate
the tender late stalks, especially picking them out.
I finally found some yukon seed potato in spring
2017. (As I recall I was
barely lucky even then - it was the last bag or one of only 2 or 3
left.) Why are they SO hard to get? I brought them up to Haida Gwaii
with me. Tom and I planted them. But in fall 2017 as he harvested, his
wife Tess cooked them all up (in preference to all the other varieties)
and we had eaten them all before I realized there were absolutely none
saved for seed or still in the ground. So I had none in 2018. AWRG!
But having thought of it, I put yukon seed potatos on my
shopping list. There were LOTS at "Funk It", the garden store. I got
some, and then
at the health food store they had yet MORE - and also "french
fingerling" seed potatos (and other unusual varieties). These are
reputed to be sweeter than most, so I got some of them too. So this
year I'll have white, red, purple with white eyes & white flesh,
purple with purple flesh haida, yellow fleshed yukon and french
fingerling. Not
actually being a big potato eater I decided to try and recoup some of
the 25$ or so I had spent on seed potatos by taking several 1 Kg bags
of my small harvest to someone to sell at the farmers' market. But she
didn't answer my message and it turned out she hadn't done the market
that week.
Take Apart of a Sealed Window
 Somehow related to
planting... I tackled an interesting and perhaps unusual project on the
31st. A thermopane window sitting in my basement was just the right
size for the greenhouse I've been putting together. It was fogged on
the inside, and anyway double glass doesn't let as much light through
as single. Plus, it was just right for that whole wall section if there
were two of it. So I looked on line for sealed window disassembly
instructions. To my surprise there weren't any. It seemed no one ever
does it. I guess that explains why you can get them free or cheap if
they're fogged up inside.
Somehow related to
planting... I tackled an interesting and perhaps unusual project on the
31st. A thermopane window sitting in my basement was just the right
size for the greenhouse I've been putting together. It was fogged on
the inside, and anyway double glass doesn't let as much light through
as single. Plus, it was just right for that whole wall section if there
were two of it. So I looked on line for sealed window disassembly
instructions. To my surprise there weren't any. It seemed no one ever
does it. I guess that explains why you can get them free or cheap if
they're fogged up inside.
I did it before, years ago, with somewhat unsatisfactory
results. I sawed through the aluminum edge spacer with a jigsaw to get
the panes apart. Trying to get that awful aluminum oxide off, I
somewhat scratched the glass with "scotchbrite". It was better than the
fog.
This time I came up with much more satisfactory means both
to open and to clean them [baking soda], which are written up below
under "Other Green Projects". I have also done a video which I'll
upload when the internet is working a lot better than it is right now.
(They're the two panes next to the door of the greenhouse below.)
 I finally got
the greenhouse almost as sealed up as I wanted it to be on April 3rd.
Last year I grew nice greenhouse tomato plants that got almost no
tomatos, and those few very late. This year I hope pollinating insects
can get in and out, while inside it still gets warm in the sun. I put
in a first row of peas by transplanting some that had fallen last year
and had now taken root here and there and grown a few inches. (I don't
know what variety(s) they are, but they're bound to produce sooner than
seeds I start now.) Now to do a bit each day or two until it's all made
into beds and planted. Fresh peas! Tomatos! Cucumbers! Asparagus!
I finally got
the greenhouse almost as sealed up as I wanted it to be on April 3rd.
Last year I grew nice greenhouse tomato plants that got almost no
tomatos, and those few very late. This year I hope pollinating insects
can get in and out, while inside it still gets warm in the sun. I put
in a first row of peas by transplanting some that had fallen last year
and had now taken root here and there and grown a few inches. (I don't
know what variety(s) they are, but they're bound to produce sooner than
seeds I start now.) Now to do a bit each day or two until it's all made
into beds and planted. Fresh peas! Tomatos! Cucumbers! Asparagus!
Oh wait... first the wall inside needs to be painted white so it
doesn't absorb half the light. (Half done as of newsletter final edit.
Ran out of white paint.)
 At the other end, I used a scrap shower door
and a couple of small windows that open.
At the other end, I used a scrap shower door
and a couple of small windows that open.
(Yes it's a two-door greenhouse!)
When I've found more windows I hope to match the two halves of the
greenhouse at the front and
eliminate some of that shady "Solexx" plastic. Plants grow huge leaves
in there trying to get enough light.
 A row of peas - pretty good for "just
[trans]planted yesterday!"
A row of peas - pretty good for "just
[trans]planted yesterday!"
In Passing
(Miscellaneous topics, editorial comments & opinionated rants)
The Value of Social Ratings
Not to be confused with the now
defunct "Social Credit" political party in Alberta and BC, it seems
China is now creating a "social credit" scoring system to rate each of
its citizens. This would appear to be more of an onerous "social debit"
system, since people
scoring lower, with black marks against their name, are being
denied basic services like transportation. This will make life
unlivable, which can only end in some kind of blow-up and change of
government. There's a North American "no
fly list" too. You don't even know if you're on it or why, or who
decided you should be on it, until you try
to take a flight and can't. And there is no appeal process.
And of course, much is being made in the west of
government and corporate data collection on citizens from their on-line
activities, telephone conversations, GPS tracking, public area security
cameras with facial recognition software in city areas, and so on.
But there are benefits to fairly rating people based on
their deeds, too, provided such ratings are not used to destroy liberty
and opportunities - to make people unequal. And they may start to
outweigh the problems. In the
past, a
person's reputation was important. In the modern world before the
internet, there got to be so many people that one inevitably deals a
lot with strangers, whose reputation is unknown. If one's misdeeds and
lies started catching up with one, one
could always go somewhere where they weren't known and begin the same
shady lifestyle again. Things are changing.
On eBay and Aliexpress, customers rate merchants in accord
with how they feel they've been dealt with. Those who don't represent
their products realisticly or who give poor service, will pretty soon
have some low ratings. One can imagine that they soon will not get much
business any more.
Imagine if you could look up such ratings for the used car
salesman who is trying to sell you a car. You could see if he presents
things honestly to customers, or if people feel they had been "ripped
off", or pressured into a poor choice or sold a "lemon", and would
rather never deal with him again. Might that be helpful? Might he
himself be more inclined to honesty?
Now imagine you could look up ratings of those running
for political office. Today we can usually only hear the
propaganda media's opinion of what those running stand
for. We don't get to hear the candidates' platforms, and rarely even to
hear them speak, except perhaps a for
brief sound byte taken out of context for purpose of furthering a
preset narrative - often of making the establishment's choice candidate
sound noble, or of "demonizing" some upstart "not in the club" who
thought he could make a difference if he was elected to that office,
and that he had a realistic chance at it.
With a good rating system that can't readily be "gamed",
we would start finding out the reality behind the façade, the
upbeat - or downbeat -
"public image" that we are being presented with. Do they mean it, or is
it just hypocrisy? Does their track record say they try to keep their
promises? Do they treat voters with disdain once elected? Have they
taken favors from big corporations? Are they on the board of one? Do
they have other conflicts of interest?
a criminal record? do they intimidate others or pull dirty tricks to
make opponents look bad? Have they ever done anything worthwhile for
their
society and community? Are they honest and forthright in their
dealings? Are they a team player with real leadership qualities? Do
people who know them like and trust them?
Here is an opportunity to know more of the real person, in
order to start electing those who are sincere, honest and capable.
Unlike today, those who are crafty and designing, and in it for their
own power and self-serving personal gain, will be found out and won't
get the votes. Could Hitler have won the votes to gain office in 1933
if it had become widely known that Goering had said something to the
effect that "We're having a hard time getting into office, but once
we're there, the only way we will leave it is when they drag out our
dead bodies."? The public only heard what the Nazis wanted them to
hear, on the radio. Today we have means of "peer to peer"
communication, and if and as we start using it, a lot will change.
Then again, today people fear they may be dragged into
court and
impaled (or at least fined) for minor infractions that formerly meant
little and were forgotten minutes later, but which will now inevitably
be
detected and permanently recorded by computerized spying. Will one
start being persecuted
for small indiscretions or mistakes of long ago... because one has now
developed a political agenda different than those presently in power?
for having a new product that would disrupt an existing major business
or "status quo"?
Today these are real concerns.
But who really has the most to lose? We have the
incriminating e-mails even of "top" people like Clinton and Podesta,
Comey,
Wasserman-Schultz: the top ranks of the FBI, the CIA and the
"Democratic" party,
and so on, all in on plotting child sex trafficking, murders and
treasons. Before the 2016 election they all thought they were in an
"elite" club, always in power and "above" the law. To these
"despicables", the public were just "deplorables" to be lied to during
elections and then ignored. A billionaire with his own security force
and resources crashed their party.
Since then they've
tried everything to cover their tracks, but when their e-mails were
sent
they were
recorded by those same spying agencies the public so much fears. Their
cell
phone conversations may also be of record and might be of great
interest to the courts. Even the plottings of 2001/9/11 are belatedly
coming under court scrutiny. We will see whether and who is brought to
justice - or not - but notice is given that from now on it will not be
possible to sweep ones' nefarious activities under the rug to be
forgotten by everyone in a few weeks. The black stains on the records
of the bad actors are increasingly coming into the light.
Since that election the spate of "retirements", "not
running again" (for senate or congress, etc.), firings and resignations
has
evidently been astonishing, along with many charges being brought to
bear of pedophilia and child trafficking that was formerly kept well
hushed up. "Democrat" lawyer Michael Avenatti, who apparently still
thought he was above the law, has been arrested for trying to blackmail
the Nike company. Hopefully people of such ilk are now at the very
least becoming unelectable, and unemployable
in high level positions.
It seems inevitable that more and more of what we do and
who we are will be recorded and known. But for this very reason,
increasingly we should start to have have reliable, understanding
people in the high
positions that corrupt sociopaths occupy today. Then the public will
have that reason to celebrate, and
little to worry about.
Self, Other and Together Interest
"Self interest" is a
common term. "Other interest" is less common. We may often
speak of "altruism" with similar meaning. There's also "mutual
interest". The usual connotation of
"mutual interest" is still limited to it being "your and my interest".
But not other peoples' interest. "The public interest" is often used by
politicians. Usually it's used to deny consideration to a smaller group
that is being harmed by an act that supposedly benefits the majority.
A new term is "Together interest", which includes both the
self and others. Perhaps it may also be expressed as "Realism".
"Together interest" is a more general idea
that it is in everyones' interest - not excluding others, not excluding
the self. The concept has also recently
found expression on the
internet as a new term "WWG1WGA" - "Where we go one, we go all."
What is in the true interest of everyone is usually also
in the
interest of the individual, and what is in the true interest of the
individual is usually in everyones' interest.
"Together interest" is in accord with the seven core
values starting with equality. It seems to me is a valuable philosophic
concept
towards establishing and maintaining social stability and
sustainability.
Climate Disasters, Chapter One
The prologue is evidently over. The much anticipated
climate disasters are upon us in force. Without disregarding the many
other "record", "once in a thousand years" and "unprecedented" weather
events and local or regional disasters around the globe, it would be
hard to overstate the magnitude of the colossal catastrophes
that have taken place this month in Mozambique and in the center of
America.
In Mozambique the floods have made almost a clean sweep in
many areas including major cities. roads are destroyed. the power is
gone. the homes and buildings are gone or badly damaged. Mozambicans
are going to need help on a gigantic scale that is probably not going
to be forthcoming from South Africa or any other quarter. What will
happen to all those people? Many are likely to start migrating.
especially if it happens again when some have started rebuilding.
In America, the crop losses alone from the "bomb cyclone"
that rampaged through the heart of the country's agriculture are
staggering. 6.7 billion (was it?) bushels of stored wheat, soy and corn
grown in
2018 have been flooded out, ruined. This is half of America's food crop
production and the source for the whole "just in time delivery" supply
chain. The land won't be dry enough to plant this spring with continued
inundation projected into May as the heavy snows melt and make their
way down the swollen rivers. So that's two years of half of the USA's
crops lost. Owing to top soil damage - what hasn't been simply washed
away - it may even take several years for some land to be restored to
good productivity. What are Americans going to eat in the meantime?
(Evidently a million calves have drowned, and what food is there for
the rest of the cattle. Australia's gigantic flood in Queensland also
drowned staggering numbers of cattle, while elsewhere the drought is
ruining Australian agriculture.)
And who will farm it? For some time now most farmers have
increasingly been the elderly, and they have been pressed to the limits
by previous
disasters of recent years. With this new calamity many are now
bankrupt. It sounds like only half
of them are likely to even try again in spring 2020 - if nothing else
happens by then. Then too, much infrastructure has been destroyed.
Major highways, roads and bridges have been washed out and some have no
way to
drive anywhere. No doubt power outages are widespread with many and
major repairs required to restore it. A week later further drone
footage by a Nebraska resident [youtube channel "farm dad word barf" -
where do
people get these names?] showed the water had receded a long way, but
the prospect remains for much curtailed crop production for the USA
this year.
Once the mass of the general public realizes what has
happened, it may be too late to start storing up some food that keeps.
It either won't be available or it'll cost too much. Will the price
hikes be coming in weeks, or will they take months to filter through?
There can certainly be no doubt they're coming. And then, will the high
prices kick off unrest as people already stressed can no longer afford
to eat? And will rising food prices kick off hyperinflation and the
death of our "pyramid scheme" debt-based money system, created by
bankers to make
bankers rich? And will the generally deteriorating conditions help kick
off a sudden pandemic that kills billions of people in a matter of
weeks or months? WHO and CDC have already been telling us a pandemic is
a matter of "when" not "if". And how many more devastating climate and
geological disasters may we expect in the next decade or two or three?
I am
certain this is only "Chapter 1" and more is in store.
And we need to remember that except for volcanos and
earthquakes, these problems are almost entirely man-made, including the
weather and sea level rise and all that these changes entail, via a
century and more of burning fossil fuels (esp. coal) and lately,
misguided and huge geoengineering projects. And even more, we have
permitted the
"population bubble". There are simply far more people on the planet
than can have a good quality life and grow into their full potential -
almost four times as many as just 100 years ago.
When the appearance of "normalcy" begins to vanish - and
for many it already has, the
world will never return to "normal" as we have known it. Disasters
other than continued sea level rise will start to wane after 2 or 3
decades with the end of the geoengineering programs and population
reduction, but things may not settle down socially for 1000 years. In
that time people will be building a new world and a new, and this time
sustainable, civilization. from the local community level up.
---
Here on normally soggy Haida Gwaii we seem to have an
unusual problem - dryness, not to say drought. It started last summer
and there hasn't been much rain this winter or spring. On the 27th I
lit a pile of branches I wanted to burn for fear there would soon be a
burning ban. While I was away for a couple of minutes gathering more
branches, the grass caught fire around my fire and it started
spreading. It went out easily when I played the hose on it, but I'm
glad it didn't have a few more minutes to spread! I've been burning
daily since, as those piles may themselves become a fire hazard if it's
dry enough. (They are, at least, shrinking.) I suppose we'll get
our disasters here - perhaps not in the form of an earthquake, volcano
or tsunami but
instead a forest fire(s), like so much of the BC interior has been
having
(not to mention California). One here might well threaten my house.
(Gosh, should I take out my row of spruces that edges the forest beside
the house?)
On and Off Beefs
When most every appliance had a power switch, it was
pushed one way for "off" and the other way for "on". There was no
question about whether an appliance was "on" or "off".
Whose crazy idea was it to replace the power switch with a
single button that reversed the state every time it was pressed - even
when there is insufficient feedback to know which state one has set
something to?
Often there is some sort of display, but even then one
can't just go turn something off without pausing to make sure that is
what happened when the button was pressed. Even then it may be unsure
because some devices don't respond fast enough, and it may come back on
once your back is turned.
Worse is when there is no feedback, or it is too slow.
Such as with sound and video players. I've often tried to pause a
youtube video during a dropout, only to have it start up again after
I've walked away to do something. Then I have to come back and hit the
play-stop button
again, and back up to get to what I missed. Or even the video plays to
its end while I'm gone. The button shows "||" [pause] when it's playing
and ">" [play] when it's paused, too. But after a couple of presses,
the
button stops showing the actual state. WHY is it the same button for
both? We pay for data/bandwidth here!
Another case is new cars. One button to start the car. The
same button to stop it. But the button does different things at
different times. When my Nissan Leaf is plugged in, it takes two
presses to get the instruments on - when all you want to do is see how
much longer it'll take to charge. And then they don't go out like usual
when you turn it off. Since it doesn't appear to be off (I'm still not
sure it really is), you hit it again and go around in a vicious circle,
to the point I'm not actually sure how many times I'm supposed to hit
it. I only know it's off if it doesn't start beeping at me when I open
the dorr to get out. And a car I rented kept starting the engine again
when I was trying to turn it off. I've always turned off the key first
to get the car to stop polluting, then put it in park. Not with a new
car! The one I had wouldn't turn off. Hit the button again and the
engine restarted. No, no, it wanted you to put it in park before
turning it off! Why? electronic automatic gearshift: if you turned it
off, you wouldn't be able to put it into park!
I have no doubt that these modes would be much less
confusing if there were separate "on" and "off" buttons. Then at least
there could be no misinterpretation of what the user wants to do.
Then there's the telephone "mute" button. There is no
feedback. In long conference calls, I eventually lose track of whether
my mute is on or off. Then either everyone is listening (unknown to me)
to my coughs and rustlings around, or I have something to say
and some "rude" person breaks in right while I'm talking -
because I'm not being heard. (And occasionally someone else is making
distracting noise, probably thinking they're muted.) Many times I'd
like to press a button again to confirm being muted or live. What
insanity that the same button goes between mute and unmute, with
absolutely no way of telling which state it's in! And the conference
call system we use does exactly the same stupid thing - "4*" both mutes
and unmutes your line, again with no way to tell what state it's
presently in.
(Having written this, I took a look at the phone. The
display says "mute on" or "microphone live". Since the phone is up to
my ear when I'm on it, in 3 years of occasional conference calls I've
never seen that before. If I take it away to look, I'll miss something.
My complaint stands.)
And as long as I'm here... Why won't video players - even
video editors - let you go forward or back frame by frame? Sometimes
something valuable is caught in just one or two frames, and it can be
not just frustrating but
impossible to pause at just the right spot. Often it ends up playing
a little farther - or just playing on - just when you finally hit
"pause" in exactly the right place! Videos are played frame by frame
anyway. Just how hard could it possibly be to let the user page through
them?
More on
Recycling Plastics into Valuable Products
Plastic Building Materials - Tiles Etc.
On the 3rd, the day I sent e-mails saying TE News #129
was posted, with its ideas for plastic recycling, my friend Tom told me
about a Russian youtube video about making patterned tiles from
recycled plastic. I searched youtube for "making plastic tiles" and got
dozens, maybe even hundreds, of results for recycled plastic floor
tiles, roof tiles, paving tiles, decorative tiles, extruded plastic
slabs, plastic cubes, plastic bags into decorative blocks, and on and
on and on.
It's being done in India and Africa - people all over the
world are realizing the potential of a valuable raw material. Just go
onto youtube to get almost countless ideas on what to do and how.
That's what I'm going to do, because...
...that seems like a perfect - and free - material to to
use for floor tiles - and maybe other parts (ceiling tiles?) - if I
should ever decided to turn the roof over the trailer into a building.
A major caution in using plastics as building materials is
to consider fire safety. Will they, for example, burn if a match is
dropped on them? (I doubt it, but I will certainly experiment before
constructing anything! If plastic tiles ever did get burning, look out!
What would it take to ignite them? wood embers? a propane torch?) I
wouldn't use them on the roof of a building that has a woodstove for
fear sparks and hot stuff from a chimney fire might ignite them.
Info On Line
One youtuber whose channel especially attracted me is
DaveHakkens, of PreciousPlastic.com. In the past 5 years he has done an
entire excellent, professional series of videos on recycling plastics,
going into all the details of types of plastics and how to sort and
separate them, types of machines and how to make them, and various
techniques and molds.
(We learn that some plastics float, some sink. Some float,
or float
better, in salty water!)
Shredder
As I had surmised, the first piece of equipment in the
series is a shredder, and he has instructions for making one. There's
CNC files for cutting out some of the shredder parts including the
rotating cutters with (eg - ready for this?)
a CNC plasma cutter. (I'm abandoning my 1991 CNC driver box, which
turns out to have only two stepper motor drivers. To replace it I've
ordered a "Gecko Drive" quad stepper motor driver to get started on
this project.) Another
homemade shredder in video by someone else seemed pretty "Mickey Mouse"
compared to Dave's. One can
see Dave's will last and last, and does a better job. Various
sieves can be attached to keep bits circulating until they're small
enough to fall through.
Extruder and Molds
While I had been content to think of pressing plastic into
blocks in molds, Dave has instructions for a homemade plastic extruder
and shows homemade molds for extruding into to make various forms. (He
does do some welding to make these things.) An
interesting feature was a threaded pipe fitting on the output of the
extruder. Every mold to use it had the matching pipe fitting welded to
it for the plastic to come in through, and for use it was screwed into
the extruder. Of course the pipe fittings attach the mold securely to
the
extruder.
He had long steel tubes for extruding plastic beams and
rods into. (His were different lengths with an end on the tube. (I
question that one needs an end on the tube. If the tube is long enough
for the plastic to cool and harden some, couldn't it just extrude
continually and then the product be cut to any desired length? I
suppose I could check out his forum and ask if it hasn't already been
discussed.)
Other Plastic Working Tools
I could see there were other videos on vacuum forming,
blow molding and other techniques. Doubtless he showed how to make
these tools as well as use them. His web site and videos appear to be a
gold mine of info on plastic recycling.
I found out that a friend now living in Queen Charlotte
had
been involved in the recycling business in a big way in prior decades
and knew a
lot about it. He showed me a simple device he had made to extrude 3D
printer filament.
Reuse Before Recycle: Transparent Plastic for Greenhouses?
Last winter I purchased seven "corrugated" 2' x 10'
polycarbonate sheets for my greenhouse roof and they were well over
500$ on this island. I was looking at some transparent food containers,
PETE and PS, and wondering about making them into plastic panels or
sheets for greenhouses. Would it be hard to do? How long would they
last? I mentioned the idea to someone and he asked if I meant to
re-melt them or to use as-is. That gave me the idea to just cut some
flat pieces out and use them as-is to fill in some narrow gaps. All I
needed for that was scissors and a stapler. And in a couple of years
one question would be answered: Would they last? If they ripped in the
wind in the second year, it wouldn't be worth making and installing
PETE or PS panels. But if they were still strong, it might be. Perhaps
one would last better than the other?
On looking them up, it seemed PETE needed more heat,
didn't hold up well in sunlight, and in fact turns markedly yellow. PS
lasts well and melts at a lower temperature. It sounds like clear PS
food containers are the plastic to start with.
I remembered back to when I was 4 or 5, and my dad and his
brother and a friend decided to make polyethylene tents for ice
fishing. (I'm sure in 1959-1960 PE was a pretty new thing.) They took
mom's iron and (IIRC) put some aluminum foil over the hot part. They
cut the PE and overlapped it where they wanted seams. Then they put
cellophane over it and ironed it. The cellophane protected the plastic
and the iron, and the seams were melted and fused.
 What would
happen if I cut the corners out of the PS
packages so they would flatten out, overlapped any voids thus created,
and ironed them with a cellophane barrier? Could I melt them down flat
and have the seams melt and join? (preferably "seamlessly?") I had some
cellophane, so that was easily tested.
What would
happen if I cut the corners out of the PS
packages so they would flatten out, overlapped any voids thus created,
and ironed them with a cellophane barrier? Could I melt them down flat
and have the seams melt and join? (preferably "seamlessly?") I had some
cellophane, so that was easily tested.
It worked, but badly. The polystyrene softened and
flattened out as it got hot, but it also shriveled quite a bit, leaving
holes and generally looking really ugly. One could fill the holes with
another piece, making it even uglier. And the fragile cellophane stuck
just enough that it was soon ripped into pieces too small to guard the
iron. Clearly another technique would be required, probably involving a
complete melt and re-extrusion. Substantially thicker panels would
surely be much better anyway.
...or maybe press some between two sheets of aluminum in the oven?
(Cellophane is clear too. Could thick and hence durable
panels be made of cellophane? Or would it rip almost as readily as the
thin sheets? Well, even if that works it's not going to recycle much
plastic!)
ESD
(Eccentric Silliness Department)
There was a hurricane outside, but all was comm at the radio station.
It was also.com at local websites.
Swiss chard should be eaten raw, boiled or steamed, not charred. It's
already chard.
What's with the word "palindrome"? Shouldn't it be "palinnilap" or
something?
Why does "touch" end with "ouch!"? Not everything you touch is hot or
sharp.
Those who plant light bulbs will surely have a brilliant garden.
(Alternative: Those who plant light bulbs aren't very bright.)
Why do they want Maduro out? Hmm, the last thing the US did in action
in Syria was steal the gold, just like from the basement of the world
trade center, and from the Ukraine and from Libya. Maduro tried to
withdraw some of Venezuela's gold from the bank in London. They asked
what he wanted it for! That's none of their business. They're stalling.
Maybe they're trying to oust him with a coup before they have to admit
they sold Venezuela's gold with the rest and that the vaults are empty?
Some write memoirs. Here's a couple of stories from the 1970s.
You know you're in good hands (1976?)...
Fishing Boat: "Mayday! Mayday! I'm sinking off the northern tip
of Cormorant Island!"
Alert Bay Coast Guard Radio Operator: "Cormorant Island, where's
that!?!"
(Alert Bay is on Cormorant Island.)
Some bureaucrat in Ottawa noticed that this same Alert Bay
Coast Guard Radio station didn't have CW (morse code radio
communication
- 1978?). And, for such stations, the rules said radio operators were
supposed to only be rated RO-1s instead of RO-2s. But it was hard
enough to get people to want to move to isolated small island Alert Bay
without asking them to take a pay cut too. Not very fair to get
different pay depending where one got stationed, when the job wasn't
that different. (The radio operators, it seemed to me, already did the
most work for the lowest pay of those I worked with and around.)
This was after I had moved to Victoria. My supervisors
decided to correct the situation as fast as possible by sending a young
electronics tech (me) north in the van to install a CW transmitter in
the transmitter building at Alert Bay. It was an old 6 foot tall, 19
inch rack vacuum tube unit that had been removed from Tofino. As all
suspected, I didn't have enough time for all the travel first to Tofino
to pick it up, then up to Alert Bay to get it installed and working,
and then to return. But they had anticipated that. I got it set in
place
in the transmitter site, but I didn't get much farther than that before
having to get the ferry back out and then head home.
It was enough that they told Ottawa, "Oh yes, that was
just an omission. There is CW at Alert Bay."
---
The new "5G" cell phone system is supposed to be much
faster than the present system. This is a very exciting prospect. If I
can get people off the phone in half the time, I can get more done!
(But I must remark that 5G is powerful enough in the
millimetric (...why is it called "micro"wave?) band to raise
substantial concerns for the
health of birds going by and people living too close, and yet no
health
studies
have actually been done on it. For the whole world
to be the guinea pigs in this is not comforting. Human adults can
probably take it if the antenna isn't right outside their window. But
where are the studies
on chickens or whatever, showing that there are no adverse effects on
the offspring after 3 or 4 generations of exposed chickens and embryos?
The last thing we need is damaged children being born - something like
the thalidomide
crisis all over again, or young children becoming damaged as they grow.)
---
AHA! I've found the culprit! Evidently it was the great
inventor and experimenter Benjamin Franklin, who got it wrong. He
ascribed one direction of electrical charge as being "negative" and the
other as "positive". What he didn't know was that the direction he
arbitrarily assigned as being "negative" indicated an excess of
electrons rather than a deficit of them. (The more money in your bank
account, the more negative your balance. ...say, is that the trouble
with the financial system?) Would we then say that the
Franklin Stove, the forerunner of the modern wood stove (and still
produced up to about the 1960s?), was Ben's "most negative"
contribution
to improved quality of life?
---
Evidently the name "Witch Hazel" has nothing to do with Margaret
Thatcher et al. Wikipedia indicates that
it only got the "w" in later times, replacing "y" or a vowel in some
Gaelic word. In view
of its purpose then, might it not be prudent to drop the "w" and call
it "Itch Hazel" instead? One would immediately get the idea it's
for skin care. (Now as for that second word... is it derived from
hazelnut trees
or some relative thereof?)
Which word is out of place?: Sing, Sang, Song, Sung. (Well, three are
verbs, one is a noun.)
"Odd" has only two sounds in it, but three letters. That may seem odd,
but it couldn't be spelled "od" because that would be even.
"in depth reports" for
each project are below. I hope they may be useful to anyone who wants
to get into a similar project, to glean ideas for how something
might be done, as well as things that might have been tried or thought
of... and even of how not to do something - why it didn't
work or proved impractical. Sometimes they set out inventive thoughts
almost as they occur - and are the actual organization and elaboration
in writing of those thoughts. They are thus partly a diary and are not
extensively proof-read for literary perfection and consistency before
publication. I hope they add to the body of wisdom for other
researchers and developers to help them find more productive paths and
avoid potential pitfalls and dead ends.
Ground Effect
Vehicle (R/C Model): Beginnings?
Mentioning how great it would be to have ground effect vehicle
coastal/islands/ocean transport to someone inspired me to do just a bit
of work on it. I marked out and cut the side profile for each hull from
2" extruded styrene foam. According to the plan the hulls should be
4.5" wide. And I actually did want hollow space in them for batteries
and electronics.
I decided to split them with the shop bandsaw and put 1.5"
wide foam on the bottom between to make them into the two sides for
each hull. Much to my surprise the foam warped worse than any wooden
board when it was split down the middle. It'll take some stiff clamping
to straighten them out when the bottoms are glued on!
The ducted fan on the coffee cup is the approximate
intended position, about at the front of the wing and vertically in the
middle, blowing some air under the wing and some over.
The hulls top shape of course matches the upper surface of
the special wing profile designed to provide good ground effect lift
with maximum stability.
In an aircraft there's usually a heavy spar toward the
front of the wings at the center of lift that provides much of the
strength. But if this wing has more suction lift toward the rear as
well as compression lift more front to center, should that be broken
into two or three smaller spars?
Rather than aerodynamic considerations, the width (the
length of the boards) is 2.5 feet in the 1/4 scale model, making 10
feet in the full size version, which (I believe) is maximum legal
regular trailer width on the highway. The length of 4 feet (16 feet)
was chosen as making it a good profile with the 10 foot width.
I think the length and width of the hulls should provide
sufficient buoyancy. The wing length is about 3.125 feet (12.5 feet).
Since there will be 7 feet between the 18 inch wide hulls, there's 87.5
feet of wing area. I believe that should be a good value - but it's a
good reason to build the model first and run it with various weight
loads to see how well it works before attempting a full-size human
carrying craft.
Other
"Green"
Electric
Equipment
Projects
"Off Grid"
(etc):
36 Volt DC "HAT" Plugs & Sockets
...and other 36 volt components.
Use of 36 Volts as a House Distribution Voltage
I've discussed before (if not ad nauseum) what makes "36
volts" (or
a few more) seem to be the best compromise DC distribution voltage for
off-grid home (or RV, boat, etc).
- Highest "human safe" voltage. It
starts getting incrementally more dangerous to go higher. In saying
this we must take into consideration that up to 15 volts is used to
charge lead-acid 12 volt batteries, so a nominal "36 volts" could be as
high as 45 while it's charging. Nominal "48 volts" can be as high as 60.
- It has 1/3 the current and hence
1/3 the distribution wire size of 12 volts for heavy loads. The cost of
copper wiring being large, thinner wire can save a lot of rather
needless installation
cost. And it's lighter. and easier to work with.
- Voltage drop with current loses a
high percentage of total power at 12 volts. (eg, a 1.2 volt drop is
10%) With 38 volts, currents are reduced by 2/3 and the same voltage
drop is 1/3 the loss. (eg, a 1.2 volt drop is 3%, and with lower
current the drop itself
may be less than a similar appliance with 12 volts.)
My optimism that 36 volts may eventually be adopted as a
standard inside distribution voltage has recently increased with two
factors:
- Finding the simple little single
chip, potentiometer adjust, DC to DC down converters for under about
3$; 5$ for higher power rated ones.
- Simply the making of the HAT and
CAT connectors. A HAT plug allows the DC to DC converter to easily be
plugged into a 36 volt wall socket, and a 12 volt device - the most
common appliance voltage other than 120 VAC - can then be plugged into
the
converter's CAT socket.
The subject reminds me of
the fight between DC and AC power distribution at the beginning of
electrification. Once the diode had been invented to convert AC to DC,
the battle was over because AC could be converted to DC for appliances
(electronics) that needed DC. Once we had reliable DC to AC inverters,
it became still less of an issue. Now we have small, cheap, adjustable
DC to DC
down converters to readily get 24 or 18 or 12 or 5 volts from 28 to 40.
And that's well regulated voltages for computer power supply, etc, not
a raw "somewhere around there" battery voltage as with a 12 volt
battery.
Now the 12 versus 24 versus 36 versus 48 volts and higher
issue can be argued along lines of distribution wire sizes versus
safety.
Presently 12 volt appliances are next most common to 120
volts, but with standard HAT type appliance plugs, sockets and wall
receptacles
to facilitate adoption of 36 volts, that may easily become preferred,
and certainly preferred over 24 or 48(+) volts. (I recall a major auto
company (Ford?) had created a 36 volt gasoline car maybe 20 years ago.
It seemed curious at the time. They thought it would be better than 12
volts probably with reasoning similar to mine. But apparently it never
got onto the market. A pity!)
About mid month I noticed that with the 12 volt
"night-light" on "high" (a
whopping 10 watts or so) the little DC to DC got pretty hot. I ordered
some beefier adjustable DC to DC down converters with substantial
looking heatsinks. They were something like double the price - 5$
instead of 2.50$ area. Double insignificant is still not very
significant.
Instructions
Before delving into the diary of the development, here are
some instructions for making the sockets and electrical
box wall plates. Also and for the plugs, see the illustrations in last
month's issue, TE News #129.
Socket "Hairpins"
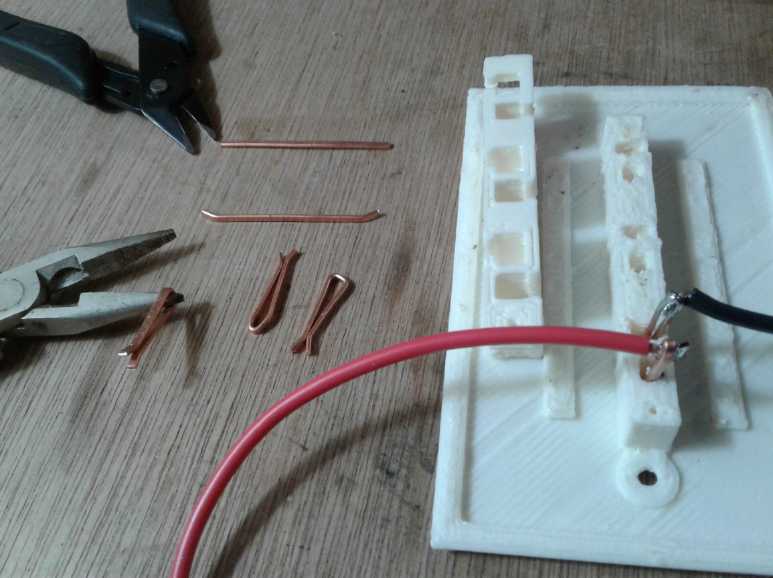
1. Flatten a piece of #14 AWG (or #12?) with a hammer on some sort of
anvil.
This "work hardens" it as well as flattening it,
making it somewhat springy instead of limp.
2. Cut it into pieces about 44 mm long. If you're going to squeeze the
wire in (6), make it 40-42 mm.
3. Bend the ends over a little, about 4 mm long. This will end up as an
entry for the plug blade.
4. Bend it around a pair of needlenose pliers until the ends meet - the
"hairpin" shape.
5. Squeeze it just a little more with the pliers so there's a good
spring tension when a 1.25 mm flat blade is inserted.
6. Solder the wire into the inside of the fold.
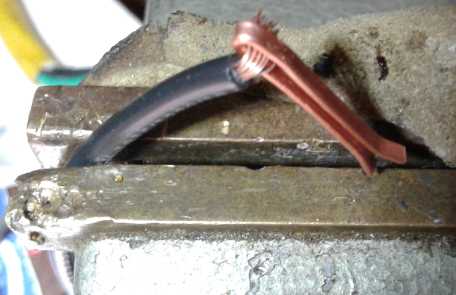 The '-' wires have to
do a 90° bend right where they attach, best done before soldering.
You can squeeze the hairpin
turn around the wire to help hold it, but be careful solder doesn't
flow down the pin and close the gap.
The '-' wires have to
do a 90° bend right where they attach, best done before soldering.
You can squeeze the hairpin
turn around the wire to help hold it, but be careful solder doesn't
flow down the pin and close the gap.
7. Insert both/all hairpins into socket.
 Close socket
and screw it
together or screw plate rear cover on. The hairpins & wires should
be slightly loose.
If they're tight, they can hold the rear cover off its seat or
cause bad connections. They can be trimmed a bit
shorter if necessary.
Close socket
and screw it
together or screw plate rear cover on. The hairpins & wires should
be slightly loose.
If they're tight, they can hold the rear cover off its seat or
cause bad connections. They can be trimmed a bit
shorter if necessary.
Now back to the month's sequence.
Revised HAT plugs and sockets
On the 5th I went at the revision to the shell design (not to the HAT
connection specifications themselves), to make more room for
the wires inside the shells. I decided to keep the 7.5 mm pin centers
spacing. I printed a socket, then a plug which looked good. The socket
had a misalignment so I went to reprint it. Try as I might I couldn't
get a good print. The piece kept coming loose from the bed. It was like
when I had first got out the printer in February and couldn't get it to
work.
I tried again on the morning of the 6th with the same
results. Suddenly I realized: I had put a new spool of plastic on. I
had thought it was PLA but it must be ABS instead. That explained
everything. ABS needs a higher extrusion temperature, and a much higher
bed temperature to stick on. I must have had ABS when I first tried,
too, and then for some reason I must have changed spools and got PLA,
and that's when it "mysteriously" started working. The first plug and
socket that I successfully printed were red PLA, which as I recall was
not the color originally in the printer. Now I wanted white and changed
spools - obviously back to ABS.
I should have paid more attention when I was buying them
that the spools weren't labeled. I could have labeled them then because
I knew what I ordered each time, but now they were all in one big box.
Printing ABS on the RepRap is a little frustrating because the bed
barely gets hot enough - usually not even quite up to the 110°C
setpoint,
and only very, very slowly. Then I remembered that putting a sheaf of
paper on the glass helps it warm up quite a lot. (Heating paper indoors
- yow!) If it's not hot enough, the piece comes off during printing.
And the printer immediately turns off the extruder and bed heat when a
print finishes, so if you're not right there to turn it back on, it
makes for another lengthy delay before the next print - before each
print.
Perhaps the new printer will do a better job of ABS? In
the meantime, it's too much trouble to figure out the software for the
moment. I just want to make some things, so the old printer it still is!
I
put on a print of 4 plugs, and made 5 plugs and 4
sockets total by the 6th. I can doubtless design better looking plugs
and sockets - and better CAT plugs and sockets - but for now these work
fine.
Wall Triple Outlet & Cover
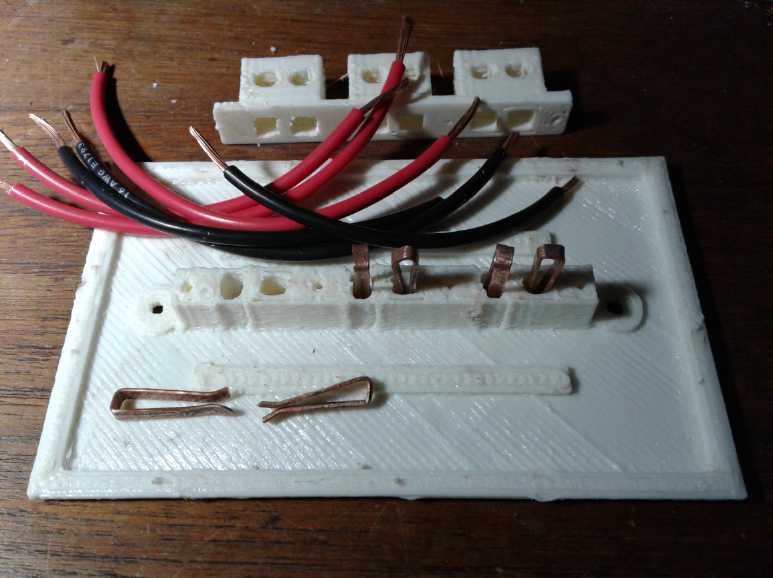 Next the wall plates! Duplex? Triplex? Quadplex? Hexplex?
Nineplex? The only trouble with getting carried away is the need to
make contacts and wire all those sockets. Other then that, putting more
than two in a receptacle could, if one had enough devices needing
power, save a lot of power bars. Maybe a triple outlet would be a good
place to start? I got that made on the 8th. It just took a couple of
tries to get everything reasonably optimized, but before that it took
several hours defining every detail before trying. Then each print took
over an hour. So I only made one good one.
Next the wall plates! Duplex? Triplex? Quadplex? Hexplex?
Nineplex? The only trouble with getting carried away is the need to
make contacts and wire all those sockets. Other then that, putting more
than two in a receptacle could, if one had enough devices needing
power, save a lot of power bars. Maybe a triple outlet would be a good
place to start? I got that made on the 8th. It just took a couple of
tries to get everything reasonably optimized, but before that it took
several hours defining every detail before trying. Then each print took
over an hour. So I only made one good one.
I looked at it and thought it would be very easy to get
the plus and minus wires reversed. In fact, it would be a natural
because the shapes were opposite to the front: the 'plus' was in-line
and the 'minus' was crossways. I decided to to modify the design with
indents in the plastic: "-" and "+" signs on both sides of each socket.
 The next afternoon I wired up the one I'd already printed. I
couldn't get the wires in and had to turn the wire holes into slots
with a hacksaw.
The next afternoon I wired up the one I'd already printed. I
couldn't get the wires in and had to turn the wire holes into slots
with a hacksaw.
At last it was all together and I
connected it to the
(disconnected) across-the-house line that was to be 36 volts instead of
12. I plugged
the DC to DC converter into it to check the fit. Then I went in the
garage and connected it the power. I went in the house and instead of a
working unit with a lit LED, there was the smell of fried electronics.
It was the DC-DC, which I hadn't unplugged. I checked the wiring for
reverse polarity. Nope. Nope. Aha! It was the wall plate itself. I had
fallen for the very trap I had envisioned and put the pins with the red
and black wires attached in the wrong holes!
 The wall plates fit on standard "1110" type
electrical boxes.
The wall plates fit on standard "1110" type
electrical boxes.
(The one that's actually in use so far is behind furniture and anyway
just hanging in the air.)
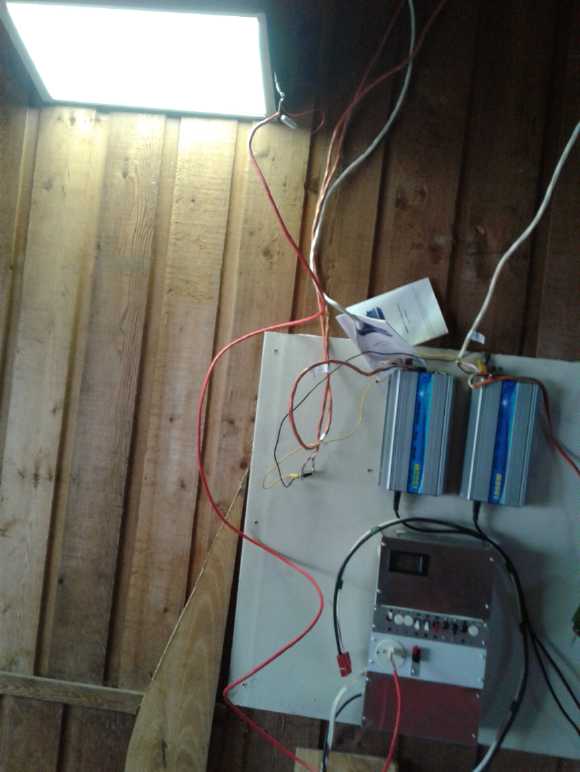
36 V DC System Breaker Box
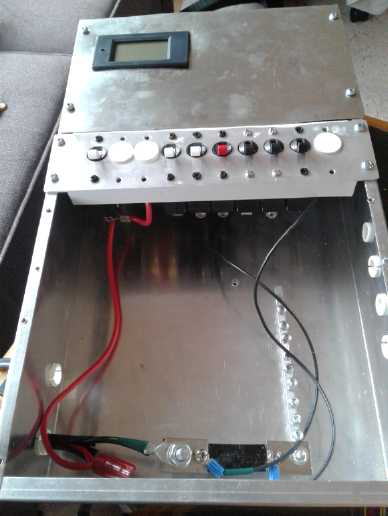 But the wiring problem reminded me there was something
that should take precedence. There wasn't a single fuse or circuit
breaker between the batteries in the garage and the lamp plugged into
the DC-DC converter.
But the wiring problem reminded me there was something
that should take precedence. There wasn't a single fuse or circuit
breaker between the batteries in the garage and the lamp plugged into
the DC-DC converter.
The simple thing to do would be to install the same
breaker box I had used in Victoria, and which I still had and indeed
now had lying on the garage floor under the solar equipment. If it was
to be used for 36 volts instead of 12, it needed a few small changes.
Most notably, the 0-15 volt analog panel voltmeter would have to go.
(Why did I get that anyway?)
I had originally thought to put all the electronics in the
breaker box. Now the solar panels went to the programmable DC to DC
converter/charge controller and then to the batteries. It seemed
simpler to now just connect the breaker box to the batteries. The only
"extras" I put into the breakers box itself were a power monitor, an 70
amp Anderson "APP" connector to the 40 volt main, and a HAT duplex
socket with an ON-OFF switch on one. I'm sure the box is twice the size
it needs to be to easliy fit everything.
So: the 36-40
volt battery connects (-) through the current
measuring shunt to the main grounding block and (+) to a 50 amp circuit
breaker. This breaker's output goes to the main "bus bar" that all the
rest of the breakers connect to. There are presently 6 breakers
connected to that: 40, 20, 20, 15, 15, 5 amps. The 5 amp one goes to
the front panel HAT connector. The 40 amp one goes to the Anderson
connector. The rest are left for house circuits.
On the 11th I finished wiring the front panel stuff, and
mounted it on the garage wall. I plugged in the 36 to 12 volt converter
and a lamp with a 12 volt "corn cob" 'bulb', and the display showed it
used about 4-1/2 watts. I hooked up the wire to the livingroom as a 15
amp branch circuit. Then I plugged in the 12 volt adapter in the
livingroom. Then I plugged in 3 different 12 volt lamps sitting there,
and found their wattages. I had set the DC-DC to 13 volts, and I found
two 12 volt lights operated at far above their rated power: My homemade
lamp was 3.2 watts on "low" (my night-light), but 20 watts instead of
10 on "high", and a 15 watt flat panel was 30 watts. (They did however
give lots of light!) Only my own flat panel with the current control
circuit ran at about its rated 11 watts, and probably would have even
up over 15 volts. (Perhaps I should set the DC-DC to 12 volts instead
of 13? But "12 volt" lithiums would put out 13, as would well charged
NiMHs. Later I set it to 12.5 V and my lamp drew its rated 10 watts.)
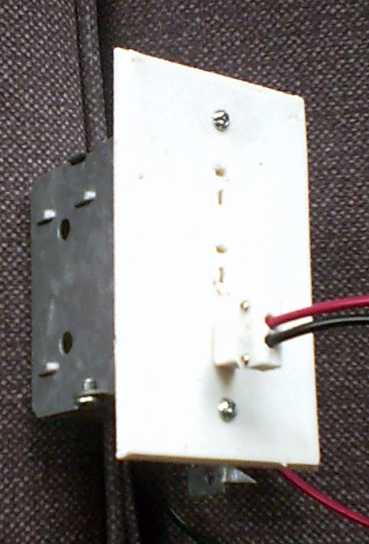
Special Duplex Outlet with Switch (as seen on breaker box, above)
Removing the analog meter from the breaker box plate left
a 2" diameter round hole. I thought of making a new plate and tossing
that one, or making a sheet metal plate to cover the hole. Then I
thought
that since I wanted a 36 volt HAT socket outlet on the breaker box
anyway for convenience, I would simply
make one with a round shape and use that hole. I spent over 2 hours at
it, but the print worked on the first try, and I had improved on the
design with the aforementioned wire slots. In doing this one I also
made it easier for
future wall plate designs to place individual outlets anywhere on any
plate.
When I went to wire this socket on the 11th, the positive
side was fine. But I had a very hard time fitting in the negative
wires. The negative socket "hairpins" made the soldered wire come out
in-line, and so it needed to be bent 90° in a very small space to
come out the side. The wiring spaces needed to allow for this with
space on the end and offset wire exit slots. On to "receptacles version
4" and another day of development! (Done.)
The switch
proved to be very useful. Later I mounted a panel light on the wall to
light the area better. If I had put a switch on it, it would have been
too high up to reach. So having the switch right by the plug proved
very convenient.
(It was a 24 watt panel, but I put in a resistor that was
a bit large and it used about 10 watts. It's pretty bright at that.)
Hole caps and glands
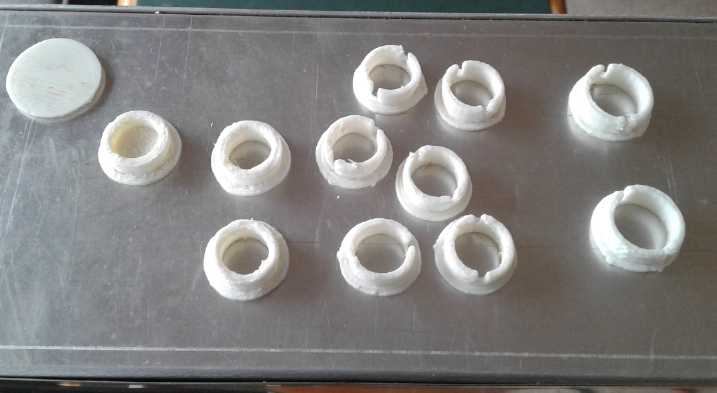 3D Printed glands and hole covers.
(The top left one is covering a larger hole in the top of the box.)
For ages I've bought plastic caps and through-hole glands
for wiring boxes. They never seem to come in the right sizes and you
never have the right ones, or enough of the right ones, for whatever
you're doing. So you leave holes with no caps on them, or stuff
wires through the bare metal holes with their sharp edges, meaning to
come back later and, by clipping it somewhere, flex a gland over the
wire and then into the hole.
I decided to do the breaker box up right. There were holes
with no circuit breakers in them. Enter the 3D printer and the brain.
Having done things one way all these years, it now occurred to me to
try the 3D printer. It was just the thing! I spent some hours at it,
but I covered all the holes with caps or glands. (which are almost the
same thing as far as the designing goes.)
At first they were too small and loose, then with tiny
adjustments they fit tightly and were hard to put on. Then I put two
slots in the edge and they were easier. I did 3 different size holes. I
just used one design file. I put the figures to enter for 15, 16 and 18
mm holes in as comments below the actual "Open SCAD" design program. At
first I printed one at a time, then I made a change to have it print
four at once.
13 holes covered or fitted and I even have 10 left over -
more than I would usually buy. and virtually for free (not counting my
time). Nevermore will I be hunting in stores to find glands or caps
that don't fit right anyway! Yay!
Power Monitor
I wanted to be able to see the voltage and current being
used. I wanted to do it with an LCD display monitor that didn't itself
use any appreciable amount of power. I had already bought several off
AliExpress.com . There were a 100 amp and 500 amp with separate shunts
for measuring the current, and two 20 amp units that seemed to have
internal shunts. They all looked identical but had different model
numbers.
I mounted the 0 to 100 amp unit on the breaker box. Its
100 amp/75 mV (750 micro-ohms) shunt went down at the bottom of the
breaker box in line with the battery negative terminal.
When I powered it up it showed all four things at once:
voltage, current, watts, and watt-hours used. I thought it would be
micro-power and that's why I had wanted LCD, but I was momentarily
annoyed that the display was
backlit. However pressing the one and only button turned the blue
backlight
off and on. I thought that if you held the button down longer it would
reset the amp-hours. Instead it went into some sort of setup mode. I
have no idea what that's for, but a voltage number went from 90 to 91
to 92 with successive presses. Then I held it down several seconds and
it said "Pass" and went back to normal, and the readings didn't seem to
be affected. I
think I'll just avoid doing that again! The watt-hours will just have
to be counted from wherever they left off. (I found some instructions
later, but they seemed confusing. It was for setting "voltage alarms" -
on a unit that makes no sound. All it does is blink.)
Anderson Connectors
Since I haven't made a higher current HAT plug and socket
yet, 70 amp
Anderson connectors were really the only choice. And they are versatile
because the "plug" and the "socket" are identical. This means I can
plug in the 36 volt, 3 KW inverter as a load (to run, especially, the
fridge and freezer), or perhaps the 36 volt Sprint car [batteries]
either to charge them or to supply the system from them. One might also
plug the inverter into the car batteries, completely separate from the
breaker box.
They are also dangerous in that being all the same, one
can easily plug in incompatible things. Like a 12 volt appliance into
36 volts -- or one appliance into another appliance -- or a 12 volt
battery into a 36 volt battery. They aren't for household use where
someone who may not know exactly what they are doing may do something
wrong. So far, all the things I want them for are 36 [nominal] volts.
The items with Anderson connectors are:
1. The ["36 volt"] solar batteries
2. The Sprint car ["36 volt" batteries]
3. The battery connection into the breaker box. I can use either set of
batteries to power the system.
It goes through the power monitor so I can see
supply battery usage - voltage, current and watt hours.
4. One on the front of the breaker box via a 40 amp circuit breaker.
5. The 36 volt to 120 VAC inverter. (fridge & freezer etc. during
power grid failures.)
I can plug it into the breaker box (house system) or
directly into the Sprint (or either) set of batteries.
(Hmm... Rats, it'll take an Anderson-both-ends
extension cord to get from the car to the breaker box.)
I'll also do the 36 volt to 230 volt inverter when it arrives.
More Wall Plates
The back cover
of the HAT receptacle plate was re-done
with wire slots instead of holes. (above - "Special Duplex...") On the
12th I shifted the "-" wire slots over in the design files because I
had found it very hard to fit the wires in.
I went to print the new wall plate, but the printer
started messing up during the print. Observation showed that while it
had started right, the right hand side of the gantry had risen up, So
it was printing higher, into the air without touching the previous
layer. It's never happened before. One expects that if something is
going to slip, it will slip down, not up. It didn't happen again. This
wall socket still had a
couple of things to improve. Somehow it was all I had got done that
day... but I returned to the chase late in the evening and made the
modifications, and then did a print starting around midnight. What a
night owl I've become!
Weak NiMH Battery Repairs
TE News from
October 2014 says My two "newer" NiMH "D" cell "box" batteries were
made then and so are 4-1/2 years old, and they were part of the power
for the RX7-EV car for a while. But were they really as weak as they
seemed to have become? Measuring them individually disclosed that the
even older one held voltage longest under load (13.0 V). The middle one
was in between (12.6 V). But the bottom one was absurdly short lived
(11.0 V so I shut it off). If one, and the oldest at that, was still
"pretty good", maybe there was more hope than it had at first seemed?
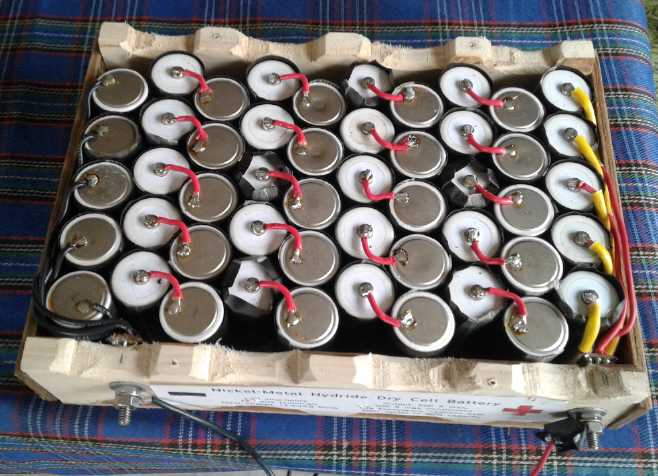 On the 16th I
disconnected the lowest one and took it inside.
It was composed of two 50 amp-hour boxes, each holding five rows of ten
"D" cells. I disconnected the two boxes and connected a "self powered"
LED voltmeter (they do draw some small amount of power) to each. They
started at 13.2 volts. After 3 (?) hours one was at 13.0 and the other
was down to 12.8. I took the lid off the low one and un-soldered one
connection point in each row to separate the five rows. Then almost
immediately I checked the voltages in each row. Some were substantially
different from others. I got the impression that the problem wasn't
that the whole battery was weak, but just that some few of the cells
were probably dragging the voltage of the whole thing down. I decided
to leave it overnight and see if any went notably flat. I still had
100+ more "D" cells in a box, so I could just replace the weak ones.
On the 16th I
disconnected the lowest one and took it inside.
It was composed of two 50 amp-hour boxes, each holding five rows of ten
"D" cells. I disconnected the two boxes and connected a "self powered"
LED voltmeter (they do draw some small amount of power) to each. They
started at 13.2 volts. After 3 (?) hours one was at 13.0 and the other
was down to 12.8. I took the lid off the low one and un-soldered one
connection point in each row to separate the five rows. Then almost
immediately I checked the voltages in each row. Some were substantially
different from others. I got the impression that the problem wasn't
that the whole battery was weak, but just that some few of the cells
were probably dragging the voltage of the whole thing down. I decided
to leave it overnight and see if any went notably flat. I still had
100+ more "D" cells in a box, so I could just replace the weak ones.
In the morning (17th) 3 or 4 cells seemed to have gone
quite flat, reading around .4 volts. Another 3 or 4 seemed weak and
were somewhat low voltage. I replaced 7. Without any charging the
voltage was up to 13.2 again. It seems obvious that the bad cells were
dragging down and discharging the whole battery - regardless of whether
or not it was supplying a load.
Obviously disconnecting rows to be able to check
individual cells was the thing to do. I didn't have to wait long after
disconnecting in the other 50 amp-hour box to find that it seemed to
have 6 bad or weak cells. Total 13 out of 100 - and 130$ at 10$ each.
Replacing individual bad cells (after 4-1/2 years) somehow seemed a lot
better than saying "Well, that 1000$ battery is shot." and throwing it
out. Especially as I already had the replacement cells. And in spite of
it taking a couple of hours.
Note: Someone once told me that if NiMH dry cells were
overcharged, the ones facing up (+ side up) fared better. But I think
all of the ones I replaced were "+" side up. The ones pointing down
apparently lasted better.
I decided to check out the
other battery that wasn't as
strong too. (Things in general have been getting more reliable and
longer lasting over the decades, but it seems there's always something
that needs fixing!)
I tackled it on the evening of the 17th and the morning of
the 18th. One box was great - every spot read almost exactly the same
as every other parallel spot in the five rows of cells.
The other box actually had a shorted cell, the only one of
all of them that read 0.0 volts. That would have been stressing the
other nine in that row and dragging the whole voltage down. I think I
replaced 5 in all, but there were 2 or 3 that might have been okay just
with a bit more charging - they weren't that far down. Since I had
lots, I replaced them. I didn't want to have to take it out and open it
again! I put it back in place and connected it. Then I changed the
jumper cable connection from the batteries to the breaker box to
having proper connections ending the wires, and with Anderson
connectors so you could
unplug the breaker box. Now I can plug in the Sprint car [batteries]
instead, either in a power failure to supply the house, or to charge
the car from the solar panels. (I'll need to make up an Anderson
extension cord to reach the car.)
All those idle NiMH batteries and loose cells have been
just a nuisance because
one must get them out and charge them every few months to keep them
from going bad. Connecting the bulk of the batteries to the solar has
at last
given them some new employment. I had 21 or more tubes of 10 cells,
which I had charged one at a time from the solar. When I disconnected
the weakest battery, I split the next two-box unit into two 50 amp-hour
batteries. Then I made up some short jumper connections and tied 5 of
the tubes together, and connected them to one of the boxes to make it
100 amp-hours again. And some more to the other that made it 110.
There's some more put into use!
Since I'm not doing much else with them, I might as well
replace any weak cells in the pipes (it looks like there are a
lot, too, making a lot of weak pipes) and connect them all as well.
That should get it over 170 amp-hours. Adding the Honda hybrid NiMH
cells as another 36 volt set should bring it to at least 210 - over 8
KWH at '38 volts' nominal.
Then, both the NiMHes and the lithiums in the Sprint sit
at about 40 volts and will charge if brought up to 41 or 42. They could
be connected together. (This time I know the DC to DC charge controller
isn't doing anything strange. It's a steady voltage that already works
with NiMHs.)
If I do swap in the Sprint lithiums when the NiMHs get low, that would
make it 520 amp-hours - around 20 KWH. That should carry over a couple
of rainy days if one is careful.
Unfortunately the Nissan Leaf has no connection from which
one can draw its power, at any voltage. It has 24 KWH, which would
cover a fair power outage - as long as you didn't need to drive
anywhere. (New Leafs have 40 KWH.)
2500 Watt, 36 to 230 Volt Inverter
I was still concerned that during a power failure there
was no water. Once the pressure tank ran down, the 230 volt pump
wouldn't run. For this purpose alone I finally found on Aliexpress and
ordered a suitable inverter. Here again the advantage of a higher
voltage shows, since 6 amps (peak/max... I think) at 230 volts is 35
amps at 40 volts, but it would be 115 amps at 12 volts. 35 is bad
enough - a 2500 watt 12 volt inverter would need quite heavy wires. (I
could have got a used 1700 watt 36 volt to 230 volt inverter, but I
finally decided that would be a little light. I've discovered more than
once that motors tend to overload inverters and not start even when the
specs say they should work.)
More Better
LED
Lighting
It looks like I'll be doing some solar installations for
others needing - in fact as the main objective - LED lights.
Having obtained some of the flat 12 volt "cob" light plates that Jim
Harrington showed me at Christmas, I originally intended to
put 3 together in series and make 36 volt lights. Now I think I may use
the DC to DC down converters to run them individually as 12 volt
lights. One can adjust to (eg) 11 volts for low battery drain and
cooler running or up to 12.5 or higher for maximum power and
brightness. Then I'll probably put them in glass or plastic "globe"
diffusers, which I have a lot of. As lamps, its a benefit that the
light will come out one side instead of in all directions, so they can
be aimed for best lighting for reading or whatever. I'll need to get
more of the DC to DC converters.
Disassembly
and Cleaning of Thermal Glass
I kept looking at the "refuse
transfer station" for glass for the greenhouse. I wasn't getting
enough. There were some thermopane window units in my
basement, and one of the sliding windows was just the right size. Being
double pane, it could make two - just what was needed. So I looked on
the web for instructions on how to take apart thermopane windows and
clean the aluminum oxide off them.
To my great surprise, there weren't any! There were
instructions for
replacing them, or for hiring a professional to get moisture out of
them "for half the price of replacement", before they fogged up with
aluminum oxide. After they got the oxide, you might as well throw them
out, it was said. That seemed absurd.
I've never thought highly of thermal glass, thinking it
was quite a
lot of trouble to go to - and trouble to make for the future when it
fogs up - for just a little better insulation. Now that I look it up
however, I see thermopane with argon gas is supposed to be quite a bit
better than simple double pane, with R value 3 and better instead of
2.1.
But for the moment I just want single pane greenhouse
glass.
Once upon a time, long, long ago (before the internet) and
far, far
away (Victoria), I cut a thermopane patio door glass apart, cutting up
the
aluminum spacer around the edges with a jigsaw. (I made two big
skylights for my back porch.) I later took a different window apart to
clean the inside. I don't remember, but I probably did that one
with a jigsaw too. I do remember the glass being darned hard to clean,
and I ended up scratching it with scotchbrite. The end result was
hardly satisfactory - but a lot better than all clouded up with oxide.
I made a wooden spacer and put it back together around that.
Disassembly: "Success by 1000 Cuts"
So this time I decided to experiment - and as I did, to do
the video about it that I hadn't found. Even if I was
unsuccessful maybe some people would comment with better ideas? (I
haven't uploaded it to youtube yet because the internet is working very
badly here lately. I can hardly wait for that fiber optic hookup!)
After
removing the aluminum outer frame and rubber gasket, I stuck a thin
exacto knife into the
goo in the slit between one pane of glass and the aluminum spacer. I
had the theory that getting the glass off the goo would be like peeling
off a sticky label or
tape. If one pulls quickly, the label rips. But if pulled away slowly
the glue releases and the label will come off in one piece.
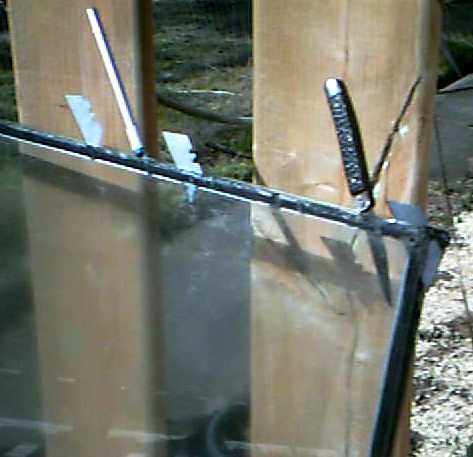 The blade was
just marginally wider than the goo, and pushed on the
window a bit. Then I got another exacto knife put it in a few inches
away. Then I stuck in a utility knife blade, a little wider yet,
between them. And then another farther over. With 4 or 5 narrow blades
in the slit,
the goo started letting go of the glass and a gap formed over to the
corner. Then I put in a thin jacknife and then worked around the corner
with the thinner blades. Once the corner was open there was a wider gap.
The blade was
just marginally wider than the goo, and pushed on the
window a bit. Then I got another exacto knife put it in a few inches
away. Then I stuck in a utility knife blade, a little wider yet,
between them. And then another farther over. With 4 or 5 narrow blades
in the slit,
the goo started letting go of the glass and a gap formed over to the
corner. Then I put in a thin jacknife and then worked around the corner
with the thinner blades. Once the corner was open there was a wider gap.
So then I stuck in a little
piece of thick sheet aluminum, wider yet, and moved the other blades
along the glass.
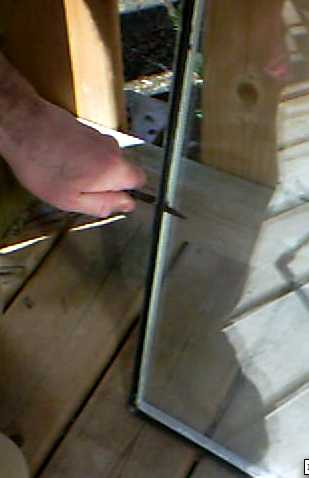 Then I put in the jacknife and
started pushing it
along slowly, separating the goo joining the aluminum and the glass and
lengthening the slit. It
got easier and faster as I went along. When I came to the first corner,
a small triangle of glass broke off, about .4" x 1.5". I was prying too
hard or going too fast approaching the corner when the second edge's
seal hadn't been broken yet. It was still usable (and of course so was
the other pane), so I worked the corner open with the two exacto knives
and then continued down the second side, sticking in the
pieces of sheet aluminum as I went. It got easier and easier. Near the
bottom of the left side I turned the glass 90 degrees so it was the
top, and more carefully loosed the third corner.
Then I put in the jacknife and
started pushing it
along slowly, separating the goo joining the aluminum and the glass and
lengthening the slit. It
got easier and faster as I went along. When I came to the first corner,
a small triangle of glass broke off, about .4" x 1.5". I was prying too
hard or going too fast approaching the corner when the second edge's
seal hadn't been broken yet. It was still usable (and of course so was
the other pane), so I worked the corner open with the two exacto knives
and then continued down the second side, sticking in the
pieces of sheet aluminum as I went. It got easier and easier. Near the
bottom of the left side I turned the glass 90 degrees so it was the
top, and more carefully loosed the third corner.
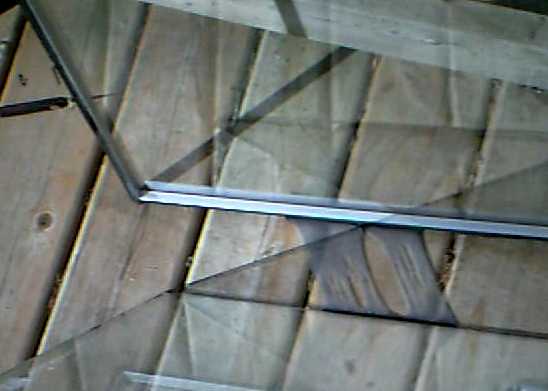 When I
got to the bottom of the third side, I just swung the whole pane down
slowly to release the last, bottom, side. Some goo held on tenaciously
for several inches before gradually letting go.
When I
got to the bottom of the third side, I just swung the whole pane down
slowly to release the last, bottom, side. Some goo held on tenaciously
for several inches before gradually letting go.
So... it's not that hard to do. Just find enough skinny
blades and
things to keep sticking in to get it started. Be gentle and slow and
take care at the corners.
Cleaning: Magic Baking Soda
The window units are supposedly sealed, and inert
argon gas is
injected. Eventually air and moisture get in (making the "R" value
what?) and the moisture causes aluminum from the edge spacer to
oxidize. Somehow the molecules vaporize and get transported onto the
glass.
Glass cleaner didn't work. Paint thinner didn't work. Acetone
didn't
work. Methylene Chloride didn't work. Baking soda and a soft cloth
worked, with quite a lot of wiping. It initially felt grimy, but as I
scoured it started to feel like clean glass. After I used regular glass
cleaner too and dried it off, it looked quite clear except under close
examination with the light just right. If I had been reassembling the
thermopane instead of using it as greenhouse glass, I'd have gone over
it some more.
Later it occurred to me that Comet or Ajax would probably
have worked somewhat better and faster than baking soda.
I ended up with a 15 minute video about the take-apart. I
decided to do a separate one about the cleaning but I haven't made it
yet. Anyway, just knowing about the baking soda is the main thing -
anyone can scrub.
As far as I was able to find out, to disassemble and clean
thermal glass is something that just
isn't done. Throw it out and get a new one! But it doesn't seem that
hard to do. Then it could
be reassembled - and if one wanted to go to the trouble, probably even
refilled with argon, too, to get the extra "R" of insulation value
back. (Welding places have bottled argon. Good luck!)
Myself I'd probably just put the window back together
without any "stickum" on the outer pane. Let it breathe instead of
fogging up, and also next time it's dirty it'll be much easier to clean.
One should wear gloves for much of this - the edges of cut
glass are
sharper than a knife. Somehow I didn't most of the time and I didn't
cut myself. Dexterity yes, but I probably beat the odds too, to not get
a couple of nicks and slices working around the edges, and wiping the
glass near the edges to clean it.
But fate wouldn't let me get away unscathed. In putting
the
pieces up on the greenhouse, I made some aluminum clips to hold them
on.
One clip was spinning with the screw and so stopped the
drill/screwdriver and I grabbed it to hold it. But it was like the
aluminum had attached itself to the
screw, and on the next twist, the drill drove it right into my finger
making
quite a deep cut. (Curtailed my heavy lifting - moving dirt next to
make a bed - for a couple of days. A bandaid let me type okay.)
When the glass was up on the greenhouse, from where I
first looked it looked like there was no glass there. Yes, the birds
would fly right into that!
 The disassembled thermopane panes are next to
the door.
The disassembled thermopane panes are next to
the door.
The bottom pane was clear. I left the aluminum strips
around the edges, still attached by the black goo.
The top pane is the clouded one that I scoured
[almost] clear with baking soda.
(They looked so good I soon cleaned the other glass windows.)
My
Solar Power System
The solar power equipment: Top is wires from
solar panels. Two 1 KW grid tie
inverters, 36 VDC breaker panel with several features, green 10
amp NiMH 36V
charge controller (it's
"hanging out" because it has a noisy fan and my bed
happens to be on the other side of that wall. If
it's attached, the sound
penetrates through the wall. I'll be replacing it soon
anyway.)
 There seems to
be some
overlap between projects here... I'm generating solar power with the
panels, then converting it either to grid power or to 36 volts DC, and
from there it goes to the "36 volt" house distribution system in the
making. There's not much to say about the grid here. I'm writing about
the 36 volt system under the Other "Green" Electric Equipment
Projects heading, above.
There seems to
be some
overlap between projects here... I'm generating solar power with the
panels, then converting it either to grid power or to 36 volts DC, and
from there it goes to the "36 volt" house distribution system in the
making. There's not much to say about the grid here. I'm writing about
the 36 volt system under the Other "Green" Electric Equipment
Projects heading, above.
Now the solar panels are up and their connections are in
place, so there's less to say about installing them, but I have some
remarks on operating them and their potential. It's free energy, but by
no means continuous. If this is "the" energy to use as it has been
becoming in recent years, it would be nice to have enough cheap
batteries to save up power, ideally not only overnight, but from a good
week or
two for a bad week or two.
As a general observation, if all you need is a light at
night and a means to charge your cell phone, not much is required. To
power a whole "regular" house from solar instead of from the grid, ten
solar panels and a few kilowatt-hours of batteries is not trivial
except in midwinter, but it's pretty lightweight. You won't be driving
the electric car every day. 20 or 30 panels and 15 to 30 KWH of
batteries would be more satisfactory. (Counting the Sprint car as an 11
KWH backup battery I guess I actually have about 18 KWH. I may get more
panels.)
Also a means for powering the house circuits - hot water
tank, well pump and so on - would make it all much more practical than
extension cords, even if one had to be very careful what was turned on
so as not to overload inverters or drain the batteries too far.
I decided to
continue taking daily performance readings from the 1.6 KW of panels on
my
house roof and 1.2 KW on the trailer roof. One observes March is the
month of greatest transition from low winter sun casting long shadows
to higher summer sun and shorter shadows. My roof slope (in both
locations) gives best angles for solar panels in summer. (see readings
below. Note: I've shown all times in PST, clocks 48 minutes ahead of
the sun, and ignored DST, an hour and 48 minutes ahead. Since I don't
consider that a day ends until midnight, there are occasionally times
as late as 24:47 PST (25:47 PDT)) After reading it daily last month,
somehow I forgot about
the house meter for a few days. And as can be seen it would have been
very desirable to check it twice a day to better pinpoint where the
power was being used, but until near the end of the month I only
occasionally thought to read it more than once. It usually didn't move
much during the day when the solar was working, exceptions being for
charging the car (Nissan Leaf EV, 3 KW), hot water and the clothes
dryer (probably both 3.6 KW), which used electricity faster than the
sun on 10 solar panels (under 2 KW) could make it. Much more
power was used at night for heating my bedroom. (I'm certainly glad I
don't heat the whole house all day with electricity! Firewood from your
own acreage is dirt cheap. It grows on trees.)
The house
meter wouldn't run backward: I never saw it go down even when the solar
was producing well and nothing special was running in the house. So
it would be ideal to do power hungry
activities during the day (if sunny) when the solar power would be used
before
grid power. The tree shadows from 11 AM until 1 PM (read about 10
AM until 12 solar time - or 12 until 2 PDT) were a nuisance. Once again
we see the great value electricity storage capacity would have...
such as cheap, reliable, safe, efficient and long lasting batteries
would bring.
A few times after driving I waited until the next morning
to charge the car from 10 until 11 then turn it off, then on again at 1
PM. But that was going a long way for quite small
savings. What if I needed the car and it wasn't charged? If I had to
drive the gas Toyota Echo somewhere instead it would certainly nullify
any savings!
It did occur to me that charging the car took 3 KW while
the solar supply delivered less then 2 anyway. But near the end of the
month it occurred to me that I could plug in the the car's 120 volt
slow charger, which I thought drew 1 KW. The solar could supply that.
But I put a power meter on it, and found it actually drew 1.5 KW - the
full maximum allowed load on a regular 15 amp circuit. Even with this
slowest charge, it could only be charged by solar alone when the output
was good on a sunny day. And then most other loads would have to be
supplied from the grid. Still, if one didn't need to go anywhere for a
day and not much else was running, it could be charged virtually for
free.
On the 27th I discovered to my great surprise that the
meter apparently had run backward, because it had gone down by 4
kilowatt-hours. 11 were made that day, so I guessed only 7 were used
notwithstanding having had a bath. But the next morning the meter
seemed to
be sitting stationary as usual. I was sure I wasn't using any
appreciable power
and the sun was shining. Perhaps I had recorded the meter as being
65252
in the morning on the 27th and it was actually 65242? That would
explain it. 252 would also have indicated a surprising amount of power
having been used overnight on the 26th-27th. It seems most unlikely
that there was just one occasion when the meter would have run
backward. So I decided it had to be a typo (or I mis-remembered the
number on my way into the house). I changed it to 242.
I was confused for a day. I'm not sure whether to be
annoyed or relieved. I get no
credit for the power I send out, but if the meter was running backward
in the summer, the power company would obviously discover it and
probably bureaucrats in their head office in Vancouver would have a
fit. Savings on the power bill is a bonus, not a main objective.
As the ides of March approached tree branch shadows that
had shaded the collectors on the house roof got lower and started
passing just underneath instead. Then shadows came just from the
thinner tops of the trees. The 6 panels on the house (@1600 W)
finally started producing almost as much electricity per day as the 4
on the trailer cover (@1200 W). And peak power rose. On the 12th (when
there was a bit of sun at midday) I noted much the highest power yet,
about 1950 watts peak - almost 1150 at the house and over 850 at the
trailer. By the 20th 'shadow time' hours narrowed to 11:20 to
12:40 - 80 minutes instead of 120. By the end of the month the shadows
were below the top row of panels entirely, and power produced by the
house caught up with and passed that from the trailer. Obviously in the
first week of April, the tree shadows would go below the house roof
entirely through the summer until early September.
When the clouds rolled in after the 12th total power was
reduced, but the
trailer started outproducing the house by a wider margin again. First I
thought perhaps the new "Q" panels really did have much better lower
light performance than the old panels. OTOH, when there was little sun
a larger percentage of the power at the house was going into the DC
system instead of into the grid. It didn't seem like a lot being used
there, but the solar power meter on the charge controller is powered by
the solar panels and it resets to zero every night. So it's hard to
estimate the amount of power going into the batteries. (Battery
charging currents became lower with the repaired batteries.) But
neither of those was the actual reason.
Crappy Alligator Clips!
On the 18th I found the real problem: one of the alligator
clips connecting two of the panels to the inverter had burned off the
wire on or after the 12th and those two panels [500 W] were no longer
contributing. And it was the one touching against the wall. My
precaution of putting up the gyproc panel on top of the cedar wall may
possibly have saved the house from a fire or even burning down, and it
only went just high enough above the inverter. OTOH my alarm bells
might have gone off just putting the clip up against the cedar in the
first place and [I hope] I would have positioned it a little
differently to keep it away.
Still lacking a suitable terminal block mounting, I came
up with a new arrangement with two 1/4" bolts hanging in midair to
attach some of the wire lugs to. I wrapped them with tape to avoid
shorts. (Not exactly ideal either.) It was sunny and when I turned on
the inverter the power out went up to over 1000 watts. Full power again!
I knew I didn't like using alligator clip leads for anything where high
currents would flow! It's not the alligator jaw itself that gets a bad
connection, it's the wire inside, to the back of the clip. They're all
SO cheaply made! The alligator jaw is thin metal, but they use it as a
crimp connection. It's not thick enough to hold its shape against
pressure and keep a good connection. And on some the insulation on the
wire isn't even stripped back properly before it's crimped. I would
gladly pay extra for jumper test leads that were properly soldered on
or otherwise had good connections, but nobody sells them. Since the
join is under the rubber hood, the customer doesn't see it, especially
in the package in the store, so there's
no advantage to the manufacturer to do a good job. I often pull back
the rubber hood and solder them... but usually not until it's had a
problem. I don't know how many times I've had trouble with some
experiment only to find it's a bad alligator clip lead. The crimped-in
unstripped insulation keeps the wire from falling off the clip (even if
you pull on it) so you think it's still connected. Once or twice I've
repaired them all with solder as soon as I bought a bag of them. The
insulation in the join burns and stinks when you solder. But even
solder isn't perfect. Often the wire is so thin and cheap it breaks off
anyway. So now you've changed the wire and soldered the joins. All
that's left of the original manufacture is the two end clips. (The
longer, heavier clip leads I used here had thick enough wire. The crimp
connection to the clips was better than most... but obviously still not
adequate!)
I've probably made too much of this, writing it up in such
detail, but it's always been a beef of mine. And wouldn't that be a
classic case of domino effect? Can't fit proper connectors, so connect
with alligator clips. Cheap clip lead with hidden defect gets hot,
burns off, and starts fire that burns a place down. I'll bet it's
happened.
With the two panels restored and the reappearance of
sunshine, overall production reached new highs. And with the shadows on
the house roof from the trees decreasing, on the 19th the house
(finally) definitely overtook the trailer in production. I didn't see
1100 W (house) or 850 W (trailer) again, but on the 24th it was pretty
much sunny and the total production for the day finally broke 10 KWH,
which was more than half of what the house power meter said I had used
since the previous day.
--- Solar Power to Grid --- (times shown are all PST - 48
minutes ahead
of the sun. [PDT is and hour and 48 minutes ahead.])
Date House - Trailer - KWH Solar [house electric meter] (sunny unless
otherwise indicated)
March 1st - 25.22 - 28.68 - 6.32 [64548 @ 11:30 AM & 2:30 PM;
drove 87 Km before 2:30 PM, plugged in car. 64558 @ 6 PM... unplugged
car: Why not let it finish charging in the daytime tomorrow!] Sunny all
day. (The 1000 W panel set was mostly unplugged from the grid for the
hot water tank experiment.)
2nd - 27.70 - 30.78 - 4.58 [64589 @ 1 PM; 64595 @ 4:30 - Drove
to
Charlotte, so charging car again from ~3:00 PM.] - Cloudy early AM (was
little point waiting to charge car?), patchy cloud later AM, cloudy PM
3rd 31.67 - 35.11 - 8.30
[64624@12:30; 64627@17:00] -
sunny all day
---
4th 35.61 - 39.37 - 8.20
5th 40.80 - 44.48 - ----- (Oops, I didn't read until 11 AM on 6th)
6th 44.04 - 47.98 - ----- (average 5th, 6th: 8.52)
7th 48.29 - 52.27 - 8.54 [64745@11:30AM; 64750@17:30 - charged car,
probably took ~8 KWH:4 solar + 4 grid.]
8th 52.31 - 56.37 - 8.12 [64776@15:00, 779@16:00, 790@19:00] charging
car from 14:00 (~13 KWH, ~3 from solar). part cloudy from ~15:30.
9th 54.19 - 58.40 - 3.98 [64842@18:00] Cloudy all day. [66 KWH used?!?
Let's see... car 85 Km, bath...?]
10th 54.50 - 58.90 - .81 [64852@18:00 PST] Clouds and rain. (Here's a
"worst case" day - for March!)
11th 56.90 - 60.82 - 4.32 [64872@18:00] AM clouds & rain, PM mostly
cloudy [Bath accounts for 10 KWH?]
12th 60.10 - 63.48 - 5.86 [64893@15:30, ] Off and On Rain, Clouds and
Sun. Power hit or almost hit 1950 W at one point.
13th 62.25 - 65.76 - 4.43 [64931@19:00 still PST] Clouds & some
rain. Car charging (60 Km). Bath.
14th 64.21 - 68.30 - 4.50 [64961@18:30] Clouds & some rain.
Car charging (55 Km). Laundry
15th 65.53 - 70.09 - 3.11 [65000@20:00] Clouds & Rain. Car charged
(86 Km).
16th 67.09 - 72.59 - 4.06 [65013@12:30, 65015@18:00, 65024@25:30]
Cloudy. Bath-evening. No drives.
17th 67.95 - 73.87 - 2.14 [65040@20:00] Clouds, fog. Cloudy west
coast... disappointment is to be expected.
18th 72.18 - 78.49 - 8.85 [65063@10:00, 067@17:30, 072@24:00] Sunny.
[Bath at 3 PM. No drives.]
19th 77.46 - 83.17 - 9.96 [65080@11:30, 088@18:00] [Drove to QC 60 Km,
back before 3 PM]
20th 81.38 - 86.21 - 6.96 [65102@14:00, 107@17:30, 112@24:30] Pretty
good for light cloud & chemtrails all day! [20 Km drive, back by
2PM]
21st 84.58 - 88.74 - 5.73 [65127@20:30] Light cloud. Laundry x2 AM.
Charged car (60 Km; 9 KWH) late evening/night.
22nd 87.55 - 91.28 - 5.51 [65150@12:30, 158@21:30] Moderate overcast.
No drive. Bath.
23rd 92.25 - 95.11 - 8.53 [65175@16:00, 179@19:30] Moderate
overcast with sunny breaks. Drive 55 Km back 2PM.
24th 98.02 - 100.11 - 10.77 [65190@10:30, 197@19:00] sun, occasional
clouds. Chj.car 40 Km.
25th 104.17 - 105.06 - 11.10 [65209@10:00, 211@19:00] sunny. went
nowhere, did nothing powerwise. I'm sure the power co. got most of it,
to sell to my neighbors!
26th 110.15 - 110.11 - 11.03 [65223@10:00, 229@18:00] sun. drive 55 Km.
Power tools?
27th 116.24 - 115.04 - 11.02 [65242@10:00, 248@20:00] sun except short
cloudy period AM.
28th 122.70 - 120.17 - 11.59 [65260@10:00, 263@18:00] sun.
29th 127.68 - 124.01 - 8.82 [65275@9:00, 287@16:30, 298@20:30] sunny
then fog. 85 Km & car chj (~14 KWH), bath.
30th 134.67 - 129.35 - 12.33 [65310@9:00, 315@18:00] sun. House meter
didn't move from 9:00 AM 'till I plugged in car @15:30 (55 Km). Turned
car off at 17:00.
31st 141.41 - 134.61 - 12.00 [65331@9:00, 334@19:00] sun. Turned car
back on with 1.5 KW/120 V charger to finish from solar.
April 1st 148.59 - 140.16 - 12.73 [65349@9:30, 351@20:00]
2nd 154.98 - 145.04 - 11.27 [65361@21:00] thin chemtrails, clouds later
PM. Charged car @1500 W from solar after 55 Km drive previous day.
3rd 161.62 - 150.27 - 11.87 [65371@9:30, 378@19:30] more of same slight
overcast.
4th 163.66 - 151.92 - 3.69 [65405@19:00] rain AM, cloudy all day.
5th 166.61 - 154.21 - 5.26 [65442@20:30] clouds & rain.
(bath, 85 Km drive & charge.)
Total KWH produced for the month March 1 to April 1: 234.85 KWH.
Total KWH consumed from grid for same period: 801 KWH.
So I made about 30% as much as I consumed. And the total
amount used is greater than what came from the grid, because in the
daytime, consumed power coming from the collectors is not added to the
meter. (My only financial savings) OTOH, I obviously sent power to the
grid on many days (free power for BC Hydro), and then used considerably
more power from the grid after the sunny part of the day ended (full
price to me).
Apparently to break even in March, I should have had more
like 30 solar panels than 10. Wow! That's not going to happen. It would
mostly give more free power to BC Hydro during the day while I bought
just as much from them at night. A big battery system with cheap new
chemistry batteries - and a means to employ them automatically - could
of course change the picture. But we know the winter months are solar
"losers" around here. Just counting from mid month as the sun was
getting stronger, March 16th until April 1st, the figures improve with
more solar and less consumption:
149.07 KWH were made from the 16th to April 1st.
336 KWH were used.
Here production was up to 45% of consumption. Not until
April second was less power drawn from the grid than the panels made
that day, and then only because of quite low consumption as well as
good production.
I noted a few other things over the month:
In mid afternoon on the 25th it occurred to me to check
the upper versus lower panels at the house, by turning off the lower
ones. This was after peak production which was about 1050 W at the
house and 760 W at the trailer. If 75% of rating is the 'realistic'
maximum, by month's end it was heading that way, being well over 60% at
midday. It read:
All house panels together (~1610 W rated): 985 W
Top row (four, ~1000 W): 600 W - 60% of rated power (by turning
inverter of bottom pair off)
Bottom row (pair, 610 W): 385 W - 63% of rated power (Bottom Pair = All
- Top Row)
---
Trailer single row (four, 1220 W): 690 W - 57% of rated power.
Then I noted that all the panels were coated with tree
pollen. On the 27th I went up on a ladder and sprayed off the house
panels. Immediately before I read 900 watts. (the lower ones were in
shadows) Immediately after it was about 930 watts. Okay, a little over
3% improvement. After 10 minutes it was 950, but as the shadows were
moving it was difficult to ascribe the cause. However, at solar noon it
was doing 1110 watts instead of "the usual" 1050 as of late. I suppose
a good rain would have done pretty much the same thing.
The trailer roof was a long way to extend a hose, so I
didn't. But an hour later it occurred to me that if I did, generation
might hit 2000 watts. I put together three 50 foot hoses, got the
ladder and tied it on, went up on the roof, and sprayed them off.
Trailer production went up from 760 to 830 watts. 1110+830= 1940 watts.
Not 2000. Oh well, what's in a number? It's good production.
The next day [28th] the power from the house was only 1000
watts in early afternoon. Even less than the day before, before
cleaning off the tree pollen. That seemed odd. Then it hit me: it was
also warmer out. To check out the theory I went up the ladder again and
sprayed the 6 panels. Sure enough, the output increased to 1100 watts.
The main increase wasn't from eliminating the pollen, it was from the
cold water cooling off the panels! I don't think spraying the panels to
get 10% more production is something I can make a habit of.
The chart is a bit of a mish-mash as far as power usage.
Because the power meter to the house won't run backward when power is
being sent out, the totals don't add up to reality. In general I made
power during the day, and
presumably simply sent much of it to the grid for free without being
able to tell how much, then used power at night and got charged for it.
("Smart" meter - Grr! a mechanical meter would simply have run
backward.)
Nevertheless, the month's figures again disclose that in
spite of increasing solar production, I was at first only producing
around 20% as much as I used except on sunny days when it might be over
30%. But toward the end of the month with decreasing use for heating
(burning less firewood too) and further increasing production, it was
getting closer to 40% or even over 50% some days. Of course, in a "grid
down"
situation all electric heaters would be off, as would the hot water
tank. With minimized use, and with inverters for essential 120 volt
needs (fridge, freezer, misc.) and the 230 volt water pump inverter,
I'm sure I'd get by. Except maybe in December.
In figuring out how much the car would use in charging, I
finally noticed there seemed to be a discrepancy. It seemed to me it
was using more than expected. If one drives 85 Km and the gauge says it
got 6.6 Km per KWH, 85/6.6=14.8 KW. But on April 5th I was flipping
through readings on the dash and it said somewhere around 25% - 23 or
27 or something: "Battery charge 25%". If the batteries are 24 KWH and
you've used 75%, that's 18 KWH. Also "6 hours to charge" (at 3 KW). I'm
not sure, but I think 18 KWH seems more in line with what's actually
being drawn from the house. I could be wrong.
Winter Solar Panel Reflectors?
Someone tried adding reflectors to four different 100 watt
solar panels [on youtube], on the left and right, taking measurements
to
see what would happen. (His cheapest polycrystalline panel gave the
highest output in all conditions!) He got around 15 extra watts out of
all of them at first, then after 10-15 minutes they got hotter and lost
half their gain. A cooling fan hardly helped at all - a watt or two
better. (Apparently he should have tried cold water.)
The panel manufacturers say not to use reflectors. The
extra heat is more than they bargain on in writing the specs and
designing for longevity. But I'm sure the objection would only apply
when the power
is at or near full. Here, in December when the sun is only 14°
above the horizon at noon, and the panels are only tilted maybe
20°(?)
toward the south, the light angle is quite oblique, and the weather
will certainly not be hot. If one put reflector sheets above the panels
to reflect back onto them (almost upright and in fact leaning back over
the panels by some angle), one might well collect even twice the
sunlight or more, depending on their size and angle. Twice not much is
still not much, but if the grid is down in December every bit might
count.
Panels mounted vertically on a wall would be a much better
angle in winter, but shadows then are so long that even the roof gets a
lot of shadow, and anything lower than that may be almost worthless.
Perhaps a better plan would be to re-mount the panels at a
higher angle instead of flat against the roof. Then they would produce
more most of the year and especially in winter. But in cloudy winters
at high latitude solar will never be a big producer. And they would
have to have very sturdy mountings so they wouldn't get ripped off in
the high winds we occasionally get around here. That's why I put them
flat on the roof in the first place. Ditto reflectors would have to be
very well mounted.
More panels because I'm not making as much power as I'm
using? because of winter? or add winter reflectors? make "off-roof"
higher angle mountings? How much farther do I want to get into this?
One more panel on the house just to hit 2000 watts midday production?
It's
already more solar than I had intended to do by about 4 panels. I think
I'll just call it "done" for now. At least until the grid is actually
down in winter - then I'll panic! It is doubtless lowering my power
bills just a little. Maybe by next winter I'll have HE ray energy
working or something? Or maybe I can run a few things off batteries at
night besides a light or two and get more cost benefit from what I have?
All the Angles
Just what angles were the roofs, anyway? I took a 24" long
level and a ruler up to the house roof. I measured the drop as 6.75" in
24".
Arctangent ( 6.75/24) = 15.7°. That didn't seem like much slope -
surely it was steeper than that?
Arctangent (24/6.75) = 74.3°. Well, that does add up to 90°.
I did a reality check with the level and a protractor. Sure enough it
seemed right.
Then the trailer. The protractor said about 15°.
By measurements: arctangent (6.6"/24") = 15.4°. Almost the same, as
I had thought they must be by appearance.
* Location is 53° north + the sun is 23° north at summer
solstice.
* That would mean the sun gets as high as 37°+23° = 60° at
noon on June 21st.
* With just 16° roof slope, the panels point almost up: 74°. 74
- 60 = 14°
* So the roofs are 14 degrees too flat for the sun to hit square on
even at noon in summer.
* But cosine 14° = .9703; still 97% as much sunlight. at noon. on
June 21st.
* Then there's the sun on December 23rd: 37°-23°= just 14°
above the horizon.
* With the panels facing 74°, 74-14=60. I don't need the calculator
for this one: Cosine 60° = .5.
* The maximum possible power at noon at winter solstice is just 50%.
And the days are pretty short with lots of shadow.
By gosh I'm far north!
---
Power Outage Power From Grid Tie Inverters? (EXPERIMENTAL)
Normally, if the mains shuts off, the grid tie inverters
shut off.
What if the power was out for a long time, as would happen here if
there was a sufficient interruption in fuel deliveries?
One can gain a lot from the DC system and regular
inverters. But
what about the grid tie inverters on sunny days? Only 4 of my 10
panels connect to the DC system, which in any event (so far) only
charges at 10 amps/400 watts maximum. A very long power outage might be
considered an emergency situation where one might try this to get 120
volts supplied "directly" from the solar panels (not via batteries)
while the sun is out. I'm thinking one would use a
pure sine wave inverter, perhaps 1500 to 3000 watts - or higher.
Disclaimer: it is an EXPERIMENT I have NOT (yet) tried myself and I
will take no
responsibility. If anyone tries it it is at their own peril.
...And as I think about it, I think it would be better if possible to
try
it with a bunch of extension cords and 3-outlet splitters and not
connect it to the house wiring at all, assuming you have plug-in grid
tie inverters that can be unplugged and moved to another power outlet.
(For a grid tie inverter, should it be called a power inlet?)
IF nevertheless you're connecting to the house, carefully
observe steps 1 to 5.
HOUSE
1) VITAL! Shut off the main breaker to the house to isolate the house
from the regular power grid.
2) Turn off all grid tie inverters.
3) Shut off all 230 volt breakers powering anything that might come on
(like the water heater.) Turn off all electric heat.
4) Also shut off all 120 volt things that are turned on, and all 120
volt loads that could come on automatically. (Fridge and freezer come
to mind. You'll want those to run while the sun is shining, but you
want to start them separately - starting them together and at startup
would probably overload the system.)
5) Plug a pretty hefty pure sine wave inverter into an outlet as if it
was a grid-tie inverter. (Don't turn it on yet!)
6) The inverter, the grid tie inverters and all the loads you want to
run must be on the same side of the line, eg, both on phase A:
---- 120 (phase A) }\
----
Common |
240 V
---- 120 (phase B) }/
It will probably take a little figuring out or
discovery get get the inverters and desired appliances all on the same
phase.
WITH EXTENSION CORDS
7) Turn off the grid tie inverters. (And the pure sine wave inverter)
8) Connect together the pure sine wave inverter (don't turn it on
yet!), the grid tie inverters, and appliances you wish to run with
extension cords as required, and 3-way splitters and or a power bar(s).
There is thus only one, 120 volt line for everything, and no other
phase and nothing 230 volts "half connected" to worry about. (Ideally,
plug a power bar into the pure sine wave inverter, everything else into
the power bar.)
THEN
9) Plug in a power monitor or connect a voltmeter in a way that you
don't have to hold it connected. Set it to 200+ AC Volts to show the
voltage on the line.
At this point, the system is ready to be powered up from
the pure sine wave (PSW) inverter, which is itself powered from the DC
system (or any other battery supply). It is presumed that the
experiment is performed during daylight.
10) Turn on the PSW inverter. Check the voltage with your separate
meter - don't trust the inverter's meter.
11) Turn on a significant load but one the inverter can handle -
perhaps a 250-750 watt electric heater or some incandescent light
bulbs. Note the AC voltage and the amps/watts draw from the DC system.
(If you have tied into the house, hopefully nothing else is turned on.)
12) Turn on a grid tie inverter. It should come on because it will
sense "power is on" - from the PSW inverter, and synchronize to that
inverter. Watch the AC line voltage and be ready to turn it off
again quickly. This is where it gets hard to predict what will
happen. It may depend on the brand and model of grid tie inverter. If
the grid tie inverter is monitoring the line voltage, it should only
put out enough to bring it up a few volts. This is what we hope for. If
however it simply assumes it has a "limitless" grid to feed current
into and pumps in all it can supply, it could potentially cause too
high a voltage. Also be aware of any strange noises, especially from
the PSW inverter.
This is potentially very dangerous for your PSW inverter.
However well protected it is against overloads, it won't be expecting
current being supplied from an external source feeding back into it. I
don't know what will happen.
13) My grid tie inverters start putting out current gradually. If this
is the usual case for all types, there should be sufficient warning
that an overvoltage situation is developing.
14) If turning on the grid tie inverter hasn't caused any problem,
check the draw from the DC system/battery. It should have dropped since
the grid tie (from the solar panels) is now supplying (hopefully) most
of the load.
Perhaps the "base load" some load should be left on to
prevent the grid ties from creating an over-voltage situation by
pumping too much in to the limited circuit. Or it may be that only what
it is intended to power needs to be on, and (ideally) it doesn't matter
what turns on and off. I'll say it again: I haven't tried it and so I
don't know for sure what would happen.
If all is in balance, much or most of the power should
come straight
from the solar panels via the grid ties. 1/2 of the 120 volt house
circuits should be live if tied to the house. The batteries and DC
system shouldn't be working very hard. Of course, this would only work
when the sun is out. The less solar there is, the more the PSW inverter
and the battery will be taking the load.
Again, although my original idea was to power up the house
circuits,
it would surely better be tried completely separate from the house
circuits
with extension cords and a power bar and any needed splitters.
Disclaimer
Once again: I have not (yet) tried this experiment myself
and I take no responsibility for
whether it works or for whatever happens. If you do it, it is entirely
at your own risk and the risk of your inverters and appliances. and
House! Keep close watch over it starting it up, starting up
an appliance, and while it's running! Remember to turn loads off if it
gets cloudy and toward the end of the day.
"Portable"?
Solar Panels
Someone asked me to do a couple of 100 watt solar panels
to sit on the top deck of his two tugboats and point at the sun. It
turned out he didn't want them mounted in any way, just to sit up there
and charge the battery when the vessel isn't in use. I guess he'll set
it aside somewhere when the boat is in use. I ended up making a
mounting out of plywood to form a triangle so that it could sit at a 30
or 60 degree angle.
Perhaps this might also be of use for any small solar
setup where there isn't full sun, or where it might be needed to set up
a small panel temporarily? Camping with a thermoelectric fridge?
For America to
go 100% Solar
Australia seems to be well ahead in the solar game. The
place is ideal: lower latitudes and lots of sunshine. The mild climate
means they don't need much heat, so electricity usage during the night
would be quite low. The power companies in the large eastern Australia
grid complain that there's excess power in the day when it isn't needed
and then by suppertime their generators have to run full bore.
Obviously they need to be able to store the power for at least a few
hours. It sounds like a good place to pump water up a hill in the day
and have it run a generator in the evening.
A 2016 video from Australia, "Battery Powered Homes"
(apparently an episode of a TV show called "Catalyst") was providing
the individual solution to the problem. The first featured homeowner
said he got paid 7 ¢/KWH by the utility for his solar... and paid
four times that (28 ¢? - ouch!) for power at night. The subject
was his 8 KWH lithium battery system. One key was that everything was
routed automatically through the system. His daytime power and battery
charging came from his 3 KW of solar panels. His evening and night
power came from the batteries via an inverter until the batteries got
low. Only a small percentage came from the grid. If that seems avant
guard now, it would have been even more so in 2016. And in Perth, WA,
they were likewise already into solar and batteries in a really big way
a couple of years before Puerto Rico got into the act when the
hurricane destroyed their grid.
I note that that first featured system isn't so different
from my system in capacity. I have 2.8 KW of panels and a base of 3.6
KWH in my NiMH "D" cell batteries, plus a couple more in random NiMH
tubes and the Honda hybrid batteries when they're all hooked up. And if
those get low I can manually switch to the 11.5 KWH of lithiums in the
Sprint car. (Then there's the 24 KWH inaccessible for house purposes in
the Nissan Leaf.)
What I lack is that computer "brain" and all the stuff to
route the power as required. I can run the grid tie inverters and
effectively power my own stuff from solar during the day. (assuming the
grid power is working.) My DC system can take a limited amount of power
and charge the batteries. Heavy use of the batteries and they would
take all day to recharge. I've ordered a more powerful charger, 60 amps
instead of 10, which will give me a lot more if the power is down. But
only by reconnecting all the things I want to run to the 36 to 120 V
inverter by extension cords. and the 230 V inverter (on order) for the
well pump. In Australia I understand everything is 230 volts. A greater
electrocution hazard yes, but it would simplify designing such routing
equipment by not having two different phases of 120 volts to deal with.
Someone else, also evidently in Australia, did a video
showing his 6000 watt solar panel system "for $3000". It seemed a bit
unbelievable until he started explaining that he got half of the
equipment for a very low price from someone who had removed a system,
and the other half were "reject" panels from an installer again for a
bargain price. 70% of them were perfectly good he said. A used solar PV
system is not a deal likely to be found on this island! I note that his
latitude must be much less than mine, because where he had his panels
propped-up they would all be shading each other up here.
---
For America to go 100% Solar
Another video on
youtube was about "What would it take for America to go 100% solar?"
The presenter went into energy use figures
and so on. The potential and actual land use figures were surprising.
 These work out to about .5%, 1% and 1% of all
USA land area.
These work out to about .5%, 1% and 1% of all
USA land area.
(I do note that these plots are serious size exaggerations - 12 isn't that
small compared to 25 or 22.)
The 12 million acres solar figure was projected. The other
47 million acres are actually in use today. That's land now being
occupied for
all purposes related to fossil fuels and liquid burning cars. It's four
times as much land, and
more valuable, productive land rather than desert. Apparently if the
USA
converted to solar, and to electric vehicles, it would reclaim 47
million valuable, productive acres in exchange for just 12 million of
desert. Notwithstanding the challenges to attaining this goal, why
would in their right mind
anyone argue philosophicly against it, and for things which are
already
wasting land and causing environmental nightmares?
And never mind all the wars over oil and the fuel
companies
relieving people of their hard-earned wealth. And never mind how much
of that solar power would in fact be accommodated on home and business
rooftops,
effectively taking up zero acres.
In another video, a TedX talk that turned out to be
advocating nuclear power, the presenter went out of his way to blow up
molehills about renewable energy and make no mention of the mountains
of troubles nuclear causes. He said how many desert tortoises would
have to be removed to accommodate giant solar arrays and the "vast"
tracts of desert they would take up. Aw, gee! But, isn't uranium mined
in vast open pit mines? - with severe environmental consequences?
He stressed how hard it is to recycle solar panels, that
the "toxic" chemicals they contain are being sent to third world
countries for disposal.
Really? How many have been recycled so far, and why? Virtually all of
them ever made have a long way to go before hitting their decades long
expiry dates. And then with the bit of plasticy stuff (and valuable
pure silver) scraped off the back, they perhaps will be valuable pieces
of framed
glass for greenhouses or windows. I wish I could get a bunch of big
panes of
tempered glass like that, cheap - I'd make a whole much bigger
greenhouse out of them!
There's nothing like people grossly distorting facts to
make a case for the unsupportable to put your nose out of joint. Most
of the commenters under the video were about equally impressed,
deploring what depravity TedX talks could sink to!
And by the way: all forms of nuclear power create
radioactive waste. The whole surroundings of the reaction gradually
become contaminated and radioactive. Fusion won't solve it. Thorium
won't solve it. I
once met an engineer who had been taking nuclear science in University.
Around 1990. He said when he realized that there was in fact no way to
make it
benign and clean, he got out. (I'm not sure yet about so-called "cold
fusion" - which generates a lot of heat. If it actually does work as
many claim, one suspects it would have the same problem.) So for
decades now, recognizing a dead end, the world's bright science,
engineering and inventive talent has been finding its way into other
areas.
http://www.TurquoiseEnergy.com
Haida Gwaii, BC Canada