Turquoise Energy News #132
covering May
2019 (Posted June 3rd 2019)
Lawnhill BC Canada
by Craig Carmichael
www.TurquoiseEnergy.com
= www.ElectricCaik.com
= www.ElectricHubcap.com
Month In Brief
(Project Summaries etc.)
- Lower Power Hot Water Tanks - Under Kitchen Sink Solar Hot
Water Tank - Air Injection Iron Filter - Pipe Battery Assembly
Improvement - Biggest Mistake in Solar: Not Going Solar? - Batteries
In
Passing
(Miscellaneous topics, editorial comments & opinionated rants)
- More on Time Zones - The Weather and The Corn - American Armyworm Invades China - The Sudden Drop in the US Crime
Rate: Many Misattributions and the Real Reason - ESD [Eccentric
Silliness Dept.]
- Project Reports
-
Electric
Transport - Electric Hubcap Motor Systems
* Ground Effect Vehicle: Multiple Ducted Fans? - Selecting
Ducted Fans for the RC model
* Seen on youtube: a very large Fully Electric Ferry and a Solar
Electric Passenger Train.
Other "Green"
Electric Equipment Projects
* "Off Grid" (etc) 36 volt DC Infrastructure - HAT clay socket
- "DIY" Blades for High Power HAT36V-50A Plugs? - Kitchen Solar Hot
Water Tank: Plumbing & Wiring (Yay, instant hot water!) - Solar Hot
Water Panel(s) Versus Solar-Electric Water Heating - Badderies - Fried
Charge Controller- Oops - Charge Controller Vagrancies
Electricity Generation
* [In?]Efficiency of 1000 Watt Y-Solar Microinverters - More solar
trivia - Lots of cloudy days make for low power generation - Miles
truck charge controller goes berserk, doubles house power usage for
10(?) days (see May 25th) - Extra Solar Panel on Lawn ups production
* Beach-Launched Tide Power: the Beach
* Off Grid Solar Installation for a neighbor
Electricity Storage -
Turquoise Battery
Project (Mn-Zn, Ni-Zn or Pb-Zn in Methyl
Hydroxide electrolyte)
* Electrode "Pocket" with Nafion Ion-Selective Membrane Face
* "Mounting" NiMH D cell Tube Batteries
Me on the beach
 I was again frustrated in May at how little work I was able to do on
any "cutting edge" green energy projects. I seem to be more and more
occupied with the more mundane things - and with getting the garden in.
On the first of June there were still a couple of unplanted areas, and
I know I won't have enough peas to freeze some.
I was again frustrated in May at how little work I was able to do on
any "cutting edge" green energy projects. I seem to be more and more
occupied with the more mundane things - and with getting the garden in.
On the first of June there were still a couple of unplanted areas, and
I know I won't have enough peas to freeze some.
Insofar as I went, I
continued my push to create
infrastructure for 36
volt "off-grid" and solar power systems. I figured out how to 3D print
and manually smooth and
shape a workable (if crude) plastic mold to shape clay for ceramic 50
amp HAT36 sockets, did it, and made the two halves for a socket. But
the raw clay has to sit until I fix my long-broken mini-kiln - one more
little project I didn't get to.
(Hmm... I should make more than one shell before I do the firing? ...or
wait and
see if any changes are needed?)
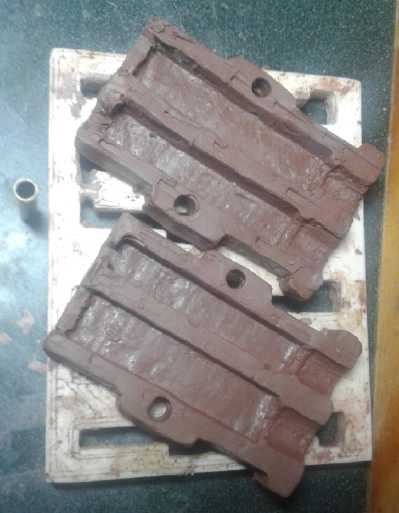
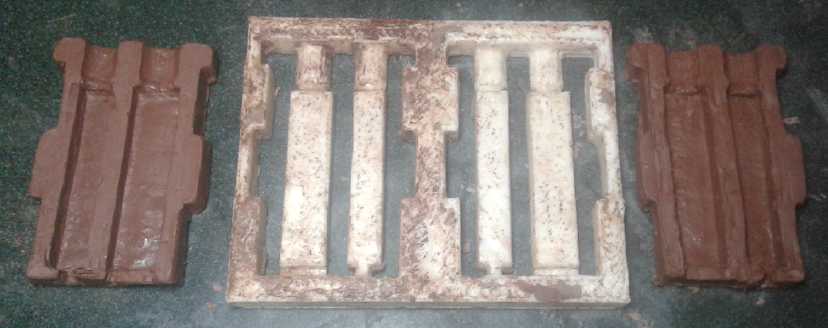 3D-printed mold and red clay ceramic socket
pieces formed in it
3D-printed mold and red clay ceramic socket
pieces formed in it.
I spent part of the month including the last few days
doing solar work for other people - the ones for the tug boats and an
installation for a lady across the highway in her 70s who has lived
without electricity most of her life. Even this little system with two
90 watt solar panels and a 12 volt battery for LED lights and to charge
her cell phone, and to occasionally run a vacuum cleaner with an
inverter, should be a big plus for her.
Lower Power Hot Water Tanks
Hot water tanks are essentially mysterious creatures. We know
they're there. We know they're using energy - more than anything else
in the home except electric heat and perhaps electric car charging. But
there's usually no way
to see or measure it. They're hidden away in some closet or basement,
and even when seen still betray nothing of their activities - whether
they're doing nothing or drawing 3000 watts of electricity. How much
electricity is it using? The wiring is carefully set up so even if you
want to, you can't get an ampmeter on them without disassembling
something. It's about the one thing that still gets directly wired in,
without a plug and socket. How much electricity is being wasted when we
have to run the hot water
for a while each time before we get a cup of it to wash our hands? The
simple fact that they take so much power when they're on, and that
they're hard wired in with 240 volts (ooh!), makes us apprehensive. It
says "Don't Touch!"
Yet when I changed mine from 240 volts, 3000 watts to 120
volts, 750 watts by simply moving one wire in the house breaker box, I
found no difference. Hot water is always available when I want it. But
there is one difference: My 10 solar panels put out over 1500 watts in
sunshine - a few hundred even in clouds. But it would take 20 or 30
panels to supply 3000 watts. So now if I use hot water when it's sunny,
the
grid electric meter doesn't move, instead of jumping up rapidly by the
majority of what was needed to reheat the tank. So that's a keeper.
With the kitchen sink now having almost instant hot water
from its own solar tank, I prefer to go there even to wash my hands,
and the big tank is now used almost entirely for showers, laundry and
baths. (Why do I always want my baths at night?) 3000 watts is probably
needed for a family of four or five. Likely not for a
single person or a couple - which is the occupancy of the majority of
homes these days.
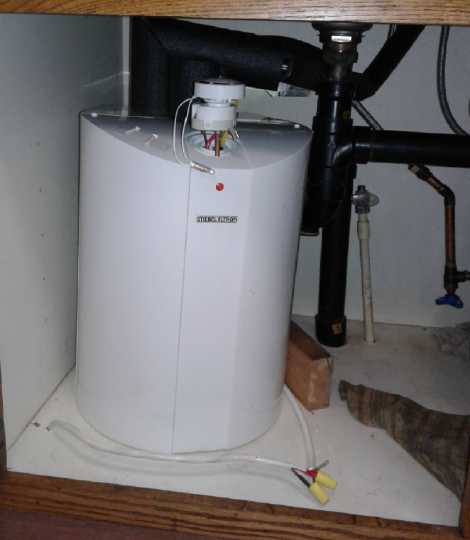
Under Kitchen Sink Solar Hot Water
Tank
I've always said "No level of scalding hot temperature can
atone for the hot water taking so long to get here." In this house, to
get hot water at the kitchen sink took a minute or more, and 4 liters
of hot water wasted in the pipe. The answer I have
long wanted to try, a tank right by the sink, I finally did.
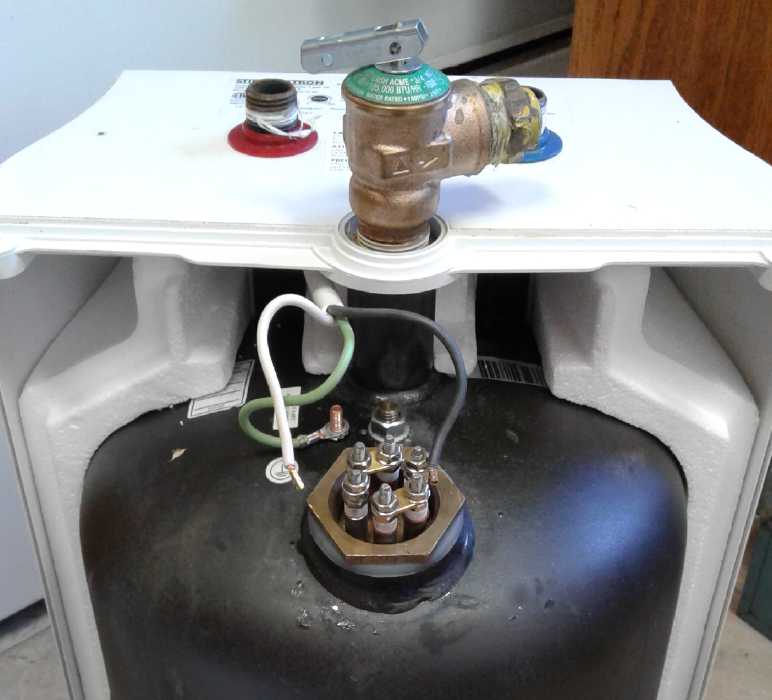
I must have had the 15 liter hot water tank for the
under-sink hot water for the kitchen for well over a year now,
but with the new "chemical-free iron filter" for my house well water
system, I wouldn't need to connect it to rain water to get un-stained
dishes. So by putting it off so long I saved myself a lot of work that
now
wasn't needed.
The Dernord 36
volt water heating element in the
15
liter
under-sink hot water tank. I found 250 watts was
plenty.
But the soft silicone(?) gasket supplied (white, under hex top)
squished
out
under pressure, causing a flood in the kitchen. Get an "O-ring" or a
stiffer gasket.
 The 36 volt
water heater element having arrived, until the
8th I made up pipe assemblies for it. On the 11th after a
couple more trips into town for parts, I did the plumbing and installed
the
36 volt heater element
in the tank and the tank under the sink. Then I ran a cable across the
house through the crawl space (ugh!) to connect up the 36 volts. On the
12th I
hooked
it up and (not without some troubles and a flood first) got the water
hot. It seemed to heat surprisingly quickly even with just 265 watts of
heating applied. (I wired two ~500 watt elements in series with the
third disconnected.) It was hot
for dishes in under an hour. I also found the small 15 liter tank
seemed to
cool surprisingly quickly. There was only warm water in the evening and
quite cool late at night. But soon I found that it actually seems to
spend most of its
time shut off, so I started leaving it turned "on" at night to run on
the batteries.
The 36 volt
water heater element having arrived, until the
8th I made up pipe assemblies for it. On the 11th after a
couple more trips into town for parts, I did the plumbing and installed
the
36 volt heater element
in the tank and the tank under the sink. Then I ran a cable across the
house through the crawl space (ugh!) to connect up the 36 volts. On the
12th I
hooked
it up and (not without some troubles and a flood first) got the water
hot. It seemed to heat surprisingly quickly even with just 265 watts of
heating applied. (I wired two ~500 watt elements in series with the
third disconnected.) It was hot
for dishes in under an hour. I also found the small 15 liter tank
seemed to
cool surprisingly quickly. There was only warm water in the evening and
quite cool late at night. But soon I found that it actually seems to
spend most of its
time shut off, so I started leaving it turned "on" at night to run on
the batteries.
I left the top of the tank with two wires
sticking out that could be connected to the thermostat giving either
~260W (drawing 6.5 amps) or ~500W (almost 13 amps). The water heats so
fast with 260 I don't expect to use the 500 at all.
I still want to install a 50 amp socket and plug rather
than a 15 amp, because I want to be able to unplug the heater and plug
in a 36 to 120 volts
inverter to run the fridge in case of a power failure. I connected the
tank with "wire nuts" until I've made the socket. I wouldn't have dared
put the connection down there where it might get wet (and already has)
if the power was 240 or even 120 volts... or maybe even 60. 40 or
less is different.
(There are "on demand" sink water heaters that don't need
to keep a tank
of water hot, but they need sudden very high power that is sort of
counter to the way solar wants to work. Someone on Youtube also said
that they aren't very reliable and he's on his third one at his sink.
But I confess they weren't even on my radar screen and I had never even
thought about the idea until I saw that video, and I don't know what is
available. I'm very
happy with the new tank. It's great!)
 From the 13th
it
was a real pleasure to have almost instant
HOT water (~2 seconds with the tap full on) instead of over a minute to
get tepid water from the distant main tank.
From the 13th
it
was a real pleasure to have almost instant
HOT water (~2 seconds with the tap full on) instead of over a minute to
get tepid water from the distant main tank.
In several short sessions
(my preferred way but previously impractical) I did dishes that had
been piling up for 3
weeks and cleaned up the counters. After that I could do dishes
right after I
used them and kept the place tidy[er]. I'd always wanted to do it that
way,
but especially here I'd also always been loathe to run a gallon of hot
water from a
distant tank to get a cupful or two. Now it's just a cupful extra in
the pipes.
(Anywhere I can shorten the pipe or tube? I guess not unless I move the
sink drain pipes. NO!)
Air Injection Iron Filter
"The 24th of May is the Queen's birthday. [British queen
Victoria
18??-1902(?)] If you don't give us a holiday we'll all run away!" (How
is it the holiday Monday falls on the 17th to 23rd then?) It was on the
21st
after the long weekend that I finally installed the new filter. I
wanted to start in the morning on a work day so that if it didn't go
well I could drive into town for parts. (The hardware store had been
closed Saturday! Why would I trust them for Monday?) I had all the
parts I needed, but it took most of the daytime anyway before it was
finally in and working.
On later observation it seemed that the water was just
slightly
orange instead of clear. But it didn't get any worse. With just the
sand filter, the water started clear and then turned more and more
orange and brown. And now it didn't seem to leave a stain behind it.
Previously just one bath left a very visible ring in the bathtub. It
was so thick and hard to scrub I had given up and just sometimes did
one section of the tub, which was all brown stained again by the time I
had worked my way around to the same place again. Or I would clean a
few wall tiles. I had long since taken to using a squeegee after each
shower to keep them from darkening so fast - not something I had ever
bothered with before.
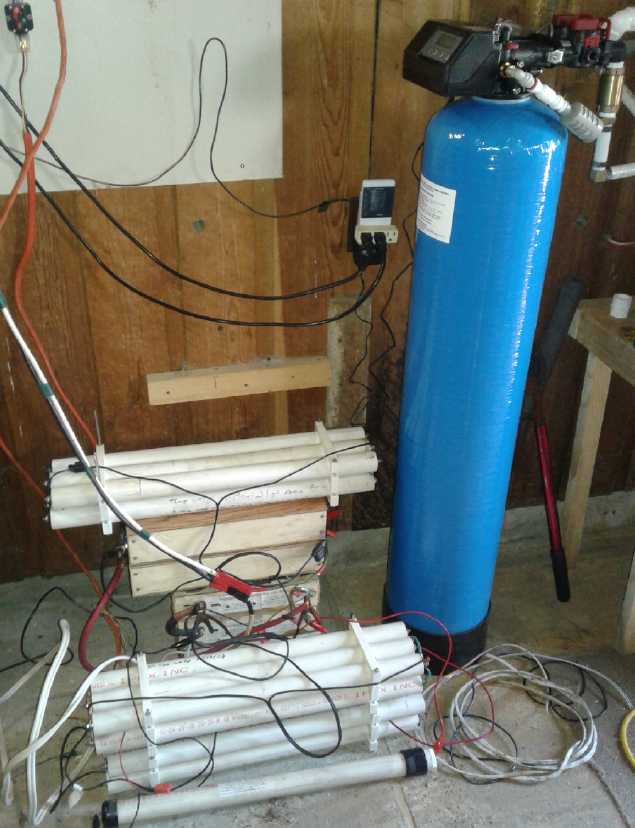
Pipe Battery Assembly Improvement
Pipe Battery Racks for the solar,
and Air Injection Iron Filter for the well water
 Putting NiMH
"D" cells into long pipes of ten for 12 volts
had made it practical to use them for big batteries by amalgamating 10
cells into a single physical unit. But the pipes themselves had always
formed unwieldy
groups, wired together but not forming a physically solid piece. The
Honda hybrid batteries stacked onto little "racks". That gave me the
idea. On the 16th and
17th I printed "racks" for the "D" cell pipe batteries on the 3D
printer. One could make a rack of 3, 6, 9 or 12 pipes stacked 1, 2, 3
or 4 rows deep. I decided to make three sets of 6 pipe batteries to add
capacity to the solar storage. (I even had to make 2 more pipes to do
that. But I still had extra cells (the better part of 100 bought in...
early 2016?) which might as well be put to use. And even extra pipes
and ends all cut.
Putting NiMH
"D" cells into long pipes of ten for 12 volts
had made it practical to use them for big batteries by amalgamating 10
cells into a single physical unit. But the pipes themselves had always
formed unwieldy
groups, wired together but not forming a physically solid piece. The
Honda hybrid batteries stacked onto little "racks". That gave me the
idea. On the 16th and
17th I printed "racks" for the "D" cell pipe batteries on the 3D
printer. One could make a rack of 3, 6, 9 or 12 pipes stacked 1, 2, 3
or 4 rows deep. I decided to make three sets of 6 pipe batteries to add
capacity to the solar storage. (I even had to make 2 more pipes to do
that. But I still had extra cells (the better part of 100 bought in...
early 2016?) which might as well be put to use. And even extra pipes
and ends all cut.
Then, using the Honda batteries - for anything - had been
awkward because of them being welded into tubes of 6 cells, and because
there were racks only for 3 rows. I had been given the battery from one
Honda Insight, but then I bought some more sets cheap on eBay, so there
simply weren't enough racks. The one way to get a "standard" voltage
out of them would be to pile them 5 rows deep to get 30 cells, 36
volts. So on the 18th I changed the dimensions of my previous racks and
printed 12 more pieces to do two top rows on the Honda batteries. But I
didn't get anything more done with them.
The 3D printer - and I'm still using my old RepRapPro,
having not yet successfully downloaded and installed the "Cura" slicer
software for
Ubuntu - is a wonder. Each of these 30 total pieces took nearly an hour
to print, and the printer chugged away hour after hour for days, the
print head and the bed whipping back and forth at rapid speeds, without
anything coming loose or failing.
Biggest Mistake in Solar?
A solar company put a video on youtube, 8 Costly Solar
Mistakes to Avoid When You Design Your Solar Panel Kit. One of them
was
a little surprising: Mistake #4: Deciding Not To Go Solar. Here it was
pointed out that solar soon pays for itself and is then a continued
gain for many years, especially as electricity prices keep rising. We
may not have an ideal climate in the "Pacific Northwest", usually with
plenty of cloud cover in winter, but if our electricity wasn't being
subsidized here on Haida Gwaii (same rates across the whole province),
seeing the price of a couple of solar
panels on each month's bill would surely cause solar panels to be
covering rooftops at a rapid pace.
Solar Power for a Neighbor
As mentioned the end days of the month were occupied with
putting in solar electricity for an older neighbor who has lived
without electricity for much of her adult life. Just a 12 volt system:
two 90 watt panels on her roof, a "frame 27" size 'deep cycle' battery
just outside, and a PWM charge controller on an inner wall.
Two 90 watt solar panels, facing south and ESE.
(The west side is shaded by a nearby tree in the afternoon.)
 Inside near the battery went a 1500 watt
inverter mainly for vacuuming.
Inside near the battery went a 1500 watt
inverter mainly for vacuuming.
The 100 amp circuit breaker behind is for emergency shutoff.
The battery is just visible outside the window.
Plywood panel with charge controller,
solar &
battery breakers, CAT12V duplex socket
 The duplex
"CAT12V" receptacle will allow plugging in LED lights. (I loaned her a
lamp with a multi-voltage DC light bulb for now.)
The duplex
"CAT12V" receptacle will allow plugging in LED lights. (I loaned her a
lamp with a multi-voltage DC light bulb for now.)
Something was wrong and I was still troubleshooting
into June. It turned out that the
charge controller was "positive ground" rather than the virtually
universal standard negative ground. Solar panel "minus" couldn't be
grounded with all the other minuses. (The last item I've even heard of
having
a positive ground - much less seen myself -
was some British cars of the early 1960s.)
If the instructions had simply mentioned this important
and unexpected fact, it would have save me a lot of trouble. And the
battery wouldn't run the vacuum cleaner after being so badly
overcharged.
Battery Development
 I made a
battery pocket with nafion ion membrane covering one face to test out
the idea of preventing metal ions - especially zinc - from traveling
between electrodes. I haven't had a chance to test it yet. Again I am
frustrated with how little time I've been able to devote to such
projects with so much potential.
I made a
battery pocket with nafion ion membrane covering one face to test out
the idea of preventing metal ions - especially zinc - from traveling
between electrodes. I haven't had a chance to test it yet. Again I am
frustrated with how little time I've been able to devote to such
projects with so much potential.
In Passing
(Miscellaneous topics, editorial comments & opinionated rants)
More on Time Zones
 It has
evidently been noticed that people living in the west end of time zones
are more often more deprived of sleep than those living in the east
ends. It seems that's because the sun goes down up to an hour later. It
also comes up up to an hour later, but the clock times scheduled for
starting work are the same. So those in the west ends of the zones tend
to go to bed at the same actual time of day by the sun, but they have
to get up, by actual sun time, up to an hour earlier to go to work than
those at the east ends.
It has
evidently been noticed that people living in the west end of time zones
are more often more deprived of sleep than those living in the east
ends. It seems that's because the sun goes down up to an hour later. It
also comes up up to an hour later, but the clock times scheduled for
starting work are the same. So those in the west ends of the zones tend
to go to bed at the same actual time of day by the sun, but they have
to get up, by actual sun time, up to an hour earlier to go to work than
those at the east ends.
Then there's where I'm living now, Haida Gwaii, where the
clock is almost a whole hour ahead of the sun... an hour and a half
ahead of those at the eastern end of the Pacific time zone. And then it
gets moved another hour ahead for "DST" most of the year. What
insanity! Only real
early birds need apply for 8 AM start jobs around here,
because it's really 6 AM! Even employees in stores opening at 10 AM are
actually getting up quite early to make it to work on time.
(Even regardless of time zone position, I call DST
"afternoon losing time" because that's usually my most productive
outdoor working
time, and when there's anything scheduled in the evening it starts an
hour
earlier and I have to cut the afternoon an hour short.)
(I might also mention western France as being in a similar
situation to Haida Gwaii. Apparently Germany won the war, because in
spite of being a time zone and more to the west, all of France has been
on central European time since 1940. But at least France doesn't
go on "daylight savings" time as well.)
My tentative conclusion is that Newfoundland has it
right... the world should be divided into 48 time zones 1/2 an hour
apart to limit the disparity of what "the time of day" means across the
zone. And surely to God we can do away with "phony time" DST, which by
the only available statistical evidence costs extra energy not
withstanding that "energy savings" is often cited to justify adopting
it.
The Weather & The Corn
By early May the drenched US "midwest" was raining again.
The Mississippi was flooding 8 feet higher than ever before for longer
than ever before (41 days as of May 6th), with projections that there
could be no crop planting in many areas even in June. Near the end of
May, just 40%
of US corn land had been planted. And evidently, planting so late risks
getting frost before the crop is in. (And who knows these
days - maybe snow?) And evidently some of it was "wet planted" - seed
sown in the soggy ground or water with no hope of a crop, before June
in order that "crop
insurance" will pay out in the fall.
For the latest gruesome stats on crop failures around the
world see "Ice Age Farmer" and "Adapt2030". For graphic footage of all
the horrible weather and other calamities from around the world from
South America to Soggy Arabia to places I've never even heard of, see
"Nared King" and "World of Signs". All on Youtube.
I planted my own garden corn early, but it didn't come up.
Hedging my bets, I put a bunch of seeds in a tray of potting soil
inside. These
sprouted. I transplanted them outside, replanted the rest of the rows
outside, and planted
another tray inside. But the tray was a half-hearted effort - there
were nothing like enough plants to fill my little corn field. Again
nothing came up outside. No frost, but probably just too cold for corn
seed germination. Again
the tray of seedlings inside sprouted and I relocated them outside,
where the first ones were at least growing a little. I did a third
tray which only sprouted gradually here and there (I think I used some
older seed), and by the time some of those came up it was almost the
end of
May, and there was still a whole row (of four) with no corn. While
things are warming up with spring proceeding, there have only been a
very few nice, warm sunny days. (The solar power records under
"electricity generation" below show how few sunny days.)
There probably won't be any frost to summarily end the
growing season here. Much less snow. It will probably just peter out
with the days getting too cold and dull for plants to grow further.
Then tomatos and things will start to go mouldy.
Next year I will know to start enough corn indoors under
LED lights for whatever cornfield I decide to grow.
I had the theory that the deer wouldn't eat corn. The
plants were too tough, and they wouldn't know to eat the cobs. If there
were enough, the raccoons wouldn't get too many. So I planted them in
the field outside the garden fence. But on the 29th I found that a deer
had "sampled" the first four small corn plants in one row. Fooey! Do I
need to fence off EVERYTHING? I bought a roll of fencing on the 31st.
But my mom says to mix up an egg, vinegar, hot peppers and water and
spray it on the plants. The deer evidently do have some limits to what
they'll eat. (No more had been eaten in spite of doing nothing by June
3rd.)
 Gratuitous picture of the expanded greenhouse.
Hopefully it will become much greener as summer progresses.
 Typical of waterways along the east coast of
Graham Island, "Jungle Creek" flows north
Typical of waterways along the east coast of
Graham Island, "Jungle Creek" flows north
parallel to the coast for a long ways before it finally turns and heads
down to the sea.
(It even ran another kilometer from here behind me before the highways
department
put in big rocks and "rip-wrap" and diverted it down onto the beach at
this point.)
The water and the flow is very low, especially considering that it's
spring.
American Armyworm Invades China
The American Armyworm some years
back jumped continents and hit Africa, with none of its natural enemies
accompanying it. It has been decimating food production ever since. It
has spread across Asia and has now reached China, where it is wreaking
havoc. It is so severe it has been said it threatens economic and
social stability. (Adding to the African Swine Fever problem and the
crop-wrecking weather in general.)
When migrant Winter Moths hit Victoria BC in the 1970s
they
defoliated all the fruit trees and some other broad leaf trees every
spring. Healthy
trees grew a second set of leaves later, but some died and there was no
tree fruit
anywhere, for some years. People tried various things to kill them or
keep
them out of
their trees, to little avail. In about 1980 biologists had located and
imported the moth's enemies, a parasitic mini-wasp that injected eggs
into the leaf-curling caterpillars, and a fly that laid eggs on the
leaves for them to eat, which hatched out inside. The next year - in
just one year - this horrible
pestilence was gone and while the caterpillars and moths could be found
occasionally ever after there
was never any more serious trouble from them. (Next in the later 1980s
came infestations of tent caterpillars, which I was familiar with as
they had infested the poplar trees in the Edmonton, Alberta region in
the 1960s when I was
growing up there.)
The article I read made no mention of trying to find and
bring in
the armyworm's enemies, only the despair and the woes they were
causing. As if there
was no solution. This seems very puzzling. Is no one even trying to
solve this biological catastrophe?
The Sudden Drop in the US Crime Rate:
Many Misattributions and the Real Reason
from Freakonomics by Levitt and Dubner
In the late 1980s there was
a lot of violent crime in the USA and the rate was rising year after
year. Everyone looked at statistics and
said it was going to be a worsening, horrible blight on society. No one
predicted anything else. Then rather abruptly the violent crime rate
started to fall substantially. It got better and better year after year
and stayed down. (For example, murders in New York 1990: 2,245. 2003:
596.) This was variously attributed by the former gloom and doom
predictors to a 'roaring' economy, better education, gun control
programs and innovative law enforcement tactics. Except for a
quadrupling of the incarceration rate (2 million Americans living in
prisons) which probably accounted for 1/3 of the improvement,
decreasing profits (and hence decreasing turf wars) from selling crack
cocaine (another 10%?) and an increase in the number of police
(effective where it occurred) most of these actually had little effect.
While all the agencies
were patting themselves on the back for 'solving' the problem,
economist Steven D. Levitt figured out the main reason.
In 1973 was the case of "Roe versus Wade". By almost a
century before that,
abortion had been made illegal in most states. Afterward it was legal
and
affordable. The number of unwanted children being born into adverse
family environments to (take your pick) poor, uneducated, foolish,
alcoholic, drug
abusing, unwed teenage mothers dropped sharply. In under two decades
the crime rate
followed suit. The pool of the statistically most likely potential
criminals entering their criminal prime had dramatically shrunk. (At
the same time, so had the pool of young girls statistically most likely
to have unwanted families, so the effect was and is multi-generational.)
Levitt
connected cause and effect. Of course birth control is highly
preferable and was just coming into wide availability around the same
time. But as ugly as abortions may be (and we may hope it's done as
early in the pregnancy as possible) here was a huge positive result of
restoring
personal freedom. The high crime rate was an unseen result of foolishly
coercing
women, not all of whom were ready to, or in a position to, or capable
of raising a healthy, functional family, into having one anyway.
Freedom works better than government trying to control peoples'
lives.
"Know the truth, and
the truth shall set you free." - Jesus
Now imagine all children, in numbers just sufficient to
maintain a stable and healthy population, being born wanted into
loving,
caring, well functioning families that are living the morality and
ethics of the seven core values of
Life, Equality, Growth, Quality of life, Empathy, Compassion and Love
for humanity. In a couple of generations would the world not be a
wholly different place? This is coming in the decades ahead and will
become a permanent quality of our planet's civilization.
ESD
(Eccentric Silliness Department)
(with a little filosofy mixed in?)
* A website, FootprintCalculator.org , reportedly figures out how big
the Earth
would have to be to sustainably support the global population based on
usage of materials and resources. In 1971 we evidently hit 1.03 Earths.
Last year it was 1.71 Earths. Unless we become more frugal and austere,
or drop the population, the Earth will need to grow quite substantially
to maintain its existing population for much longer. The mounting daily
mass die-offs and the horrifying numbers of species going extinct
probably indicates that the oceans have been essentially fished out and
poisoned with plastic, and the land is faring almost as badly.
Isn't that just another view of what more and more have
been
saying when they suggest we should prepare for a lean time and that the
population bubble will soon burst?
* No amount of hours spent driving in the car makes up for the missed
exercise of
not taking a 20 minute walk.
* Politics and Peace are opposites. Ultimately politics is separation;
peace is
everyone in harmony together. Politics comes about when people won't
work together and compromise to find the common good and the best path
forward. Bipolar politics is "my way or the highway." We won the
election
(51%); you lost (49%), so get lost. Your view is worthless. Peace comes
when all views are taken into account and there is co-operation instead
of competition and strife.
* In mid May big game hunting season opened. The big game hunters came
out in swarms:
carnivorous blackflies, midges ("no-see-ums") and mosquitos.
Best to stay inside in the evening.
* Why do Christians hate Muslims? No doubt because mosques must surely
breed mosqu[ito]es - and nobody likes mosquitoes.
* The hardware/building supply store in Queen Charlotte is called
"AMS". According to the store that's short for "Aaron-Mark Services".
According to most everyone else it stands for "All My Savings", as in
"I took in all my savings and bought something at AMS."
* HOW many functions with ONE button? The LCD DC power meter I put on
my solar electricity system has only one button controlling several
features. But I couldn't figure them out... When the watt-hours reading
passes 9,999 WH, it says 10 KWH. Eventually it goes to 11 KWH. This is
a sudden 1000-fold loss of precision. Hard to track a few hundred
watt-hours per day, let alone activity within the day, with that! I had
to go back to AliExpress and read the instructions, a couple of times.
If you click the button, it turns the LCD backlight on or off. If you
hold it longer, it suddenly says "SET" and allows setting of alarm
points. (What good an alarm is on something that doesn't have a beeper
I don't know... but apparently the backlight flickers.) Here Patience
is the key: KEEP holding it down. In a few more seconds it goes from
saying "SET" to "CLR". At this point release it, and the WH/KWH
reading flashes for a few seconds. While it is flashing, click the
button again to set the WH/KWH reading back to zero. (If you hold it
down even longer you can change the setting from "100 amp shunt" to "50
amp shunt". That would require changing the actual current measuring
shunt resistor too.)
* Microwave ovens heat things up in 2 or 3 minutes. In 20 or 30
minutes... the item is completely cold again.
Headline February 7th, 2057:
Using poultry embryos and advanced Crispr25.9 gene splicing technology,
Scientist Recreates
a Phorusrhacid, an Extinct Giant Flightless Bird.

 June 3rd,
2057:
June 3rd,
2057:
"You called the pound, sir?"
"Yes, it's my next door neighbor. Her chicken is eating my dogs!"
"in depth reports" for
each project are below. I hope they may be useful to anyone who wants
to get into a similar project, to glean ideas for how something
might be done, as well as things that might have been tried or thought
of... and even of how not to do something - why it didn't
work or proved impractical. Sometimes they set out inventive thoughts
almost as they occur - and are the actual organization and elaboration
in writing of those thoughts. They are thus partly a diary and are not
extensively proof-read for literary perfection and consistency before
publication. I hope they add to the body of wisdom for other
researchers and developers to help them find more productive paths and
avoid potential pitfalls and dead ends.
Ground Effect
Vehicle (first the R/C Model)
Multiple Ducted Fan Propulsion
A friend, Rick Peterson,
sends me various links to what
are sometimes very interesting articles about green energy stuff. He
sent me a link to an article about a VTOL
[vertical take-off & landing] "electric jet" aircraft from Germany
for "urban" use, the "Liliam". I couldn't think what an "electric jet"
might be but a ducted fan such as I intended to use, and so it turned
out to be. A feature of special interest was that it had 32 of them: 12
on the flaps on each wing and 6 on each side of the elevator (elevons?)
of a front canard. Instead of a rudder, it used the differing thrust of
the motors to steer.
 The design was perhaps not so strange for some radio
controlled craft, but mind bogglingly different in many ways from any
other real aircraft for carrying passengers that I've seen.
The design was perhaps not so strange for some radio
controlled craft, but mind bogglingly different in many ways from any
other real aircraft for carrying passengers that I've seen.
VTOL was attained by the ability of the control surfaces
to point the motors straight down. (Step aside, Harrier fighter jet!)
Ducted fans doubtless gave it
sufficient static thrust with less power. And they said they made it
far less noisy than a regular aircraft, much of whose noise besides
engine roar is propeller tip vortex noise. In 2017 Lilium[.com] got 90
million dollars funding to make the prototype 5 seater craft (the
intended full size) after demonstrating their smaller two-seater could
transition smoothly from hovering to forward flight. (How do other
people seem
to get immense levels of R & D funding? I haven't managed a penny -
not even SR & ED tax credits since 2015. Even my "Fantasy Budget"
for all projects combined was only 1/4 that much. Ah well...!)
I'm not so sure an aircraft to take off and land on
special pads all over town and just to cross town is practical. It
might however be
productively employed for hops over water, replacing slow foot
passenger ferries, or in extreme terrain (swamps, jungle, canyons...)
where distances are too far or it's impractical, or the
volume of travelers is too small, for a bridge.
However, such a high speed
service over water could also
(and I trust better) be provided by a ground effect vehicle using much
less energy per kilometer, greatly increasing the range or the carrying
capacity
of a given size craft/vessel. The multiple ducted fans is
certainly a fine new idea and a timely one as I was just about to start
making the wing, which will hold the motor(s). Multiple fans should
be able to solve at least two design issues that have been in my mind.
1. Having the thrust above the wing tends to push the nose downward.
Yet if the propeller is large, to put it lower puts it into the water.
Land aircraft have long wheel struts to keep their low propeller(s)
above the ground.
Thus "amphibian" aircraft with floating bodies (including the electric
one shown in last month's issue) have the propeller back by the tail to
minimize the nose-down effect. But for the ground effect vehicle, to
blow some air under the wing for additional lift means putting the
propeller at the front of the wing, as low as possible. Multiple ducted
fans of smaller diameter would allow the thrust to be down lower, still
with
water clearance. Additionally, the vertical aim of the thrust might be
adjusted with pivoting fans.
2. I have seen 'catamaran' shaped R/C models flying diagonally for a
considerable distance before straightening out when the rudder is
employed to make a turn. Keeps going straight on when turned... the
collision stats will start mounting up! I was going to have a large
central "tail" ("dorsal?") fin sticking up for lateral stability
especially when turning. That would be fine on the model. On the
piloted version it would have to be made of transparent material or
something to
prevent a serious blind spot in the view to one side that would make
"taxiing", maneuvering and docking extra challenging.
Multiple fans, especially if they could be aimed left to
right, might take the place of the fin (or at least reduce its size).
Selecting Ducted Fans
Previously I was wondering if the 5" ducted fan was large
and powerful enough. Then
I started thinking of 4 (or even 6?) smaller ones, perhaps 3 inch
diameter.
I'm thinking of mounting them under the front of the wing, where they
would all contribute to "blowing up the bubble" under the craft that
will help it lift off as well as providing forward thrust.
So at this point, the next thing to do was to look on line
and see what's available in the 3" size. Surely there were some better
ones than the 5" one I have, which is the largest available but by no
means aerodynamically optimized. Then I'd need a motor and
controller for each one. More minimally, just getting another 5" fan
and having two would fulfill the essential requirements, at least for
the model.
On the 25th I sat down to look. I already had a browser
window
open to AliEpress, and I just did a search there. Sure enough there
were many pages of results. It wasn't that I didn't spend a little time
looking over a couple of pages of other choices. But at the top left
hand corner, the first result, was the biggest size, a 90mm ducted fan
with 12 blades.
3-1/2 inches. It looked very good. It looked powerful. "for model
jets".
You could buy it with a recommended motor already installed. I wasn't
prepared for the prices, thinking of 30 or 40 $. With motor it was 130
$C.
But considering the alignment problems I've had with the 5" one,
getting them already assembled sounded like a good plan.
Then they needed BLDC motor controllers, "ESC"s
("electronic speed controls") in hobby
parlance. 120 amps was recommended. The store didn't have one! I
searched again and found a store that did, a "Sky Flight" controller.
Another 40$ each!
I sat a few moments looking at my on-line "shopping cart".
Two of each, left and right. That was the minimum. I wasn't
going to go for four at those prices,
and it sounded like two would have plenty of power. Was I really going
to do this? I decided that if I was serious about the ground effect
craft, I needed
to. It has such potential! I clicked "purchase". There went yet another
350$ I didn't have. I get Canada Pension starting next year. I wonder
when money will start hyperinflating? Not something to count on when
incurring debts! (I got the solar panel system done for the off-grid
lady across the highway by the 31st... oops, June 3rd. That will pay
for them.)
Let's see... 120 amps at 22 volts is 2640 watts: 3-1/2
horsepower! Each! And in total 16 pounds of static thrust! Put it
nose up and it could probably lift off vertically! It starts to dawn on
me that having not just "sufficient" but "impressive" or even
"excessive", power will make for not just working but impressive demos
that can create the sort of enthusiasm needed to attract funding for
more development or perhaps even commercialization.
Then, what to use for the full size manned craft? Twenty
of the very same ducted fans? Those should actually fit across along
the front under the wing. That would be 160 pounds of thrust. This
would seem to be the approach of the VTOL "electric jet". But I suspect
bigger ones will be needed.
What part to build next if I wasn't sure how the fans
would mount on/in/under the wing seemed to be an academic question
since I didn't have time for building much of anything. (It's early
June and there's still areas of the greenhouse that aren't planted
yet!) I guess I'll wait for the parts to arrive. Before the end of May
however I decided to just make the whole wing and mount the
motors on top, in "amidships" on each side. It should have lots of
take-off power without blowing the air under the wing, and the small
diameter ducted fans wouldn't do much forward tipping.
From the 90mm 12 blades Ducted Fan Order Page:


 It looks better made than the 125mm one I
bought
before.
It looks better made than the 125mm one I
bought
before.
It has a bit of a front rounded 'scoop' to bring in more air.
12 blades. (and a spare fan.)
It has a center streamlining piece at the back.
It comes with recommended motor, assembled and aligned.
Description:
Brand Name: FMS
Item Name: 90mm 12 blades Ducted Fan
Motor: 3546 KV1900(the diameter of the shaft: 5mm, the length of the
shaft: 27mm, the max power:3000W , banana plug: 4mm)
Weight: 327g
Usage: Suitable for RC Airplane
Recommended setting:
6s 22.2v 5500mAh 35C Lipo battery (not include)
ESC: 120A (not include)
Features:
- All composite materials processing and injection molding processing,
light weight, power system 327 g, has ultra high rigidity and toughness.
- First-class mold design,ensure the blades perfect dynamic balance,the
blade cooperates the duct in place,sound effect and efficiency value
are comparable to all metal duct on the market.
- FMS pioneering thermal design,in does not affect the efficiency of
the case,ensure the motor's normal working,no need to worry that the
motor heating will affect the life and performance.
- Reasonable structure design,you can arbitrarily choose different
manufacturers motor,this item can e assembled to all the 90 ducted
airplane,no need to make too much manual changes to the aircraft.
Electric Ferry
Danmark to Sweden
I've noted a couple of small electric ferries operating in
Norway. Here's a very large one plying a 4 Km route between Danmark
(Hey, that's how the Danes spell it) and Sweden. This one was converted
from diesel electric to plug-in electric by adding sheds full of
batteries on the top deck. Evidently the conversion is a plus in every
way.
https://www.youtube.com/watch?v=rE_M1n-ClOA&feature=youtu.be
Sweden to Denmark
Batts: 800 V 4,200 KWH
4 propulsion Motors 1.5 MW each.
46 crossings per day - every 15 minutes
4 Km
10 KV charging in 10 minutes / 6 minutes.
 Inside one of the battery containers on the top
deck
Inside one of the battery containers on the top
deck
 An automatic arm comes out from a tower to
recharge the ferry when it docks.
An automatic arm comes out from a tower to
recharge the ferry when it docks.
No human intervention - they need to charge fast during
the short docking while cars are unloading and reloading.
Solar Train
Also from the "Fully
Charged" Youtube channel that did the ferry video... In someplace
called Byron Bay in Australia, a short railroad between the town and a
resort was converted to solar electric. It's a level track so it
doesn't take much power. The train, fully restored and converted
"historic" units, has some solar panels on the roof (flexible ones to
match the original curved roof), but mostly it recharges at
each station. (through the rails, perhaps?)
Other
"Green"
Electric
Equipment
Projects
36 V DC "Off
Grid" Infrastructure
HAT36V-50A Ceramic Sockets
I printed the "bottomless" mold on about the 7th and tried
it on the 8th. The clay didn't come out very well, but it was much
better than with the previous mold. So I went about fine tuning this
one. Someone named Eric who I've never met said the walls should be
sloped 3 degrees to make it easier to get the clay out. That seemed
reasonable. Trying to program that in with OpenSCAD would be a daunting
task, I'm sure. I needed also to smooth the side walls, so on the 9th I
filed them and put a slope into them that way. After I was reasonably
satisfied that I had smoothed it off as best I might without going to
exacting lengths (both halves), I then coated it with the liquified wax.
The mold with smoothed and slightly angled
edges, and the clay pieces made.
 That night I stuffed fairly stiff clay into one side.
Pushing on the bottom sections carefully, one area at a time, the clay
suddenly fell out. It looked workable! So I did the other half. Then I
did some edge trimming, then dug out the bolt holes with a small piece
of brass tube. After it dried I would need to fix my mini-kiln to fire
it. Somehow that didn't happen during all the rest of May.
That night I stuffed fairly stiff clay into one side.
Pushing on the bottom sections carefully, one area at a time, the clay
suddenly fell out. It looked workable! So I did the other half. Then I
did some edge trimming, then dug out the bolt holes with a small piece
of brass tube. After it dried I would need to fix my mini-kiln to fire
it. Somehow that didn't happen during all the rest of May.
"DIY" Blades for High Power HAT36V-50A Plugs?
The spec for the blades is 2mm x 8mm x 20mm. There are no
common solid wire sizes that will flatten to 2x8mm. It's not even
a very common thickness of copper sheet to find. However, 1/2" copper
plumbing pipe has about 1mm thick walls, and 1" pipe has about 2mm. So
one could slit a 1" pipe, pry it open and flatten it down to get 2mm
thick sheet copper. Alternatively, one could slit open a 1/2" pipe,
flatten, and cut it 8mm wide by double the desired length. Then fold it
in half. The closed end is the outer end, to be inserted into the
socket. Perhaps most ideally, the other end can be shaped to hold the
wire between the two pieces. Be sure it fits in the shell before
soldering.
Kitchen Hot Water Tank - Plumbing & Wiring
I've always said "No level of scalding temperature atones
for the hot water having taken so long to get here." The answer I have
long wanted to try, a tank right by the sink, I finally did. It's great!
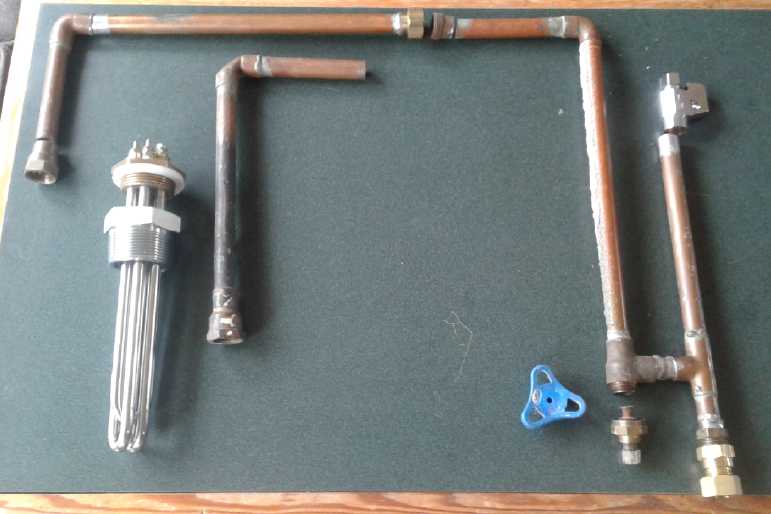 Near the start
of the month I put together a rather
complex set of pipes and fittings to connect the hot water tank under
the sink. Then I remembered that since I had done any plumbing decades
ago, people had switched to using flex tubes with threaded fittings on
both ends to connect faucets to the rest of the plumbing. I supposed
that the fittings on faucets were some special size, but when I took
the one off the hot water tap it proved to be the most common size,
"1/2 inch NPT" - the same size as the hot water tank. So the tubes
would be too. When the flex tubes were created, they were quickly
adopted and everything else was cast aside. They are not only flexible,
but the nuts are loose and can be screwed on without turning the tube,
giving threaded connections without the need for "pipe unions" having a
loose nut.
Near the start
of the month I put together a rather
complex set of pipes and fittings to connect the hot water tank under
the sink. Then I remembered that since I had done any plumbing decades
ago, people had switched to using flex tubes with threaded fittings on
both ends to connect faucets to the rest of the plumbing. I supposed
that the fittings on faucets were some special size, but when I took
the one off the hot water tap it proved to be the most common size,
"1/2 inch NPT" - the same size as the hot water tank. So the tubes
would be too. When the flex tubes were created, they were quickly
adopted and everything else was cast aside. They are not only flexible,
but the nuts are loose and can be screwed on without turning the tube,
giving threaded connections without the need for "pipe unions" having a
loose nut.
I would still need the rather complex little assembly with
two shutoffs I had mostly already put togther to split the hot water
off from the cold and then reconnect the cold, but the connection from
there to the tank, as well as much of I had meant to use from the tank
to the hot water tap, could be replaced with two flex tubes. Pfew! But
I couldn't find one long enough so I had to make an "L" piece so the
tube would reach.
Having finally done everything, I found the old valve I'd
used leaked to the outside world. The "O" ring rubber was perished. I
didn't
have any the right size. So on the 9th I had to go into town, for the
fourth day in a row, and get a new one. Since I would have to shut the
water off, I wanted to start the job in the morning just in case
something didn't work out and I had to run out yet again and buy some
other part before I could turn it on again. The 10th was out. That
meant waiting until the 11th. Rats! How long was this going to drag out?
On the 11th I
finally got the main pipe assembly in. It took a couple of hours and
two tries. It looked like a solder join leaked... then it didn't. I had
to cut the original plastic cold water pipe. I really
hated to do things that were irreversible in case something didn't fit
right in the new assembly. Plastic "pex" pipe had replaced the plastic
pipe type used when building the house in 1988 and there was almost
nothing that fit it. The selection of plumbing parts on this
island is pretty limited if I needed something else. It could mean no
water... for how long? But there was no choice. Happily the parts I
thought would fit did.
I found the
Dernord element was (after all) the right size
for the threaded hole in the tank and I put it in. I disconnected two
of the three 400 watt elements, leaving 400. Then it occurred to me I
could put in a switch and switch it to 400 or 800, or even two switches
and have 400-800-1200.
The original thermostat went into a special tube in the
original element assembly, so I couldn't use it. Another hot water tank
thermostat I've had kicking around for decades turned out to have at
least two problems. It was junk. (And I threw out several others when I
moved - rats!)
So I made a hack job of putting the original thermostat up
against the side of the tank, inside the insulation. It might not
respond as fast or as well - and it sure wasn't proper - but it should
suffice.
Knowing I couldn't scrounge any very long wire, I had
recently broken down and purchased a 75 meter roll of AWG #14-3 house
wire
cable "for solar projects". (146$ - I knew was saving money by
scrounging/saving wire!) I used about 20 meters to go from the solar to
the tank at the far end of the house. With the
bare ground wire, "#14-3" actually has four #14 wires. The black and
bare,
and the white and red, can each be doubled to make the equivalent of
two #11 AWG wires, which would be rated for 30 amps. 1200 watts at 36
volts is actually 33 amps. First, that doesn't seem like serious
overload. Second, I figured I'd probably never use all 1200 watts
anyway. I'll
start with 400 (11 amps) and see how that works out, and then go to 800
(22 amps) if that heats the water too slowly. (It turned out 2 in
series for 250 watts was plenty.)
I tried my best to arrange it so I'd only have to crawl
though each section of the dusty crawl space once, but such plans
rarely work out. The worst part is a long section only 16" high,
crawling on my belly on the concrete. I found a solid wall at the end
of that with nowhere to put the cable through. I called someone to help
me the next day, but he wasn't on the island. I decided by gosh I would
finish it that same day after all. I went back in with the drill. In
spite of good luck pushing the wire through that wall, I had to go in
to the other low section with a sand floor three times to pull the wire
up under the sink with a coathanger wire and tape - the cable came off
the first time. The next time I folded both the coathanger and a copper
wire around each other before I taped them together so I could pull
harder. I got out alive, if sore and tired and coughing up dust for a
while. An interesting thought is that while the water heater was under
the sink, if it had been 120 or 240 volts, I don't think I'd have
wanted the power connection to be under the sink where it can get wet.
Everything was ready for the hookup except that I didn't
have the first ceramic HAT36V-50A socket fired yet. Ah well... "wire
nuts"! Definitely time to call it quits. Plumbing, 36V heater element
installed in water tank, water tank installed, then a long wire run
across the whole house in the crawl space. That was lots of progress
for one day!
Next day (12th) I hung up the wire with some wire staples
in in the easier access places, hooked up the water heater, and hooked
up the other end of the wire in the breaker panel. I
was going to use the new surface mount breakers, but there was no place
to connect ground (B-) wires except inside the box. It would seem
there's a need for a surface mount grounding block for external
breakers.
First problem: When I turned it on, it was only 275 watts
instead of 400. So I took the water heater cover off (not so easy being
all plumbed in now - it would have been impossible without the flex
tubes!) and checked it. I ended up hooking the power wires directly to
one element, and it was 460 watts. Bad connection in the thermostat?
(Later I noted that's the power with two elements in series. No doubt I
had it wired that way by accident.) I put it back with two wires
sticking out that could connect to the thermostat either one element
(which turned out to be about 500 W with full batteries) or two in
series (265W). Power seemed good. After a while the water was getting
warm, then hot. I did a few dishes.
Next problem: The MPT7210A was putting under 4 amps into
the batteries, while the tank on 225 W was drawing 6 amps. The MPT7210A
is supposed to be 10 amps, but now that it was actually being asked to
put out 6, it wouldn't! It wasn't drawing much from the solar panels
either - they were almost at open circuit voltage. The unit was running
cold, definitely not limiting itself because of overheating. It just
wasn't even trying. It was putting out 135 watts while the water heater
was drawing 250. The batteries were getting lower.
It turned out that if it's turned OFF and then ON again,
it wakes up and delivers the current, but I didn't know that at the
time. (And manual intervention certainly shouldn't be required!)
I decided to connect the PowMr 60 amp charge
controller. That meant some rewiring, which took quite a while. The
PowMr needs over 50 volts in to put out 40 volts, which meant taking
two
panels away from the grid tie and putting them in series with the other
two. That's well over 60 volts open circuit - my one beef with "buck"
controllers. I would rather they "boost"ed from 30 up to 40. (Don't
touch that, no! put the nut in the nutdriver and don't touch it while
putting it on! Only touch the handle of the nutdriver, not the metal
shaft!) At this point I did get to use a couple of the surface mount
breakers to disconnect the solar and the batteries. The PowMr and the Y
Solar grid tie inverter at this point seemed to fight over the two
panels still connected to the grid tie. Soon I gave up and turned off
the grid tie. The PowMr was however much more satisfying than the
MPT7210A: it was putting out 500 watts instead of 135, and recharging
the (now lower) batteries even with 235 W going out to the water heater.
Next problem: I went into the kitchen and found the floor flooding. The
soft plastic (silicone?) gasket that came with the Dernord heater
element was
surprisingly soft. I had wondered about it. Now it had squished out
from the join as the water got hot and the tank was spewing water - by
now cold again. I made a new gasket from a piece of hard rubber but it
leaked. I looked at the original element. It had a simple rubber "O"
ring. I put that on the Dernord and put it back on. Everything was so
wet I couldn't tell if there was some minor leak, but it seemed okay. I
put it back together (still minus the outer cover), connected the 400
watt element and turned it back on. With the batteries at full charge
that was doing 512 watts. There was still almost an hour before the
tree shadows would shade the collectors. Could I get some hot water
again? In 45 minutes it certainly felt hot coming out the tap. That
didn't mean the whole tank was hot. It was still heating at 500 watts.
And the PowMr was still putting out a similar amount and
keeping the batteries up. It certainly seemed to perform well. If set
to 40.5 volts, when the tank went on within seconds it would be putting
out as much power as was being used and even a bit more to keep it at
40.5 volts.
Next problem: The water got too hot. I don't like
scalding. I discovered that one set of contacts on the thermostat was
just "pass through", not a switch. I moved the wires to the other side.
There it switched on and off properly. While I was at it, if it was
going to heat that fast, I connected the wire with two elements in
series instead of the single element. The series pair drew about 265
watts with fully charged batteries. (137 W each. They should never burn
out!) I'm pretty sure I'll never want the full 1200 watts or even 800.
Probably not even 500.
The water was seemingly heating more than twice as fast as
in the experiment a couple of months back with 100-140 watts. I'm
putting that down to the element sticking into the tank from the top
instead of from the side near the bottom, and the Dernord element being
considerably shorter than the original. So it's probably not heating
the whole tank very quickly, just the top half. That is actually fine
with me if I don't run out of hot water doing dishes.
Solar Hot Water Panel(s) Versus Solar-Electric Water Heating
The other thing I would note is that I never got anything
like this sort of hot temperature when I was doing solar hot water with
a hot water collector and pipes around 1980. Notwithstanding all the
work installing it, this one has far less plumbing and was much easier
than putting in a hot water solar panel and a solar water preheat tank
- to feed an electric tank which would use grid electricity to finish
heating it. This was much simpler and more satisfactory. And once the
water is hot, the solar power is available for other things. I think
except perhaps for swimming pool heating, electric is the way to go
even for solar hot water.
For December when there probably won't be enough solar
power many days, I think I might just add on a battery charger that
plugs into the wall to keep up the 36 volts, and stick with using the
DC
system. Of course, only four
of my ten solar panels are on that so far.
Heat Loss
Aside from having the cover off the small tank, the pipes
coming out the top including the pressure/temperature relief valve,
were hot from the water. I had used some hot water, yes, but just four
hours after shutting it off, the water was hardly tepid. The pipes
seemed like major radiant heat leaks. Some pipe insulation was surely
needed. On a shelf I had a very fat (3" O.D.) piece that I cut and put
on before
bed, and a couple of thinner bits that I put over the flex hoses.
To skip ahead a day, the water was pretty cool again just
2 or 3 hours after I shut the power off as the sun went behind the
trees at 4:30 (PST). I guess with such a small tank (15 L) it's
probably inevitable it will cycle on and off frequently, and one just
can't expect it to keep the water hot for 8 hours.
The next morning (13th) was cloudy. I turned the water
heater breaker back on at 9 AM. It was using 265 watts. The PowMr
managed to put out 200, so it was usings batteries for the other 65.
But the solar power crept up as the sun rose - and then the clouds
lightened a bit - and soon it managed to equal the drain, and then to
recharge. By 9:45 the water coming out the tap was pretty hot and by 10
quite hot.
Hot Water! Clean Dishes!
It was a real pleasure to have hot water in the kitchen,
in 2 seconds, instead of tepid water after 70 seconds! I could wash
dishes as I used them, instead of letting them pile up for weeks then
spending an hour and a half at it, and still the "hot" rinse water got
cooler and cooler because I wasn't running it fast enough. This is how
I've always wanted to do it. Having a central hot water tank at a
distance has always been an obstacle, and this one was an extreme
example.
I cleared up much of the kitchen sink clutter by 10:15. I
filled a small metal bowl rather than the whole sink, but I mostly just
squirted a bit of dishsoap into whatever I was cleaning and ran hot
water into it. Before I was done the water wasn't as hot as it was at
first. But it had only been powered on 75 minutes at that point, at 265
watts. I picked away at the mess and wiped parts of the counter a few
times as I passed through, and before the end of the day, the kitchen
started looking almost habitable. Hot water any time you want it is
great!
Last time I had noticed the energy meter on the DC panel,
it
read somewhere around 1000 watt-hours after some months of use mainly
just for the night light at 2.4 watts. But after a couple of days of
heating hot water in the daytime, I noticed it had now hit 3709. I was
finally making some substantial use of the DC power system!
The next day (14th) I turned it on and in a couple of
hours(?) it said 4333 WH. So 624 watt-hours to heat up the tank from
room temperature. I wasn't using much hot water in the kitchen (3 or 4
quick rinsings), and by 4:30 PM it said 4483. That meant that it only
came on very occasionally and had used just 150 watt-hours or so to
keep the tank hot all day, 8 hours. Maybe it wasn't such an energy hog
as I had been thinking after all! At that rate, all I had to do to save
the batteries yet have 24 hour hot water would be to not use very much
hot water in the kitchen at night. Even if I did some dishes after dark
they shouldn't be down too far by morning.
So I tried NOT shutting it off for the night. (What?!?
Actually USE the batteries? For more than a night light?) At 6:30 PM it
had gone up to 4578 - another 95 WH. At 7:30 it was 4641. Apparently it
uses around 50-70 WH for each "top-up" reheat?
May 14th, 15th, 16th
Time (PST) / Watt-Hours Reading / WH Used by water heater / Battery
Voltage
09:00 3709 0 40.5 Turned on circuit breaker -
water heated from room temperature to scalding.
11:00? 4333 [40.5 - being charged]
16:30 4483 150 [40.5] - (I turned the thermostat down a little at 11 AM
so it may not have come on for a while.)
18:30 4578 95 V??
(Didn't record battery voltage. It was well over 39 volts.)
22:20 4721 143 38.24
24:00 4768 47 37.61 (Voltage drop doesn't
look good! [but maybe it had just shut off?])
6:30 4982 224 38.6 (Too late to
see minimum voltage - it's already charging 3.2 amps)
8:30 5048 66 40.5
(Total 1339 WH - includes initial heat-up of 624 WH. Only a few rinses
of hot water use.)
14:30 5248 200 40.5
17:30 5311 63 40.5
18:30 5385 74 40.0 (I turned
voltage down to 40.0 - go easy on the poor old batteries. Ouch! Water
is hot! 817 WH in 24 hours.)
20:00 5452 67 40.0 (Sun
almost down - behind the trees - still getting 35 W of solar!)
21:00 5518 66 39.2 (Caught it in
the act - 235 W. Voltage dropped to 37.?? while it was running, but
recovered to over 39.)
24:00 5649 131 37.6 (again... 215 W and barely 36
volts while running. 891 WH over 24 hours.)
1:30 5718 69 ~37 (why
am I still up?)
4:30 5787 69 36.9 (Did I really get
up to do this? Batteries: 12.7, 12.6, 11.2 -- AHA! It's just ONE
battery that's the problem!)
9:30 5919 142 39.9 (~880 WH in 25
hours (= 845 in 24).)
Reading the voltages was a bit of a pain. If the meter on
the PowMr would say 14.2, then the one on the breaker panel would say
14.57. One voltmeter would say 14.3 and another 14.4. I finally started
using the one on the breaker panel at night. It was obviously a bit
optimistic, but the display always showed voltage, and it had a fourth
digit to decrease round-off error.
Next improvement would be to install the "chemical free
iron filter" so the well water doesn't stain everything brown. Then
it'd be perfect!
Oh yes, and then to install the 240 volt plug and socket
so I can unplug the well pump from the wall and into the 36 volt DC to
240 volt AC inverter instead, and so still have water if the grid power
is off. Then it'll be perfect. [Still not done June 3rd]
(Then can I move on to some more exciting project?)
On the 23rd I tried to chart how fast the temperature
rose, with
just a 250 watt (or thereabouts, depending on voltage) heating element
in the 15 liter tank. Considering how long it took to heat up with
around 120 watts in the experiment a couple of months ago, the
performance seems surprising. But again, it was probably heating the
top half of the tank, which only gradually conducted down to the bottom
half. The water was quite warm to start with, having been hot the
previous evening before I shut off the breaker (owing to
battery/charger problems) . (I didn't record the initial temperature or
the time I flipped the breaker on.)
~11:20? Start
11:30 37.2°
11:40 40.1°
11:50 42.0°
12:00 42.5° ...dropping battery (bad connection - fixed)
12:10 42.8° Huh? I think my measurement is using too much hot water.
12:20 43.1
Owing to there being almost no solar and the batteries
dropping, and so the power going down instead of staying constant, I
ended the test and shut off the breaker. Time to get to repairing the
main battery I had out! One problem with the test was that I was
actually running hot water to measure it at the faucet, and that the
temperature sensor took a long time to heat up, so I was actually using
a fair bit in order to measure it.
"Universal" Power Control?
Shutting off the breaker to the hot water for the night a
couple of time brought me back to the need for a voltage control. I
checked out the "output" circuit on the PowMr. Although I could set the
battery charging to various levels (thank goodness) the output shutoff
defaulted to 11.2 volts and could only be programmed up to 12.5
(*3=37.5V). I would pick at least 39 volts and probably 40. This
arbitrary maximum level would mean the NiMH batteries would be over
half way to flat before the load would shut off. I only wanted the
water to heat when they were fairly well topped up, ie, when the sun
was keeping everything charged. For the lack of imagination by limiting
its shutoff to this arbitrary low voltage, it couldn't be used for that
purpose.
At this point I'm thinking once again of designing my own
control. Now I'm thinking of using a microcontroller and a small LCD
display and making it highly programmable. Even with allowance for
voltage drop in the line. In fact, it might have 3 or 4 outputs to
control that many loads. One or two could be N-channel MOSFETs for
simple resistive DC loads, including high power loads. Another might be
a relay for anything. Another output or two might be a simple digital
output to control (eg) a solid state relay. Thus it could be a
controller for all solar and intermittent power purposes, installed at
the main equipment panel. Also it could have a temperature sensor
input(s) to control heating or cooling of any sort, in which case it
would probably run only one thing, installed at the equipment it would
control.
Another thing it could do in a central setting would be to
switch on another load "load B" when "load A" was satisfied. For
example, it could turn on a baseboard heater once the hot water tank
was hot.
That could be an actual valuable, salable product! (When
am I going to make it and program it, again?)
Arcing Thermostat
A reason cited by some for not using DC water heating was
that the thermostat might arc. That seemed to me to be a pretty paltry
reason. Surely an appropriate thermostat can be had! 120/240 volt AC
circuit breakers, when they bother to also give them a DC rating, seem
to be rated for about 40 volts DC. I figured a 240 volt water heater
thermostat should likewise be okay at 40 volts DC. I had ordered a
couple of high rated ones on line, but the one I had proving to be
defective, I presently had only the original 120 volt one from the tank.
At 10:50 (on the 12th), it having had another 1/2 hour to
reheat, I moved the dial to see how close it was to shutting off. When
it clicked, there was a green glow from within and a hissing sound. It
was arcing, and not shutting off! I did that a couple more times with
the same result. After a little bit I tried again and it shut off
normally. There was just a quick green flash. But it was certainly
disquieting! I hope the "240 volt" ones arrive soon! Meanwhile I
thought I'd better keep it shut off at the breaker when I wasn't home.
This would be a good place for the "universal" control above, set up to
measure the voltage and the temperature, and to switch the water heater
via a power MOSFET - solid state; no mechanical contacts arcing.
But I turned it on and off a couple more times, and left
it on while I was home, and it didn't do more than the momentary green
flash. I know it went on and off by itself at least once - probably 2
or 3 times. I decided it must be all right... for now. It continued to
behave itself into June.
Badderies
One fly in the ointment for the kitchen hot water was that
I didn't want the tank to run at night and drain the batteries. That
would mean manually turning the breaker on in the morning and off again
before the sun goes down. That increased my desire to make a "universal
power control" that will control most anything solar or even multiple
things, via flexible control schemes to be worked out by the
user/purchaser himself for various circumstances.
But after a couple of days my apprehension was relieved
when viewing the watt-hours meter on the solar breaker panel indicated
the tank (the only daytime load) only came on occasionally and would
use under half a kilowatt-hour overnight if I wasn't running hot water.
I shouldn't fill the sink at night, but quick rinses/washes with the
tap running slowly wouldn't make much difference.
The NiMH "D" cell battery bank however, while not
completely useless, appeared to be quite disappointing in actual use
after all the repair and replaced cells. They lost a lot more voltage
than they theoretically should have. At first I thought well, most of
them are 5 years old now and were used hard and perhaps abused in
charging in the converted Mazda RX7-EV. Still a 4.7 KWH battery bank
shouldn't drop from 40.5 volts (1.35 V/cell) to maybe 36(? - 1.2
V/cell) from supplying just 0.5 KWH of night time electricity. (How can
I ever find the time to finish my 'everlasting' battery experiments and
then get them into production?)
Then I got up before dawn with the hater heater turned on,
and checked on them. They were down to 36.8. That was getting toward
"flat" - not very good for 4600 kilowatt-hours of batteries having been
drawn down by less than 1/2 a kilowatt-hour. As soon as my head hit the
pillow it occurred to me I should check the individual 12 volt
sections. I got up again and found: 12.7, 12.6, 11.2. AHA! It was the
one battery that I hadn't done any work on that was 'bad'. I had
thought it was okay. Evidently I should take that one apart and (no
doubt) replace a few cells, too.
The next day (16th) was heavily overcast with raindrops
and the solar was only charging at 75 watts. I did some dishes, then at
10:30 went out and looked. The water heater was running. The batteries
were at: 13.0, 13.0 (steady) and 10.3 and dropping. Definitely some
repair was needed! Ugh! More work! But when I broke it into parts, none
seemed to discharge especially fast. It did appear however that a fat
jumper between the two boxes of 50 cells each, somehow had a high
resistance connection. And the 'extra' 30 amp-hours in three tubes was
attached to the wrong one. Could it be that the lowest battery was
operating on just 50 amp-hours instead of 130? That might explain the
problem and it needed to be checked out. Too bad it was on the bottom,
underneath the other two box batteries and some tube ones.
During the day on the 17th I checked: 13.5, 13.8, 12.9.
The lower box was 80 mV higher than the upper one if the water heater
was on, with the difference being at the negative terminals. despite a
fat #6 or so wire between them.
I was also surprised that the middle battery was up to
13.8 volts. It's acceptable, but I hadn't meant to charge them that
high, only to 13.5. It shows how having batteries out of balance can
wreck the less leaky ones that hold charge better. If I had set them to
the
highest steady charge level for NiMH, 14.0 (total 42.0 volts), the
middle one would have
been overcharging.
That night before bed, I went out and checked: 13.07,
13.14, 11.60. I turned the hot water breaker off (as I had the previous
night too).
It wasn't until the 24th I got the bottom battery fixed. I
lost count, but I replaced about 7 "D" cells in one box and 6 in the
other. give or take a cell. No wonder it got low so fast! Once again I
note that it was mainly but not invariably batteries with the "+"
button facing up that were bad. This was the oldest battery from the
RX7 (2013?) and there was some rust around a few of the solder joints.
The solar power system NiMH "D" dry cell
batteries, now in "racks" - mostly 5 or more years old.
Bad cells have been replaced in the three 100 amp-hour boxes and in the
three 60 amp-hour
tube sets theoretically providing 160 amp-hours at 36-40 volts - 6000
watt-hours of storage.
A single tube with an unscrewable end at the front is charging 10 spare
cells.
Also seen is the new "Air Injection Iron Filter" for the house water
from the well.
Water quality is much better without the water gradually or quickly
turning
brown and staining everything after it comes out of the faucets.
(Its backwash cycle is 75 minutes(!) instead of 10-15 for the old
filter.)
Hey! I thought I had cleaned up those loose pieces of wire before I
took pictures!
After I fixed the third box battery and put it back in,
when I went out in the morning the MPT7210A was only putting out 150mA
to keep the batteries up - much the lowest I'd seen. Before fixing most
of them it had been, IIRC, over half an amp to keep them up. Before
this last battery and the tubes, it was at best 250-350mA.
Now that I've made the "racks" for the tube batteries I
think I like them better. There is at least no disassembly and
unsoldering to isolate the tubes and see which one(s) may be causing a
problem. OTOH, for each tube that has a problem, the end has to be
cracked open, and reglued with methylene chloride to close it again.
But again no soldering to replace cells.
Having now done all the boxes I started checking out each
tube. Not
just a few but most of them seemed to have low voltage once
disconnected and separated. When I opened them each one typically had
one bad cell. I attribute it to the hard use in the RX7-EV (excessive
current drain) with the continuous charging at the highest float
voltage, 1.38-1.40 volts per cell.
By the 28th I seemed to have got them all. Now there was
160 amp-hours in all three 12 volt sections, around 6000 watt-hours. If
the water heater was on at night, the voltage held pretty well. And I
had two odd tube sets of 30 amp-hours each - the "quintos" and the
former car starter. One more set of three and it could have 190
amp-hours, about 7000 watt-hours. I still have lots of cells to do
that. Going to 200 AH I'd be getting into a few dicey ones. (The exact
watt-hours figure depends on what one decides to call the voltage.
Mostly it's over 38 volts. I wouldn't want to draw them down below 36.)
I am certainly hoping they will provide long and reliable
service with a float voltage of just 1.33-1.35 volts per cell and very
moderate load currents. 6.5 amps (water heater) spread over 16 sets of
cells in parallel is a lot less than 70 to 200 amps from a car motor
spread
over 10 sets. If it's really supplying the whole house, steady-state
currents should still be under 15 amps (fridge+freezer+water
heater+some lights...) most of the time.
I left the kitchen solar water heater on on the night of
the 29th, and at 6 AM on the 30th it had come on 3 times using over 200
WH. The batteries, now all 160 AH and supposedly repaired, read 12.85,
12.8, and 12.65. When fully charged they seemed to be around 13.3,
13.2,
13.0.
Might there still one bad, or just more leaky, cell in the
top (formerly bottom) newly repaired box battery or the 6 tubes in
parallel with it? I thought I should probably separate them into box
top and
bottom halves and the tube set, and see if one of them dropped more
then
the others. Or was it just natural variability with old, abused cells,
perhaps combined with the fact that I wasn't really "topping them up"?
Did I really want to get further into this?
Out of sequence... on the night of June 1st I went out
late at night and found the water heater on - and the battery voltage
down notably. Now to my surprise, while two batteries seemed fine one
had in fact dropped to 11.5 volts. But it was the supposedly "better"
bottom one, not the "lower" top one. I turned the heater off and it
bounced back to over 12.5 volts. It was disquieting that it should drop
so far with just a 250 watt load, but it wasn't really "85%" discharged
as 11.5 volts open circuit would indicate. I swapped the 60 AH tube
sets between the lower two batteries hoping to get better balance. It
seemed to help.
I don't think I would recommend to anyone to use NiMH dry
cells for big storage unless they were getting a really good deal on
them. I do again lament the killing of the big flooded NiMH cells as
used in the EV-1, RAV4-EV, et al. And I am trying again to get MnZn or
NiZn cheap, 'forever' cycle life battery chemistry going with an ion
selective membrane, pH 11 electrolyte, and jelled electrodes.
Fried Charge Controller- Oops
The PowMr charge controller when it was wired
right and working
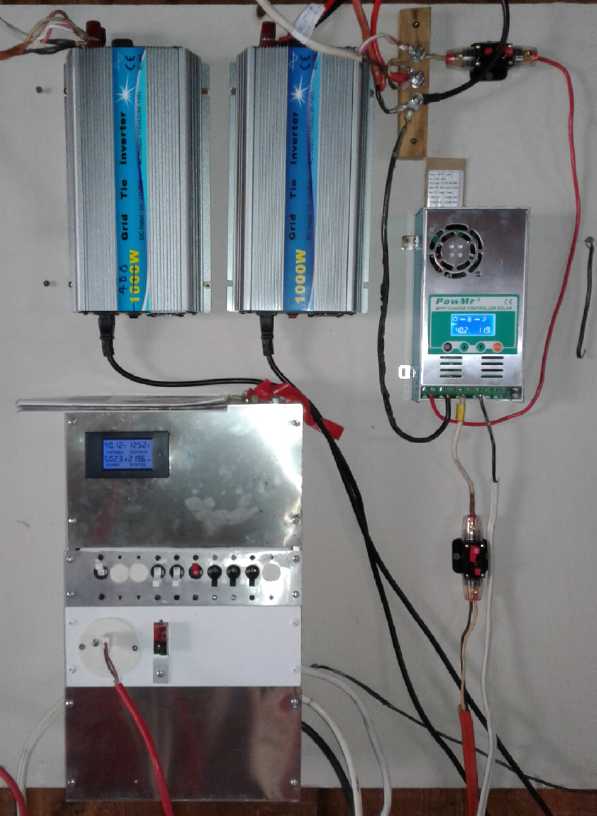 On the 22nd I
dug out the 100 AH box battery from the
bottom of the heap for inspection and repair. When I went to hook
everything back up with other batteries, the ground wire to the PowMr
was too short by about 2 inches. I got another wire and hooked it up.
but to the wrong terminal. When I turned the breaker on there was a big
"Zap!" and it blew. The PowMr had two terminals for two wires to each
connection, and I had connected the new ground to the +36 volt battery
terminal. I'm not sure why that blew the controller, but electronics
are delicate. I have the impression the microcontroller blew rather
than the heavy electronics. Perhaps it just zapped the flash memory and
lost the program.
Anyway I can't reprogram it.
On the 22nd I
dug out the 100 AH box battery from the
bottom of the heap for inspection and repair. When I went to hook
everything back up with other batteries, the ground wire to the PowMr
was too short by about 2 inches. I got another wire and hooked it up.
but to the wrong terminal. When I turned the breaker on there was a big
"Zap!" and it blew. The PowMr had two terminals for two wires to each
connection, and I had connected the new ground to the +36 volt battery
terminal. I'm not sure why that blew the controller, but electronics
are delicate. I have the impression the microcontroller blew rather
than the heavy electronics. Perhaps it just zapped the flash memory and
lost the program.
Anyway I can't reprogram it.
Obviously the operator is the the one responsible. That's
who put the wire on the wrong terminal. But without trying to blame
others for my mistake, I like to analyze contributing factors. One
could say the driver of a car is at fault in an accident, but obviously
if he hadn't been on the road it wouldn't have happened. The fact that
he was is a very obvious contributing factor.
We might itemize the following contributing factors.
1) The labeling of the terminals was unclear. It was just small white
figures silkscreened onto the circuit board, in the deep shadow under
the terminal block itself. (On the MPT7210A the terminal markings are
larger and printed right on the front of the case.)
2) There was insufficient light in the area, contributing to the above.
This is typical of places where equipment is installed. I couldn't read
the markings but since I thought I knew which terminal was which, I
wired it anyway.
3) The "hot" +36 volt wire was white instead of red. Because in AC
wiring black perversely is hot and white is neutral (which stupid color
scheme I complained of just last issue of TE News), putting a ground
wire right beside a white wire triggered no mental alarms. (Apparently
neither did the yellow tape.) It's not that I shouldn't have known -
it's just there's a confusion factor from there being two incompatible
wire
coloring schemes.
4) It's hard to get red wire. That's why it was white. White and black
are everywhere. Black is ground. White is completely ambiguous. That
one can't readily get the right color wire is
a problem in doing DC wiring.
If any of these contributing factors hadn't been there,
probably the accident would never have happened in spite of my usual
lamentable glossing over of "the fine details" in this sort of job and
working "on autopilot" without much presence of mind, a habit I've
never fully overcome. (Maybe a few more hundred dollars of blown
equipment will do it. Nah, probably not!)
"The only people that never make mistakes are the ones who never do
anything." - Roger the plumber, heating system specialist.
It was the last of a bunch of connections I made to
connect up a temporary set of batteries while one of the three "main"
ones was out of service. There were of course things I could have and
obviously should have done. In the first place I should have wrapped
some red tape around the white wire when I put the "B+" wire from the
breaker to the PowMr in place weeks ago. In the second place, being
unable to read the tiny letters in the dark shadow in the dim garage, I
should have gone and got a flashlight and shone it to read them and
verify the
connections.
I decided to try the MPT7210A again.
Charge Controller Vagrancies
The MPT7210A is a rare boost controller that raises a
lower solar panel voltage to a higher system voltage. Most are
buck controllers requiring the power input to be higher voltage
than the desired system voltage. For a 36 volt system this means the
solar panels must be put in series in pairs, putting out over 50 up to
80 volts - into dangerous territory if touched.
But it does
appear to have something of a flaw. When a load is drawn from the the
system, it seems absurdly slow and reluctant to respond. When the water
heater comes
on, the MPT7210A takes minutes to gradually, stingily even start
bringing up its output current much. In the meantime, power is being
drawn
from the batteries while the solar panels are almost idle. Why after
several minutes should the batteries be down 2 volts* from the
setpoint,
supplying 6 amps, and yet the controller has only increased its output
from half an amp to 2 amps, while the solar panel voltage is way above
the MPP and they're hardly being drawn from?
But if the MPT7210A is
turned
off and then on again, it "wakes up" and quickly ramps up to supply the
required 6 amps and more. Obviously manual intervention shouldn't be
required. Of course without intervention, when the water heater shuts
off the voltage will gradually recover, but why take it out of the
batteries in the first place when there's sun and the controller can
supply 10 amps?
In contrast, when the 60 amp PowMr charge controller is
installed and the water heater comes on, within seconds it is supplying
as much power as is being drawn to keep the battery voltage at the
setpoint, so the power essentially goes straight from the solar panels
to the load. This pretty much eliminates any cycling and draw-down of
the batteries. Isn't that how it's supposed to work?
(*Down by 2 volts in just minutes? Yes, there was still a weak battery
on the 25th, readings: 13+, 13+, 11+ ~=38 volts. Dropped in 10(?)
minutes from setpoint 40.5. Shortly after this I put the third 100 AH
box battery, repaired the previous day, back in.)
My
Solar Power System
[In?]Efficiency of 1000 Watt Y-Solar Microinverters
On the 26th I hooked a third 305 watt panel to the
grid-tie inverter already having two the same on it. On the 27th I
noticed that it didn't seem to have 1.5 times as much output. So I
disconnected one, then two and got the following readings:
1 Panel : 235 W
2 Panels: 445 W
3 Panels: 635 W
4 panels: 815 W (Trailer roof with four of the same 305 W panels)
From one panel we would expect that four would make 940
watts, but only 815 was coming out of the trailer according to the
meter. So each panel was adding less power than the previous:
#1 235 W (This is about what the 75% "realism factor"
says you can expect from these panels in real world conditions.)
#2 + 210 W
#3 + 190 W
#4 + 180 W
The sun was pretty high but not yet at its zenith. The
only panel pointing straight at the sun was the one I had placed on the
lawn, panel #3, which didn't seem any better than the others. The
conclusion is that the Y-Solar microinverters, while being rated for
1000 watts peak and 900 continuous, are more efficient when more
lightly loaded. So I'll go back to a previous idea: that they are
cheap enough that it's best to have more of them running with lighter
loads. Probably three panels on one inverter is plenty. Two is even
better.
One grid tie inverter on the wall, one in the
(turned off) freezer.
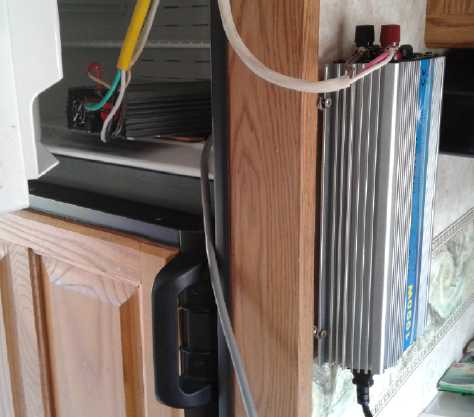 Hide and Seek
If I put two inverters in the trailer each with two
panels, instead of one with all four panels, at noon I should get over
900 watts instead of ~830-850. But I looked everywhere for the fourth
grid-tie except where it was and couldn't find it. It must be around
here somewhere... but then I've failed to find things before because
they were on edge instead of lying flat, were a different color than I
thought, were out instead of in a box, or even were hidden under a
sheet of paper. It would surely help if I could simply remember where I
put it! Surely it should be in the electronics shop near the other
inverters? I looked one more time and found it at the far end against
the wall with a just-sufficient piece of opaque white foam plastic
draped over it to hide the shape and view of the on-end box.
I put this fourth grid-tie in the trailer and connected 2
of the 4 panels to each one. I thought I'd see how much power there was
at noon, but it soon clouded over. At one point in the afternoon it
lightened up (not completely cleared), and the output briefly hit 899
watts. The previous high was about 860 in full sun, so it must have
been working better. The next day was sunny and at some point I found
it was making around 885 watts where it usually was around 830 to 850
at the most.
It makes a little more electricity. Is it worth it? For
simplicity call it 50 watts extra, so 20 hours - two sunny summer days
- to make an extra kilowatt hour (worth 13¢ at the current
subsidized price, the same throughout BC). 20 days for 1.30$, 200 for
13$ (call it a year), and somewhat under 2000 hours - 10 years - to
pass the purchase price of somewhat over 100$. If OTOH we take the real
price of diesel generated electricity here of 50¢/KWH, that's 1/2
a dollar in 2 days, 5$ in 20, 50$ in 200 days (a year) for about a 2
year payback.
Month's Log of Solar Power Generated [and grid power consumed]
(All
times are in PST: clock 48 minutes ahead of sun.)
Date House solar KWH, Trailer Roof solar KWH - day total KWH
made [power
co. meter readings] weather, usage...
April 30th 69.91, 245.80 - 15.46 [65940@9:30, 942@19:30] Sun. Few
chemtrails.
Finished charging car (5 Hrs at 1500 W from 9:30)
May 1st 77.40, 252.05- 13.74 [65954@11:30, 959@21:00 ] very light
overcast/chemtrails. Sunny later PM. Drove 55, started charging car
2nd 82.13, 255.88 - 8.56 [65965@9:30, 975@20:00] clouds
with sunny
breaks. Finished charging car but not much solar.
3rd 86.79, 259.41 - 8.19 [65987@13:00, 991@19:30]
Clouds.
4th 90.24, 262.32 - 6.36 [66000@10:00, 009@19:30]
clouds. again. 55
Km & 2/3 charge car.
5th 93.80, 265.58 - 6.82 [66022@9:00, 030@21:00]
clouds. A couple of
short sunny breaks. rest of charge car.
6th 96.80, 267.89 - 5.31 [66040@10:00, 055@21:00]
heavy cloud. 55 Km.Charged car, laundry x2. Not much help from solar!
7th 99.52, 269.94 - 4.77 [66082@19:30] Is it my
imagination or is each day duller than the last? 60Km & fast charged
8th 106.90,275.60 - 13.04 [66101@22:30] sun but dense
chemtrails, later PM clouds, 55 Km & slow charged until 6PM.
9th 115.66,282.36 - 15.52 [66108@9:00, 115@19:00] sunny! yay!
4th daily drive to town 55 Km & slow charging with solar help from
?2PM.
10th 123.46,288.56 - 14.00 [66125@19:00] sun but chemtrails. Drove to
Masset in Echo to pick up Air Injection Iron Filter for DW.
11th 132.38,295.38 - 15.74 [66131@9:00, 132@18:00] sun, clear. Bath AM.
With HWH turned down to 120V/750W, solar reheated the tank over some
hours - house power meter didn't move. Now if only I could get the car
charging down to that sort of level, real energy independence would be
feasible on sunny days - at least from a power use perspective, or if
tying all the inverters together with the grid down works. (Even if you
could only drive to town one day out of three.) Of course the other
alternative is always... More Solar Panels!
12th 137.86, 301.50 - 11.60 [66139@9:30, 141@20:30] Put in kitchen hot
water tank. Had to disconnect the 1 KW section of 4 panels and hook up
PowMr charge controller. It didn't seem to get on well with the grid
tie inverter, so 2 panels "lost" to grid tie by being set in series to
higher voltage, and 2 I have to turn inverter off if there's a heavy
load (ie the water heater) on the batteries.
13th 142.10, 306.62 - 9.36 [66150@9:00, 151@19:30] cloudy, bit of
sun. No bath, no laundry, no drive, only big power draw was night
bedroom heat.
14th 144.78, 310.09 - 6.24 [66157@9:30, 166@19:30] cloudy,
drizzle later. Bath AM. Drive 55 Km but only part charge at 1500 W.
15th 149.65, 315.96 - 10.74 [66179@20:00] some sun. Finished car chj.
16th 151.01, 317.98 - 3.38 [66194@14:30 - oops I left BR
heat on - BR heater was trying to heat house, 199@20:00] Clouds, bit of
rain.
17th 154.74, 322.77 - 8.52 [66209@9:30, 230@19:30] clouds,
bit of sun, bit of rain. Fast chj after 85 Km drv. Laundry x2. Hi
energy day!
18th 157.35, 326.06 - 5.90 [66248@11:30, 261@20:30] more of
the same. Fast chj after 55Km. Trailer heat on all day (250W = 6 KWH).
19th 161.05, 330.41 - 8.15 [66274@12:30, 282@20:30] Thin
clouds/dull sun.
20th 163.46, 333.47 - 5.47 [66302@20:00] like last few
days. 35Km drv.+slow chj. 3 to 8 PM.xxx
21st 165.48, 336.33 - 4.88 [66323@22:00] nuthr dul dae (and
just why should the garden grow with no sun... and no rain?
Thank goodness for the garden hose! But how about some real sun?)
22nd 170.91,342.67 - 11.77 [66335@10:00, 350@25:30] Sun! - rats,
morning only. PM light clouds.
23rd 173.04, 344.75 - 4.21 [66362@13:00, 373@22:30] Heavy
overcast - almost no solar. (power failure at night reset house solar
meter)
24th 2.94, 349.21 - 7.40 [66401@20:00] cloudy
with sunny breaks - 85Km, fast chj.car ~16 KWH? (power fail evening
reset house solar meter)
25th 8.67, 356.18 - 15.64 [66427@22:00] Genuine SUN!
bath, car chj.(on low 1500W) in sun...
Where on earth was all that grid power being used??? This time it
looked really odd... the bedroom heat was for once off, I hardly did
anything all day - I didn't even water the garden (and hence run the
well pump)! The Miles Truck?!? I had plugged the truck charger in maybe
10(?) days ago. But why would it use any appreciable power for a float
charge? I went into the garage and checked. No heat was on but the
whole usually chilly garage was warm! Inside the truck's cargo space
above the batteries it was even warmer. The "Delta-Q - Quik-Q" 1100
watt charger was blasting away, boiling off the water in the batteries
- I could hear it boiling out! That was certainly what had been
draining the house power. Day and night, using most or all of the solar
plus the grid power. That's the same brand of charger that caught the
Suzuki Swift on fire. I hate them more and more! And apparently I
haven't learned my lesson about charging electric vehicles inside a
garage. I hope it hasn't torched the batteries. It certainly can't have
done them any good. I'll have to check and refill all the cells. And I
plugged it in "just to keep the batteries up"! The only "good news" was
that nothing caught fire! and the truck still moved. I didn't however
drive it far inside the garage.
I wonder when I would have thought about the truck again
if I hadn't been recording power usage and been puzzled that it was so
much higher than expected? There wasn't a day under 20 KWH from the
16th to the 25th, so perhaps it was the 16th when I plugged in the
truck.
26th 16.08, 363.11 - 14.38 [66434@10:30, 437@22:00] Sun. Light
chemtrails PM gone before evening. I set a 305W solar panel on the lawn
and connected it to the grid tie with two the same on the house roof,
total 11 panels instead of 10. With 1200W at the house and 830W from
the trailer, at last it was exceeding 2000W. In the sun. In late May.
And with the truck charger off, grid consumption was 10 KWH instead of
20+, in spite of doing a load of laundry with hot water and ~3 KWH
going to the clothes dryer.
Perhaps I'll put the panel as planned on the Sprint car
and arrange it so I can plug it into the grid tie if the car doesn't
itself need charging. I'll make it so it will swing up to at least
60°, and one can park and orient the car to get the best advantage
- even moving it around during the day if desperate in December. Maybe
I'll even arrange a few more panels that can be rotated or moved around
by the house, for more in the morning, more in late afternoon, and
especially, more in winter, the roof panels being at such a flat angle
they lose up to 50% of what little sun there is in December.
27th 25.27, 370.13 - 16.21 [66442@20:00] Sun. With 11th panel makes new
daily record. BR Heat, Bath AM. No drive. Use from grid just 5 KWH!
28th 31.75, 376.03 - 12.40 [66447@9:30; 451@21:00] Sun earlier AM then
clouded over. Later 55 Km Drv. & part chj. @1500W. Had to
disconnect 11th panel to close garage door - didn't hook it up, had 4
panels doing DC/water heater only for part of the day. Also on this day
I split the 4 panels in the trailer between two "Y-Solar" 1000 W grid
tie inverters. Trailer hit 899 watts in a short sunny break.
29th 41.14, 383.60 - 16.96 [66457@10:00, 66460@20:00] Sunny. Hooked up
#11 today; Another record! Bath AM & finished charge car. The
trailer was generating around 885 watts with the 2 inverters instead of
maybe 830-850 with a single one. If we call it an extra 45 watts,
that's about 5% more from more lightly loading the inverters. The
'extra' inverter was another ~100+$. That makes for a long payback time
at 13¢/KWH - over 5 years.
30th 50.37, 390.74 - 16.37 [66466@21:00] sun w. a few kemtrails.
31st 53.10, 393.27 - 5.26 [66469@9:00, 485@20:30]
Lt.Rain. (no BR heat) 85 Km drv. fast charged.
June 1st 56.94, 397.18 - 7.75 [66502@20:30] cloudy, occasional sunny
spots in PM. 60 Km drv.Fast Chj.
2nd 68.56, 399.19 - 3.63 [66517@19:30] RAIN, more RAIN!
(We REALLY needed rain!) 49 Km Drv.- chjd.after meter reading.
The 4 older poly panels went to the DC system only, to keep kitchen hot
water hot, so real total might be ~4.4 KWH (with a little power wasted
from the 4 panels).
From the 11th the DC system started using some real power
-
for the 36 volt, 250 watt kitchen under-sink water heater. I was often
turning it off at night because of a bad battery (or "just because"),
in which case it
probably used .65 KWH per day. Otherwise it seemed to be around .8 to
.9 KWH/Day, probably depending how much hot water I ran and how hot I
set the thermostat. I didn't run
very much hot water because it only took a couple of seconds to get it,
and then I was usually just washing or rinsing a few things - a few
more seconds running slowly. The total amount drawn would have hardly
started the water on its long journey from the main water tank to the
kitchen, so the new tank is doubtless saving energy. Where was I going
with this? Oh yes: add .8 to the "total daily KWH generated" (total to
the
grid), especially from the 22nd on. (There's still power going to waste
from the DC tied panels - depending which charge controller I have
connected and whether their grid-tie inverter is on at all.)
My power bill for March 13th to May 10th arrived. Little
graphs on it showed that last year in the same time period I had used
about 37 KWH/day, and this year only 20. Counting the times I must have
been sending a little free power to the grid, it would seem the system
generated around half the power I used. Unless I did more driving last
year (probably). or it was colder (not that I recall). The answer
to reducing the other half would be of course more solar panels and
maybe a
VAWT windplant... or to get the HE ray energy device working. (At the
rate I'm going, will that ever happen?)
For the month of May itself, the house meter says I've
used just 17.5 KWH per day from the grid. Of course a lot of that is
for charging the Nissan Leaf after driving, too... not to mention the
rampaging Miles truck "Delta Q" charger.
Something becoming quite clear is that the power used from
the grid is less when the sun is shining. This is due to it being
warmer (needing less heat - including letting the woodstove go out), as
well as to the extra energy input directly from the solar panel system.
The bedroom still used a bit of electric heat at night most nights to
keep me at my comfort level. I used
to say Victoria (BC) wasn't cold, but it had a 9 month heating season.
This seems to be even more true up here. (And then finally May gave way
to a chilly start of Juneuary.)
Low Light Performance
It has been said that monocrystalline solar panels have
better low-light performance than polycrystalline. I decided to try a
few readings to see what happened. First I simply looked at the output
to the grid from the house, with the DC charging turned off. That
includes the four polycrystalline panels totaling about 1000 watts on
one grid tie inverter, and two monocrystalline panels totalling 610
watts on the other. Then I turned off the inverter on the
monocrystalline pair and read again, giving just the polycrystalline
panels. I did it twice a couple of hours apart to get a better average.
The monocrystalline is of course the difference, so there's no need to
turn the others off and the monos on.
(Total - Poly only = Mono only)
11th - full sunlight at 11:30 PST: 1120 - 675 = 445. 445/675= 65.9%.
13:20
PST:
1190
-
703
=
487.
487/703
= 69.3%. (sun more straight on to
panels)
So if the Hanwha "Q cell" monocrystallines were actually better in low
light, then on a cloudy day their percentage contribution should be
above 70% or so. Next: wait for a cloudy day. On the 12th there were
instead
high altitude "chemtrail" clouds.
12th full sun but chemtrails:
11:00: 898 - 405 = 493. 405/493 = 82% (turned off the
four 1KW panels' inverter
instead)
Oops DC is on, add 100 W to the four: 998 - 405 = 593. 405/593 = 68.3%
later on... 965 - 563 = 402. 402/563 = 71%
Tentatively the monocrystalline panels seemed to perform
slightly better than the polycrystalline in percentage terms when there
was some cloud cover than in full sun. But the DC production from the
polys wasn't consistently accounted for so this wasn't a very reliable
test. There were lots of cloudy days afterward, but I got busy putting
the solar water heater in and I forgot about doing the low light
comparison readings... and then the water heater started taking away
much of the polys' grid-tie output.
Beach-Launched Tide Power
Notwithstanding that
I decided not to attempt the 100 KW (or much smaller without looking
for funding) floating tide power
unit,
when I drove to Masset to pick up my "air injection iron filter" water
filter, on the way back I stopped right about where I would want to
deploy such a unit in Masset Channel and took a look at the beach
there. It was just what was wanted. A nice wide beach at low
tide, flat, solid (not muck) and not too rocky, and the highway and
power lines
were just
up from it - easy access. The channel was relatively narrow here, so
flows would be faster. There was lots of room to lay everything out and
then let the rising tide lift the vessel. Its self-steering rudder
would then take it out into the channel where it sensed the
fastest current. (And with all the other control stuff and tactics I
mentioned in previous issues.)
The anchor cable and the power line would come to the
anchor which would remain on the lower part of the beach. The electric
cable might be buried from there up to the power poles across the
highway. The vessel would stay toward the near side of the channel,
leaving lots of room for vessels and log booms to go around.
 40 Km Long Masset Channel (AKA Masset Sound),
where the tide
40 Km Long Masset Channel (AKA Masset Sound),
where the tide
journeys back and forth from the ocean to empty and refill huge
Masset Inlet, virtually a small sea in the center of the island twice a
day.
Looking southeast to east, at about 6-8 Km from the north end.
 Looking north toward Masset and Old Masset with
the ocean just to the left in the farthest distance.
Off-Grid Solar Power Installation
for a Neighbor
Plywood
panel with charge controller,
solar
&
battery breakers, CAT12V duplex socket
As mentioned the end days of May were occupied with putting in
solar electricity for an older neighbor who has lived without
electricity for much of her adult life. I put two 90 watt panels on her
roof, a "frame 27" size 'deep cycle' battery just outside, and a PWM
charge controller on an inner wall. Inside near the battery went a 1500
watt inverter so she could vacuum. A duplex "CAT12V" receptacle will
allow plugging in LED lights.
But things weren't working right and I was troubleshooting
into
June. The charge controller was absolutely frying the battery. I had
carefully grounded all the "-" terminals safely in a box.
Investigation with a meter finally disclosed that the
charge
controller was "positive ground". To connect the solar panel
minus side
to the battery minus side was to bypass the controller and put the full
power of the panels straight to the battery. Ditto with the switchable
load output to shut the outlets off if the battery gets too low.
Instead, it was all the "plus"
sides that were tied together internally. Nothing was mentioned about
this critical detail in the instructions.
The last item I've even heard of having a positive ground
was some
British cars in the early 1960s, so to say this was a surprise was an
understatement. I can understand why they might PWM modulate the
solar's negative side and switch the load negative side instead of the
positive side, as
n-channel mosfets are better or cheaper than p-channel, but
THEY MIGHT WARN THE PURCHASER! They include a card of several warnings,
but
that's not on it.
The rewiring wasn't too bad. I had to get
up on a ladder
and change
several connections in a junction box in the ceiling and on the main
panel. Then I had to go back yet again after I later realized the
load/outlet sockets negative was the same way. But I hadn't tied frame
ground to solar minus in the solar panels, so I didn't have to go up
and take one off the roof (fyooh!)
But the
battery seemed reduced in capacity if not fried by a few hours
excessive charge that first morning - at least for now it would no
longer run her heavy 1000 watt "shop vac" vacuum cleaner, instead
dropping in voltage in a couple of seconds until the alarm came on and
the inverter shut off or the 100 amp breaker blew. (I only put the
breaker in as a manual shutoff in case the inverter was going up in
smoke or otherwise needed disconnecting... you can actually trip a 100
amp breaker?!?) And it was all because of one vital piece of missing
information that should have been supplied with the charge controller.
I took over a lamp with a 12 volt bulb to plug into the DC
system. (the first electric light besides flashlights that's ever been
on in that house!) At this latitude the days are so long at this time
of year she won't use it much, but she'll appreciate having electric
light come fall and winter. After all, lights, cell phone charging and
vacuum cleaning were the stated objectives. I didn't try to "upsell"
her to a 36 volt system with four+ big solar panels and a hot water
tank. But I did suggest that she go in for a couple on a bulk purchase
of golf cart batteries that someone else intends to make soon.
Electricity Storage (Batteries)
Electrode
"Pocket" with Nafion Ion-Selective Membrane Face
Obviously I wasn't going to get anywhere until I had
"glue" for the nafion. On the 10th I went down to the cellar and looked
in a box to see if I had anything the least bit like the recommended
"barium
metasilicate" glue. It seemed I had barium sulfate and
barium carbonate, from the pottery supply.
Looking things up on Wikipedia it seemed both the sulfate
and the carbonate were
insoluble. It also seemed that barium in contact with glass would
itself bond with the glass and "set" as barium metasilicate. I thought
the carbonate was probably the better bet
to "set". Would that work with ABS? It didn't sound very likely, but I
decided to try it.
(If I could get the nafion to glue solidly to an ABS
plastic frame, I
would also try Osmium doped cellophane film later.)
 On the 19th I
made a little box with one face and 3 edges. The top stays open for
inserting and removing electrodes at
will, and will be kept above the level of the electrolyte in the cell
so nothing gets around the nafion. I opened the nafion package and cut
a little piece to glue on to cover the front. I was surprised that the
nafion
seemed like a pretty strong, thick sheet of flexible plastic. Somehow I
had expected it to be thin and brittle.
On the 19th I
made a little box with one face and 3 edges. The top stays open for
inserting and removing electrodes at
will, and will be kept above the level of the electrolyte in the cell
so nothing gets around the nafion. I opened the nafion package and cut
a little piece to glue on to cover the front. I was surprised that the
nafion
seemed like a pretty strong, thick sheet of flexible plastic. Somehow I
had expected it to be thin and brittle.
On the 20th I read up on barium sulfate and barium carbonate. Son of a
gun - barium carbonate is used as a cement in mortar and concrete. On
the 27th (still having had no time to look at it) I thought that if I
put some in a test tube with some water... perhaps there was how to
make some barium metasilicate.
Instead of etching the zinc in ferric chloride I put it in
a small puddle of hydrogen peroxide. The zinc wasn't very flat, and the
peroxide only seemed to hit a few spots so it wasn't very effective.
And then it evaporated. (The here unseen back side was however much
better than the front.)
Regardless of theory, on
June 1st I (finally) put 4cc of barium carbonate into a test tube,
added 3cc of water and stirred, making a stiff paste. I smeared this
all around the edges and then slapped on the nafion. I put it face down
on the flat countertop with a weight on it. Would it glue it on just
like
that? On June 2nd it had dried or set, and looked like it just might
work. I'll find out... hopefully very soon.
---
From a Website
http://barium.atomistry.com/barium_silicates.html
Barium silicate occurs in nature under the form of various
silico-aluminates, such as harmotome, brewsterite, and barytafelspar.
A barium orthosilicate, Ba2SiO4, melting at 1750° C., has been
mentioned, but it is probably not stable in contact with water.
Barium metasilicate, BaSiO3, may be formed by fusing a mixture of
barium chloride and carbonate with silica. It may be obtained as the
hydrate, BaSiO3.H2O, by precipitation of a soluble barium salt with an
alkali silicate. A hexahydrate has also been described, prepared by the
action of barium hydroxide solution on sodium silicate or colloidal
silica. The heat of reaction of dissolved barium hydroxide with
colloidal silica is 8 Cal. It is probably decomposed by water, but the
decomposition is prevented by the presence of barium hydroxide in
solution. Barium silicate is formed on the walls of glass vessels
containing barium hydroxide solution.
The anhydrous metasilicate forms small crystals showing a weak double
refraction. The density is 4.435 and melting-point 1604° C. The
heat of formation from barium oxide and silica is 26.3 Cal.
The metasilicate is not isomorphous with calcium or strontium
metasilicates. With α-calcium metasilicate it forms a double
compound, 2CaO.BaO.3SiO2.
By treatment of hydrated silicic acid, or powdered quartz, with barium
hydroxide solution, or by boiling barium metasilicate with water for
some time, a number of hydrated acid silicates may be obtained.
Crystals of barium disilicate, BaSi2O5, have been observed to separate
in optical glass in the form of hexagonal plates.
A compound, 2BaO.3SiO2, which forms a complete series of solid
solutions with the disilicates is also known.
The use of barium silicate as a constituent of glass has already been
mentioned. Its employment was first suggested by Dobereiner in 1829,
and its effect upon the properties of the glass is much the same as
that of lead. It gives a higher refractive index and greater brilliancy
than lime alone, and it has the additional advantage over lead of being
unaffected by the products of combustion in the furnace.
With barium aluminate a cement may be formed of composition
2(SiO2.2BaO).Al2O3.2BaO. It sets hard with water, but, after some time,
it splits, becomes soft, and deposits crystals of barium hydroxide.
"Racking" NiMH
D cell Tube Batteries
It was great putting the NiMH "D" cells in sets of ten in
"PVC 1-1/4 inch irrigation pipes" with ends drilled from 3/8" ABS with
a 1-5/8" hole saw. All those unwieldy little batteries were made into a
larger pipe assembly as a 10 amp-hour, 12 volt battery that was easy to
handle. However the individual tube batteries were then unwieldy in
groups - individual loose tubes connected only by wires, to be
carefully picked up together to move and set down carefully on a flat
surface. or occasionally taped together, but still not really a solid
package. In the Mazda EV they had been set inside a wooden box. Now I
had seen
what I wanted to do from the Honda Hybrid batteries: make little racks
that they would sit on, each row above another and then all bolted
together, and that would make
them into a 'solid' unit.
Now I wanted to temporarily swap out the bottom box
battery to check it and fix any loose connections or bad cells and it
was awkward to replace it with a bunch of loose pipes. And essentially
that was what was missing to assemble and connect the Honda batteries
into the system, too.
 I set about
making some "racks" on the 16th. To make holes
for the tubes in plywood I had too sizes of hole drills: too small and
too large. I finally decided to do them on the 3D printer in plastic.
Of course then they were just right and no splinters. I was glad I did
them that way. The only problem was that each little rack took almost
an hour to print and I needed 18 of them - six for each 'rack' of six
batteries. The printer was doing it, not me. But I had to be there the
moment each print was finished to turn the bed heat back on (it turns
it off when any print is finished), or else I had to wait around for
another 1/3 hour for it to warm up again. It cooled much faster than it
heated, and it never quite reached the set temperature. (It worked fine
for printing PLA plastic, where the bed temperature was 55°C. For
ABS the set temperature was 110°C and the prints slid off the glass
below about 96.)
I set about
making some "racks" on the 16th. To make holes
for the tubes in plywood I had too sizes of hole drills: too small and
too large. I finally decided to do them on the 3D printer in plastic.
Of course then they were just right and no splinters. I was glad I did
them that way. The only problem was that each little rack took almost
an hour to print and I needed 18 of them - six for each 'rack' of six
batteries. The printer was doing it, not me. But I had to be there the
moment each print was finished to turn the bed heat back on (it turns
it off when any print is finished), or else I had to wait around for
another 1/3 hour for it to warm up again. It cooled much faster than it
heated, and it never quite reached the set temperature. (It worked fine
for printing PLA plastic, where the bed temperature was 55°C. For
ABS the set temperature was 110°C and the prints slid off the glass
below about 96.)
On the afternoon of the 17th I started the printing again.
I had intended to just print a few. But somehow I was always there just
before or just as it shut off, or within a minute or two, so each time
I started the next print. Before midnight all 12 were done.
 On the 18th I
shrank the dimensions a little and did 8
"interior" rack pieces for the Honda batteries. I couldn't do them wide
enough so the interior racks were in pairs. Their shapes held the rows
in place, and the entire 36 volt, 6.5*6 amp-hour battery was very
heavy, so for the outer strips I decided to simply use wood - 1"x2"s
for the bottom were not "overkill" for strength. But I didn't get any
farther than printing the racks in May.
On the 18th I
shrank the dimensions a little and did 8
"interior" rack pieces for the Honda batteries. I couldn't do them wide
enough so the interior racks were in pairs. Their shapes held the rows
in place, and the entire 36 volt, 6.5*6 amp-hour battery was very
heavy, so for the outer strips I decided to simply use wood - 1"x2"s
for the bottom were not "overkill" for strength. But I didn't get any
farther than printing the racks in May.
http://www.TurquoiseEnergy.com
Haida Gwaii, BC Canada