Turquoise Energy Newsletter #156 - May 2021
Turquoise Energy News #156
Covering
May
2021 (Posted June 9th 2021)
Lawnhill BC Canada - by Craig Carmichael
www.TurquoiseEnergy.com
= www.ElectricCaik.com
= www.ElectricHubcap.com
Month
In
"Brief"
(Project Summaries etc.)
- Roofing Screws the Easy Way! - Ground Effect Craft:
Promotion
of the Designs -
Sundry - Plastic Recycling - "Plug & Play?" DC plugs, sockets,
circuits
In
Passing
(Miscellaneous topics, editorial comments & opinionated rants)
- Tinnitus Treatment - World: Dangerous Phase? - Small
Thots: (Reader/viewer comments under articles; Rudeness and
Intolerance; Toxic Vanilla?) - ESD
- Detailed
Project Reports
-
Electric
Transport - Electric Hubcap Motor Systems (no
reports)
Other "Green"
& Electric Equipment Projects
* Off grid infrastructure: "Plug-and-Play Solar"
* Greenhouse, Gardening, Chickens
* Innovative Beekeeping for the BC Coast
Electricity
Generation
* My Solar Power System: - Daily/Monthly
Solar Production log et cetera - Monthly Summaries and
Estimates (26 months)
Electricity Storage
* Turquoise Battery Project
(NiMnOx-Zn in Mixed Alkali-Salt electrolyte)
- Assembling C Cell - Tests (ug!) - Drawing Copper Pipes
into
C-Cell Cans?
May in Brief
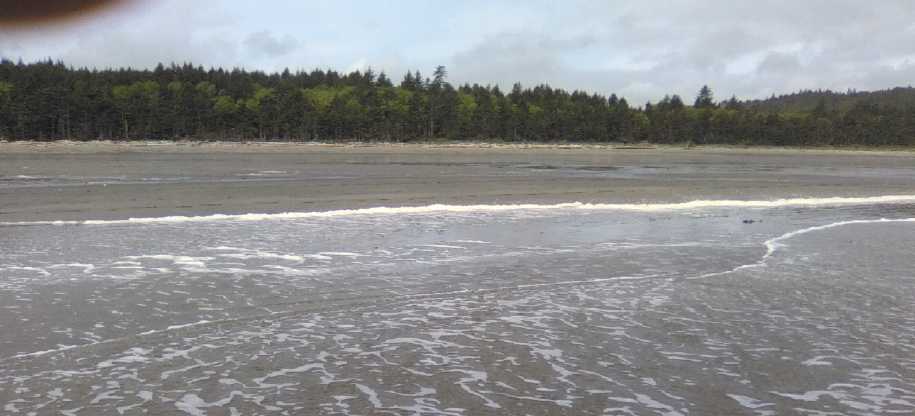 Looking at my house -
somewhere
in there - from
low tide.
Looking at my house -
somewhere
in there - from
low tide.
(This camera has a much wider angle of view than the old one.)
Roofing Screws the Easy Way!
I put up another piece of
sheet metal siding on my cabin. (one piece for the whole month!)
You
can't push hard enough to penetrate
the sheet metal easily without the drill suddenly jumping sideways
and
the screw coming out of the driver with its flimsy magnetic
holder.
You spin it and spin it and spin it trying to get the screw to
start
penetrating, even using two hands to try to press and keep it
centered
(when one
hand should be holding you on the ladder). I take plenty of extra
screws
up the ladder to replace the ones that fall to the ground below.
Some
people punch a hole in the roof metal first for the screw to go
into,
but that too is extra work.
After all the many years of frustration with this
unsatisfactory process, this time I suddenly came up with the idea
that
the hex screwdriver bit for sheet metal roofing screws had a
hexagonal
base to fit securely in the drill chuck... but so did the roofing
screws
themselves! Why not just put the screw straight into the drill
chuck?
With a keyless chuck it's easy to tighten it in, and then loosen
it off
once the screw is in. Bingo! It stays in the drill chuck securely
and
goes in like a charm, ending all the extra effort, time and
frustration. This should work for any hex-head screw that fits in
the
chuck.
I was excited enough by how easy it was to quit
working
and make a short, clumsy video of it to share it with everybody on
Youtube.
https://www.youtube.com/watch?v=ipMVx4AkwZo
Ground Effect Craft: Promotion of the Designs
I have been too busy to get at the programming
for the thrust/steering on my ground effect vehicle. But on the
10th
there
was a new video from RCTestFlight, one of the people whose models
I
originally watched when I was designing the ground effect vehicle.
He
had now tried out in model form the "airfish" inverted-delta wing
design and the old
Russian ecranoplan layout. Neither of them seemed very
satisfactory. An
interesting aspect was that he used a height sensor to to
automaticly
control the motor power to try and maintain a steady altitude. I
was
going to potentially use inertial sensors to make for a smooth
flight
even over a rough sea, but even his altitude sensor might have
worked
well over flat ground if it controlled the angle of a canard
rather than motor power.
One of his problems was that the propeller was well
above
the center line and increasing the power made the craft's nose
drop
instead of rise. This was one reason I went with ducted fans: the
small propellers can be more in-line with the wing without hitting
the
water.
I put in a substantial comment with details of my
design
under the video. If he sees it amidst the other 1000+ comments,
perhaps
he may get excited by the ideas? If so, he seems to put together
and
try out
cheap models pretty rapidly. (Well, actually I guess it's been
over 4
years since his previous ground effect tests. Still faster than
I'm
getting there, and I wasn't able to get to it this month.)
Soon there was a related video by someone who had
been in
contact with RC Test Flight and I more or less repeated myself
there.
Both times with links to TE News. If only there weren't SO many
useless
comments, mine might get seen.
Sundry
On the 13th I drove to Masset airport, but my bees
weren't
on the flight. Way to go Hiveworld, who almost never return my
e-mails
or phone messages! But this may have worked out serendipitously:
later
I saw a video of a guy who just this month invented a new type of
beehive that I realized would be much better for the BC west coast
and
especially Haida Gwaii, and having no bees yet, I combined parts
of my
two hives and built it. But it now depends on them finally sending
me
the bees. Details in "Other Green & Electric Equipment
Projects"
(which category I have to expand from just "Other Green Electric
Equipment Projects").
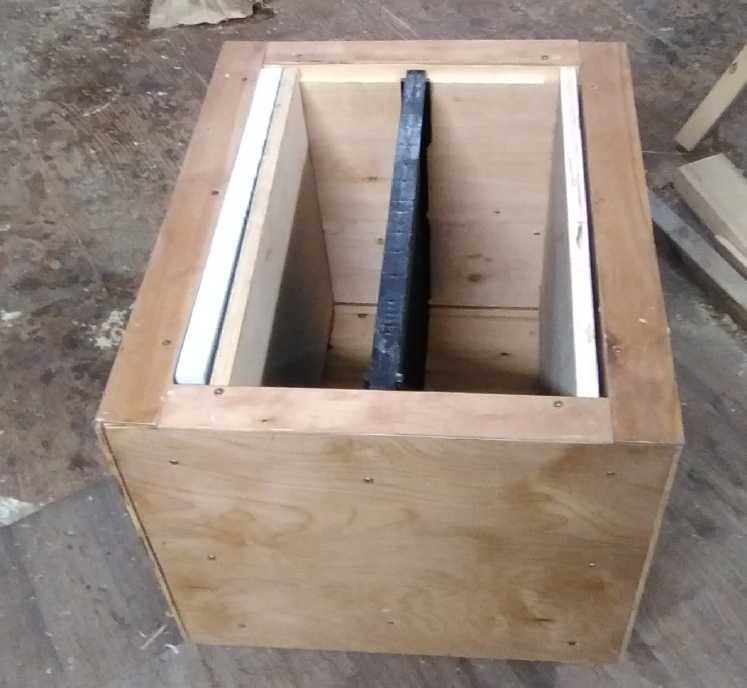 The new insulated, tall,
beehive
box with
plywood and insulation end spacer inserts,
The new insulated, tall,
beehive
box with
plywood and insulation end spacer inserts,
and the first matching "tall" frame - two "deep" frames cut and
glued
together.
I bought a nice metal door at Co-op Home Centre in
Masset while I was there. On this island I could only find doors
complete with frames/casings around them. What? Can't buy just a
door?!? And because it did have a frame around it, I'll have to
redo
my opening and make it a little taller. Yuk! And the price floored
me -
with tax it was over 500$! I almost decided to build a wooden door
myself
after all. I hope there are no more similar unpleasant price
surprises
in building supplies that I still need. (It's looking more like
we're
headed into the long predicted hyperinflation, and shortages of
all
kinds.)
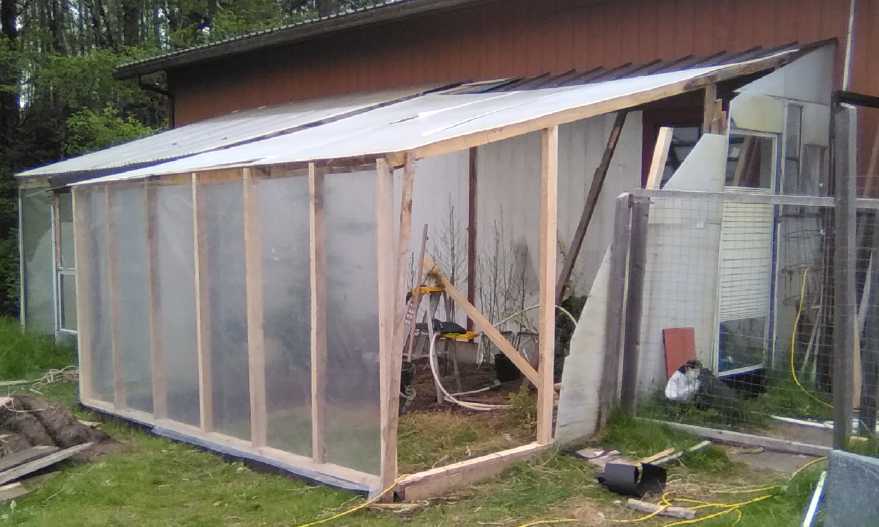 Expanding
the Greenhouse
Expanding
the Greenhouse
On the 9th I went to prepare to plant the corn I had
started in a tray of
toilet paper roll centers "seedling pots".
I was going to make a big
"cold frame" to plant it in and give it a head start, similar to
last year. But I ended up deciding to expand the greenhouse
instead,
which I had wanted to do anyway, and plant the corn inside
it. Corn grown in the open around here most commonly doesn't
produce.
Once I had straightened out the formerly curved roof, which made
it
about 4-5 usable feet
wider, I realized I should put in a concrete footing to keep the
grass
and weeds - and slugs - from creeping in under the wall. And
before
doing that I really needed to fix my cement mixer. Project creep
to
prevent creeping!
The corn meanwhile was badly outgrowing the little containers.
So...
the seemingly simple act of planting corn took all working my time
for
well over a week. Everything these days is eating into energy
project
time. But the corn is looking good! The roots were already growing
out
through the soggy tubes, so I just planted them with the tube.
Better
than "peat pots". (More under "Other ... Projects".)
I finally put together
the
"C" cell nickel-manganates / zinc. But it suffered my usual
problem of
self discharge, and didn't perform very well current-wise either.
Then
I had to clear off the top of the washing machine for laundry and
didn't set it up again. Not much of a chem lab! (More under
"Electricty
Storage".)
As I drove to Masset one day I reflected on
"hybridizing"
the Echo, that it would probably be much better to mount the motor
in a
fixed position and put in an idler sprocket mechanism with a
strong
spring to jump up and down with wheel suspension travel, instead
of
having the whole motor bounce around. (Is that as far as I get
with a
project in a month these days?)
Plastic Recycling
The food oil expeller, which seemed to have all the
same
parts as a plastic extruder and for which I hoped to use it,
arrived.
Having also ordered a few other plastic recycling
related
things on AliExpress, I told Mike I had pipe heaters and
temperature
controllers suitable for the plastic injector he had made before I
knew
him, and had shown me a year or two ago. I got the injector from
him to
add the heaters to it. (Then I started working on the greenhouse
and it
sat helping to clutter up the garage. Sigh!)
I kept thinking about how to make flat or
"corrugated"
panels from recycled clear plastic for greenhouses. I thought
about
something that would extrude a thin sheet of stiff plastic
hopefully a
couple of feet wide, but that seemed like a process that would be
too
involved and that I knew little about. The alternative would be to
press entire panels at once into greenhouse "window panes", with
or
without "corrugations" to stiffen them.
But how would one melt an expanse of plastic much too
big
to fit in an oven? On PreciousPlastic.com they had made a one
meter
square
sheet press. It was huge and had a lot of metal in it. Very
industrial
in nature, occupying a lot of shop floor space. And at least 2
meters
would be a better length. It had a bunch of flat
cartridge heaters.
Surely something simpler could be done? For the bed:
two
sheets of aluminum (can we just call this common metal "alium"?),
thick
enough to spread the heat, with a wooden frame under and on top.
Stack
dispersed weights on top instead of making it super rigid and
using a
press.
A pile of heaters would cost a lot. What about just
heating elements? What about just resistance wire? I ordered a
couple
of spools of ni-chrome resistance
wire, which can be used to make heat. These might be strung back
and
forth on insulated hangers along the length of the press. I could
make
a mold and cast the hangers in porcelain. Or ceramic inserts going
through holes in wood. (Good old "knob and tube" wiring!) The
underside of the lower aluminum plate would be insulated with
fiberglass and some bottom plywood. The top too. That way the
energy to
make the heat could be minimal, and slow heating would allow
thinner
alium plates to spread the heat through the plastic. Maybe I could
get away with 1/8" (3mm) sheets? I asked Steve to order me a 4 by
8
foot sheet of 1/8" next time he was getting alium.
Then it occurred to me that smaller greenhouse panels
might be overlapped at the edges and "glued", either with a cement
suitable for the type of plastic used, or melted together either
with a
clothes iron or a special heater that could do a whole seam at
once.
Then the individual sheets wouldn't have to be huge to be useful.
 Now...
what about my plastic shredder kit? I finally
checked on it. No information or tracking. I e-mailed the maker
and
inquired. A few days later, the 18th, I got a message that it had
now
been
shipped. Sigh! But once shipped, it arrived on the 31st - just 13
days,
from Czech republic in Europe! I had a motor and a 50:1 reduction
worm
gear. But I recently heard someone had had their shredder jam, and
that
burned out their motor. What about a safety clutch? Or maybe a
V-belt
that would slip if the going got too tough? Yes, I think that's a
good
idea.
Now...
what about my plastic shredder kit? I finally
checked on it. No information or tracking. I e-mailed the maker
and
inquired. A few days later, the 18th, I got a message that it had
now
been
shipped. Sigh! But once shipped, it arrived on the 31st - just 13
days,
from Czech republic in Europe! I had a motor and a 50:1 reduction
worm
gear. But I recently heard someone had had their shredder jam, and
that
burned out their motor. What about a safety clutch? Or maybe a
V-belt
that would slip if the going got too tough? Yes, I think that's a
good
idea.
Anyway... that's for later. My plate is more than
full!
(And... what about the planetary gear I ordered in
March
for the Chevy Sprint project?... It was taking forever. Turned out
FedEx had auto-dialed my old cell phone number, and getting no
reply
was now in the process of returning it to China owing to a trivial
customs charge. Sigh!
It arrived on June 7th. It's much larger and heavier,
and
seemingly more skucum, than the one I bought before. It's just
short of
15 pounds. I expect it'll have no problems direct driving a wheel
via a
CV shaft on the car.)
"Plug & Play?" DC Power
Components
Improved
T-Plug (right)
works better, holds
better
 I
designed and
3D printed more of the planned T-plug (36V, 15A) and mini T-plug
(12V,
10A) wiring shells. And using these I connected some devices
together.
I gave these the names "T36" and "T12", so a 36V plug is a T36P.
Eventually I hope there will be screw and crimp type connections
as
well as solder-on, and high current versions for heavy loads,
which
will need other shells and variant names. And plugs and sockets
that
lock together. But this is enough for now.
I
designed and
3D printed more of the planned T-plug (36V, 15A) and mini T-plug
(12V,
10A) wiring shells. And using these I connected some devices
together.
I gave these the names "T36" and "T12", so a 36V plug is a T36P.
Eventually I hope there will be screw and crimp type connections
as
well as solder-on, and high current versions for heavy loads,
which
will need other shells and variant names. And plugs and sockets
that
lock together. But this is enough for now.
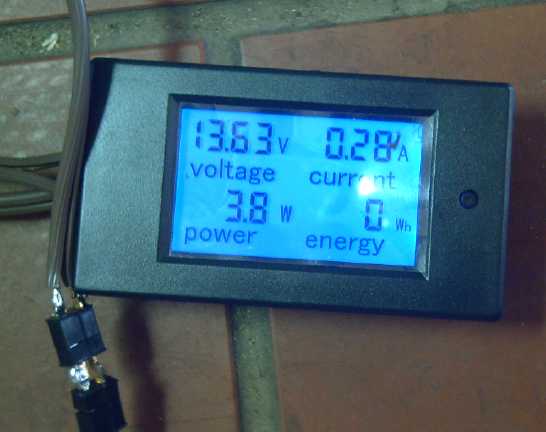
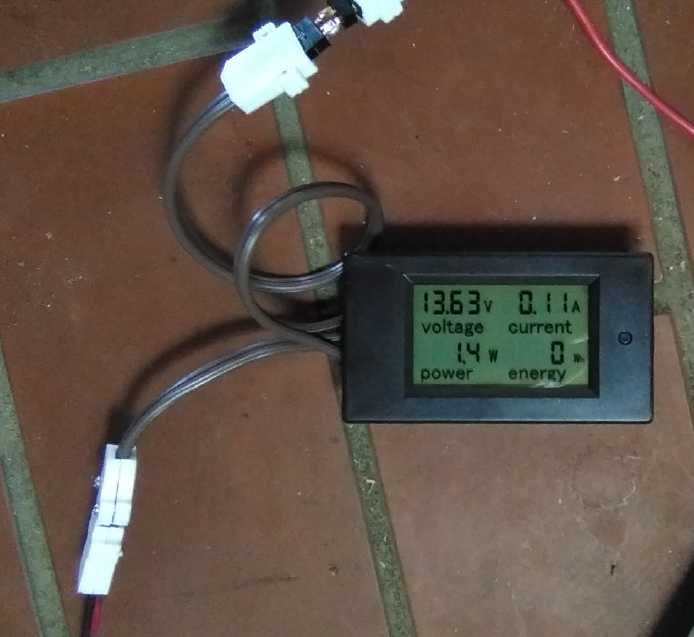
The first plug-in device I did was in-line LCD power
meters (9-100V, 0-20A) with T36 plugs and sockets, and a identical
meter with T12's. Using two of them you can see all the things you
most
want to know such as solar panel and battery voltages, current in
and
out, and accumulated totals of power made and used. And being
plug-in,
they can easily be unplugged to measure somewhere else, and the
plug
and socket of the circuit connected together without the meter. I
had
only bought two of these power meters/monitors, but having all
these
readings, independent of any other equipment, seemed so useful
that I
ordered some more of them to sell with solar systems. To go above
20
amps requires identical looking ones with an external current
measuring
shunt. I also got some straight LCD volt meters, 8 to 30V and I
put T12
plugs on them. Also some for up to 80V for T36 plugs.
Not seeing what's going on can be costly: After all,
if I
had had low power LCD voltmeters on the batteries in the truck -
or
even on one of them - I'd have seen at a glance the truck was
draining
all those batteries before it ruined them all.
Next I put a T36 plug and a T12 socket on a DC to DC
converter and set it to 13.6 volts, 10 amps max. to make a plug-in
charger for 12V Ni-MH or lithium-iron phosphate batteries.
I also made up a cable with MC4 solar panel
connectors on
one end and a T36 socket on the other, a T12 socket to a 12V
battery,
and a T12 plug to alligator clips for batteries and a 12V cord on
a
light fixture for a DC "light bulb", then connected them all out
on the
porch. (The arrow straight to the DC to DC converter input is a
...typo? The solar panel cord is right under the words - Solar
power
goes through the meter, then to the DC to DC.)
In
Passing
(Miscellaneous topics, editorial comments & opinionated rants)
Tinnitus
Treatment?
I have terrible tinnitus. The ringing in my ears
started
when I was
very young, perhaps either because of going duck hunting with my
dad
when I was 4-5 (which just very recently came back to my memory),
or because the TV we kids used to sit in front of and watch had a
very
loud 15,750 Hz flyback transformer. (IIRC the frequency correctly.
It
seemed to me that was also the original frequency of my whistling
tinnitus. OTOH,
the audiologist thought the duck hunting would have been the
culprit:
single very loud noises -
"It doesn't matter who was firing the shotgun.")
It got worse over the years along with my hearing as I hammered
together additions to my house, played in a concert band, and so
on.
Notably it got worse 2003-2007 while I was making my "Supercorder"
modern recorders, and playing them and playing them, loud and
soft,
high and low to get each note in tune by scraping away bits from
the
inside around the finger holes. And then 2017-2019 probably from
running a very large, powerful chainsaw to break up logs into
cants for
milling lumber. Even 'earmuffs' ear protection probably wasn't
enough.
My left ear is somewhere in the "mildly impaired" hearing range in
the
mid to high frequencies and
always has a loud, high pitched whistle to it. My right ear is
just
above "impaired" range.
On the evening of the 26th I heard that someone who
works
in a hospital said
tinnitus can be cured by taking magnesium and calcium for a year.
If
there's a way to end tinnitus I wasn't putting it off!: the next
morning I ran to a store and
found "Jamieson: calcium-magnesium+D3, 100+100 pills, 333mg,
167mg, 200
IU" and
bought two bottles to get a year's supply (400 pills). I took one
in
the in the car as I left the store. In case some deficiency of
magnesium is
contributing to the ringing, I'll take two daily for a while to
build
up the levels and (i trust) eliminate the deficiency, then one a
day
for the next
year. The amount of vitamin D3 is almost trivial, so
I'll continue taking daily vitamin D pills (1000 IU) to ward off
potential cancer. (And CoViD, I hear, but I'm not convinced of
that.)
If it works I'll certainly mention it in an upcoming
TE
News! If I run out of pills with little or no apparent effect I'll
also
write about it. (In the meantime, writing it here gives the date
for
when I started.)
World:
Dangerous
Phase?
While some still hope
for a
return to "normal", the world is moving on. It is very much
overpopulated and the time seems to be upon us that things are
primed
for collapse. Every civilization of the past collapsed, and while
each
collapse was unique they shared some typical features. The
population
grew too large in good years to maintain in bad, and the high
population and or poor practices degraded the environment.
(Reading
"Collapse" by Jared Diamond is eye opening. Easter Island lost all
its forest - every tree. The Anasazi turned the pine and juniper
woodland they built on into a desert, which it still is. There are
a
few presently successful stories too. Japan stabilized its
population
and reversed its deforestation by 1700, before it was too late. A
key
take-away in the many failures is that no one seriously thought
there
was a systemic problem - or that a developing problem was their
problem - until it was much too late and the population much too
large
to do anything about it.) The institutions
became self-serving: concerned with self-aggrandizement and
finally
self-preservation rather than societal service. As soon as a few
years
of drought (self inflicted from deforestation?) or other bad
weather reduced agricultural output people started starving. Chaos
ensued. The organizations and institutions couldn't cope and
simply
ceased to function, and finally ceased to exist. Usually there was
great loss of life and people were thrown on their own resources
until
a new order eventually started to emerge. A thousand year "Dark
Age"
ensued from the collapse of the Roman empire before things started
being well organized again. (Why did Alaric sack Rome? Looking for
food. But there wasn't any. The Romans were starving too.)
This time such effects look like they will be global,
not
limited to any one nation or region. There are many factors.
Healthy,
vibrant societies with stable, sustainable population levels would
be
resilient and
weather adversities easily. But most societies so far have never
even
tried to address population growth, and our social mentality (at
least
in the west) has to a
significant extent moved from being society serving and
cooperative to
being separative and self serving and this is reflected in our
institutions, creating a dysfunctionality where even the most
blatant
and severe of societal problems go unaddressed and unresolved.
* With the population growth, poverty and want is rather suddenly
becoming widespread. We think of that as being a "third world"
phenomenon, but it is now everywhere. Rents and mortgages gobble
up
everyone's paycheque. Shortages of housing and land are so far the
most
observable effect. Individual homelessness, which started around
1980
(pop. 4+ billion), has reached the point of tent cities
and refugee camps full of people, tens of millions, to which there
seem
to be no
solutions, nowhere for them to go unless they displace others or
occupy
land already in use for something else. There are more displaced
people
today than during World War II. And suddenly the price of lumber
(hey,
it grows on trees!) and other building materials has shot way up.
* We have had 2 years of generally very poor crops, globally, and
2021
is looking like a third. Supplies of
grains are now increasingly tight. The largest nations that
usually
export
a major crop are now often trying to import it. If the weather
doesn't
get the crops, plagues of locusts or mice do.
* The global distribution system seems to be having increasing
trouble
moving goods around. Delays are becoming widespread and costs are
rapidly rising. Many cargo ships have been scrapped for their
steel in
recent years decreased shipping, which has lately risen
substantially.
Shipping containers badly needed elsewhere are sitting
empty at other ports. It is said that things have been continuing
to
get worse instead of better since the Evergiven was cleared from
the
Suez canal. By early June the situation has been looking chaotic.
Shipping a 20 foot container that cost 2000 $ in 2019 is now over
10,000 $ -- but only if the shipper can book a space at all.
* Owing to the cost of housing and rising prices for most
everything,
food is becoming an unaffordable "extra" for some who are still
managing to keep a roof over their heads, to be obtained at food
banks.
Such services, now often with long lineups, have staved off
disaster so
far, but they will surely
soon be overwhelmed. Everyone trying to stockpile food is
competing
with everyone else: food banks, groceries and state governments
that
have decided they should stock up are all finding that larger
quantities have become hard to get.
* We are told "the young today don't want to work", but is that
not
because the average salaries being offered are insufficient to
live on?
What is the solution? Life, not to denigrate anyone, is becoming
"cheap".
* The financial system and the banks have been "on life support"
since
2008. Ever increasing money printing has kept them afloat. Yet the
underlying problems haven't been addressed. The value of your
dollar
denominated assets has been shrinking as the currency supply
balloons,
and hyperinflation seems inevitable and now much closer. Then all
the
fiat currencies, all
your monetary savings, will become worthless. Advice to get out of
currency and into real, tangible assets is increasing from many
quarters, and when enough people actually do that, currency
finally
becomes a "hot
potato" to be spent as soon as available, not accumulated as
savings,
and finally no one will
accept it any more. In some areas, houses are now selling not just
for
a million dollars, but for a million dollars over the asking
price.
But it will surely be a rapidly rising price of food
that
will start getting everyone buying "tangible assets" - extra food
-
"today" since we all need to eat and it will only cost more next
month.
The
crisis will probably be sudden and will catch the majority
unawares. It
is said that in Wiemar Germany "One week no one knew what
hyperinflation was. The next week everyone knew."
* New, worse strains of CoViD seem to be emerging. But whether it
is
these or some other disease that next crosses over from animals to
overcrowded populations of humans, predictions indicate that
disease
will
almost inevitably strike down billions of people in the next
decade or
two. And then this new disease(s) will continue to be a scourge
until
we learn enough about biology to eradicate it - that could be many
decades or a century or more. (Early June: WION reports a new
strain of
avian influenza in China (H10N6?) has infected a person. Might
that one
spread human to human? If not, might the next one?)
* The weather disasters not only destroy crops and livestock, but
have
become a large nuisance in their own right. Especially, high winds
are
wreaking havoc in many areas. Also seemingly random "rivers from
the sky" unprecedented floods, snow and cold to the horse
latitudes,
and giant hailstones
that can kill even large animals and destroy cars are causing
major
damages. They seem to be getting even worse. A snowstorm in the
southern USA bought Texas to a halt last winter, and in more
recent
storms there a few hailstones even bashed through house roofs. One
triangular
shaped hailstone measured 8 inches across.
* There are worrisome and credible predictions of a rapid, almost
sudden, 3 meter sea level rise before mid century, saying that it
is
already too late to prevent it. (It may not be too late to prevent
further disastrous rises over the next couple of centuries.) Many
present
day port cities and facilities will be flooded out, which will
not help supply distribution. These predictions would also involve
hundreds of millions of refugees from low lying areas seeking to
find
higher ground. (In Bangladesh alone 100 million people would or
will be
flooded
out!)
For those who manage to weather the worst of the
storms,
the world by
2050 will obviously look very different than it does today. After
the
now inevitable cataclysmic events have run their course, the
exponential learning curve we are on especially since the printing
press and now the recent advent of the
internet will continue, and we (or for many of us it will be
"they")
will start understanding our major
problems better - societal as well as technical - and learning how
to
solve them. For everyone to understand the need to limit
population is
the key to the future. (Best estimates to enable high quality
lives are
around 3 billion globally with cities of 1/2 a million or less.)
The
smaller, less dense populations will be more secure and contented,
and much more cooperative inter-person and inter-nation instead of
competitive and suspicious, and a better prosperity and solutions
for
sustainable societies will emerge. It won't be utopia at that
point,
but
it'll be the start of the road toward it.
Should our democracies finish failing, those who take
power may tell us "Democracy didn't work." And they won't want to
try
it again. Could we see a new dark age before there's another
chance?
But what is failing? It may soon be that democracy as it is
currently framed may be said to have failed. But if so, why? Did
it not
become ossified, stuck in time when constitutions were framed, and
failed to evolve to meet human and social needs?
Why did that happen?
It is said that when citizens don't participate in
governance, that society is already doomed. When populations were
tiny,
person to person contact was sufficient. One of the people at
dinner
candidly and openly discussing an issue was probably an elected
representative whose voice would be heard if he brought it up in a
government house. But as they grew, those governing became aloof.
Listening to everyone with a concern probably just left them
confused
and indecisive from
hearing multiple incompatible ideas, and occupied their productive
time, so they gradually stopped listening. This process started
very
gradually around 150 years ago. Citizens today have almost zero
opportunity for effective input into governance. Think of all the
talent, ideas and potential plans and social designs that
continually
go to waste in every
direction and sphere because those everywhere who are involved in
something, and who see and foresee problems and solutions in
their areas, have no voice in their governance. How can a few
elected
representatives be expected to come up with good answers to all of
the
many multiple issues society faces? A leader is given
responsibility
for everything. He probably picks a few major topics he's familiar
with; the rest are
never dealt with. The potential solutions of countless thoughtful
people are scattered to the winds. And into that vacuum of input
and
thought step in ever more powerful special interest groups who
eventually gain impunity to start paying politicians to pursue
their
specific agendas quite apart from - and hence inimical to - the
general
societal good. So:
essentially no input from the public except the occasional letter
to a
representative (and where does that go?); daily input from
lobbyists,
who also bear gifts for those who listen to them. Who is going to
be served?
Populations have long been much too large for
one-on-ones
of someone with an idea explaining to the leadership, or even
making an
effective presentation at a "town hall" meeting. Again, what is
surely
needed is for those people who have considered some topic to
organize
into small local groups, probably under a dozen people who assign
themselves specific roles that discuss and formulate plans or
solutions
related to it, that are agreed upon within the group - preferably
unanimously but at least by majority consensus - as being the best
way
forward. These
can be written down and presented to government. Presently they
will
probably have the most influence at the local community level. But
once
this process has taken hold, groups will link via the internet and
pick
or formulate the best consensus plans coming from all the local
groups.
Once this has been done, the plans can be submitted to elected
government for action. Even national governments will understand
that
the submission is the collective will of the most thoughtful part
of
the citizenry who have given that specific issue a far more
thorough
"going over" than anything they would manage to formulate from the
center of power.
"Social Sustainability Design Team" Organization
What differentiates the new ideas for a design team
from a
"citizens' assembly" or a "citizens' jury" is that it is an
organization rather than a simple collective, with the team
members
fulfilling specific different roles within it. It is also smaller,
to
be composed ideally of around 5 to 9 people. A committee of 100
people
without specific functions or assignments won't necessarily
research
and compile
more ideas or have more themselves, or come up with better or even
as
good solutions as a small focused group where each person has done
some
specific homework in search of optimum answers, and everything is
thought out in an organized way as a group.
I was going to try to briefly describe the
"organizational
chart" such as it is, but I don't think I could do any better than
has
been done here:
Here is a link to the structure/members of a social design team:
http://www.7corevalues.org/values-based-design-teams.html
(It's worth starting on their main page!)
http://www.7corevalues.org/
Small
Thots
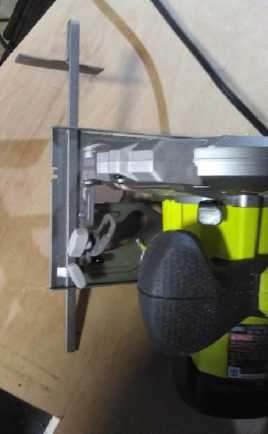 * I got a new
Ryobi skillsaw. It came with an edge guide. If I've ever seen one
of
those for a handheld circular saw before, I've never thought of it
or
used it. This time for cutting some pieces of plywood I did. Wow!
Perfect, straight cuts with a skillsaw! The big caveat is that it
only
works cutting up to about 14 inches wide. If you're making a wider
cut
you're still on your own, and I wonder how effective it would be
even
at a foot or so width.
* I got a new
Ryobi skillsaw. It came with an edge guide. If I've ever seen one
of
those for a handheld circular saw before, I've never thought of it
or
used it. This time for cutting some pieces of plywood I did. Wow!
Perfect, straight cuts with a skillsaw! The big caveat is that it
only
works cutting up to about 14 inches wide. If you're making a wider
cut
you're still on your own, and I wonder how effective it would be
even
at a foot or so width.
* I have come to look on "news" articles on major platforms that
don't
allow for comments below them as potentially being "fake news".
Such
articles often
seem to have agendas other than true information dissemination and
contain serious distortions of facts to pursue a narrative, and
apparently the authors are
not being open to hearing the views, ideas and even facts others
might
submit underneath. Just recently I've started scanning down to the
bottom first to see if comments are allowed, and sometimes
skipping
suspicious sounding articles if not.
* Come to think of it, I myself would probably get more
interesting and useful feedback if I could arrange to allow
comments
under Turquoise Energy New issues! And other readers would be
exposed
to more and doubtless often better informed opinions and ideas
than
just mine. (Awg, now I'm talking about undertaking another major
project, to set up such a thing? Way beyond my very basic HTML
skills!)
* In India CoViD seems to have suddenly spread wildly. Two states
not
using the big "I." pill were the hard hit ones. Finally it was
decided
that it should be used, and CoViD cases dropped by 92% and 84%.
Well
duh!
* In Madhra (SP?) Pradesh some village doctor or medical
practitioner
had made some herbal concoction administered as eye drops that
seemed
to be curing people - by the dozens - with notable improvement
even in
just ten minutes and no side effects that any of the treated who
were
interviewed had noticed. The villagers had quit masks and social
distancing as being no longer necessary. Thousands very ill with
CoViD
or with a family member in severe condition started coming from
all
around. They were even arriving in ambulances. The doctor said it
was a
family recipe passed down to him from his father and grandfather.
He
was arrested and the police stopped non-residents trying to travel
to
that village. A second news video treated it pretty much as a
hoax,
mainly showing the crowds and the police and (IIRC) without
interviewing patients or really asking anyone's opinion about
anything.
Viewer comments below that one were rather scathing, saying the
video
was pushing a judgment that had been decided in advance without
evidence.
Of course I have no other knowledge, but there did
seem to
be a lot of people there who didn't seem to think it was a scam or
mass
delusion.
* According to most people, rising prices are a problem. According
to
bankers, lowering prices are a terrible disaster.
* "They" say the US dollar has lost 96% of its value since 1913. I
have
thought for several years that it's more like 99%, that a dollar
now
buys what a penny would buy then. The trend toward 'worthless'
appears
to be accelerating rapidly this year.
* I have been troubled by some no longer new but more recent
"themes"
that have been put forward by authority:
- "Just say NO to drugs." I'm not a proponent of psychedelic
drugs, but what happened to common courtesy, "Yes please"
and
"No thank you"? It is implied that we should be rude
because we
dislike what is being offered. What does being offensive
accomplish
besides rubbing people the wrong way? Is it more or less likely to
generate respect for oneself? If good people rudely alienate the
person
who offers the drug will he become more or less likely to want to
have
dialogue with them, which just might result in him changing his
own
views of what's good?
- "Zero tolerance." None of us want people who are unfit to
drive
driving. Accidents happen. People are hurt and killed. Drunk
drivers
account for a lot of it. But... total intolerance? Somehow getting
the
inebriated off the
road has progressed to extremism. What is gained by besides
stress,
anxiety and a distaste for authority by almost cutting in half the
long-defined acceptable alcohol limit and giving roadside
suspensions or fines to someone who had a glass of wine or two
with
dinner or a social beer or two at a pub? Other drivers such as
tired
ones may be less safe than one with just a tiny bit of alcohol in
their
blood but nothing is said about that. When did intolerance and
extremism become good, even commendable things? (One of the women
who
started MADD said they never intended it to go so far.)
* Related: You go out for an evening drink after work/sports/band
rehearsal/evening studies/et cetera with friends at a downtown
pub. In
the interesting conversations you drink more alcohol than you had
intended. You're not flaming drunk, but you're not exactly fit as
a
fiddle either. Sure, you could take a cab home. But in the morning
rush
hour your car will be in peoples' way and it will be towed away or
at
least ticketed. (It might even indirectly contribute to an
accident
just by sitting in an awkward place when the street gets busy!)
Even if
somehow it's parked fine
in the heart of "no parking/short term parking land", you will
still
have to make your way downtown again to retrieve your car before
work,
and you're already out late. (You drove there because it was too
far to
walk in the first place, so now that's two cabs!) What do you do?
You've
accidently left yourself without an easy, right choice. "Playing
it
safe" and not socializing with one's associates has penalties
too, and there is no "one size fits all" answer.
* Of course, these days people try to avoid "downtowns" because
they
have become "too hard to park" and unpleasant, with destitute
beggars
asking the now increasingly financially stressed for (at least)
their
change. (Okay, I haven't been in a city since the pandemic
started. One suspects things will have changed again. A couple of
people have shown videos of some pretty deserted looking downtown
streets with closed businesses. In California and Ireland, IIRC.)
* My bottle of vanilla ran out. I had heard 3 or 4 years ago that
something had ruined most of the vanilla plantations in the chief
growing region, Madagascar, and soon there wouldn't be any vanilla
to
be had. (I can't remember what it was. One of the many "once in a
century" to "unprecedented" natural disasters taking place on a
daily
basis in the last few years.) So I was rather surprised that it
has
continued to be available in stores. I bought two 125ml bottles.
On the evening of the 29th I had strawberries I'd
been
given that would soon go mouldy, and carrot pulp from making 2
cups of
carrot juice that morning and the previous day. So I decided to
bake a
carrot cake (or "carrot loaf" as I call my version) and a
strawberry
upside-down cake. I opened a new bottle of vanilla and used 3
teaspoons
between the two cakes.
Of course I ate some of each cake. During the night I
developed a migraine that became more and more severe. Even 1/2 a
100mg
Sumatriptan didn't seem to do much. A half packet of Cambia seemed
to
quell it. These migraine medications last many hours, but the
migraine
outlasted them. Even without the headache I didn't feel well all
day
and by evening I wondered if I was coming down with something. The
other half Sumatriptan took me through the evening, but in the
early
morning of the 31st I had to get up and take another whole one. I
finally started feeling better in the afternoon.
I'm almost certain the vanilla was the culprit. It
had the
same list of ingredients as usual. They might as well have added
phosphoric acid or MSG! I threw out both bottles. The chickens are
getting the cakes, one piece a day from the freezer. (Do chickens
get
headaches?) It was "Western Family" brand but AFAIK it all comes
from
Madagascar and I won't trust any brand now. It would seem that
vanilla
has become toxic. (Another brand says... say, when did the first
ingredient after "water" in "pure vanilla extract" become
"propylene
glycol" - the flavoring of artificial vanilla?)
* I had been re-imagining my "ideal bathtub" (since I had never
got
around to trying to make it). A little less extreme, but still
much
less of a water hog than the typical "big square box" tub that
came
with my house. A friend wanted me to look at some leaking drain
pipes
downstairs where he was staying while he drained the bathtub
upstairs,
to see where the leaks were. (I found two spots!)
There it was in that house! My ideal bathtub! It had
the
sloped back and the (slightly) narrowed foot/drain end. It was a
couple
of inches narrower than mine and a little shorter. You could get a
much
deeper bath with less water. It was plastic so it wouldn't conduct
the
heat out of the water like metal does.
It was probably decades old, but if I knew where to
get
one like it I probably would, and would be happy. (If I ever got
around
to installing it.) OTOH if I was actually designing a tub I'd
change a
couple of things. I'd add "arm rests" pretty much above the water
line,
giving more space for moving the arms around. (That might make it
practical to narrow it another couple of inches down lower - 20
inches?)
And a rather new thought had occurred to me: if the
shower
was at the upper end of the tub, away from the drain, then that
end
would be where one would stand, and the foot end could be narrowed
even
more since it would be just an place for the legs in a bath. Water
pipes might be an issue: it would need a long pipe from the faucet
to
the shower nozzle and so the water temperature would respond to
adjustment only after a considerable delay. The faucet could
perhaps be
moved to the middle of the tub on one side (where it would also be
easier to reach from in the bath), but it might be more practical
to
have separate taps for the shower. (They could be placed higher up
near
the nozzle for quick response to temperature adjustment while also
being easy to reach while standing.)
ESD
(Eccentric Silliness Department)
* What is the difference between hash browns and hash brownies?
* Why are we "Marsiforming" the Earth? I thought it was supposed
to be
the other way around.
* What is the difference between a widget and a wigeon?
* I hear we're having a "V as in Venezuela" shaped recovery.
"in depth reports" for
each project are below. I hope they may be useful to anyone who
wants
to get into a similar project, to glean ideas for how something
might be done, as well as things that might have been tried, or
just
thought
of and not tried... and even of how not to do something -
why
it didn't
work or proved impractical. Sometimes they set out inventive
thoughts
almost as they occur - and are the actual organization and
elaboration
in writing of those thoughts. They are thus partly a diary and are
not
extensively proof-read for literary perfection, consistency,
completeness and elimination of duplications before
publication. I hope they may add to the body of wisdom for other
researchers and developers to help them find more productive paths
and
avoid potential pitfalls and dead ends.
Electric
Transport (no reports)
Other "Green" & Electric Equipment Projects
Off-Grid
infrastructure Components
[19th] Some desired configurations of
solar panels and battery
chargers seem perplexingly hard to come by. The variables are the
solar
panel voltage, the battery voltage, and the battery type. Each
combination has its own requirements.
1. PWM solar charge controllers for charging 12 volt lead-acid
batteries with 36 cell solar panels are very common and cheap.
2. The same ones can be used for charging 24 volt lead-acid
batteries
with 60 or 72 cell solar panels.
They can not, however, be used to charge 12 volt
batteries
from 60 or 72 cell panels, nor of course 24 volts from 36 cell
panels.
It has occurred to me that all that is needed for
many
systems to use "full size" panels is a DC to DC converter. (The
next
problem was that most of the common DC to DC converters use the
same
chip, which has an absolute maximum rating of 40 volts. This
choice by
manufacturers is very frustrating as 60 cell solar panels output
up to
(according to my panels' labels) 40.05 volts, and many 36 volt
battery
systems can also go up to about 42 volts when charging. It would
be far
better if they could take 45+ volts for solar panel and 36 volt
systems
operation. Oh well, find the pricey DC to DC converters that can
take
50+ volts!) Wait! The chip on my 20 amp DC to DC units is rated at
42
volts. A tiny margin for comfort.
Here are some combinations that I thought could be obtained
using
DC to DC
converters.
3. To charge 12 volt lead-acids from 60-72 cell panels, one would
reduce the panel voltage to about 15 volts with a DC to DC
converter,
and then a cheap 12 volt PWM charge controller would handle the
lower
voltage properly.
(June 8th: Having now tried this with varying light levels, I
found it
doesn't work well. Whatever is being fed from the solar panel has
to be
sensitive to what it can put out. The PWM controller is
insensitive to
how much power the DC to DC converter is able to supply. I thought
its
circuits would figure out the maximum power point for amps
available
the DC to DC converter, but it just drags the panel voltage way
down in
lower light levels. If the DC to DC converter's current limiting
is
turned down too much, the major power of the panel isn't available
when
the sun is strong.)
For battery types other than lead-acids, one doesn't
want
to use a PWM type controller. Most notably it will fry
nickel-metal
hydride type, which may leak, burst or even explode and cause a
fire.
And it's not good for lithium types either.
4. To charge 12 volt nickel-metal hydride or lithium, a constant
voltage is ideal. And good DC to DC converters can be adjusted
exactly
to any desired voltage, and a maximum current can be set as well.
If
the batteries are being left perpetually on charge as in a solar
installation, it's best not to push them to their maximum. This
table
is my suggestions for 12 volt systems:
Battery
Type
|
Max. constant
charge voltage (V)
|
Suggested constant
charge voltage (V)
|
Ni-MH (10S)
|
14.0
|
13.5 (1.35 volts/cell)
|
Li-FeSO4 (4S)
|
16.8 (better 14.4)
|
13.6-13.8 (3.40-3.45 volts/cell)
|
Li-ion (3S)
|
12.6
|
11.85 (3.95 volts/cell)
|
With the suggested voltages the cells will gradually
attain over 95% of their full charge with little stress, and then
the
charging current will drop to a very low value.
Nickel-metal hydride batteries will continue to draw
high
currents once charged if fed a continual voltage above about 1.40
V/cell (14.0V). If it's much more -- including with PWM charging that
says
it's
under
14.0V but where the peaks are actually much higher
-- they may gradually get hot and even burst or cause a fire. Both
lithium types will cease drawing much current once charged
(~3.35V,
~3.95V) but may be damaged if the voltage is raised to more than
4.2
volts per cell (both types).
(June 8th: Again this may not work well in low light/low solar
power
levels. I have yet to test it under various conditions. AFAIK so
far,
an MPPT controller whose output voltage can be adjusted is still
much
the best performer.)
 By using
a DC
to DC converter we can get the desired
charging voltage. But we can't see it. We don't know how charged
the
batteries are or what the voltage is. For that, enter the
volts/amps/watts/watt-hours power meter/monitor. (Coming up,
below.)
By using
a DC
to DC converter we can get the desired
charging voltage. But we can't see it. We don't know how charged
the
batteries are or what the voltage is. For that, enter the
volts/amps/watts/watt-hours power meter/monitor. (Coming up,
below.)
 [21st] I printed a
T-Plug
socket plate for my 36V panel in the garage and changed the
"HAT" sockets and the plug on the panel light to "T" sockets and
plug.
For the light I used
one of the T-Plugs that had a little rubber boot to cover the wire
ends. It comes off easily and I don't really think much of it. A
proper
shell is much better.
[21st] I printed a
T-Plug
socket plate for my 36V panel in the garage and changed the
"HAT" sockets and the plug on the panel light to "T" sockets and
plug.
For the light I used
one of the T-Plugs that had a little rubber boot to cover the wire
ends. It comes off easily and I don't really think much of it. A
proper
shell is much better.
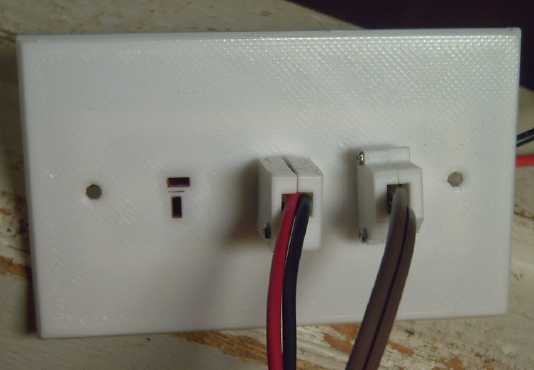
Gosh, no proper shell for the T-Plugs? I went to
design a
new one for the nylon T-Plugs and sockets with lips around the
upper
edge. (With lip is better: The connection is definitely better
when the
plugs and sockets mate without a bit of plastic in between them
being
needed to keep them from falling out of the shells.)
When I 3D printed it, "V1" as usual had a couple of
dimensions slightly off. "V2" was
perfect, an improvement in every way: it was smaller and held
together
better (two screws), the T-plug was firmly gripped yet flush with
the
front so it connected well, and the little ears for the screws on
the
sides made it easy to grip to unplug. I printed a second one.
Improved T-Plug shell (R)
versus
old one (L)
that has a layer of plastic in front of the plug body.
Also note the plastic in front of the T-Sockets in the older
wall plate,
versus the flush ones in the new round plate.
Cosmeticly the old is better, but flush makes better connection.
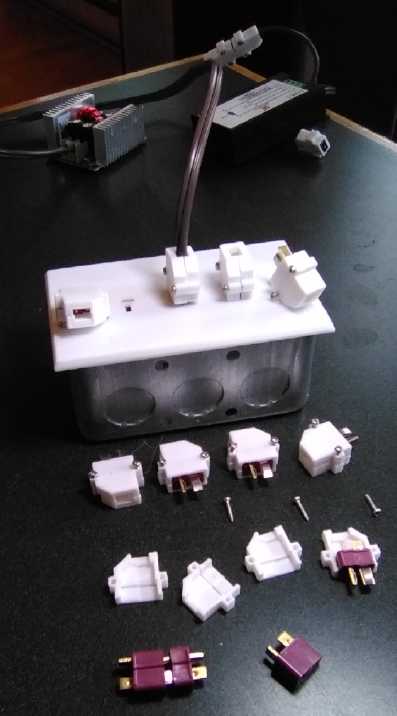
I printed a batch of T36P
shells.
[25th] Next I needed to do one for
in-line sockets. But I idly put a socket into a plug shell and
realized
it was the same except it needed to be 4mm longer at the front,
the
plug and shell bodies having the same dimensions except the
front-to-back length. Change 4 numbers. 3D Print it. Perfect fit.
That
was simple! Now I have shells for both plugs and sockets in-line
for
both mini-T-Plug (12V, 10A) and 'regular'-T-Plug (36V, 15A). And
triplex wall plates for both. (The 36V ones to be improved -
should
also be simple.)
It's well the I got the newer 3D printer and the
"Cura"
slicer. It may be painfully slow printing such fine detail on
larger
objects, but it's really needed for small, detailed things like
plug
shells. Even "draft" mode is finer than the old RepRap and
"Skeinforge"
slicer, although I prefer Skeinforge for printing large objects in
less
than geologic time and it does work fine on the new printer.
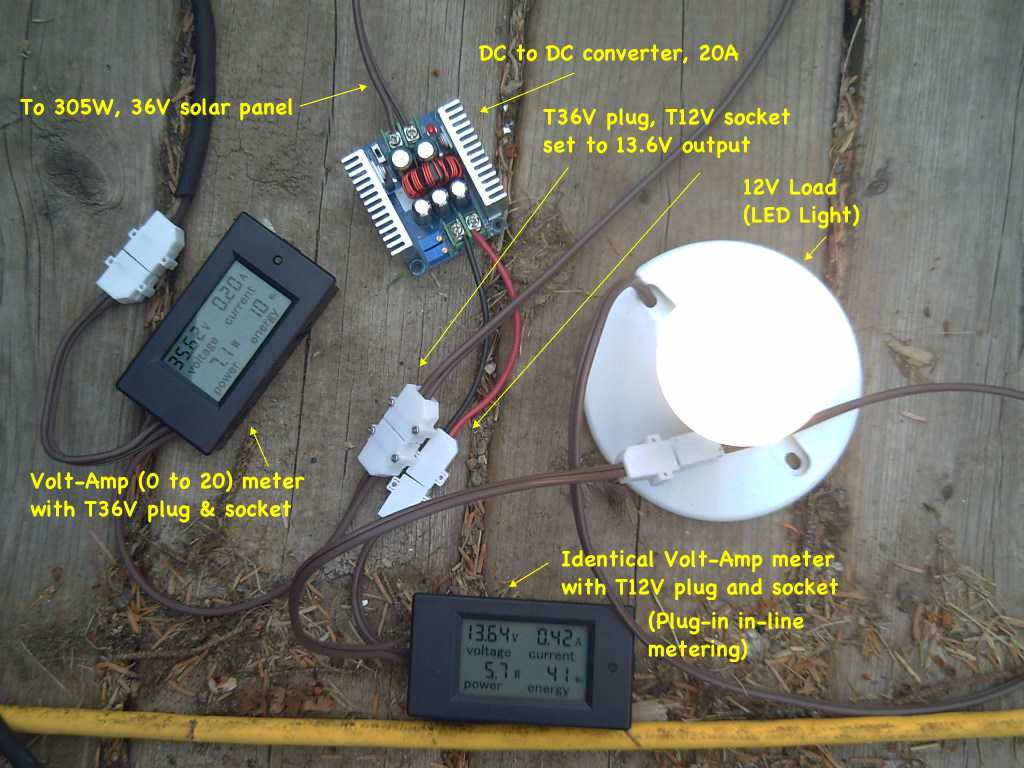
[30th] I envisoned "Plug-and-Play Solar" for off grid
systems.
The components just plug in to each other with the T-Plugs and
Mini
T-Plugs. Which I think I'll call:
T36P (T-Plug 36 volts)
T36S (T-Socket 36 volts)
T36WP-3 (T-Sockets Wall plate 36 volts, triplex)
T12P (Ditto for the 12 volt series)
T12S
T12WP-3
T12CLA (Cigarette lighter adapter... TBA)
The plugs and sockets are of course to
plug together the actual system components:
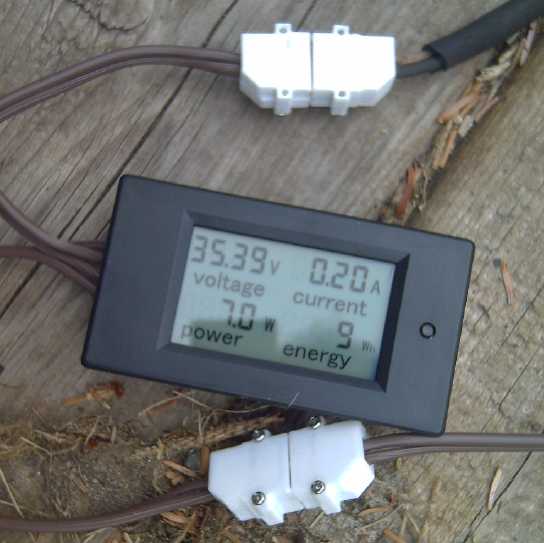 Power meter/monitor
with
T36 plugs, connected to solar panel (and DC to DC converter)
Power meter/monitor
with
T36 plugs, connected to solar panel (and DC to DC converter)
One with blueish backlight On
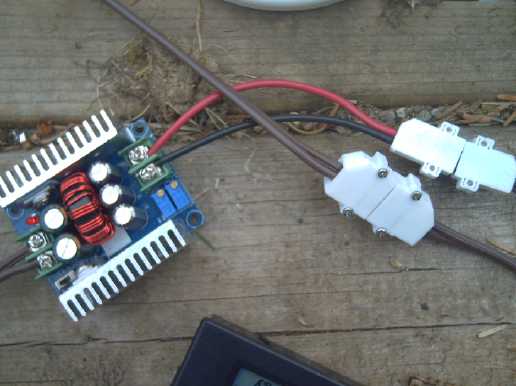 The DC to DC converter
(9-42V in, screw adjust out, screw adjust 0-20 amps out max).
The DC to DC converter
(9-42V in, screw adjust out, screw adjust 0-20 amps out max).
Operating these things so close to the
absolute maximum rating of 40V always makes me nervous. "36V"
batteries
can charge to a little over that, and the 60 cell Hanwha solar
panels
say "40.2V open circuit". Why didn't they make the XL4015 DC to DC
chip
- that
they virtually all use - 45 or 50 volts just to be on the safe
side?
Wait! I just looked and I see the 0-20 amp ones use an LM25116
instead.
It's rated 42 volts max! Just enough. Yay!
 Charging
a
battery. The battery has a T12S socket to plug loads into and so
does
the DC to DC converter, so there's a male-male coupler between
them.
It's always a bit weird connecting two power sources together.
Charging
a
battery. The battery has a T12S socket to plug loads into and so
does
the DC to DC converter, so there's a male-male coupler between
them.
It's always a bit weird connecting two power sources together.
(Top left arrow is wrong.
The
cable from the
solar panel is the one under the words.
The cord to the DC to DC Converter comes out of this first power
monitor.)
I made a cable with MC4 solar panel connectors on one
end
and a T-socket on the other. Then I wired up a voltage/current
meter
with T-plug and socket. So now for the charging side a 12 volt
system
with a large (33-40V) solar panel, one plugs the solar meter into
the
collector, the DC to DC converter into that (amps up to 20 with
the
ones I have), and the battery into the DC to DC converter. (set it
to
about 13.5V output for lithium iron phosphate type 4S, NiMH 10s.
Set to
about 11.85V for 3S lithium ions.)
For lead-acid, the DC to DC converter will bring the
panel
voltage down to 15 volts (must check optimum voltage), then a
cheap PWM
controller intended for a low voltage solar panel feeds the
battery the
pulses that lead-acids like.
By one of these methods I expect one can feed 12V
batteries including lead-acid from a 30+ volt panel instead of a
~17V
one. With two low power LCD current and voltage meters one can see
just
what's happening both to the charging and the loads. Considering
the
cost of batteries, it's worth a few dollars to be able to see
exactly
what's going on. (If I had had them on the Miles truck I would
have
noticed that they were getting low - both the original golf cart
batteries and the lithium iron phosphate ones - before they were
all
ruined. I would have seen that they were being continually
discharged
instead of being oblivious.)
 In fact, to
that end I had found and purchased self powered, low power LCD
voltmeters on line, and I wired up some 7-30 volt ones (T12P plug)
and
some 18-80 volt ones (T36P) to leave connected to the batteries in
the
truck. I used the power meters to check how much power they used.
They
read .00A, meaning less than 10mA. The old LED ones I had been
using
before read .02A, ie somewhere around 20mA. I figure the new ones
I
should be able to leave on for ages without them draining the
battery
they're supposed to be measuring. (If I could turn off their blue
backlights I'd be even happier.)
In fact, to
that end I had found and purchased self powered, low power LCD
voltmeters on line, and I wired up some 7-30 volt ones (T12P plug)
and
some 18-80 volt ones (T36P) to leave connected to the batteries in
the
truck. I used the power meters to check how much power they used.
They
read .00A, meaning less than 10mA. The old LED ones I had been
using
before read .02A, ie somewhere around 20mA. I figure the new ones
I
should be able to leave on for ages without them draining the
battery
they're supposed to be measuring. (If I could turn off their blue
backlights I'd be even happier.)
Greenhouse,
Gardening,
Chickens
[9th] People have little success
growing
corn in the open around here. Last
year I got some 1/2 decent corn (good tasting even if only 1/2
filled
cobs) by placing an improvised wooden frame with LDPE sheet around
the
little patch and on top. It was all below my waist and when the
corn
got that tall I took it off. But by that time it had had a good
head
start. I did some hand pollinating, shaking tassels over the
silks.
Right wall
plastic shows
where roof used to bend down to to also form the front
wall,
and how much new space has been added from the lawn (within the
cement
footings).
Being [just] standing height instead of under the sloped wall,
the
increase in usable space
is much more, and will be still more usable with the
cement to
keep weeds and slugs out.
 I
started to do similar this year and had a somewhat
bigger and better frame half made. But I went into the greenhouse,
and
had
the thought that if I extended it as I had planned to do anyway,
it
would have
as much room for the planned corn patch as the frame.
I
started to do similar this year and had a somewhat
bigger and better frame half made. But I went into the greenhouse,
and
had
the thought that if I extended it as I had planned to do anyway,
it
would have
as much room for the planned corn patch as the frame.
I started by
raising the roof, intending to put up walls the next day. Then I
thought I
should put a cement footing around it to keep the seemingly
unstoppable
grass, weeds and slugs from creeping in from all around. Before
doing
that, I really had to fix the cement mixer so I wasn't mixing it
all by
hand. That was going to increase project scope - all that just to
plant
some corn! But that evening I cut my finger and decided to be nice
to
it for a day or two. So I did other and 'office' things on the
10th and
11th. I got the cement mixer fixed, and I dug and got a few feet
of the
footing done on the 12th. On the 13th I dug more trench and
finished
another 6 feet of the footing. The blackflies were horrible and I
finally put on a mesh helmet. At least a couple still got in under
my
left glove and my wrist was still
itchy 3-4 days later. I could only look forward to finishing so
I'd be
working inside the greenhouse instead of out in the open.
(Something I
really miss about Victoria is the almost complete absence of
biting
insects, at least in my old neighborhood.)
 On
the 15th and 16th I got things pretty much closed in,
and I started digging up clods of grass to get down to dirt
without
grass roots.
On
the 15th and 16th I got things pretty much closed in,
and I started digging up clods of grass to get down to dirt
without
grass roots.
Then I dug up some clayish soil from an old garden
(too shady with alder trees to use since long before I bought the
house) and
dumped in a few inches of that. Then I finally transplanted the
corn
that
had badly needed it even before I started. Smaller
seedlings went in the next day [17th].
 I could
now
dig out the rest of the grass at leisure...
except that it was now the latter half of May and time to plant
most
everything. I had some broccoli in seedling pots go to out ASAP or
sooner, and a considerable garden space to fill. By the 20th I had
the
rest of the grass out and the garden soil in, and the greenhouse
was
pretty much planted - not that I didn't squeeze in a few more
things
here and there over the next couple of weeks.
I could
now
dig out the rest of the grass at leisure...
except that it was now the latter half of May and time to plant
most
everything. I had some broccoli in seedling pots go to out ASAP or
sooner, and a considerable garden space to fill. By the 20th I had
the
rest of the grass out and the garden soil in, and the greenhouse
was
pretty much planted - not that I didn't squeeze in a few more
things
here and there over the next couple of weeks.
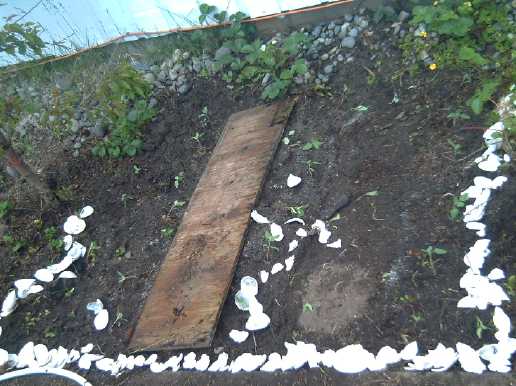
 19th. The greenhouse is
still
rather "cobbled
together".
19th. The greenhouse is
still
rather "cobbled
together".
I hope to be making my own clear plastic panels to replace the
6mil
LDPE roll plastic
and the not-so-transparent roof material... "soon". (Ya right!)
 20th. Later I stuck in a
fifth
row of corn next
to the broccoli.
20th. Later I stuck in a
fifth
row of corn next
to the broccoli.
Who needs broccoli?
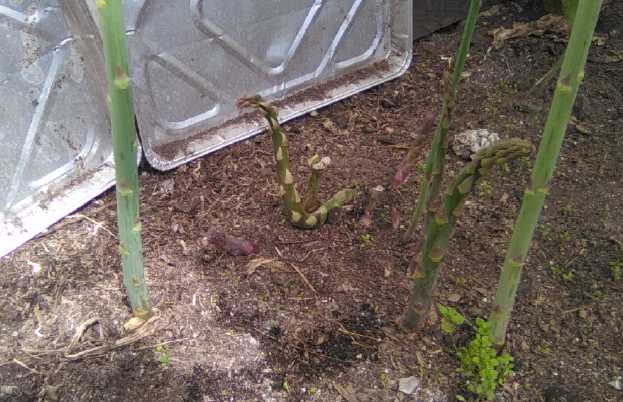 Egads, there's a snake in
the
asparagus!
Egads, there's a snake in
the
asparagus!
(The aluminum trays are for light reflectors on the house wall -
the "not very transparent" greenhouse roof makes it all too
dark.
There are no snakes around here!)
Last year plastic "walls" - wall sections of
polyethylene
milk
cartons - seemed to have stopped the slugs from killing vulnerable
plants and I managed to grow some. This year I made a slightly
raised
bed with 8 inch walls. I covered the wood with coroplast
(polypropylene). But it didn't seem to work. On the evening of the
30th
I found about 15 slugs decimating the vegetables in that raised
bed!
Regardless of eliminating those soon the broccoli was eaten to
stems. I
guess polyethylene and polypropylene don't have the same deterrent
effect. I also planted carrots at one end, but after seeing a few
sprout they vanished and only fine grass, I assume from seed,
seemed to
be growing. I planted carrots in the expanded greenhouse and hope
they
fare better.
I saw some mesh bags of tiny onions in a grocery last
winter. They
looked just like planting onion sets and I bought three bags
(white,
red and an larger type whose name escapes me at the moment) to
plant in
the spring. But nothing came up. I wetted some indoors in a tray
and
kept them moist, but very few of them would grow. Most of them
just
seemed to rot and not root or sprout. Someone suggested that they
may
have been irradiated. What a horrifying thought! What is happening
to
our food supply? Of course by then it was too late to buy planting
onion sets at seed places.
 I put out my quinoa
seedlings
next to the house.
I put out my quinoa
seedlings
next to the house.
Someone said sea shells would keep slugs away. Seems to be just
a
superstition!
But later I sprinkled on some spruce sawdust all around the
patch...
and that actually seems to be doing the trick!
(Must cut wood, make more sawdust, for other garden beds!)
 The auricana chickens gang,
seemingly safe with
a net above and when the
door is closed
The auricana chickens gang,
seemingly safe with
a net above and when the
door is closed
at night. (These chickens are late partyers and some day I'll
forget to
close it at dark
and there'll be mayhem. In the meantime, 3 or 4 eggs a day.)
Innovative
Beekeeping
Sometime later in the month I watched a video on a
new
type of
beehive, the larger cubic, insulated "Bee Barn", created earlier
this
very month, May 2021, by Jim of "Vino Farm" youtube channel. And
someone who had kept bees said I should add a roof to keep the
landing
and hive entrance area dry in blowing rains. I became sure that
such an
improved hive is just what is needed in this cool, damp climate
with
its cool to cold
nights. Combined with Carniolan bees that can forage in "cool" and
"damp" better than most, I finally see how one might make a
reliable
success of raising honey bees here other than by praying for very
good
summer weather.
Funny how things can work out: if I had got the
Carniolan
bees earlier when I was supposed to, I
wouldn't have seen the video in time and wouldn't have been able
to
make this new type of hive for them. But I really need to get
Hiveworld
to send the nucleus hive ("nuc") now, from their own last order of
the
year from Chile! (Where I hope there are no varoa mites!)
Only one person on all Haida Gwaii, in an especially
favored spot,
keeps bees. Others have said it just doesn't work around here. A
warm,
dry hive for the queen, the
brood and for the bees laden with pollen to return to after their
strenuous foraging trips must be key in a cool climate. The fellow
in
Alaska who was keeping bees had
actually put his hive inside a garage, with a "tunnel" through one
wall
to the hive entrance.
And in fact, nights are cool up and down the whole BC coast from
Vancouver Island to Alaska. I think it would make for a more
reliable
and more productive way to keep honey bees. There'd be more honey
for
harvest if the bees aren't spending their energy and eating more
to
keep warm. It seems like a worthwhile
inventive project, and, in anticipation of getting the bees, I
went
ahead with building it.
The standard Langstroth beehive components in
ubiquitous
use are built around two sizes of internal "frames", about 18
inches
long, 1.5 inches thick and 6 or 10 inches tall. These hang from
upper
lips in the "supers" (superstructures?), simple four sides pine
(or ?)
crates with open top and
bottom. The frames usually have a sheet of some material, often
plastic
laid out in a hexagonal pattern on both sides, sometimes pre-waxed
with
beeswax, for the bees to build
their combs on. Simple wire frames for the bees to build over
works too.
The width of the box is sized to hold 4 or 5 frames
(for nucleus hives, sold as "nucs"), or 8 to 10 frames, 10 being
the
most
common. There are various options for the top lids and bottoms,
and
additional optional or accessory pieces that go inside the tops
and
bottoms - vents and feeders.
Knowing so little about beekeeping I simply assumed
that
all these
must be optimal and that much thought must have been given to
choosing
the designs. Apparently it's more a case of somebody (named
Langstroth,
IIRC) slapped something together that worked, and everybody else,
having no original ideas, simply copied it. Of course at the time
it
was a huge
improvement, an exciting technical breakthrough: for the first
time,
one could raise a honey bee hive and
then extract honey from frames without destroying the hive. And it
works well in warm climates.
I was planning on getting Carniolan bees, which were
said
to fare better in cool summers and damp weather, so typical here,
but
Al was ordering two packages of live bees from Australia for the
end of
March, and he added another package to his order for me. Once the
package of bees was dumped in and the queen released, I understood
I
wasn't supposed to open the hive for 3 weeks. The weather was cold
(it
even snowed again!) and my bees all died in a few days or a week
or so.
(Who knows exactly, when you're "not supposed to open it" and
look!?!)
What went wrong? I had just taken Al's advice on a hive entrance
feeder. Apparently the bees, in trying to keep warm and keep the
queen
warm, don't come down to the hive entrance. I should have had a
hive
top feeder system. Also, did I mention it was cold? How were they
supposed to keep warm in an uninsulated wooden box? I had heard
something about wrapping a hive, but it looked almost problematic
to
start with, and especially once there were bees in it.
[17th] Ah... Here's when I watched that video. The presenter, Jim,
had
just had most of his
hives die off over the winter in spite of his precautions. It
wasn't
his only problem, but he felt the Langstroth was a poor design on
several counts and contributed to the problem. So he had (just in
April
and May 2021 -- this very month!) developed
a new layout, the "bee barn" with a larger, well insulated main
brood
box and some
features to require less lifting and disassembling, with less
stress
and dislocation for the bees during hive inspections and
disassemblies. Instead of stacking a 10 inch and 6.5 inch super
with
their separate frames on top of each other, the box was made that
tall
(16.5"), "the Goldilocks size" he thought, and the frames were
made
taller to match - "more like a
[hollow] tree". He made taller frames and used the same plastic
'hexagons' inserts as
usual for those two sizes, which left a gap between 'for the bees
to
fill in as they saw fit', eg, with drone and queen cells. And
because
it was taller, he had only 7 of
these larger frames, that being the equivalent of 12 ten inch
frames.
(Mine will hold up to 10 of these 'tall' frames, equivalent to 17
or 18
regular 'deep' frames.) And there were also several details for
end
spacers and end insulators, vents and
feeders, that sounded well thought out.
I decided that little experience tho I had had, this
design
sounded like an improvement in several ways - especially in being
insulated like a house instead of needing to be "wrapped" - and I
would
try it out. It sounded especially suitable for our climate here
where
heating would be wanted at night for most of the year, and in the
day
for much of it. Thus
insulation should save the bees a lot of energy expenditure (of
buzzing
to keep the hive warm) and could
well make the difference between "practical" and "impractical" to
keep
honey bees in this climate. (Camille, an experienced beekeeper,
earlier
said to me that
Langstroth hives were "no good". He was carving out some hollow
tree
stumps to use for hives himself, but then decided his location was
just
too cold, shady and windy regardless. Mine is more favorable - and
I'd
be able to avail myself of his expertise.)
The video:
I Fixed The Langstroth Hive (For The Bees AND The Keeper!)
https://www.youtube.com/watch?v=z768OIA3bMo
There were follow-up "Vino Farm" videos worth seeing,
and
there may
even be another one by the time I'm writing this: The day after
showing
his new hive design on camera he picked up his packages of bees.
He
had actually made five of the new "bee barn" hives, and filled
them
with bees. Just 5 days later he showed his inspection of the hives
and
they seemed to be doing really well.
A problem was that my Carniolan bees were
[supposedly]
coming as a
five-frame "nuc". It is intended to pull out these five 10" tall
Langstroth frames
complete with bees and brood, nectar and honey from the "nuc" box,
and
insert them into their new home, a ten frame Langstroth box they
can
expand in. If instead I have a hive with taller frames, what
do I do instead? My thought is to make five frames with bottom
parts
only and a metal frame, that the five regular frames will fit
inside.
(Made them in early June.)
Awg! Before I even finish with the greenhouse and
spring
plantings, here I am with another construction project to keep me
away
from energy & electric transport projects! I didn't ask for
this!
Oh, well, it shouldn't take too long... like the "week" to change
the
clunky transmission to a planetary gear in the Miles truck?
(started
last fall, still more to do. "Project creep"...)
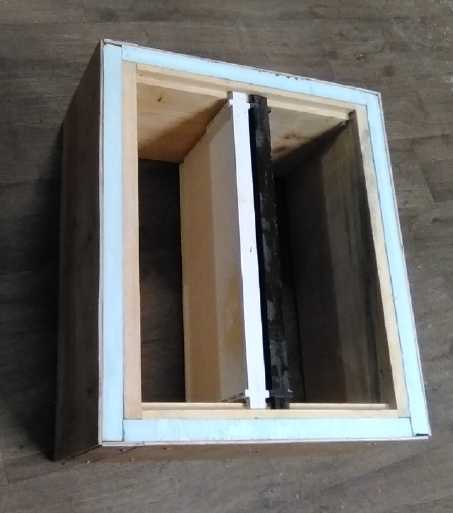 To
keep things simple I at first decided just to insulate the
regular size box with one inch insulation and use regular size
frames.
Then to do an insulated bottom and top. I could still use the end
spacers idea and have 9 frames instead of 10. Maybe some future
year,
if my beekeeping is a success (ie, I still have bees), I could try
the
deeper box.
To
keep things simple I at first decided just to insulate the
regular size box with one inch insulation and use regular size
frames.
Then to do an insulated bottom and top. I could still use the end
spacers idea and have 9 frames instead of 10. Maybe some future
year,
if my beekeeping is a success (ie, I still have bees), I could try
the
deeper box.
I decided 1" extruded styrene foam should be
sufficient
instead of
2", and I used 1/4" waxed birch plywood instead of lumber to keep
it
all from growing too heavy and bulky.
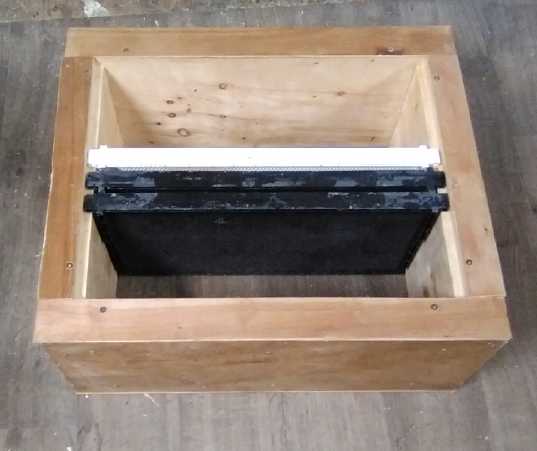
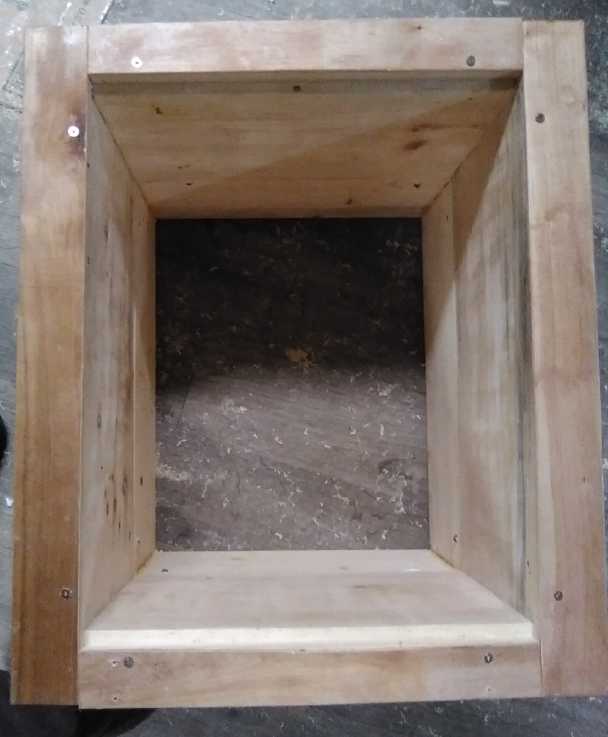 [24th]
I watched the video again and decided the deeper box was really a
key
feature. I cut down a second 10" Langstroth box I had acquired
from Al
to "medium super" size, 6-5/8", and screwed the two boxes together
to
make the deeper size. I cut more insulation and plywood. (I could
have
cut bigger pieces, but I'd have had to buy more insulation and I
had
already waxed the plywood. Effectively I'd have been starting all
over.) But where the join was, I could look right through the
crack
into the hive! It was just a thin crack, but it would be a draft
of
cold air! I reversed the insulation and some plywood so the joins
were
staggered between layers.
[24th]
I watched the video again and decided the deeper box was really a
key
feature. I cut down a second 10" Langstroth box I had acquired
from Al
to "medium super" size, 6-5/8", and screwed the two boxes together
to
make the deeper size. I cut more insulation and plywood. (I could
have
cut bigger pieces, but I'd have had to buy more insulation and I
had
already waxed the plywood. Effectively I'd have been starting all
over.) But where the join was, I could look right through the
crack
into the hive! It was just a thin crack, but it would be a draft
of
cold air! I reversed the insulation and some plywood so the joins
were
staggered between layers.
[25th] Camille came over and looked at my construction. He liked
the
depth and the insulation. He pointed out that I had better put
very
solid carrying handles on it because hives full of bees and brood
and
honey are very heavy. (I hope I don't have to lift it! One of its
features is that there's normally no reason to.) He thought that
hives
should be made differently
to suit the climate they were in. He mentioned another hive layout
called "Kenyan Top Bars", which we looked up on youtube. It looked
interesting - but probably for a tropical climate.
He also mentioned that here there is a lot of rain
and
wind. The
hive entrance should be fully sheltered from rain coming from
various
angles. He's right of course, and this was an aspect "Vino Farm"
hadn't
considered at all. He made some suggestions for large sloped roofs
over
the whole hive, but I may do something small just covering the
entrance.
Plus, once the deep brood box was well filled,
"VinoFarm"
intended
to use an uninsulated medium super on top for the honey he would
harvest. (Honey made in the brood box was for the bees for the
winter.)
Camille pointed out that that was fine where his summers were
warm.
Insulation was for the winter. Here on Haida Gwaii, the nights are
cool
to cold all year. So I should have all insulated spaces, all year
round. (Once the bees are going and making 'excess' honey, I can
get
a new medium super and insulate it.)
Then I had the thought that if I used the shorter
waxed
pieces of
plywood on that, my cutting and waxing wouldn't go to waste. So I
might
as well redo the main brood box with single full length pieces --
more
or less "start over" after all. Sigh!
[26th] I made it - new plywood all
four
sides, saving the shorter waxed pieces for the honey super. The
tedious
part was painting the boards with hot paraffin wax with a brush,
and
then using the heat gun to melt the wax and have the excess drip
back
into the tray. The tray sat on a grate on the woodstove with a
good
fire going. Drops of melted wax would miss the tray and land on
the
stove top. When I was done I realized the house air was rather
obscurred with smoke - evaporated wax. That probably explained my
growing headache, which thankfully didn't last long once I got
into
fresh air.
I understand the common method is to simply dip the
pieces
into a
vat of molten paraffin wax. That would take a lot of wax. And a
big
metal vat. It'd be worth it if one was doing more hives - perhaps
even
2 or 3.
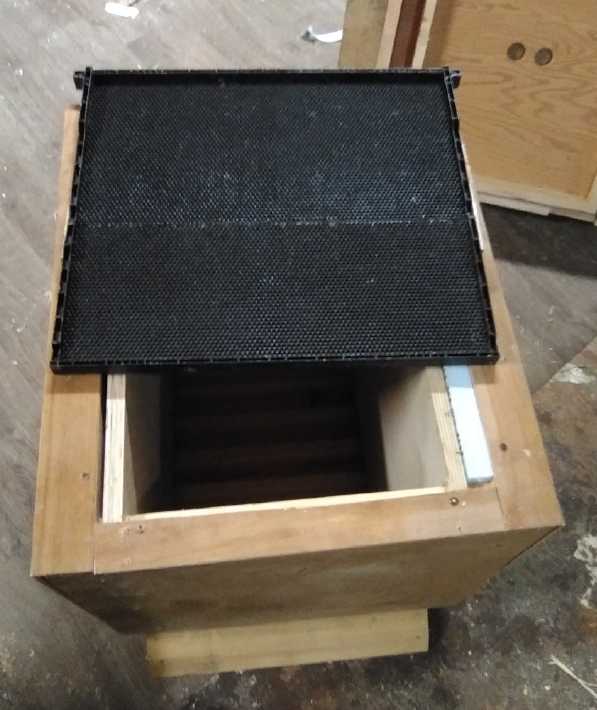 Tall hive box, with plywood
and
styrofoam
insulation side spacers for hives with fewer bees.
Tall hive box, with plywood
and
styrofoam
insulation side spacers for hives with fewer bees.
The tall frames for this box are somewhat laboriously made from
two
regular frames
glued together.
[27th] I cut insulation and plywood for the top cover and bottom
piece
too.
As I didn't have the woodstove going (Yay, a sunny, warm day for
once!), I
didn't wax and screw on the plywood until next day. Then I also
made
the two end spacers, and cut and glued together two frames to make
the
taller one. Next... tell Barry at Hiveworld. That should get him
excited to send me the bees I had expected after May 10th.
(On June 8th I finished everything I wanted to do on
the
beehive (instead of finishing this newsletter) and felt ready to
receive bees.)
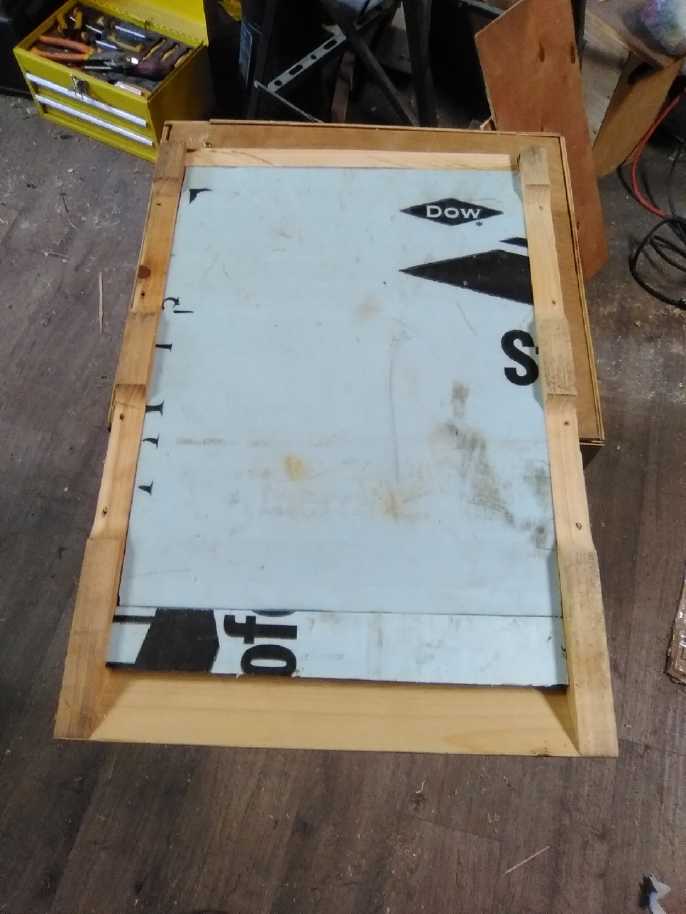 Insulation under floor.
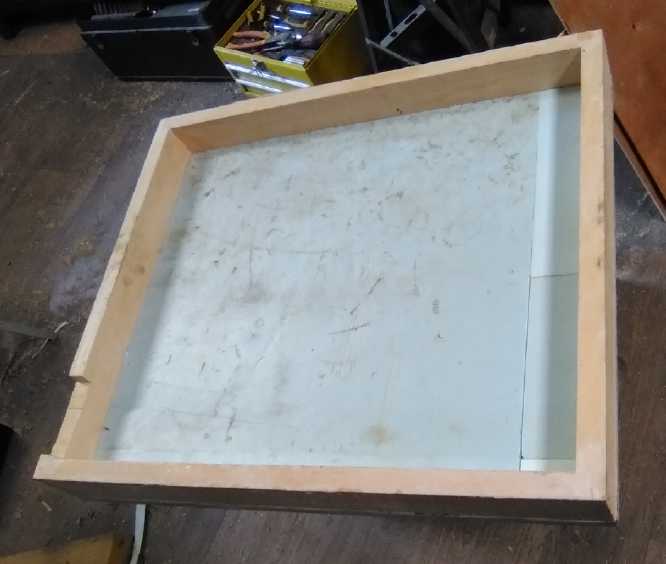 and inside roof.
Electricity
Generation
My Solar Power System
Daily/Monthly/Yearly Log of Solar
Power Generated [and grid power consumed]
(All times are in PST: clock 48 minutes ahead of sun, not PDT
which
is an hour and 48 minutes ahead. DC power output readings - mostly
the kitchen hot
water heater for some months, since its removal mostly just lights
-
are reset to zero
daily (mostly for just lights, occasionally), while the others are
cumulative.) Note that the DC is actually power used since there's
nothing totaling up the amount incoming to the batteries, which is
(unless it's a lot and there's little sun) replaced the following
day.
Solar: House, Trailer, (DC@house) => total KWH [grid
power
meter
reading(s)@time] Sky conditions
Km = electric car drove distance, then car was charged.
April
30th 1478.11, 547.08,(.08)DC => 6.89 [55Km;
84449@19:30]
similar to yesterday.
May
01st 1481.93, 549.53 => 6.27 [55 Km; 84499@29:30] For third day
rain
AM,
cleared off later afternoon.
02d 1484.99,551.65,(.21)=> 5.39 [84528@22:00] Clouds,
later
rain & wind. Power was off in AM until (?)12:00 PDT. (Used DC
system with inverter to make coffee.)
03rd 1490.40, 555.32 => 9.08 [84548@19:30] Another day of
clouds
& rain then sunshine in later PM.
04th 1496.70, 559.76 => 10.74 [55Km; 84571@21:00] A little
better.
05th 1499.66, 561.71 => 4.91 [55Km; 84595@20:00]
cloudz
an drain.
06th 1502.40,563.72,(.12)=>4.87 [35Km; 84614@20:30] more louzy
weather.
07th 1505.01, 565.57 => 4.36 [90Km; 84642@21:00]
Apparently spring was 2 weeks in April. What's this?
08th 1507.54, 567.24 => 4.20 [55Km; 84668@21:30] More
overcast & some rain
09th 1511.66, 570.18 => 7.06 [84679@22:00] Occasional
sunshine or at least lighter haze.
10th 1514.63, 572.11 => 4.90 [55Km; 84704@19:30]
cloudy
again.
11th 1517.93, 574.45 => 5.64 [84720@20:30] agin.
12th 1523.49, 578.34 => 9.45 [55Km; 84747@20:30] a
BIT
of sun.
13th 1528.38, 581.61 => 8.16 [84763@22:00] more bit
of
sun.
14th 1532.97, 584.65,(.30)=> 7.93 [84777@21:00] overcast.
15th 1537.02, 587.27 => 6.67 [55Km; 84798@19:30]
mor
cloudz, overcast
16th 1542.08, 590.48 => 8.27 [84814@21:30] Sun made
a
very brief appearance, otherwise overcast.
17th 1547.59, 594.03 => 9.06 [95Km; 84842@21:00]
Sun
made several brief appearances. Later it rained to make up for it.
18th 1553.14, 597.72 => 9.24 [84856@22:30] A bit of
sun
in AM, then hail (small) to atone for it.
19th 1561.94, 603.61,(.13)=> 14.82 [40Km; 84869@20:00] WOW! a
mostly
SUNNY day! (First one this month!)
20th 1571.84, 610.01 => 16.30 [40Km; 84886@20:30] SUNNY DAY!
1/2 way
thru afternoon I added panel #12 back into AC system. (I can
easily put
it back on the DC if the power fails. Maybe I should put
T-Plugs/T-Sockets on the indoor end of all the panels! Then
everything
can be plugged in or unplugged any time instead of unbolting.
Panel
voltage is right (~~36V) and T-plug current spec is adequate
(~15A?)
for 10
amp panels.)
21st 1575.14, 611.73 => 5.02 [55Km; 84909@21:00]
Clouds
& Rain
22d 1582.18, 615.73 => 11.04 [84925@21:00] hints of sun
now
and then
23rd 1587.01, 618.32 => 8.42 [84945@20:30]
overcast, a
bit of rain
24th 1593.03, 621.64 => 9.34 [84972@22:00] lighter
overcast,
no rain.
25th 1598.03, 624.38 => 7.74 [55Km; 85006@23:00]
cloudy
again again.
26th 1600.05, 625.47,(.41)=> 3.52 [8Km; 85032@21:30]
clouououdy.
27th 1608.67, 630.44 => 13.59 [65Km; 85054@21:30] A SUNNY, WARM
DAY!
(Oops, I turned the heat on in the travel trailer "overnight" and
forgot about until today. From the grid power readings, it looks
like
it was on from the 23rd.)
28th 1615.32, 633.73 => 10.04 [90Km; 85080@22:00] Cloudy with
some
hazy sun here and there. (Should have been ~11KWH but I had the
cabin
unplugged for an hour or so mowing the lawn. Didn't want to mow
the
cord!)
29th 1623.10, 638.08 => 12.13 [55Km; 85097@19:30] Ho-hum light
overcast/hazy sun until dark and rain toward evening.
30th 1630.72, 642.28 => 11.82 [45Km; 85111@20:00] Gosh, some
sunshine! (but not all day.) When it is sunny, power has gone up
from
~1200W at the start of the month to ~1500W from the house and lawn
panels. (Then of course there's that 12th panel!)
31st 1634.46,644.31,(.12)=> 5.89 [85127@2100] Is summer coming?
Is
summer coming?
June
1st 1636.71, 646.10 => 4.04 [40Km; 85140@21:00]
2d 1642.57, 648.89 => 8.65 [85156@26:00(2AM)]
3rd 1645.11, 650.20 => 3.85 [85166@21:30] MORE
cold,
cloudy days? Worse than May? Which was worse than April?
Seriously?
4th 1648.93,652.35,(.16)=> 6.13 [60Km; 85186@20:30]
5th 1654.23, 655.25 => 8.20 [55Km; 85210] Just a
wee bit
of sun!
6th 1661.45, 659.19 => 11.16 [90Km; 85232@19:30] and a little
more
sun. Then more rain.
7th 1666.96, 662.25 => 8.57 [45Km; 85252@21:00]
8th 1676.15, 667.35 => 14.29 [55Km; 85262@21:00] A fair bit of
sun
today - even warm!
Daily KWH from solar panels. (Compare May 2021 with April
2021
& with May 2020.)
|
May 2021 (11
Panels;
12 panels 21st-31st)
|
April 2021 (11 panels)
|
May 2020 (12 Panels)
|
0.xx
|
|
|
|
1.xx
|
|
|
|
2.xx
|
|
|
|
3.xx
|
1
|
2
|
1
|
4.xx
|
5
|
3
|
1
|
5.xx
|
4
|
3
|
2
|
6.xx
|
2
|
4
|
1
|
7.xx
|
3
|
2
|
5
|
8.xx
|
3
|
1
|
4
|
9.xx
|
5
|
1
|
5
|
10.xx
|
2
|
|
1
|
11.xx
|
2
|
3
|
1
|
12.xx
|
1
|
4
|
1
|
13.xx
|
1
|
5
|
1
|
14.xx
|
1
|
2
|
4
|
15.xx
|
|
|
3
|
16.xx
|
1
|
|
1
|
17.xx
|
|
|
|
18.xx
|
|
|
|
Total KWH
|
254.76
|
274.51
|
313.18
|
Monthly Summaries: Solar Generated KWH [& Power used
from
grid KWH]
2019
March 1-31: 116.19 + ------ + 105.93 = 222.12 KWH - solar [786 KWH
used from
grid]
April - 1-30: 136.87 + ------ + 121.97 = 258.84 KWH [608 KWH]
May - 1-31: 156.23 + ------ + 147.47 = 303.70 KWH [543 KWH]
(11th
solar panel connected on lawn on 26th)
June - 1-30: 146.63 + 15.65 + 115.26 = 277.54 KWH [374 KWH] (36V,
250W
Hot Water Heater installed on 7th)
July - 1-31: 134.06 + 19.06 + 120.86 = 273.98 KWH [342 KWH]
August 1-31:127.47 + 11.44+91.82+(8/10)*96.29 = 307.76 KWH [334
KWH]
(12th panel connected on lawn Aug. 1)
Sept.- 1-30: 110.72 + 15.30 + 84.91 = 210.93 KWH [408
KWH]
(solar includes 2/10 of 96.29)
Oct. - 1-31: 55.67 + 13.03 + 51.82 = 120.52 KWH, solar
[635 KWH used from grid]
Nov. - 1-30: 36.51 + 6.31 + 26.29 =
69.11
KWH, solar [653 KWH used from grid]
Dec. - 1-23: 18.98 + .84* + 11.70 =
31.52
KWH, solar + wind [711 KWH + 414 (while away) = 1125 from grid]
2020
Jan. - 6-31: 17.52 + ------* + 10.61 = 28.13
KWH,
solar+
wind [1111 KWH from grid]
Feb. - 1-29: 56.83 + ------* + 35.17 = 92.00
KWH,
solar + wind [963 KWH from grid]
* The solar DC system was running the kitchen hot
water
tank. Now it's only running a couple of
lights - not worth reporting. So there's just the 2 grid tie
systems:
house and "roof over travel trailer".
One year of solar!
March - 1-31: 111.31 + 87.05 = 198.37 KWH solar
total
[934 KWH from grid]
April - 1-30: 156.09 + 115.12 = 271.21 [784 KWH
from grid]
May - 1-31: 181.97 + 131.21 = 313.18 KWH
Solar [723 KWH from grid]
June - 1-30: 164.04 + 119.81 = 283.82 KWH Solar [455
KWH
from grid]
July - 1-31: 190.13 + 110.05 = 300.18 KWH Solar
[340
KWH from grid]
August- 1-31: 121.81 + 83.62 = 205.43 KWH Solar
[385KWH
from Grid]
Sept. - 1-30: 110.68 + 65.09 = 175.77 KWH Solar
[564
KWH used from grid]
Oct. - 1-31: 67.28 + 42.55 =
109.83
KWH Solar [1360 KWH from grid -- Renters!]
Nov. - 1-30: 35.70 + 20.79 =
56.49
KWH of Solar [1301 KWH from grid]
Dec. - 1-31: 19.78 + 11.31 =
31.09
KWH Solar [1078 KWH used from grid]
2021
Jan. - 1-31: 25.47 + 18.58 =
44.05
KWH Solar [1185 KWH used from grid]
Feb. - 1-28: 47.18 + 33.22 =
80.40
KWH Solar [1121 KWH used from grid]
Two years of solar!
March - 1-31: 81.73 + 55.22 + 2.2 (DC) = 139.15 KWH
Solar
[1039 KWH grid]
April - 1-30: 161.83 + 112.35 + .44(DC) = 274.62 KWH
Solar
[680 KWH from grid]
May - 1-31: 156.25 + 97.22 + 1.29(DC) = 254.76
KWH
Solar [678 KWH from grid]
Things Noted - May 2021
* Even by mid month, energy collection looked pretty pathetic
compared
to
last year. Or even compared to April. It's supposed to go UP in
summer,
not DOWN!
Annual Summaries and Estimates
March 2019-Feb. 2020: 2196.15 KWH Solar [used 7927 KWH
from
grid]
March 2020-Feb. 2021: 2069.82 KWH Solar [used 11294 KWH from grid]
Haida Gwaii is probably one of the worst places in
the
world to harvest solar energy. The low sun, long shadows and usual
clouds in the winter mean very little solar energy is available
for six
months of the year. Nevertheless, summer is much better and the
overall
result isn't trivial, and most of whatever power is made reduces
the
amount having to come from diesel generators. (There is also a
small
hydro plant on the south grid, contribution from which depends
mainly
on how much rain there has been lately.)
- Counting 2100 KWH annually from 11 panels, apparently about 52
panels
would account for my roughly 10 MW total annual electricity usage.
(There is an uncertainly factor here as some of the solar power
generated goes to the grid, and some is consumed in the house.)
- But four of my panels are now older 250W panels and the others
305W.
The newest ones are around 325W, so for a new installation one can
probably lop off about 6-7 panels. And my cheap grid tie inverters
lose
a lot in variable clouds, dropping to nothing when the sun dims
and
then taking tens of seconds to build gradually back up to what's
available. So call it maybe 43 new panels using better inverters.
- If tree shadows didn't reduce daily collection by... call it 25%
(a
very conservative estimate) that would then be 32 panels.
- A sunnier climate might easily add 25% (or more) again, making
it 24
panels.
- One sees from the monthly totals above that with the low sun,
long
shadows and clouds, there is very little solar energy here in the
winter months. A more southern latitude (than 53.4°N) would not
only have less shading but with longer days and higher sun angles,
the
solar energy would be much greater in the winter. (And - maybe -
somewhat less in the summer.)
Of course, these numbers are just based on my
electricity
use, and usage will vary drasticly by household. The electric car
uses
some. In a warmer climate (and without a travel trailer to keep at
least somewhat warm so it won't go moldy) one might use less
electric
heat. OTOH, much of my house heat is from the woodstove (which
many
don't bother with even in this climate), so the heating part of
the
bill will very wildly. If the open loop air heat pumping were to
be
manufactured and live up to its promise of COPs of 10+, it would
make a
gigantic difference to electric consumption everywhere.
Electricity
Storage
(Batteries)
Turquoise Battery Project: Long lasting, low cost, high
energy
batteries
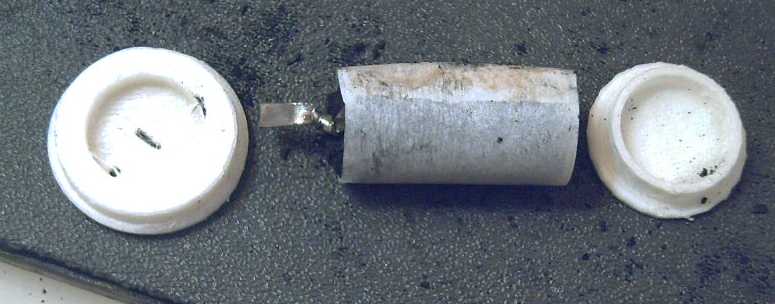
Assembling C Cell
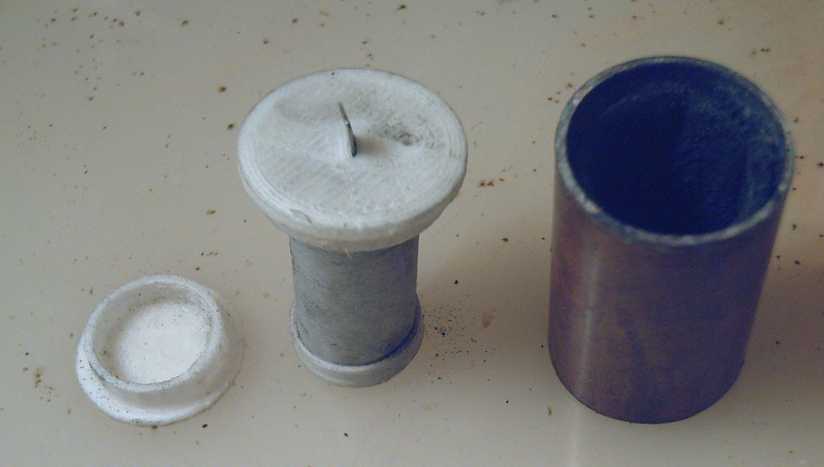 [18th] I finally got
back
to the "C cell" after getting the cement
mixer working, the greenhouse expanded and the corn planted
inside. I
had tried at one point to 3D print a bottom and top piece pair,
but the
print kept coming off the bed on the first layer ofthe top. Now I
changed the design a bit and set the printer bed 10°C warmer. This
time it printed fine. The first draft didn't quite fit onto the
top of
the cell, and the bottom piece was a little too tight around the
inner
electrode. So I did a second set with the outside top fit 1/4mm
smaller
and the inside bottom 1/2mm larger. These seemed just right.
[18th] I finally got
back
to the "C cell" after getting the cement
mixer working, the greenhouse expanded and the corn planted
inside. I
had tried at one point to 3D print a bottom and top piece pair,
but the
print kept coming off the bed on the first layer ofthe top. Now I
changed the design a bit and set the printer bed 10°C warmer. This
time it printed fine. The first draft didn't quite fit onto the
top of
the cell, and the bottom piece was a little too tight around the
inner
electrode. So I did a second set with the outside top fit 1/4mm
smaller
and the inside bottom 1/2mm larger. These seemed just right.
Then I dug out a piece of parchment paper and the gum
arabic. I cut paper to fit around the inner electrode. Then I
glued the
overlap with the gum, which will dissolve once the cell is
assembled
and wetted.
I put the wrapped inner electrode into the bottom
piece
(insulates it from the copper bottom and spaces it away from the
surrounding zinc). Seeing it I realized that if I removed the
outer
flange, I could insert the wrapped electrode with the bottom piece
-
now merely its base end cover - all at once during cell assembly.
That
would make it almost certainly insert properly with the bottom of
the
paper securely inside the rim of the base piece.
Thinking of the low currents of my last cell I
finally
remembered something. I looked over TE News #134 which was mostly
battery experiments. I had discovered then:
a) Zinc by itself works great but (as everyone knows) forms
dendrites
rapidly while
recharging.
b) with only the osmium doped acetal ester, the zinc electrode
still
deteriorated but didn't seem to form dendrites.
c) with agar alone, current capacity was pretty pathetic
d) with both, currents were good and dendrites seemed to be
inhibited.
To have forgotten these key points this project has
obviously been
spreading out over far too many years!
I got out my spice bottle of acetal ester. It had
dried up
over the years, with a black residue in the bottom of the jar. Did
I
need to make more, or could I just add water? I decided to try the
latter first, and after some time and shaking it, it looked okay
to me,
taking on the original dark green color. (When was it I had made
it?
2011?) First I thought I would add a little of the osmium powder
straight into the jar. Instead I added water to the similarly
dried up
test tube where it was already added. I have no idea how
concentrated
or diluted either one is, nor how much osmium powder is optimum in
the
first place. On the
21st I painted the whole inside of the zinc plated felt from the
test
tube. Whether the coverage is good or not, at least I got it all
well
wetted. My vision was coating a smooth flat surface thinly. This
is a
porous felt structure, which obviously takes a lot more. Osmium
isn't
cheap - I hope it doesn't become uneconomical. but then, I don't
know
how much it takes to coat well. Probably only a few atoms thick!
What does osmium do? I have been guided by intuition
for
using this metal based on it being almost unique in chemistry of
having
a valence state of +8, plus it is the densest of all metals and
thus
probably pretty immobile and insoluble in salt and alkali in most
forms. This seems to open up some possibilities for blocking the
zinc
compounds from passing through the layer of dopant, and yet
allowing
hydroxide ions to pass through so current can flow. On discharge
in
alkali zinc forms the troublesome dissolved zincate ions
"temporarily"
which are said to then convert to molecules of (solid) zinc oxide.
Perhaps osmium zincate is insoluble? The zincate ions might get
taken
up to make Os(Zn(OH3))8 which blocks the other zincate ions from
passing the layer of doping, perhaps until they convert to solid
zinc
oxide particles. Or the osmium may assist by causing the zincate
to
immediately convert to solid oxide by grabbing the extra
OH-, so again the zinc compounds won't pass the layer.
[22nd] In the morning I continued by making a new bottom insulator
of
PVB, not just without a lip, but actually tapered a bit on the
bottom
to slide in more smoothly and easily. When I went to put the inner
electrode into it I found that the gum arabic had dried and the
paper
was loose again. I managed to get it inside the top and the bottom
walls so the center electrode wasn't exposed anywhere.
(Theoretically I
suppose the separator paper isn't even necessary, since the
plastic
pieces hold the electrode centered while the agar gel sets, out of
contact with the zinc electrode, then the gel should contain it.
I'll
probably try it without paper sometime. Not this first cell!)
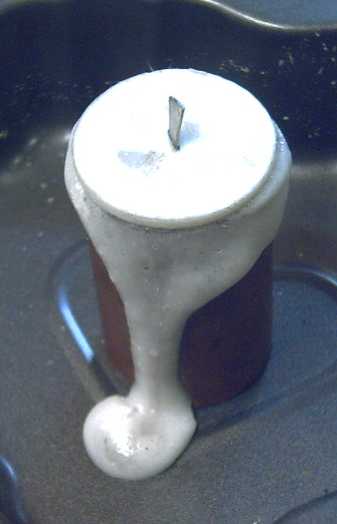 Then I
heated
up
Then I
heated
up
20cc of water to "steamy" and poured in
1.0g of agar and
0.5g of zirconium silicate,
using the electric hotplate with magnetic stirrer. I filled the
cell
half way and pushed the center electrode in. As planned the
electrode
displaced the liquid (but already thickening) solution, which
oozed out
the
cracks and the little hole intended for filling with electrolyte.
I had been somewhat suspicious of my silver soldering
job
on the bottom of the cell, and had left water in it for days to
see if
any leaked through. It had seemed fine, but now that I was
pressing on
the agar solution by pushing the electrode in, there was wetness
around
the bottom rim. Dang! I waited for the cell to cool and filled the
whole bottom cavity with heat glue. I hope it holds. This is why I
want
seamless copper cans! (If I had any confidence that plastic
bottoms
could be made to hold and not leak (including with temperature
changes), I could just use copper pipes for test battery cans
as-is!)
Testing
Before adding electrolyte the voltage was 1.264V and
shorted it would put out 8mA. I used the 20% KOH + 20% KCl
electrolyte
mix. After adding 2-3cc - it didn't seem to want any more, at
least not
in any hurry as it was coming out the top, the current went up to
120-145mA. The voltage was little changed.
[15:30 PDT] Giving it around 1.95 volts charging started at over
30 mA.
(The first thing I learned was how unstable the cheap lab power
supply
was.) After 1/2 an hour it was down below 25mA. The voltage would
drop
in 10 seconds to 1.6xx range. Short circuiting gave similar
currents to
above.
I tried to add another cc of electrolyte. Much seemed
to
come out the top, but the charge current went up to 30mA again and
a
short circuit momentarily overflowed the 200mA scale on the meter.
I
started to wonder if electrolyte was getting through the agar into
the
spongy zinc area. I suppose I should pry the lid up and squirt
some in
around the outside. (Another question then: would it be possible
to
have one electrolyte in the inner electrode and a different one in
the
outer? If so, that might be advantageous. Finally I did pry the
top off
and squirted in 1cc of electrolyte throu the agar around the
outside
edge. It just seemed to come up again and sit on top, but
eventually it
soaked in, with some little bubbles coming up where I had poked
the
syringe throu the agar. It didn't seem to make any difference to
performance, so I left it at that and closed it up again.
No doubt the positrode needed a lot of charging. I
was
pleased that the current didn't rapidly drop to "not much" and the
voltage just sit at the charge voltage, then drop fast when
disconnected. But ten times the currents or more would have been
welcome. (Perhaps the thick agar layer is holding them down?
Thinner
electrode spacing is always better - until you start getting
shorts.) And would it really hold a good charge at a respectable
voltage for days and weeks? In 3 hours charge current was down to
around 10mA and it held above 1.70V for 3 minutes when taken off
charge.
At 20:30 the cell was down to ~5mA charge and held
almost
1.7V for some minutes, which wasn't quite as good as earlier. It
didn't
seem to stop dropping at any point. A short circuit produced 170mA
that
only finally dropped off to 160mA after about 10 seconds - not
much
fade. But it took a long time recovering voltage.
That night it wasn't holding voltage as well as
earlier. I
stopped the charge and ran a discharge test. It was only about 1.5
volts open circuit after a few minutes, and with a 100 ohm load it
dropped instantly to about 1.1V. In an hour it went from 1.104V to
1.006V. The load was only 100 ohms (thus about 10 milliamps at
around 1
volt), and the voltages were pretty pathetic. But it kept on
running,
and only lost a millivolt per minute for the last half hour
Now, I'd like to start improving performance and
charge
retention without changing the design, changing just one variable
at a
time from one cell to the next so the effects of each change can
be
observed separately.
1. Try without graphite foam, in case that's what's causing self
discharge. (What was the hydrogen overvoltage of graphite, again?
Seems
to me I found two entirely different figures when I was looking
for it.)
2. Try copper mesh on the inside wall of the can instead.
3. Adding more osmium powder might increase current capacity.
4. Changing the amount and thickness of plated-on zinc.
5. I could try electroplating into the felt or mesh in a tank,
perhaps
flattening it thinner, and then putting it already plated into a
cell.
6. This can is a little fatter than a real C-cell. A thinner can
would
reduce the gap (agar thickness) between electrodes.
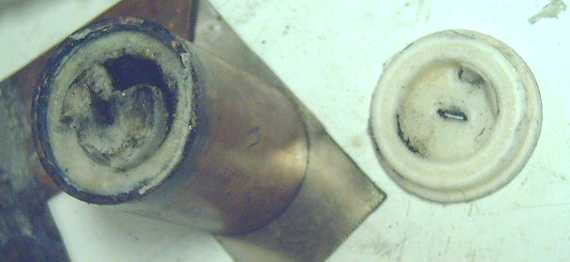 The cell with the lid pulled
off.
The cell with the lid pulled
off.
The agar is a pretty solid looking white layer, but it'll wither
if it
dries out.
Drawing Copper Pipes into C-Cell Cans?
In a recent issue I wrote of the idea of drawing flat
copper sheets into battery cans with punches and dies. That is a
long
used technique but requires making some very precise punches and
dies.
Now another and probably easier idea occurs to me: to draw 3/4
inch
plumbing pipes into C-cell size cans. In this idea, I assume the
end
can be so squashed that the hole in the middle will cease to exist
and
the end won't leak.
In some videos, I saw forms being inserted into
straight
copper cans, for example to make a narrow neck for a bottle, and
the
cans were spun on a lathe. A blunt tool was pressed against the
copper
and it gradually was pressed in to the forms and took on the
desired
shape. The forms (usually made as 6 segments of a circle) were
then
pulled out of the narrowed mouth of the bottle.
Instead, I would expand the 3/4 inch (inside
diameter)
pipe from about 7/8 inches outside diameter to 1 inch (standard
C-cell). First it would be heated to anneal it. Then there would
be a 1
inch inside round form that contained and held the pipe, and the
blunt
tool would press outward from the inside. This assembly could
either be
spun on a lathe or the form around the pipe could be held steady
and
the blunt pressing tool spun inside of it, perhaps with a drill
press.
The end of the pipe that was clamped to hold the pipe
in
place would still be its original size. Now an inside form would
be
used to squash down that end, making the opening much narrower.
Finally
the end would be pounded (or pressed) flat against a flat-ended
rod
form, which would also expand the copper right into the middle and
by
pressure seal it into a solid piece. (It might take some trial and
error to figure out the best length of copper to start with to
form the
best end.)
If it all worked, it would make a can the right size
with
thinner walls than the original 3/4 inch plumbing pipe (and
probably
just about right), with one closed end.
https://www.TurquoiseEnergy.com
https://TurquoiseEnergy.neocities.com
Haida Gwaii, BC Canada