Turquoise Energy News #161
covering
October
2021 (Posted November 4th 2021)
Lawnhill BC Canada - by Craig Carmichael
www.TurquoiseEnergy.com
= www.ElectricCaik.com
= www.ElectricHubcap.com
Month
In
"Brief"
(Project Summaries etc.)
- Pick One Project? - Windplant As Emergency Generator? - Battery Stack
#3 - UHMW for Motor Molds? - Handheld
Bandsaw Mill Kit - Oxyhydrogen (HHO) Gas Torch: CNC Steel Cutting Idea
- CNC Router Mounting - Scale of equipment for major CNC Gardening? - A
Metal Trimming
Technique (for thick sheets)
In
Passing
(Miscellaneous topics, editorial comments & opinionated rants)
- New Thought on Tinnitus - Eelgrass Building Insulation - Smol
Thots - ESD
- Detailed
Project Reports
-
Electric
Transport - Electric Hubcap Motor Systems
* Lithium Ion Battery stack #3 Assembly (for Miles truck)
Other "Green"
& Electric Equipment Projects
* CNC Router Setup
* Handheld Bandsaw Mill Kit
* DC Plugs & Sockets: - 12V wall plates - 36V "click lock" plugs
& sockets - 36V Porcelain High Current Sockets - North Coast
Gardening, Greenhouse, LED Indoor Garden
Electricity Generation
* My Solar Power System:
- A Power Test (Fridge draws 430 watts?!?: Oooh!)
- 2 New Solar Panels on a Pole
- Daily/Monthly
Solar Production log et cetera - Monthly Summaries and
Estimates
October seems to have been a relatively eventful month,
with some small projects studied, undertaken or completed. In the
studies were a couple of interesting new ideas:
* An oxyhydrogen (HHO) torch system for CNC steel cutting (below)
* Eelgrass building insulation. No kidding, this free stuff that
sometimes piles up in huge mounds on the beach is as good or better
than fiberglass or mineral wool: similar or better "R" value, more
pleasant to work with, good sound insulation, fireproof, rot resistant,
and it's really Green in all ways! (in "In Passing")
* UHMW for motor molds
* A new method of making printed circuit boards: laser printer, nail
polish, no heat!
Projects "in process" and actually worked on this month
included:
* Click-lock T-plug & socket shells (worked but need changes)
* Improved T-plug triplex wall plates
* Charging circuit for 36V lithium ion batteries (now just needs
isolation diode so it only charges and doesn't discharge 'em!)
* Router mounted on CNC table's carriage (that's not to say ready to
use!)
* Some design work and actual lumber cutting with the handheld bandsaw
mill
Projects undertaken and completed:
* Assembly of 36V, 120AH lithium ion stack #3 (for Miles EV truck)
* A few Porcelain high current sockets for 36V DC
* Erection of a pair of solar panels on a pole
Pick One Project?
People ask me why I don't just pick one project at a time
and finish it. It's a good sentiment and not without merit.
The handheld bandsaw lumber mill project occupied most of
2018. Was it finished? As such, yes. It did what I made it for: I cut
my spruce logs into many stacks of lumber.
But it obviously wasn't an "end product"; it wasn't
"finished" into a marketable item. Now I'm trying to make it into a kit
ready to
market. I probably should have started on it sooner. And doubtless I
could be focusing harder on it. But things dovetail into other things.
Over the summer (after diverting into getting the Sprint car with "96%
efficient drivetrain" going in July), in some ways I recreated the saw
with important construction changes,
and finally I put it together again. I had trouble cutting with it and
ordered new (slightly shorter) bands. It seemed prudent just to wait
until they arrived, so half of October went by. Then I did some cutting
which exposed more things that could be improved or added, and I made
notes about those, and I ordered a few more parts (still waiting).
But I want to build a "final" design on the "final" layout
around the "final" mounting plates, which are intended to allow it to
also be used as an upright shop bandsaw. I downloaded "FreeCad", which
I had
no experience with using and had to start learning (another project).
Finally I designed them in OpenSCAD files which I sent to Victoria
Waterjet for cutting out, only to have the e-mail returned. Apparently
the former owner is gone and they won't take e-mails to his name. I
sent
another to the address given and have seen no reply, much less are the
parts being cut and sent to me. Maybe I should look for another place?
Then, it would be better anyway to have a way to CNC cut
steel myself to get it done when I want it. I'm already working
on getting the CNC router table running (another project) and thinking
I should be able to put on a tool to cut steel with it (another
project).
And I couldn't seem to find some stainless steel I need
when I
went on line and looked either, so I'll have to try somewhere else when
I've got up the mental energy and time to look again. Then I'll have to
wait for it to be shipped. (If I was in a city I
could probably have run around and found things "close enough". I'd
rather not spend a bunch to buy, ship and wait for things that aren't
at least "pretty close" to what I'm after. Maybe I could do better at
the dump, for free and immediately?)
And I'm unsatisfied with a couple of features and could
use some inspiration. Inspirations often come to me. They don't come
without giving some thought to a problem, but they can't very well be
forced either.
So the timeline of something that sounds simple enough
stretches out and out, and I can't sit around doing nothing while the
processes work
themselves out. I work on something else, and occasionally I run across
something else new and exciting and worth investigating, like Open Loop
Air heat pumping (COP 10+?), or eelgrass insulation. So the projects
seem to multiply unbidden.
DC Plugs & Sockets
 I tried to
print some better "mini T-plug" 12V wall plates, but the prints left
inexplicable
gaps and I couldn't get a decent surround to shield the plug blade
holes.
I tried to
print some better "mini T-plug" 12V wall plates, but the prints left
inexplicable
gaps and I couldn't get a decent surround to shield the plug blade
holes.
Then I designed and printed
"click-lock" shells for T-plugs (36V). They fit pretty well on the
first try, then I realized the plugs should be shrouded to protect the
blades from touching other metal. This will require changing both plug
and socket
(When plugging a charger into a battery, for example, both components
are "hot" and neither should have pins sticking out.)
 Finally I made
some porcelain high current "T-sockets" for 36V circuits at up to
around 50 amps and tested the DC power system with an inverter running
the kitchen fridge. I discovered that the fridge draws 430 watts at
times to defrost its freezer coils! Ouch! - not a great appliance to
have if you're actually dependent on solar electricity in winter here
in the north. But the plug and socket seemed to work well.
Finally I made
some porcelain high current "T-sockets" for 36V circuits at up to
around 50 amps and tested the DC power system with an inverter running
the kitchen fridge. I discovered that the fridge draws 430 watts at
times to defrost its freezer coils! Ouch! - not a great appliance to
have if you're actually dependent on solar electricity in winter here
in the north. But the plug and socket seemed to work well.
Windplant As Emergency Generator?
[7th] I walked by my driveway in a stiff breeze. The wind
funnels up it from the ocean
making it the windiest place in the yard besides the house roof. The
fruit trees
were taking a beating and the bars (metal tubes) on the gate were
vibrating. I had the thought that if the power grid was down for
anything longer than a day in the winter when there was hardly any sun,
I might need any power I could get for freezer and lights. I would
probably want to run the
windplant if it was windy in preference to using the gasoline
generator, especially
if that was in short supply. (And anyway it's virtually 2 $/litre as it
is!)
And it occurred to me that it would be a lot easier to
set the windplant on some stand at the top of the driveway than to go
up in a wind and mount it on the roof. FAR more practical! I could put
it out in any wind if I thought it was worthwhile, then bring it in
again. It would be nicer to have that ready to go than to have to
build it and set it up when I needed it!
DIY PCB Toner Transfer (No Heat) & Etching
Here is a new way to do printed circuit boards with
printing the trace pattern (and silkscreen!) on a laser printer. Using
fingernail polish remover, one
simply rubs the pattern from glossy magazine paper onto the copper (or
bare board for silkscreen). One thinks "acetone", but commenters under
the video noted that acetone by itself doesn't work. The presenter
didn't say what brand of nail polish remover he used, and there are
differences in their composition. Some of the substances are mentioned
in the comments.
https://www.youtube.com/watch?v=cVhSCEPINpM&ab_channel=GarethBurrows
Naturally I bought a bottle of nail polish remover to try it out for my
next
board. (Remember, if I paint my fingernails it's only for a test!)
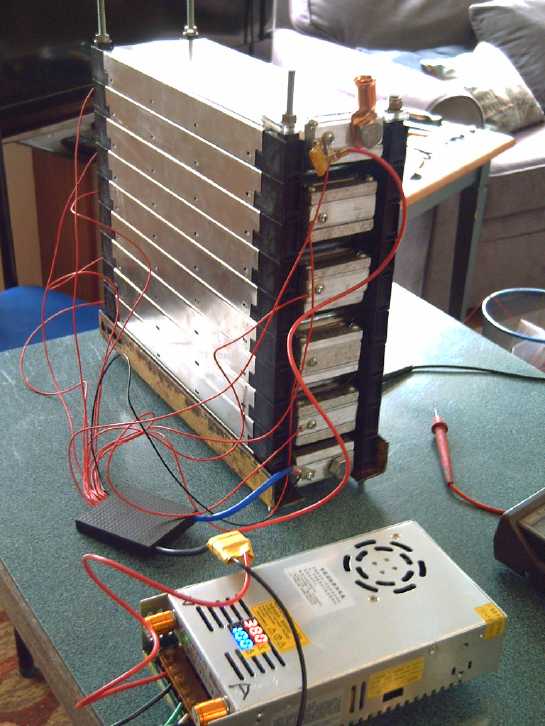
Battery Stack #3
Initially charging the
new battery stack at 10 amps.
The
charging
was completed with solar power over 2-3 days.
 Where to put a report? I dropped the "Batteries" heading (tho I'm
thinking of a couple more experiments soon). The 36 volt battery stack
I assembled this
month is intended for the 72 volt Miles EV truck. That's Electric
Transport. Then I put it
in the garage and was charging it from panels hooked to the PowMr
charge controller. That's Electricity Generation. I ran it through one
of the 36V plug-in power monitors. That's "Other".
Where to put a report? I dropped the "Batteries" heading (tho I'm
thinking of a couple more experiments soon). The 36 volt battery stack
I assembled this
month is intended for the 72 volt Miles EV truck. That's Electric
Transport. Then I put it
in the garage and was charging it from panels hooked to the PowMr
charge controller. That's Electricity Generation. I ran it through one
of the 36V plug-in power monitors. That's "Other".
At first I was charging the stack at 10 amps with one of
the two power supplies I bought to charge the Miles truck as two 36
volt sections, and verified that that seemed to work well. It hit 38.0
volts. (I plan to
also mount 2 or 4 solar panels on the truck to also charge it as two 36
volt sections.)
Once it was charging on solar, I found the charge
controller saying it was delivering 200
watts, but the power monitor said only 170 watts. I had thought the
monitors were reading low. Finally I got out my old Fluke 77 multimeter
(my best meter: "± .3%") and read the current. The voltage was
pretty close between
meters, but on the amps the Fluke and the power monitor agreed but the
charge controller didn't. And the watts shown by multiplying the
current read on the Fluke by the voltage agreed with the power monitor.
I tried two of the power monitors. They were the same. The PowMr charge
controller was measuring the current about 12-15% too high. Now I know.
Don't trust everything you read, even numbers on an LCD display - check
it out different ways. (That
goes for the TV propaganda news, too. Use your discernment!)
Another thing I discovered was that the PowMr draws about
40mA from the batteries even when the sun isn't shining. It would be
yet
another battery discharger and destroyer masquerading
as a charger, except that in normal solar use it recharges the
batteries it's draining every day. Suddenly I understand why the
charging is a minimum of ~70 watt-hours per day in spite of lithium
types having very low self discharge: that's what the charge controller
itself has used overnight.
After I was done I looked to see the cumulative energy put
into the battery. It was small: ??? oops, I had changed the power
monitor!
I hooked the first one up to a power supply and read it: 276
watt-hours. Luckily it retains its memory with the power off. (End of
day total was .623 watt-hours. It seemed there was only a couple of
hundred watts available from two 305W solar panels from the low sun
even in the sunny afternoon when the tree shadows were off the roof.
You'd think I was way up north!)
UHMW for Motor Molds
I mentioned last month that buying a big thick slab of
UHMW-PE was unexpectedly costly, especially with "freight" shipping to
here. HDPE would be adequate, tho not optimum. After I had considered
stacking flat HDPE pieces and melting them together to make a motor
mold, it occurred to me that I had lots of "too small" scraps of
UHMW-PE. If I could horizontally melt together
various scraps in the kitchen oven into bigger pieces, and left empty
spaces where I was
going to rout them hollow anyway, I
would probably have enough. And I had long saved a big can of UHMW
shavings from
a previous routing which might fill voids.
To do it, I should probably make a mold (alium. &
plywood?) to make the approximate shapes I want them to be so the
plastic is as little exposed to air as possible when it's hot in the
oven. Hmm... Using (or creating by melting) larger sheets for separate
mold
bottoms that can be unbolted from the sides should make it easiest to
get the finished
parts out.
Plastic Bolts
I had a plastic drawer full of 1/4 inch nylon bolts. I
couldn't remember why I had bought them all. One day considering UHMW,
CNC
routing
and motor molds it dawned on me that in 2018 I had found the #10-24
bolts holding my Electric Caik motor's stator together got pretty warm
or hot with extended running. That would be because of the rotor
magnets spinning around nearby inducing current into them. I had
replaced those bolts with sets of
three of the large nylon bolts running through the center of each
toroid
coil: one source of motor heat gone! I should plan the new motors to
accommodate the same.
Bandsaw Mill Kit
On the 25th I went to town to pick up my repaired computer
(with a "new" motherboard), and found my bandsaw blades had arrived in
the mail too - both of the things I'd been waiting for. Since I wanted
to get on with the potentially money making
bandsaw mill kit, the computer sat, into November. I went out and
milled up the rest
of the 6" by 6", making notes as I went about details to change or
improve. (Kneepads! It must have kneepads!)
Later I designed the left and right main mounting plates
for CNC cutting by abrasive waterjet. I tried to use "FreeCAD", but I
downloaded it and couldn't make head or tail of it. So I went to
OpenSCad, which I know so well. The newer version explicitly does 2D as
a subset of 3D, by defining "square" and "circle" instead of "cube" and
"cylinder". The only practical difficulty with it instead of any other
CAD program is that it defines curves as short line segments and
exports them that way including to .DXF (2D CAD file format). 3D
printers are fine with that, but I was told the waterjet cutter stops
at the end of each segment. It takes longer and it causes a lot of
vibration that the owner wouldn't accept. For this design I made sure
to have almost no curves, and those it did have were defined as long,
bumpy straight lines. (That wouldn't work well on a motor rotor, of
course! I'll probably have to get into "FreeCAD"s tutorials and basic
instructions at some point. Or maybe the next idea below will make that
unnecessary?)
Oxyhydrogen (HHO) Gas Torch: CNC Steel Cutting Idea
Somehow I got onto this at the end of the month. I watched
a youtube video about it. I had not understood that the potentially
self-explosive HHO gas created by the generator isn't saved in a
pressurized tank or anywhere. Instead it passes through tubes straight
from the gas generator to a torch. Essentially electricity is converted
by hydrolysis into a torch flame, which goes out when the power is
turned off. HHO flame is about 2800°C, perhaps second only to
oxy-acetylene (3480°C). Propane-air tops out at around 1900°C.
An article I read said only oxy-acetylene could cut steel,
but the video presenter cut a slit around a thin stainless steel cup
(as well as an alium. beverage can), separating the bottom from the
top. That seemed exciting, but for 1/4 inch steel would it not need a
heck of a big gas generator using a lot of power?
Then I remembered the pulsejet cutter idea from 2010. At
that time I had intended to try it and see if it would get hot enough
to cut steel. Might it work better? I went back to TE News #31-34 and
reviewed the work I did back then. The unit was 3/4 made, and Tristan
had made an electronic box to fire the spark plug. How much work would
it be to finish it? And if I did, would it work for steel?
Then too there was the plasma cutter, which others have
used for CNC steel cutting. But it seemed finicky, needing the metal to
lie "perfectly" flat on a very level table, or to have a fine height
sensor
and adjust the tool minutely up and down as the work proceeds. And I
certainly hadn't much liked the rough results from cutting with the
plasma "torch" by hand.
I decided that having seen it actually cutting stainless
steel quite well in the video, an HHO torch seemed very promising,
whereas propane isn't supposed to be hot enough and so a propane
pulsejet (even if better) was a dubious prospect, and I wasn't thrilled
with the plasma cutter. An HHO torch should work quite nicely as a CNC
carriage mounted tool. It just needed to be a big enough cutter to burn
through thicker metal. (or could a smaller one just cut more slowly?)
I ordered an HHO torch with 3 or 4 tips. Making the
hydrolyzer "DIY" seemed like a good bet for getting one that would
produce enough gas flow. I think I have everything I need to do so. On
youtube Robert Murray-Smith said (from a technical paper he had read)
that graphite gasket or graphite foil electrodes were in fact longer
lasting and better than the stainless steel ones in the available HHO
generators. From my battery work (and admittedly only after having
heard the idea from him), I recognize this as being obvious. Any metal
used as the positive electrode oxidizes away in sodium hydroxide
solution. (Cupro-nickel might work. Many metals would work as
negative electrodes.)
Having not got back an answer yet from Victoria Waterjet
on the bandmill plates after some days, and having heard a lot of
places are understaffed these days, I'm thinking having my own basic
CNC steel cutting facility might be a much better idea than relying on
others for whom you are priority #23 or #123 on their list - even if
the cuts aren't going to be as smooth as from a waterjet. I've long
wanted it but didn't previously understand the HHO system or realize it
could cut
steel.
This brings up the CNC table again - now for a third
project, the plates for bandsaw mill kit. Getting it running is
certainly rising up the priority list - and now with an HHO torch
attachment for cutting steel.
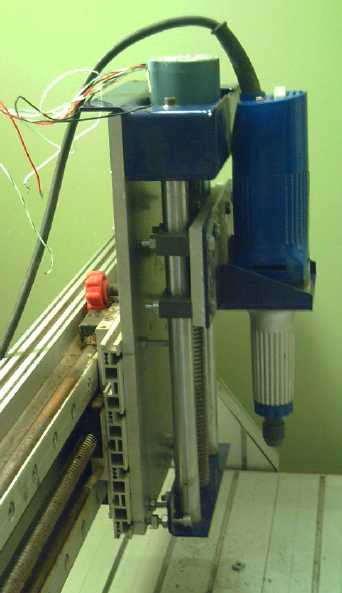
CNC Router Mounting
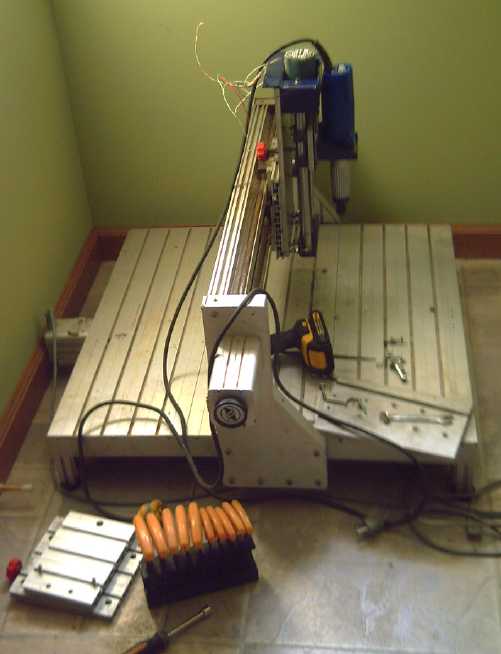 While the
computer was out for a new motherboard, I located the router and its
mountings for the CNC table, and a stepper motor for it, and got it
mounted.
While the
computer was out for a new motherboard, I located the router and its
mountings for the CNC table, and a stepper motor for it, and got it
mounted.
I got this table just as I was moving from Victoria and I
hadn't really looked at the router before. I had thought I would have
to fabricate mounting pieces myself, so I was pleased to find it was
mostly done. I did end up modifying it - the previous owner had some
superfluous parts in the mounting which only detracted from operability.
(Now, about that HHO torch attachment...)
Scale of Equipment for Major CNC
Gardening?
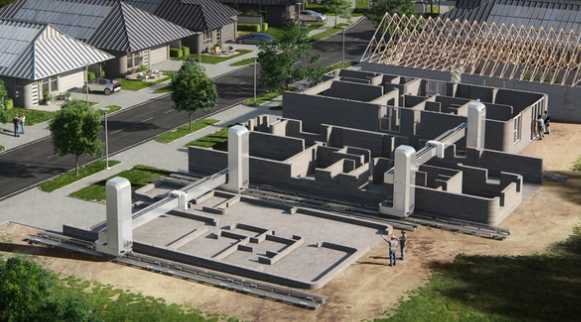 I saw these
CNC rigs, long, tall gantries on long tracks and big carriages employed
to extrude
concrete for CNC housing. My immediate thought was that they were the
sort of scale that I have been envisioning for really serious CNC
gardening
and farming projects.
I saw these
CNC rigs, long, tall gantries on long tracks and big carriages employed
to extrude
concrete for CNC housing. My immediate thought was that they were the
sort of scale that I have been envisioning for really serious CNC
gardening
and farming projects.
Differences would be that the mountings would only need to
be tall enough for the tallest desired crops, eg, corn, sunflowers, but
that the gantry would always be at the top to stay above the crops and
only the tool on the
carriage would drop down. (more like my typical CNC table).
No tractors would drive over the field and nothing more
than people's boots would be compacting the soil. Even if it was very
wet it
could be planted.
Hmm... often things are only limited by the imagination...
One might also envision a very tall unit that could move over an
orchard, and an operator could traverse the whole thing and pick the
fruit at branch height standing in a bucket 'tool' that he could
operate. (That wouldn't be "CNC" operated -- assuming you still
want/need a human fruit
picker.)
A Metal Trimming Technique
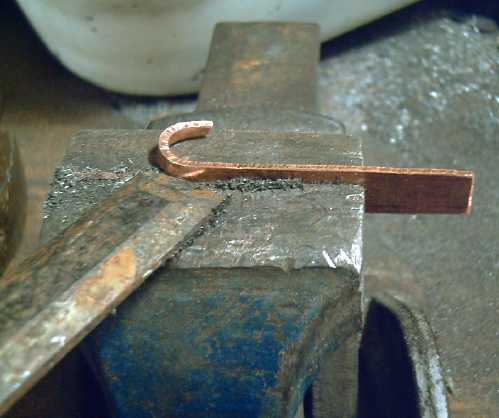 In making blades for 50 amp, 36VDC plug sockets, some pieces of copper
were too wide and I needed to just cut a bit off. It seemed too small
to
saw, but the copper was too thick for tinsnips. I hit on another idea:
put the piece in a vise and hammer a chisel against it. It worked quite
well in this somewhat limited application. (It did seem to dull my
chisel... or was that done by those steel filings I notice in the
photo?)
In making blades for 50 amp, 36VDC plug sockets, some pieces of copper
were too wide and I needed to just cut a bit off. It seemed too small
to
saw, but the copper was too thick for tinsnips. I hit on another idea:
put the piece in a vise and hammer a chisel against it. It worked quite
well in this somewhat limited application. (It did seem to dull my
chisel... or was that done by those steel filings I notice in the
photo?)
In
Passing
(Miscellaneous topics, editorial comments & opinionated rants)
New
Thought
on
Tinnitus
An audiologist thought that my hearing loss probably
resulted from being exposed to a very loud noise when I was young, such
as a gunshot or explosion. I didn't think there was such an occasion,
but after a year I remembered that my dad used to take me duck hunting
with
him when I was 4 or 5 years old. It was always loud. (One particular
occasion even seems to come to mind. I was sitting in the van with the
window open and dad shot a pheasant(?) from no great distance outside.
If my mind isn't making something up, I seem to remember that
particular shot as especially bothering my ears.) Hearing loss,
apparently, doesn't always cause tinnitus, but it doesn't happen
without hearing loss. It can be temporary as many have noted after a
loud concert with amplified music, but in many it becomes permanent.
(Many men have learned to protect their ears in noisy environments such
as around power tools and hammering noises, but musicians often have
hearing damage and even deafness. Beethoven was perhaps the first and
best known example. I suspect he had a loud piano and evidently he
played a lot.)
Something occurred to me: that while nothing ever seemed
to quiet the ringing in my ears, flexing jaw muscles, for example as in
yawning, made it quite a bit louder for the duration. Some have thought
that tinnitus is a psychosomatic effect. Really, this would seem to
disprove it. Why would flexing of a muscle have an instant effect
unless it was physical in nature? And what would jaw muscles have to do
with it except that they run so close to the inner ear? No other muscle
flexing except the jaw muscles has any effect. I thus surmise that the
jaw muscles probably push, pull, twist, flex or otherwise distort the
inner ears a bit.
So then, in order to effect a change in the tinnitus,
might there be some other way to flex the inner ears? I felt around.
The only place that seemed to have much effect was pressing the
earlobes against the bottoms
of the ears, next to the jaw bone. That effect seemed pretty small.
Could it make any change to tinnitus if done repeatedly over time?
Eelgrass
Building
Insulation
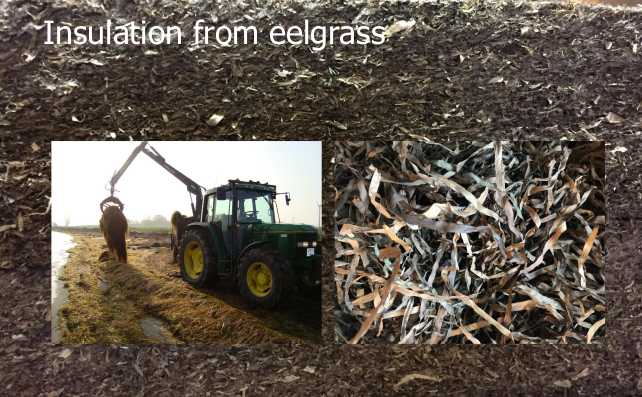 Harvesting eelgrass off a beach
in Denmark
Harvesting eelgrass off a beach
in Denmark
Eel Grass [Zostera], a type
of seaweed that washes up on the beach every year, was long used for
home insulation. It seems there used to be whole industries of making
eel grass insulation on the Atlantic coast. In a 1947 document it was
considered the best insulation. I have noticed that it takes a long
time to break down in the garden when added as soil enricher, and
apparently it's been found insulating houses as old as 300 years with
no rot or mould. Air trapped in the leaves makes it insulating, silica
and salt makes it fireproof, and the iodine and salt content makes it
impervious to bugs and decay. R value is similar to fibreglass or
mineral wool. Apparently a crash in the eelgrass population off the
east coast ("wasting disease epidemic" - fungus?) in the 1930s-1940s
was what
put an end to the industry.
Occasionally huge mats of eelgrass wash up on the beaches
around here. I wonder if it could be a commercial enterprise again, at
least for local consumption? Importing things to Haida Gwaii is
expensive, and there would be no cost of transport for this.
So I looked a little further... and a little farther.
There is actually quite a lot of information about it on line, of both
historical use and recent production of eelgrass insulation batts
similar to fibreglass or mineral wool batts, in Denmark. In a paper Climate
Friendly
Insulation,
What,
How and Why by Bodil Engberg Pallesen at
the Danish Technical Institute, "ecofriendly" insulations from hemp and
eelgrass were compared. Eelgrass came out as good as mineral wool
(which is a little better than fibreglass) and the paper verified that
it had good fire and pest retarding ratings without any additives. And
it is very good sound insulation. (Hemp was also good insulation but
needed to be grown, and to have fire retardants added.)
 Batts of insulation made from eel
grass in
Denmark
Batts of insulation made from eel
grass in
Denmark
From another source (seagrassli.org -- not exact quotes)
"A 6 inch layer of eelgrass spread to a density of 1.5 pounds per
square foot has the same "R" value as 6 inches of fibreglass
insulation." and "Zostera will burn if subjected to flame but will not
itself support combustion." (That's about what I found when I threw a
dry clump of it into the woodstove - it didn't "light up" but slowly
withered in the heat and flames.) "Cabot's quilt" was an insulation
made from layers of eelgrass stitched with layers of heavy paper. In
the 1940s the "wasting disease epidemic" forced them to stop
production." I think I read that Cabot's quilt was credited with saving
buildings from burning down. And of course it's much friendlier to use
and come into contact with than fibreglass.
It sounds like eelgrass has lots of potential for an
industrial comeback, but it has never been used except as garden mulch
here on the west coast.
I have already bought some bags of fibreglass, a material
which I have no love for, but probably not enough for the whole cabin.
Without going so far as to make industrial looking batts, maybe I'll
try out some eel grass for the ceiling, floor or a wall. (Unfortunately
the huge mounds of it that were on the beach a month ago have washed
away.) The price certainly beats fibreglass.
I was thinking that eel grass might be chopped up in the
plastic shredder, too, making a more uniform product. (I was originally
thinking of that so it wouldn't all pull out in big clumps when raking
the garden.) But as I gather it, I think it'd be better and of course
easier to leave it long, and be able to stuff it in into wall, floor
and ceiling spaces in wads, somewhat like "batts". With all the long
strands supporting each other, it apparently has little tendency to
settle and leave gaps at the top.
In all this I also discovered why boat propellers are a
different shape from those most efficient ones, windplant and airplane
propellers: their "S" shape helps prevent eelgrass and other water
weeds from tangling up in it.
Smol
Thots
* I have heard that on some planets Betrayal
of
Public
Trust is
considered one of the most heinous of all crimes, on a par with murder
and
rape, and carries the death penalty. On this planet it goes unpunished
and those practicing it have become an oligarchy occupying all the
positions of power and control. Fines to corporations, however small or
huge, are just part of business, making it look to the public like
corruption is being dealt with, but the perps giving the orders assume
no personal responsibility and are left in control, or perhaps are
shuffled
to a different position within the power structure where they can still
be "anonymous" again, to continue their
crimes. How can there
not be a collapse of civilization coming when so very few are still
working on
behalf of the overall interests of society?
* I think Betrayal of Public Trust would be a more fitting
term for many of the most common offenses of greed and corruption than Crimes
Against
Humanity
or Treason, which are harder terms to define and assess guilt
for. You can
probably think of times you think your trust "in the system" seems to
have been betrayed by a government or a corporation, and there is
always a person who has conceived of and given the orders for such
things. And more people in the organization who are
complicit, acquiescing to wrongdoings in head office, or carrying them
out at lower levels. How would the many corporate and organizational
cultures of greed and corruption today change if those in their various
high positions thought they would actually be held to account in court,
"The People versus Mr. John Doe", for willful abuse of the public trust
vested in them?
* The developers of safe, low-cost Ivermectin oral medication got a
Nobel prize in medicine for curing a great human parasite scourge,
African River Blindness. Its efficacy against many other parasitic
infections and some viruses has also long been noted, with 1.4 billion
human doses safely administered and more to domesticated animals. It
has
lately cured countless people from Covid virus, and since April 2020
dozens of clinical
studies and trials around the world have also demonstrated its high
effectiveness in that application.
* Wikipedia was intended to be edited by anyone, so if one had
knowledge of a subject, one could create or edit a page. This worked
admirably to turn it into one of the world's premiere websites, a
"go-to" lookup for tens of thousands of topics. I have made a
couple of small contributions and edited a couple of sentences for
clarity myself. On some topics
it is a valuable guide. On some topics, however, such as political and
economic topics where rich or powerful people have a vested interest,
they pay people to make sure the page says what they want, and if
anyone edits it, they change it right back again. New or controversial
information is also likewise removed by those who don't realize it
might be valid and potentially valuable new knowledge. So Wikipedia has
become a mouthpiece for the "status quo" and is not a reliable source
of information on many topics of public interest, much less a source of
new information on any topic. One of the founders of Wikipedia has said
these things himself in an interview I watched on youtube. (I don't
remember
the name of the video or the name of the person.) Be discerning of
all information from any source.
* Continuing some very casual studies of Spanish as a result of some
interesting youtube videos in Spanish, I noticed that their word for
"second",
"segundo", had absolutely no relationship by sound or spelling to their
word for the number two, "dos". After thinking about it for a moment,
in English neither does "second" have any relationship to the word
"two"! (or "first" to "one"!) I never noticed that before.
* A video in Spanish that caught my attention was that the Quebec
government has been advertising for Latino workers to come to work in
Canada. They would make the immigration/permits process easy. The Yukon
too. (Well, anybody who would go there is welcome there!) We now have
Richmond BC full of Chinese signs, peoples of all types everywhere, and
now we
want to bring in a big Latino population? I have nothing against any of
these peoples, but I must say I regret the Canada and the culture I
once knew disappearing so fast in my own one lifetime and the white
races very quickly becoming a minority everywhere, perhaps to be a tiny
one or
perhaps we will eventually be extinct. I
think the world is the loser for that.
* The present US administration, at odds with the public from the
start, seems to be destroying the country by importing as many poor,
desperate economic refugee immigrants as it can find,
as fast as it can, from every direction. A nation rises or falls on the
level of culture it maintains, which ultimately rests on the quality of
the people that compose it. By 2024 these new immigrants will
constitute a significant
percentage of the population. Few Americans - white, latino, black or
native - want this massive and destabilizing influx. The desperate
immigrants themselves who apparently had little
hope of a good quality life where they came from of course seem all for
it. But will
they fare better in a USA that
is economicly collapsing with increasing shortages here, there
and everywhere and where many anticipate famine isn't so far off? I
wonder how much will be much left of USA soon?
* In different videos I heard that polls say 26% or 29% or 31% of the
American
public skips meals at least once a week because of the high and rising
cost of food. Ouch!
* It is said that ports in China have a couple of hundred giant
container ships waiting anchored and that the authorities have severely
restricted port operations because of the virus. In California there
are 60 or 70 ships waiting (rising to over 100 at the end of the
month), altogether a million 20 and 40 foot shipping
containers waiting weeks to be loaded or unloaded. And there are
abandoned ships at foreign ports whose crews have been on board for a
year and more who have no food or water and who can't even fly home
because they can't get vaccinated. The UN is calling it a humanitarian
crisis.
Apparently those in control of the various bottlenecks in
the supply chain don't get direct financial benefit from fixing it, so
they don't. Instead the ports profit by charging extra fees for all
those containers that are sitting too long or that can't be returned on
time because of the ports' own delay problems.
The whole thing seems like a slow motion train wreck and
everyone just watches as the cars go off the track and pile up on each
other.
* As the supply chains flounder, the Everything Bubble is now
giving way to the Everything Shortage.
* In the rush to switch from fossil fuels to electricity, evidently
there has in
recent years been less new investment in the former, but little
reduction in usage. As a result fossil fuel shortages are emerging too.
Prices are going way up and the ability
of nations to keep the heat and electricity on is in question,
especially in Europe.
* In Australia, the home of the invention and development of the solar
PV panel, here's
some potentially good news: At its good latitude and with its sunny
weather, there is
now more solar power being made during the day than can be used, and
then at suppertime the sun goes down, people cook dinner and the demand
goes up. This creates a serious imbalance. Someone has come up with the
idea to smelt alium. (which takes huge electrical power) in the daytime
while the sun is shining to absorb the surplus. Since people use lots
of alium. this could turn Australia into an exporter. Presently a lot
is smelted in Iceland where there is a huge hydro plant making cheap
electricity and not many people using it. (Hmm, why is this not being
done in Ocean Falls, BC, where there's a big idle hydro power station
in almost a ghost town?)
* First it was the Renaissance. Then came exciting scientific, medical
and technical advances. Prosperity and a growing population came along
apace. An acquisitive materialism came with it. Everyone was always
excited about the latest developments. When I arrived in the 1960s it
was exciting new styles of music with famous musicians and "hi-fi"
stereos and good quality
FM radio: everyone could for the first time hear the music clearly and
were buying records
and tapes to "acquire" their favorite music. That gave way to the early
computer technology, and computer games captured us young people. Then
came along the internet, which evolved in many different ways.
But I think that now people are used to these things. New
inventions are still taking place but don't have the same captivating
mass excitement any more. And our societies are collapsing around us.
Materialism for the great majority is waning (or unattainable), and
people are asking "Where are we going from here?" Not many were asking
that question in past times. It seems to me we are
now primed for a new era when people will be pursuing social,
intellectual and spiritual development and evolution.
* If you poke even your best friend long and hard enough, you'll may
make him into your enemy. So why is the eagle poking the bear again?
* Thinking, rational people want Peace. A new term I've run across is
"Complicit Peace". This means that everyone takes a hand in bringing
about and keeping peace, working for a peaceful and sustainable future
within their scope of activities, rather than seeking for personal gain
even at divisive cost to one's society, nation, world and the future.
And this will largely be brought about by keeping the core
values of humanity and human societies* distinctly in mind, rather than
the many possible secondary sets of values. Core values are like "prime
numbers" in our DNA that can't be reduced or derived by multiplying
other numbers. Ultimately other values are interpreted and derived from
core ones. But they "take over" and lead to a multitude of
philosophies, moralities, ethics, means and goals. Derived values which
are at odds with the primary values are a prime cause of confusion and
conflict. With the "prime number" values, philosophies ethics and
morality will become unified and simplified instead of multitudinous
and complex, and make societies adaptable and sustainable.
Making the world physicly and socially sustainable for
one's children, grandchildren and great-granchildren is an altruistic
endeavor required of the present generation and those soon to follow,
without which the world is doomed to still further future
misery and privation than has already become largely inevitable in the
coming decades given current general divisive mentality and leadership
and changes already in play in the climate.
[* more?: 7CoreValues.org
]
* This planet's climate is of ever more serious concern, with ever
worsening climate cataclysms daily around the world. Some of the
changing conditions seem to be natural, but those are obviously being
exacerbated by human causes - especially long persisting stratospheric
jet trail clouds and CO2 (and other) emissions. It has been estimated
that if the human causes were somehow all stopped today, things would
continue to get worse for a while, and it would be 50 years before
something similar to pre-industrial climate conditions would
predominate again.
Since at this point we can hardly expect to drop all
fossil fuel use all at once, the best we can probably expect, making
our best practical efforts for very substantial reductions over say the
next three decades, is ever worsening climatic conditions for several
decades and somewhere around a century before the climate really
settles down again.
(Must get on with my ultra-efficient unipolar BLDC Electric Hubcap
motor & controller to better convert cars to electric! ...Etc...)
In the meantime it increasingly appears that shelters or
even whole homes built like caves on higher ground, impervious to high
winds, hail and flooding, would be prudent investments in many areas.
There are some good videos on youtube about building dome structures
with unusual materials like insulating foam cement or filled-in tires.
In some an air filled plastic shape is inflated and the material
sprayed on top. When it hardens the "balloon" is removed from inside.
There are also designs for homes built into the side of hills with
earth over top. These are easy to heat and cool.
ESD
(Eccentric Silliness Department)
Cities: (well, pretty obvious!)
1. Libyan city has a triple "E" rating.
2. Sudan city ought to be setting for Bugs Bunny.
3. In Mali between Tim Buck 1 and Tim Buck 3
(Answers Below)
* She said that he said that they said that I said, and so I was banned
from facebook and twitter.
* Walking on the beach, a little dog ran a long way over from the
people it was with, barking at me and trying to come up behind me.
Having been bit on the ankles by similar little psycho dogs before, I
was trying to be nice to it and hoping it wouldn't bite my proffered
hand. Finally the owner got closer and called the dog. "Maul-y.....
Mauly!". Ya, I knew it was that kind of dog!
* I have 4 laying hens. I've never found more than one layer of eggs in
the nest but there are sometimes two layers in it at once.
* "We Promised: No Boots on the Ground!" All personnel please pick up
your new running shoes at the canteen prior to deployment.
Answers:
1. Tripoli
2. Khartoum
3. Timbuktu
"in depth reports" for
each project are below. I hope they may be useful to anyone who wants
to get into a similar project, to glean ideas for how something
might be done, as well as things that might have been tried, or just
thought
of and not tried... and even of how not to do something - why
it didn't
work or proved impractical. Sometimes they set out inventive thoughts
almost as they occur - and are the actual organization and elaboration
in writing of those thoughts. They are thus partly a diary and are not
extensively proof-read for literary perfection, consistency,
completeness and elimination of duplications before
publication. I hope they may add to the body of wisdom for other
researchers and developers to help them find more productive paths and
avoid potential pitfalls and dead ends.
Electric
Transport
Lithium-Ion 36V,
120AH Stack #3
 [13th] I finally got around
to assembling the third stack of ten 120AH, 36V lithium ion cells. That
way I would have two stacks for the Miles EV truck (72V) and one for
the Chevy EV Sprint. (The Sprint had 2, but for the little I'm driving
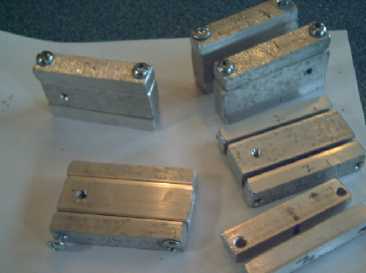
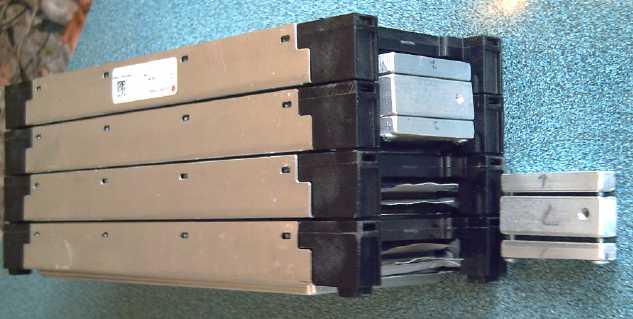
it, it doesn't need them both.) On this afternoon I got 5 connection
clamps made. There were 2 pieces left over from the previous stacks, so
I had half of the 11 needed clamps.
[13th] I finally got around
to assembling the third stack of ten 120AH, 36V lithium ion cells. That
way I would have two stacks for the Miles EV truck (72V) and one for
the Chevy EV Sprint. (The Sprint had 2, but for the little I'm driving
it, it doesn't need them both.) On this afternoon I got 5 connection
clamps made. There were 2 pieces left over from the previous stacks, so
I had half of the 11 needed clamps.
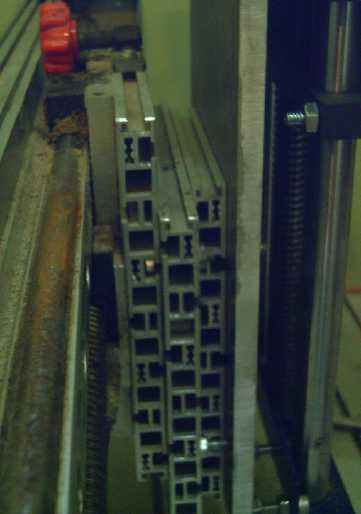
[14th] I spent a couple of hours on these in the evening and got most
of the rest of the way. But abruptly in the middle of a cut with no
warning, splitting a piece of 1/2" x 3/4" alium. bar, the bandsaw would
cut no further. as if I was suddenly trying to cut steel or something.
I guess I overheated the band or something. I think that was my last
105" cutting band, so I resolved to take out the 6" extension block I
had put in when I bought the saw 15 years ago. I haven't cut guitar
backs in a long time, and anyway the handheld bandmill could cut still
wider boards than the shop saw even with the extension, so when would I
ever need it?
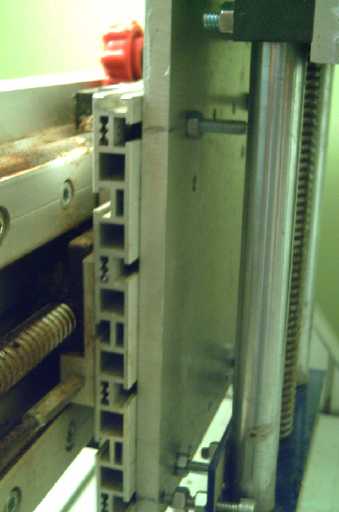
 But the next
morning I found a dull 105" band and put it on. It cut rather slowly,
but least it cut and I could finish making the pieces. I'm still
mystified why the other one suddenly stopped cutting. Over the day I
put the stack together, and later cut the mounting pieces and put them
on. (Never mind taking out the block for now!)
But the next
morning I found a dull 105" band and put it on. It cut rather slowly,
but least it cut and I could finish making the pieces. I'm still
mystified why the other one suddenly stopped cutting. Over the day I
put the stack together, and later cut the mounting pieces and put them
on. (Never mind taking out the block for now!)
Examining the first bandsaw blade with a magnifying glass,
it had a tiny bit of alium. stuck on the front of each tooth. I guess I
melted it.
[18th] I got out one of the
0-48V, 0-10A power supplies I had bought for this, set it to 39.5V, and
hooked it up to the new stack. The current was maximum (>11A) with
the voltage
at ~36.5V and quickly I smelled hot semiconductor. I turned the current
limiting down to
7 amps. After a couple of minutes the cooling fan came on. The battery
voltage slowly rose. I shut it off at 38.0V. Later I tried again at
10A, and nothing blew up before the fan came on. I still didn't get the
battery up to full voltage, just to 37.5V after it had settled a few
hours.
There was however one more critical test. I hooked in a
current meter and unplugged the power supply. Sure enough! The
unpowered power supply drew 25mA from the battery. It was yet another
slow, insidious battery drainer and destroyer! I would have to put a
hefty diode in series to prevent current from going the wrong way.
And now that one of the power supplies has proved
itself...
why did I only buy two when I have three stacks of batteries? (In fact,
it might even be an idea to double up on them for faster charging. At
10A, it would take 12 hours to fully charge a completely discharged
120AH battery. At 20 amps it would only be 6 hours. The balance
charging device is rated 20A. Say I drove the truck to town it might be
3 or 4 hours to recharge instead of 6 or 8.
Solar Charging
[20th] This time I had used an XT90 plug and socket (the pins are
recessed on both) instead of my 36V T-plugs. (Oh wait... I should be
making "click-lock" T-plug & socket shells where the plug pins are
surrounded. I seem to have forgotten about those!) I made an adapter
cable XT90 to T-socket, took the battery stack out to the garage, and
put
it on the solar charger. It charged at 4 or 5 amps all day while the
sun was out, around 170-225 watts, using .623 watt-hours of
electricity. Since 39.5V*120AH = 4740WH, that's just 15% of a full
charge, from (effectively) two 305W solar panels. At that rate, if I
did put 4 panels on the truck, it could take a week to charge it from
empty to full - and that's if it's sunny out! It wasn't out first thing
in the morning and tree shadows obscure the panels much of the day, but
early to mid afternoon was good and I was surprised it was so little.
The days are certainly getting shorter and the sun lower. You'd think I
was way up north! Perhaps I should connect more solar panels to the 36V
DC
system?
Meters and Solar Equipment: I found the PowMr solar charge
controller saying it was delivering 200 watts, but the power monitor
said only 170 watts. I had thought the monitors were reading low.
Finally I got out by Fluke 77 (best: ".3%") multimeter and read the
current. The voltage was pretty close between meters, but on the amps
the Fluke and power monitor agreed but the charge controller didn't.
And the watts shown by multiplying the current read on the Fluke by the
voltage agreed with the power monitor. I tried two of the power
monitors. They were right. The PowMr charge controller was measuring
the current about 15% too high. Now I know. Don't trust everything you
read - check it out different ways. That goes for the TV propaganda
news, too. Use your discernment.
Another thing I discovered was that the PowMr draws about
40mA from the batteries when the sun isn't shining. It would be yet
another battery discharger and destroyer masquerading as a charger,
except that in normal solar use it will recharge the batteries every
day. (Since it seems to charge a minimum of 70 watt-hours each day,
that must be what the charge controller uses overnight!)
Other "Green" & Electric Equipment Projects
CNC Router Setup
[9th] Since the computer was out for
repair, and thinking that I should at least get something done on this,
this evening I located the router in a box among several, which was
mounted on an assembly to raise it up and down, but without a stepper
motor. I eventually found the right size bolts and nuts to fit into the
slotted plate (not 3/8", not 5/16", not 1/4" but 6mm, and not the nuts,
or pan head or with attached washer, but only plain hex head bolt), and
figured out how it attached and got it on. I had the right size stepper
motor and I attached that.
It hadn't realized it was almost a complete assembly, and
had visions of spending hours cutting pieces and drilling holes, so it
was contrary to expectations that it went smoothly and easily, in one
[very late] evening.
 The next
morning I looked at it and wasn't
satisfied.
There seemed to be a couple of superfluous alium. channel
plates putting the router farther from the carriage. Surely the closer
it is
the less play there will be in the position of the cutting bit when
forces are acting on it? And the maximum size of workpiece fitting on
the table expands
by that inch or more, too.
The next
morning I looked at it and wasn't
satisfied.
There seemed to be a couple of superfluous alium. channel
plates putting the router farther from the carriage. Surely the closer
it is
the less play there will be in the position of the cutting bit when
forces are acting on it? And the maximum size of workpiece fitting on
the table expands
by that inch or more, too.
 So I took it
apart, measured and drilled new mounting
holes in the plate backing the "Z" axis & router assembly, and
assembled it again. Looks better to me. It also took at least as long
as the first assembly.
So I took it
apart, measured and drilled new mounting
holes in the plate backing the "Z" axis & router assembly, and
assembled it again. Looks better to me. It also took at least as long
as the first assembly.
 Next was the
wiring to go between that stepper
motor (with
6 short wires sticking out of it [why 6 instead of 4?]) and the "Z"
axis output DB9 plug of the Geckodrive 4 axis motor driver. How was
that cable to be held so it didn't sink down into the work as it moved
to the slack side? There was no special cable routing trough usually
used for that, and I didn't have any.
Next was the
wiring to go between that stepper
motor (with
6 short wires sticking out of it [why 6 instead of 4?]) and the "Z"
axis output DB9 plug of the Geckodrive 4 axis motor driver. How was
that cable to be held so it didn't sink down into the work as it moved
to the slack side? There was no special cable routing trough usually
used for that, and I didn't have any.
I looked up and found that 6-wire stepper motors have
center taps in the two coils. I can pretty safely leave those
unconnected.
Then this got put aside for other interests.
12V, 36V Plugs and
Sockets
12V Wall Plates
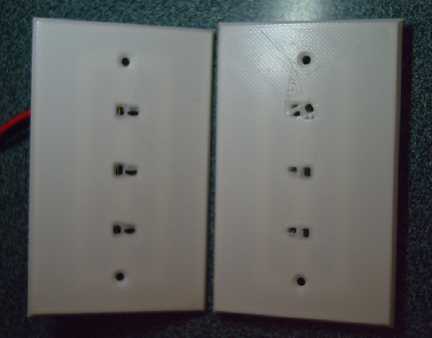
[17th] I redesigned the 12V
T-socket triplex wall plate to put a thin
layer over the sockets with only the rectangular holes for the blades
exposed, because I had found it was possible to touch the plug and
socket pins backward when trying to insert them. I printed a couple,
but the filament snapped while doing the third. (This spool of PLA has
been terrible for breaking with little force.) I couldn't find the
acetone, the best substance to clean the print glass, and the printer
didn't do a good job with the tiny, thin slots. The edges seemed to
lift and move around during printing. But if they were made very thick,
even a millimeter, the plugs wouldn't stay in the sockets very well.
A bright note was that the sockets fit in so tightly I had
to push them in with pliers. I didn't bother to do anything to keep
them from being pushed out by someone putting in a plug, because I
doubt it would come loose.
[18th] I made a slight change to the dimensions of the blade slots,
remembered another place the acetone might be (and was) and tried
again. Frustratingly, it left a gap on three sides immediately
surrounding the slots. There were no gaps anywhere else. In other
words, the Cura software that told the software exactly where to lay
down plastic made a mess just of the only really critical points on the
whole plate. The surround of the blades that I'd changed the design to
include were just about set to break off with any slight agitation or
scraping from trying to insert a plug. Spending a few more seconds of
the hour and 20 minutes printing time per plate on the critical inner
edges where the plastic was only one trace thick would have been most
appreciated! Sure enough, when putin a plug and pulled it out,
the inner ring around the hole came out with the plug. (G-code files
are text, but there are so many traces and commands in a 3D printing
file that trying to manually edit it would be nuts.)
But the position and size of the blade holes weren't perfect, so I
changed them a bit. I hoped maybe they'd just work out better next try,
but they were even worse, a thin skeleton of an outline, one trace
surrounded by gaps. I changed something in the many optional settings
thinking it might be better. I'll change it the other way next time.
I finally left it, still without having a satisfactory
print around the blade holes.
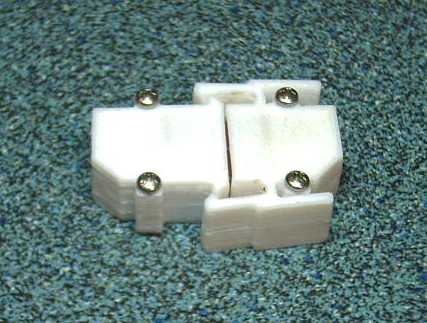
36V Click-Lock Plugs & In-Line Sockets
[21st] I modified plug and socket shells to click together. It worked
pretty well on the first iteration of each the next morning. But then I
realized it would be much better if the plug pins were shielded with
plastic, especially so battery chargers wouldn't short out, and so they
should be redesigned for that.
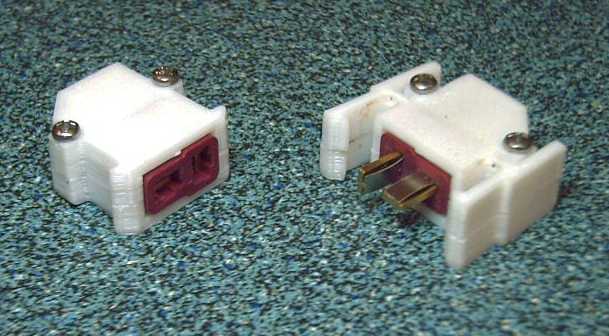
36V High Current Plug & In-Line
Sockets
[23rd] I had changed from my own designs to "T-Plug" designs when I
found them. They were being used just for model aircraft and came with
the batteries for the model ground effect vehicle. (Yes, I must get
back to that, too!)
There were "mini" and "regular" size of T-plugs and
sockets, Which I decided should be good for 12 and 36 volt systems. But
in spite of high current ratings for use in model aircraft, they are
probably only good for maybe 10 or 15 continuous amps in home use.
Model aircraft aren't in long or frequent use.
So I went back to my own design for a 50(?) amp plugs
& sockets. I thought I could probably adapt the T-plugs' spring
idea into the
socket and in fact did so. An advantage in current rating that the
T-plugs have is that
typical sockets have a conductor in the form of a double spring that
presses against the plug blade at just two lines or even two points, on
opposite faces of the blade. In the T-plug idea, the spring is a
separate component that presses
the flat blade of the plug against the flat blade of the socket, along
the entire common contact plane. In the original T-plugs, this spring
is on the plug blade. In my high current version, the plug is the
simple piece and the spring is inside the socket. The effect is the
same.
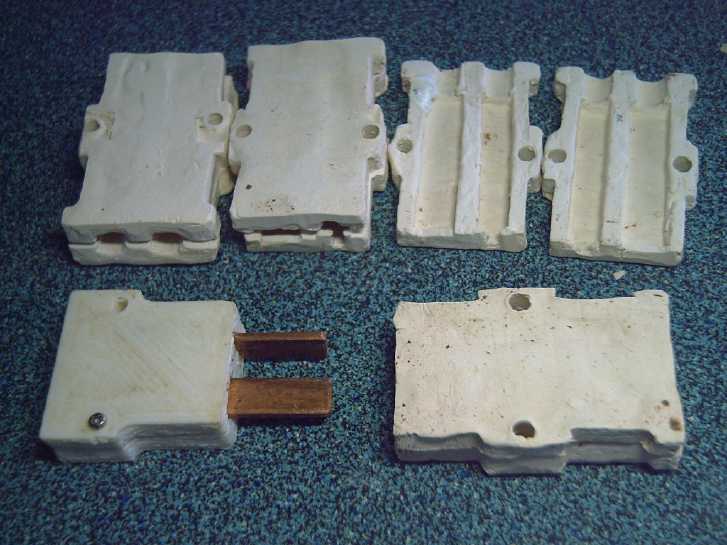 But again for
high current I figured the socket should be porcelain. I got out the
mold I had 3D printed previously and squashed out 8 halves in porcelain
clay for 4
in-line sockets to be fired to 'cone 5' - 1180°C. (Laguna B-mix
cone 5 grayish clay.) That took a couple of hours. The next morning
when
the clay was dry I spent more time sanding and scraping them somewhat
smooth. Somehow I didn't break any. Then they still needed to be fired
in
the mini kiln. I used a thermocouple and a meter for the temperature
rather than melting-down pottery cones.
But again for
high current I figured the socket should be porcelain. I got out the
mold I had 3D printed previously and squashed out 8 halves in porcelain
clay for 4
in-line sockets to be fired to 'cone 5' - 1180°C. (Laguna B-mix
cone 5 grayish clay.) That took a couple of hours. The next morning
when
the clay was dry I spent more time sanding and scraping them somewhat
smooth. Somehow I didn't break any. Then they still needed to be fired
in
the mini kiln. I used a thermocouple and a meter for the temperature
rather than melting-down pottery cones.
Tempting as it was to throw them right into the kiln, I
set them on top of the woodstove (running) to warm up for a
few hours to be sure they were dry. Otherwise they might crack in the
kiln - or surely warp badly. (Not that they won't warp anyway.) I got
onto cleaning my gutters, and put the already crispy sounding pieces in
the kiln. (How hot was the top of the woodstove?) Once it was getting
quite hot the thermocouple did funny things. I finally cut it a bit
shorter and twisted the wires together again. Finally I got a stable
looking reading of 1190°C. Since that was up toward the top, I
figured the bottom was probably just about right (1180°) and
unplugged the kiln. (It has no temperature control or switch.)
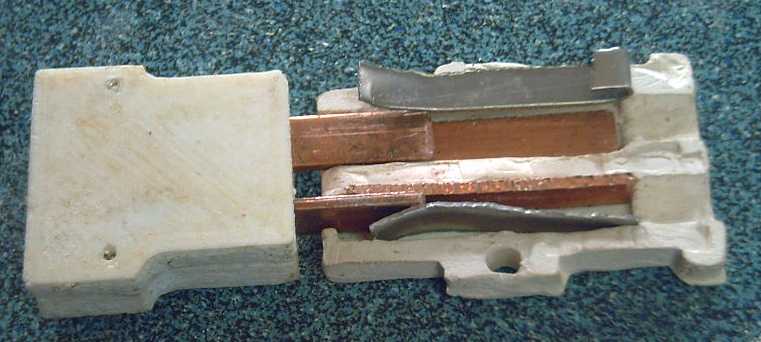 After that I arranged straight "bars" of copper as the connections, and
pieces of steel spring opposite to them in the socket to press the plug
blades against the bars. The springs have no electrical connection.
They
are put in loose and are held in place by the porcelain shell.
After that I arranged straight "bars" of copper as the connections, and
pieces of steel spring opposite to them in the socket to press the plug
blades against the bars. The springs have no electrical connection.
They
are put in loose and are held in place by the porcelain shell.
Again the design is in keeping with the superior (IMHO)
T-plug
idea that the plug and socket be pressed together along a whole flat
contact surface plane instead of just at two points or lines on a bent
springy conductor in the socket.
My design moves the springs inside the socket
instead of attached to the plug pins, and the plug is unchanged from my
previous design, as is the socket shell itself.
 Then I
soldered short wires to the coppers for "pigtail" connections and put
in #6 screws to hold the socket halves together. There was a "crack"
sound and one piece had broken. I had hoped they would be less
brittle than that. Perhaps I should have left them in the mini-kiln a
little longer (than ~1-1/2 hours) to reach a higher temperature.
(notwithstanding that they were still glowing white hot when I finally
opened the door a while after turning it off.)
Then I
soldered short wires to the coppers for "pigtail" connections and put
in #6 screws to hold the socket halves together. There was a "crack"
sound and one piece had broken. I had hoped they would be less
brittle than that. Perhaps I should have left them in the mini-kiln a
little longer (than ~1-1/2 hours) to reach a higher temperature.
(notwithstanding that they were still glowing white hot when I finally
opened the door a while after turning it off.)
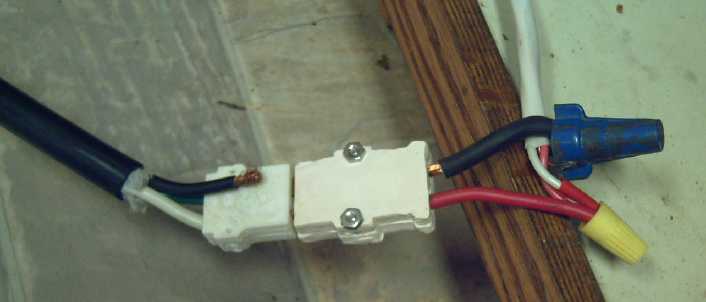
I had made four, so I tried again, successfully.
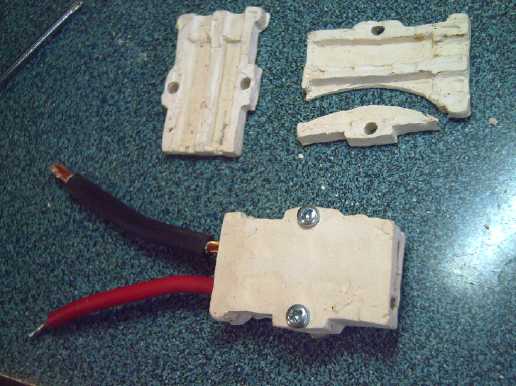
Then I
connected it with marette connectors ("wire nuts") to the 36V wire I
had run from the garage to under the kitchen sink, and plugged in a 36
to 120 volt inverter. I ran the kitchen fridge off the DC system for a
while to check it out.
(I was shocked to discover that while the fridge drew
130-140 watts most of the time when running, it had a defrost cycle in
which the defrost heating element drew a continuous 430 watts. This
will not go over well if there's a long power failure and I'm trying to
keep it running!)
The plastic plugs are 3D
printed - no problem. The porcelain sockets (to ensure no fires result
from heat if there's a poor connection) are a lot of work to make,
not uniform, and brittle. I have to punch the bolt holes by hand with a
little
brass tube and they don't always line up. I couldn't
sell them at any reasonable price without a better way of making them.
Maybe I should get one of those 3D printers that extrude clay? I
suppose they are $$$$. Come to think of it the plastic mold was printed
with the old coarse 3D printer & Skeinforge slicer. I should at
least reprint it with Cura slicer at the finest resolution (smoothest
surface) I can get, on the slipperiest plastic filament I have.
(Nylon?) That could help a bit.
Also it would be good to have sockets on a plate that
fit into an electrical outlet box. That needs a new design of socket.
Handheld Bandsaw Mill Kit
[8th] I tried milling a 1" by 6" off a 6" by 6" beam. It didn't go
well. The band must have been quite dull and the set on the teeth poor.
Soon it was getting hot and I realized I had forgotten about doing a
cooling water drip system onto the band. And obviously the
band tension was insufficient. It was jamming and it had been long
enough since I had milled that I didn't realize what the problem was. I
cut a few inches at a time until it was hot again, and each time had a
hard time getting the V-belt to not slip and the band to run again.
When I finally got to the far end I found the board was
cupped so much across that the cut had almost come through the top in
the middle of the board. Memory started coming back as to that sort of
phenomenon. More band tension; set the teeth to give some clearance!
Sharpening, while definitely desirable, actually comes third on that
list.
I ordered a couple of different spigots to shut off water.
I didn't find anything very miniature like I wanted, but at least
they're for small diameter (6mm) pipes. I also ordered new cutting
bands: 2 shorter, 3 medium, and 2 a bit longer (80, 85 and 88 inch).
[18th] I sharpened the band and set the teeth with pliers, a tedious
job. Wayne had shown me his tooth-setting jig, and I think I want
something like that. Preferably it would be automatic like the band
sharpener, moving the band two teeth at a time and pressing one each
way all by itself. If not, perhaps it might allow manually pressing
several
teeth at once?
Then I put the saw back together and drilled a little hole
in the guard for the bottom of a funnel. I put a piece of sponge in the
funnel to hopefully control the drip to a reasonable rate. I cut
another thin 3/4" by 6". It still went very slowly, less than half the
usual speed - only 5 or 6 inches in ten seconds instead of 10 to 12
inches. I am puzzled by that. I trust the new bands will cut better.
The second guide wheel that I had made was jamming, and with the saw
half way along the cut I replaced it with the new "4 pieces" type I had
bought the main parts of from VXB bearings. The sponge kept popping out
of the funnel, but it jammed up quickly with sawdust and often no water
was going through at all. But this time, with a good set on the teeth,
the band never got very hot. Except for
those details and being slow it did run smoothly and made a good, flat
board.
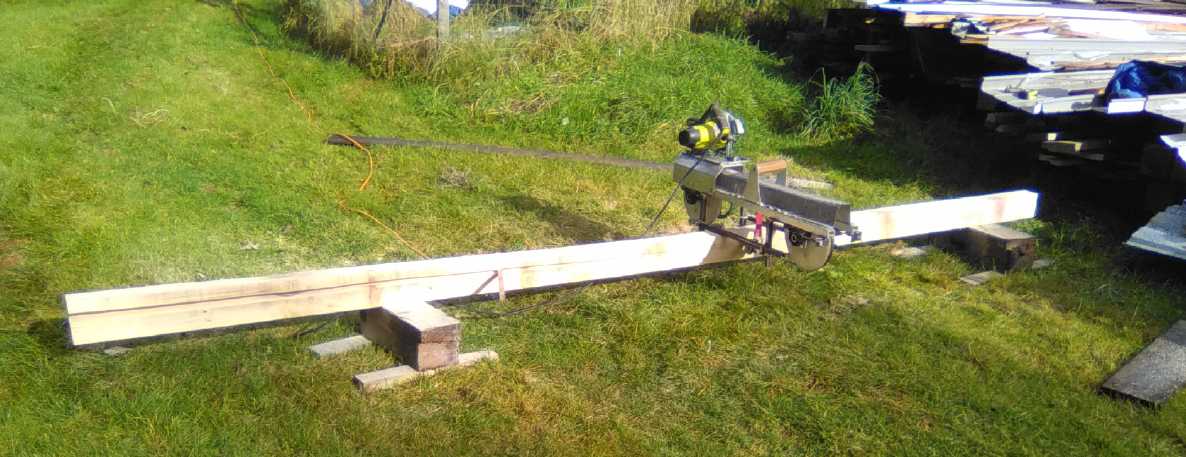
[25th] The new cutting bands arrived. In
the evening I put one on and got it ready to mill the next day.
When I went to take the mill to the cant, it started to rain. Then it
quit, then it started again. Every second time I went out it was
raining. It poured rain even when the sun was shining. Finally at
1:30 it seemed pretty nice and I finished cutting up the 6" by 6":
total
three 3/4" by 6", three 2" by 4". Somehow the 2" by 4"s came out thin,
and so the last one was more like a 3" by 4". In this cutting I kept
stopping for the band to cool. And the boards were something of
wedge shapes. Notches in the posts as markers for setting the depth of
cut as desired and evenly all around will be a must.
It cut much better, but for a brand new band still a bit
slower, maybe barely 1 inch per second in the 6 inch wide cut. (10
inches or less in 10 seconds.) I assume it's because the wood is now
dried (4 years now!) and
tougher instead of fresh and green. Still, for the four inch wide
boards I
was cutting up to 16 and even 18 inches length in ten seconds
of cutting.
In with all this I measured the steel plates for making
them a CNC design pattern, and made a few notes of things to modify or
add to the mill. I think the plates, posts and depth set/slide bars
should be stainless steel.
It was a bit hard on the knees pushing the mill along the
board, which I will attribute to the rusty steel guide rails not
sliding easily. But I also note that glue-on(?) knee pads for pushing
would be very desirable. Maybe 1.5 inches thick.
[27th] I started looking for a good 2D CAD program. I seemed unable to
download "LibreCAD" for some reason. I tried "FreeCAD" and got it
running, but I was unable to make heads or tails of it. I thought I
would try their tutorial next day.
[28th] I looked over my 3D printer "OpenSCAD" program and found that
newer versions
would do 2D drawings and export them to to the standard .DXF format as
a subset its 3D features, using "square" instead of "cube", and
"circle" instead of "cylinder". I designed the left and right mounting
plates [to be stainless steel], the main custom parts of the saw that
needed to be CAD done, to send to a CNC abrasive waterjet cutting
facility.
After I finished, I remembered why I didn't use OpenSCAD
for this purpose. It turns curves into a series of very
short straight lines. That seems fine on a 3D printer, but Jesse at
Victoria Waterjet said that would make the cutter stop and restart for
each line instead of cutting a smooth arc, creating unacceptable
vibration. My simple solution - for these plates - was to tell the
software that each arc segment is to be at 30° to
the previous: just a few longer lines instead of a bunch of short ones.
That wouldn't have done the job for the motor rotor I was cutting then,
but I think it should suffice for this. I made the drill holes as
little squares as center points, and
will use a drill to cut them to size later. This affected only two
holes, the eight other holes being square anyway.
[30th] Having finished up the plates I sent the .DXF file off to
Victoria Waterjet. I might just make some kneepads and cut some more
boards from 6" by 6"s to finish the firewood shed doors. (By November
4th there was no reply!)
North
Coast
Gardening,
Greenhouse,
LED Indoor Garden
In Case of Shortages, Break Glass
I wonder if some aren't thinking that if there are food shortages then
they'll go out, dig up the lawn and grow vegetables. I suspect many
such
people are either going to have help from neighbors who garden or
they're going to have a lot of work and a lot of failures for at least
a couple of years.
A neighbor originally taught us gardening when we moved to the coast in
1972. I
was 17, I haven't been on it full time or every year, but I'm 66 and
I'm still learning, and I'm still learning more in this
somewhat
unusual climate zone of very cool summers and not very cold winters
with
lots of rain.
The lawn can reclaim a garden over the winter here, and
sometimes you have to pretty much start over again.
Easier Garden Clearing or Turning Lawn Into Garden
But on youtube someone's comment reminded readers that one
can
put down cardboard or black plastic or whatever, and then weigh it
down,
preferably with something like compost or chicken guck, and keep the
light off the soil. Then the weeds and grass die or at least don't grow
much, and the job of clearing off the lawn or the weeds is much easier.
This seems like the right time of year as most of the garden produce
has been harvested. I got a car full of flattened paper towel boxes
from a grocery. (They have no packaging tape, just cardboard - yay!)
Greenhouse
Somewhere this month I noticed that my apricot tree in the
greenhouse was bare with no leaves while the one outside had yellow
leaves. I fear I may have killed the inside one - which bloomed so
nicely in the spring but had no fruit - for lack of water. Somehow I
always think I'm doing plenty of watering but peppers and tomatos
wither, my
prize new grape vine almost died, I think the cherry tree in the
greenhouse has suffered, the apricot tree outside died way back the
first year I had it and now it looks like the one inside is probably
gone.
I've always been afraid of washing nutrients out of the
soil, and
only through long experience have I learned to water as much as I do,
and apparently it's still not always enough. A nice pepper in a pot
withered, to my surprise. Blueberries take tons of water and I was
never able to grow them until someone apprised me that fact.
 Strawberry Tree (more of a Bush -
Arbutus
Unedo) has little
Strawberry Tree (more of a Bush -
Arbutus
Unedo) has little
white bells. Fruits next year? Where am I going to plant it?
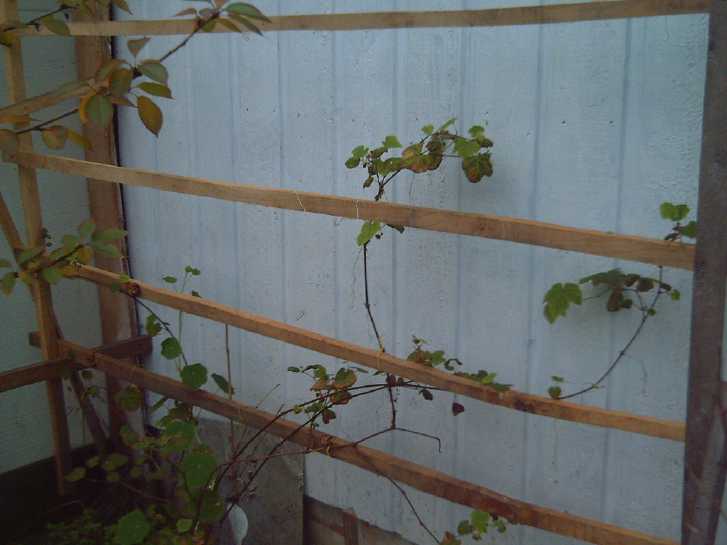 The green grape vine in the
corner is growing
slowly, but I expect it
The green grape vine in the
corner is growing
slowly, but I expect it
will become a nuisance, spreading everywhere, within a few years
 Last of the yellow zucchinis
 The asparagus hit the roof and
blocked the path
until I finally cut it back
The asparagus hit the roof and
blocked the path
until I finally cut it back
with hedge clippers! Maybe I should eat more of it, earlier, next year.
 A pathetic double row of carrots.
Why can't I
seem to
A pathetic double row of carrots.
Why can't I
seem to
grow decent carrots, inside the greenhouse or outside?
I probably don't water enough when they are germinating?
 And outside, a sunflower spent
the whole summer
growing taller and taller,
And outside, a sunflower spent
the whole summer
growing taller and taller,
and only in October-November is it trying to grow a flower. Good luck!
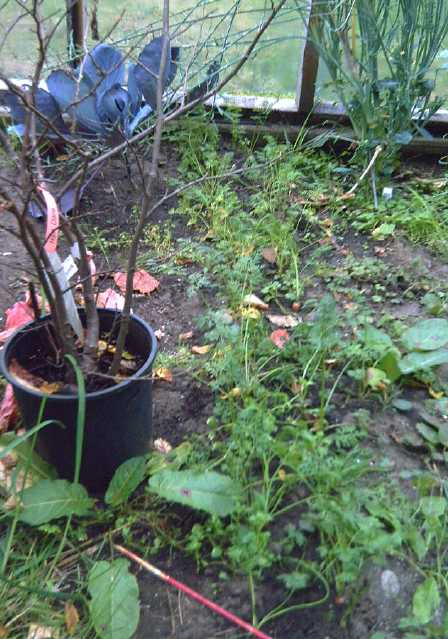
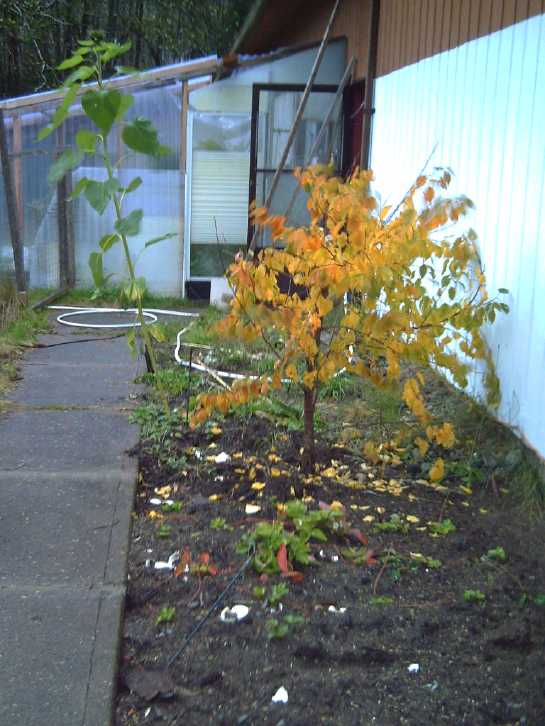
Apricot tree with yellow leaves; New, productive strawberries in front
of it,
runners all planted. (Freshly planted garlic bed very bottom.)
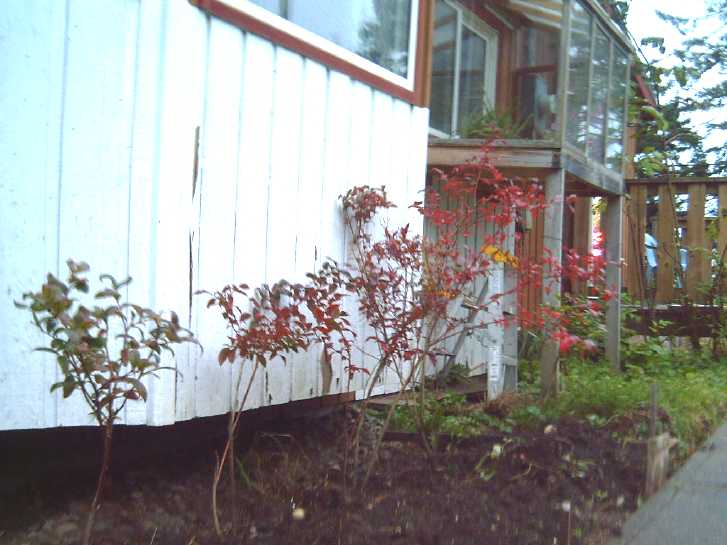 The blueberry bushes with red
fall leaves
The blueberry bushes with red
fall leaves
I started sprinkling - almost dumping - wood ashes around
the fruit trees, and sprinkling them in the garden and on the
blueberries too. Perhaps lack of potassium was part of the reason for
for the almost complete lack of fruits on my trees? The leaves of the
apple and pear trees are rather yellow except the new one that I
planted in its peat pot, which are dark green. The blueberry crop
wasn't bad, but I didn't think it was as good as 2020 considering I
have more bushes now and the first 3 have grown a bit. (I forgot that
wood ashes raise the soil pH and blueberries like acid soil!)
On the bright side I have noticed prolific
caterpillars/"worms"(?), that look like slimy tiny black leeches from
above, on the outside cherry tree, and this year I took pains to
wipe them off every leaf, with "touch-up" repeats several times. They
finally stopped appearing about the end of September. In previous years
this tree lost its leaves in early September(?), long before the nearby
apple and pear trees in November. This year it still has leaves
into late October. So! Those caterpillars have really been doing it in,
cutting its growing season way short! That probably helps explain why
it has grown so little over 5 summers and maybe why it has produced so
few cherries. Now there are healthy looking suckers coming up
vigorously on one
side. Do I assume those are tiny, bitter wild cherry from the root
stock and cut them off? Or do I say, gosh, finally at least a part of
the cherry tree is growing well!, and leave them? Those leaves didn't
get the caterpillars.
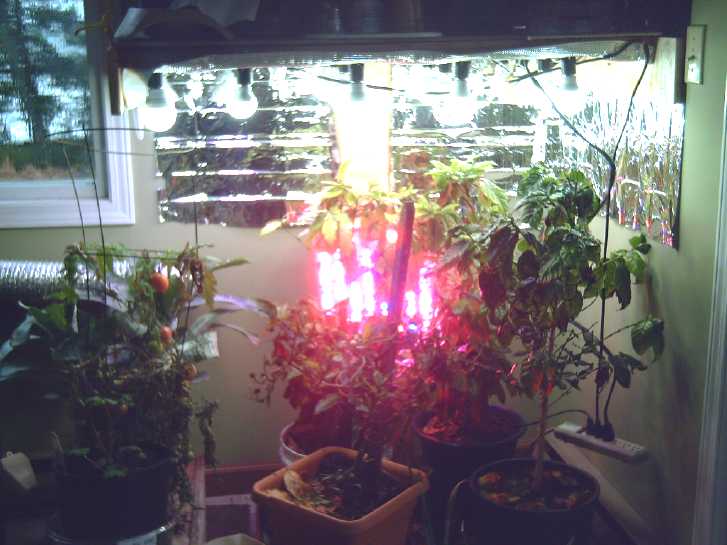 Around the 5th(?) I lowered the light bulbs panel in the LED garden for
plants down on the floor instead of up on shelves - last year's
unsatisfactory arrangement. I brought in the
coffee bushes from the window greenhouse as it was getting pretty
chilly at night. Everything on the floor went into "boot" trays (to
catch water) set on the rolling flat dollies I made when I first made
the
LED setup. But having put the growing coffee plants into bigger pots,
it all takes
more room. It seems the main set of lights is now largely devoted to
them.
Around the 5th(?) I lowered the light bulbs panel in the LED garden for
plants down on the floor instead of up on shelves - last year's
unsatisfactory arrangement. I brought in the
coffee bushes from the window greenhouse as it was getting pretty
chilly at night. Everything on the floor went into "boot" trays (to
catch water) set on the rolling flat dollies I made when I first made
the
LED setup. But having put the growing coffee plants into bigger pots,
it all takes
more room. It seems the main set of lights is now largely devoted to
them.
The rest of the plan was to put the small "grow lights"
panels up high for lettuce and small things, but I hadn't got around to
it by month's end.
Millet and Timothy Grass
 I plucked a
head of the unusual grass plant I noted
finding in my garden a couple of months ago, and checked on Wikipedia
to try and find it. It seemed to look most like sorghum, of which there
are evidently 25 species. The top flowers had some little seeds in them
which might just be worth harvesting if you have some means to
automaticly process them. The lower ones felt empty, and it's October
20th, so this may not be a very good climate for it.
I plucked a
head of the unusual grass plant I noted
finding in my garden a couple of months ago, and checked on Wikipedia
to try and find it. It seemed to look most like sorghum, of which there
are evidently 25 species. The top flowers had some little seeds in them
which might just be worth harvesting if you have some means to
automaticly process them. The lower ones felt empty, and it's October
20th, so this may not be a very good climate for it.
 There was another grass family plant a couple of feet from
it, which I assumed must be the same thing but as the flowers developed
turned out to be quite different. It seemed more like some relative of
a
bullrush.
There was another grass family plant a couple of feet from
it, which I assumed must be the same thing but as the flowers developed
turned out to be quite different. It seemed more like some relative of
a
bullrush.
 A Russian Tatar friend of much
experience around the world saw the head on my desk and exclaimed
"millet!" He also identified the other, as "timothy grass" from the
prairies, which I had never heard of, but a picture on Wikipedia looked
pretty similar. Millet makes sense since I had bird seed with millet in
it. The seed could easily have come from that, and the seeds looked
about right - maybe a bit smaller because probably not quite mature.
Maybe the bird seed had timothy grass seed in it, too?
A Russian Tatar friend of much
experience around the world saw the head on my desk and exclaimed
"millet!" He also identified the other, as "timothy grass" from the
prairies, which I had never heard of, but a picture on Wikipedia looked
pretty similar. Millet makes sense since I had bird seed with millet in
it. The seed could easily have come from that, and the seeds looked
about right - maybe a bit smaller because probably not quite mature.
Maybe the bird seed had timothy grass seed in it, too?
I wonder how different millet and sorghum are? There are
several species or varieties of each, and mine looked more like a
Wikipedia picture of sorghum than ones of millet.
Electricity
Generation
My Solar Power System
DC Power Test
[26th] Having made new porcelain "high current T-Plug" sockets (above
under "other projects") for 36 volts, I replaced the broken ceramic
socket under the sink. Then I thought I would run the fridge for a
while for a test. The present batteries are three of the five 12V sets
of the old yellow 100AH lithium iron phosphate ones.
The 2500 watt inverter's plug went in, felt solid, and the
socket didn't break. Good start! [11:41] I plugged in the fridge. When
it came on the voltage dropped from 39.3 to 38.5. (after dipping down
substantially for a moment as the compressor started.) That drop was
mostly in the long 36V wire across the house, since it still said 39.2
at the batteries. The PowMr was recharging the batteries at about 80-90
watts - about the best it could do in the cloudy weather with two solar
panels. (which I'll
call "SPs" here. I find "panels" by itself confusing since there are
many types of "panels".) (At the same time the AC grid ties with ten
SPs were
doing a little over 400 watts. Later the sun came out but the key SP
was in tree shadows and charging dropped to around 50 watts.) The
fridge plus the inverter were using ~135 watts. (The inverter uses
about 15). The fridge shut off and the voltage at the inverter rose to
39.0, 39.1, 39.2 at the batteries.
I left it to run that way, not connected to the power
grid, for a few hours. Since the fridge didn't run continuously the SPs
were keeping up with it during the day, even on this sort of "medium
overcast" day in late October. (November to February it probably
wouldn't. More solarps would of course help.)
Except for the one SP connected to the DC system only,
nothing is gained by running the fridge off the DC system: the power
"sent to the grid" by the grid tie inverters first goes to things in
the house anyway. Only if the grid is down for a day or more does the
ability to run without it become valuable. Otherwise one is just
running batteries up and down, which (with present battery
technologies) gradually shortens their life.
At ~19:00 I looked and the voltage was down to 33 volts,
soon 32, after having been at 37.0 with the fridge running moments
before. I found the fridge was using 420 watts, and it wasn't even
running! This was an unpleasant surprise. How? It dawned on me that it
was defrosting the freezer coils. At that rate, if there is ever a long
power failure, this fridge is going to be trouble!
I used the opportunity to check the 12 battery cells,
which were after all pretty old. 9 were above 3 volts. 2 were just
under. 1 had died ingloriously and read -.32 volts. I unplugged the
fridge and plugged it back into the wall. I had a spare cell I had
already
found to be weak, and I connected it to the dead one with alligator
clip leads. The voltage on the other was 1.5 once the fridge was
unplugged, and it slowly rose, being charged by the other. The two
weaker cells can stay in parallel.
2 Solar Panels on Pole
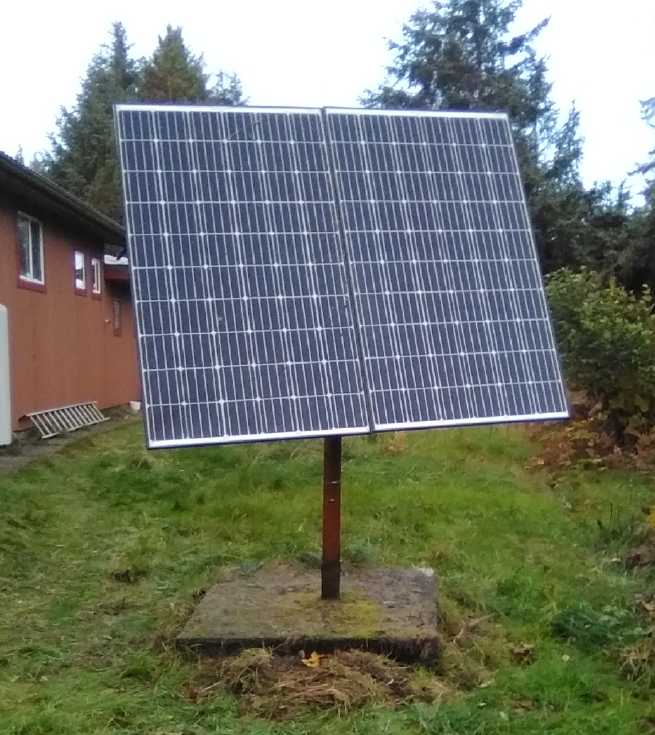 [20th] A
couple of years ago I dug a pit and had an old steel pole from
a 1980s era satellite TV system, anchored in a heavy concrete base,
carted by
a lawn mangling machine (a skid-steer forklift) to about the sunniest
spot in the yard, intending to put up a
couple of solar panels on it. But I wasn't sure how to attach them.
This mid afternoon I thought of it again and looked, and realized I had
only to remove the
short aluminum beam and replace it with a longer wooden 2" by 6" beam
as the central support. Duh!
[20th] A
couple of years ago I dug a pit and had an old steel pole from
a 1980s era satellite TV system, anchored in a heavy concrete base,
carted by
a lawn mangling machine (a skid-steer forklift) to about the sunniest
spot in the yard, intending to put up a
couple of solar panels on it. But I wasn't sure how to attach them.
This mid afternoon I thought of it again and looked, and realized I had
only to remove the
short aluminum beam and replace it with a longer wooden 2" by 6" beam
as the central support. Duh!
So I cut the pieces of wood and tried to measure
everything up carefully. I bolted the "Z clips" to the 2" by 4" cross
piece "bars" and made sure they fit across and would bolt onto both
sides of a SP. Then I put it together and up on the pole.
Somehow the vertical measurement on the main beam was short by the
thickness of one cross bar (~5cm), and so the bolt holes on those
didn't line up with those in the SPs. By this time it was starting
to get dark and I had to quit for the night.
[21th] That was just as well, because it blew up a storm in the night
and I had intended to add stays to stabilize it the next day. It blew
and rained all day, and if the SPs had survived the night, I'd have had
to be out in it to do the rigging. It blew fiercely again in the
evening.
[22nd] It was still breezy, but not raining. I got at it after lunch,
padded the length with a couple of bits of 1" by 6", attached the SPs
to the frame on the ground this time, and (not without effort and a bit
of help) put the assembly up. I used some stainless steel 1/8" wire
rope, eye hooks and a couple of pipe clamps to make stays and hopefully
prevent the wind from doing anything bad to it. It didn't seem very
sturdy. Either I'll think of something stiffer or we'll see how it does
in a blast.
I must say the time of year doesn't seem very opportune.
The solar systems don't seem to be doing much most days now, and it'll
just get worse until spring. At least these SPs are pointing straight
south in a good spot, and are aimable up and down with the seasons. I
set them steep for low winter sun.
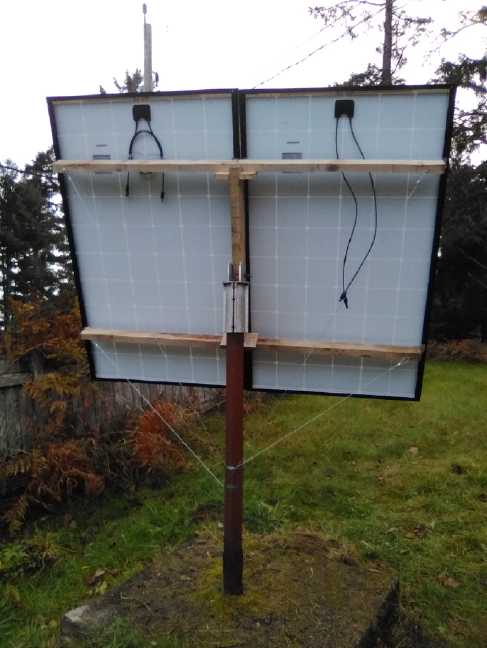 [23rd] I found an old dead
3-wire extension cord with a socket on one end, and ran it from the new
SPs to the plug end of the cord that had connected the windplant into
the garage where the equipment is. When I stripped the wires I
discovered the cord was #18 AWG. Ack! Do they even make such skinny
cords? #16 would have been okay. #14 would have been better. With 150
feet of skinny old extension cords outdoors, the voltage was dropping
at least 3 volts with just 4 or 5 amps of current. Power would be
seriously reduced in strong sunshine - the wires could even get pretty
warm. I may replace it. (In fact, I should add another grid tie
inverter or two to the whole setup and have fewer SPs on each. At
present maximum power output in full sunshine is limited by the grid
ties, not the SPs.
[23rd] I found an old dead
3-wire extension cord with a socket on one end, and ran it from the new
SPs to the plug end of the cord that had connected the windplant into
the garage where the equipment is. When I stripped the wires I
discovered the cord was #18 AWG. Ack! Do they even make such skinny
cords? #16 would have been okay. #14 would have been better. With 150
feet of skinny old extension cords outdoors, the voltage was dropping
at least 3 volts with just 4 or 5 amps of current. Power would be
seriously reduced in strong sunshine - the wires could even get pretty
warm. I may replace it. (In fact, I should add another grid tie
inverter or two to the whole setup and have fewer SPs on each. At
present maximum power output in full sunshine is limited by the grid
ties, not the SPs.
The two 305 watt SPs seemed to be adding around 100 watts
to the total, but there was a tree across the highway casting a shadow
on the SPs. A short time later it was off of one and I thought that in
5 or 10 minutes they'd both be in full sunlight. Then a cloud covered
the sun, and then I had to leave.
It must have been fairly sunny for much of the day. By
evening the house system with these added on had made all but 4 KWH by
itself, with a further 1.98 KWH from the cabin SPs, and with .10 from
the DC system it [just] hit 6 KWH for the day for only the third time
this month.
[31st] Finally I was out at a good time to catch both panels fully in
the sun. It had seemed to me throughout that they weren't putting out
what they should be. The connector formerly where the windplant
attached was warm. That meant it had a poor connection. I cleaned it up
and the 'power to the grid' readings improved. So I guess they weren't
contributing a lot until the afternoon of the 31st.
But there were definitely
too many solar panels now for the two grid tie inverters for summer
sun, and I ordered some new ones, and a couple more AC power monitors.
Seeing I have been dissatisfied with the performance in variable light
of the inverters I've been using, I ordered some 700 watt ones of a
different brand. (700W were the largest in that brand.) With shipping
they came to ~100$C each.
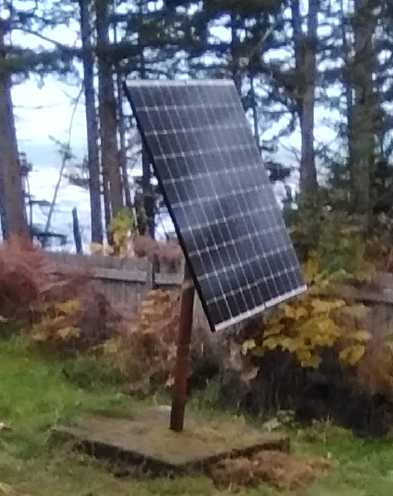 I
also noticed in this whole process that the top of my new carport roof
was sunnier than the pole with the SPs, which got substantially more
shadows than I had expected. That's where I should have put them, and
it's where I'll put more next time I if have some craving to add some.
I
also noticed in this whole process that the top of my new carport roof
was sunnier than the pole with the SPs, which got substantially more
shadows than I had expected. That's where I should have put them, and
it's where I'll put more next time I if have some craving to add some.
The panels can be aimed up and down with the seasons, and
I finally got the top free to rotate (albeit using much force, and
having to loosen the guy wire clamps) so they could be pointed to the
west in the afternoon. But there too they got a lot less afternoon sun
than I expected - at least in winter. By the time the tree shadows from
the trees to the south-south-west were clear, the sun was lower and
behind the trees farther to the west.
Daily/Monthly/Yearly Log of Solar
Power Generated [and grid power consumed]
(All times are in PST: clock 48 minutes ahead of sun, not PDT which
is an hour and 48 minutes ahead. (DC) battery system power output
readings are reset to zero
daily (often just for LED lights, occasionally used with other loads:
Electric car, inverters in power outages or other 36V loads), while the
grid tied readings are cumulative.)
Solar: House, Trailer, (DC@house) => total KWH [grid power
meter reading(s)@time] Sky conditions
Km = electric car drove distance, then car was charged.
September
30th 2307.19, 1031.84, .09 => 4.52 [30Km; 87068@18:30] A bit
of sun in afternoon (continued raining anyway).
October
01st 2308.05, 1032.37, .00 => 1.39 [87088@21:30] Just
rain.
02nd2311.00, 1034.19, .00 => 4.77 [55Km;87105@20:00]
Sun, deluge, on, off, on, off, on, off
03rd 2313.97, 1035.73, .25 => 4.76 [87132@18:30] More of the
same.
04th 2315.62, 1036.44, .00 => 2.36 [87147@18:30] yet mor.
05th 2320.20, 1038.18, .17 => 6.01 [87171@19:00] Sunny!
Wow! The trailer installation was unplugged until mid morning, but I
don't understand why it produced so little.
06th 2323.74, 1040.48, .00 => 5.84 [55Km; 87219@23:00]
Frost in AM. Partly sunny again! Colder weather: Electric heaters ON in
travel trailer and Perry's RV. [48KWH - Yowr! More and more I want that
open loop air heat pumping, in fully developed form!]
07th 2325.25, 1041.38, .00 => 2.41 [87248@19:30]
08th 2327.41, 1042.61, .00 => 3.39 [95Km; 87299@18:30]
09th 2330.71, 1044.69, .31 => 5.69 [55Km; 87342@22:00]
10th 2334.05, 1046.59, .00 => 5.24 [20Km; 87372@18:30]
11th 2335.67, 1047.42, .22 => 2.67 [87397@18:00]
12th 2338.56, 1049.05, .00 => 4.52 [75Km; 87430@18:30]
13th 2340.94, 1050.59, .18 => 4.10 [87454@18:00]
14th 2342.42, 1051.36, .00 => 2.35 [57Km; 87488@18:00]
15th 2346.63, 1053.53, .00 => 6.38 [85Km; 87521@17:30]
Oh wow, a sunny day!
16th 2349.35, 1055.58, .25 => 5.02 [110Km; 87567@19:30]
Another mostly sunny one. (didn't top it from sprinkling rain!)
17th 2352.72, 1055.98, .00 => 3.77 [86602@18:30] Mostly
sunny again! Cabin ground fault breaker was blown, so no cabin solar.
(For how long ??? - shoulda been almost a couple more KWH.)
18th 2353.34, 1056.34, .15 => 1.13 [86644] A windy day, so
dark the solar outputs mostly said "0" until 11 AM.
19th 2354.37, 1056.86, .07 => 1.62 [55Km; 86683@17:30]
Not much better.
20th 2356.36, 1057.96, .62 => 3.71 [86712@19:00] Mostly
sunny! DC: .276 +.347=.623 (replaced power monitor - charging new 36V,
120AH lithium ion battery stack, stack #3.)
21th 2356.89, 1058.26, .15 => 0.98 [86754@18:30] Wind,
rain, dark! Batteries didn't get much mor charj today!
22th 2358.30, 1059.11, .28 => 2.54 [85Km; 86803@17:30]
Brighter than yesterday with little to no rain. Batts. finished
charging.
23rt 2362.26, 1061.09, .10 => 6.04 [70Km; 87838@18:00]
Mixed sun & cloud. (Some actual sun!) I set up & connected 2
new solar panels on a pole facing straight south. (see report above.
Wouldina hit 6KWH without the new panels! And the bit of DC!) At the
end of the month I noted a bad connection, so the new panels really
weren't contributing what they should have been until PM of the 31st.
24rd 2365.46, 1062.68, .16 => 4.92 [87877@18:30] Pretty
nice day, sun & light clouds.
25th 2367.65, 1063.75, .00 => 3.26 [55Km; 87919@16:30] Light
clouds.
26th 2369.85, 1064.93, .49 => 3.87 [87952@17:30] A bit
of sun but mostly overcast, rain off and on. Ran fridge from solar DC
system with 2500W inverter for several hours.
27yj 2373.28, 1066.82, .25 => 5.57 [50Km; 87983@17:00] A
fair bit of sun, occasional clouds.
28th 2375.78, 1068.37, .15 => 4.20 [88021@17:30] mostly
lighter clouds, occasional sun.
29th 2378.41, 1070.15, .00 => 4.41 [88053@18:00] Pretty
sunny. (but chilly)
30th 2381.09, 1071.51, .21 => 4.25 [55Km;
88091@18:00]
31st 2384.71, 1073.69, .09 => 5.89 [88134@17:30] Sunny
with haze at times
November:
01st 2386.58, 1074.72, .00 => 2.90 [88170@16:00] not bad
02d 2386.96, 1074.89, .14 => 0.69 [50Km; 88225@19:00]
Wind & rain, dark.
03rd 2389.42, 1076.20, .00 => 3.77 [88257@17:30] Much nicer.
Daily KWH from solar panels. (Compare October 2021
with August 2021 & with September 2020.)
Days of
__ KWH
|
Sept. 2021 (12
solar panels)
|
October 2021
(12 solar panels ->
14 by end of month)
|
Oct. 2020 (12
solar panels)
|
0.xx
|
|
1
|
4
|
1.xx
|
4
|
3
|
6
|
2.xx
|
5
|
5
|
1
|
3.xx
|
4
|
5
|
2
|
4.xx
|
4
|
8
|
11
|
5.xx
|
5
|
6
|
6
|
6.xx
|
4
|
3
|
1
|
7.xx
|
1
|
|
|
8.xx
|
1
|
|
|
9.xx
|
|
|
|
10.xx
|
|
|
|
11.xx
|
2
|
|
|
12.xx
|
|
|
|
13.xx
|
|
|
|
14.xx
|
|
|
|
15.xx
|
|
|
|
16.xx
|
|
|
|
17.xx
|
|
|
|
18.xx
|
|
|
|
Total KWH
|
152.29
|
123.47
|
109.83
|
Km Driven
on Electricity
|
1072 Km
(~155 KWH)
|
973.6 Km
(150 KWH?)
|
|
Monthly Summaries: Solar Generated KWH [& Power used from
grid KWH]
2019
March 1-31: 116.19 + ------ + 105.93 = 222.12 KWH - solar [786 KWH
used from
grid]
April - 1-30: 136.87 + ------ + 121.97 = 258.84 KWH [608 KWH]
May - 1-31: 156.23 + ------ + 147.47 = 303.70 KWH [543 KWH] (11th
solar panel connected on lawn on 26th)
June - 1-30: 146.63 + 15.65 + 115.26 = 277.54 KWH [374 KWH] (36V, 250W
Hot Water Heater installed on 7th)
July - 1-31: 134.06 + 19.06 + 120.86 = 273.98 KWH [342 KWH]
August 1-31:127.47 + 11.44+91.82+(8/10)*96.29 = 307.76 KWH [334 KWH]
(12th solar panel connected on lawn Aug. 1)
Sept.- 1-30: 110.72 + 15.30 + 84.91 = 210.93 KWH [408 KWH]
(solar includes 2/10 of 96.29)
Oct. - 1-31: 55.67 + 13.03 + 51.82 = 120.52 KWH, solar
[635 KWH used from grid]
Nov. - 1-30: 36.51 + 6.31 + 26.29 = 69.11
KWH, solar [653 KWH used from grid]
Dec. - 1-23: 18.98 + .84* + 11.70 =
31.52
KWH, solar + wind [711 KWH + 414 (while away) = 1125 from grid]
2020
Jan. - 6-31: 17.52 + ------* + 10.61 = 28.13 KWH,
solar+
wind [1111 KWH from grid]
Feb. - 1-29: 56.83 + ------* + 35.17 = 92.00 KWH,
solar + wind [963 KWH from grid]
* The solar DC system was running the kitchen hot water
tank. Now it's only running a couple of
lights - not worth reporting. So there's just the 2 grid tie systems:
house and "roof over travel trailer".
One year of solar!
March - 1-31: 111.31 + 87.05 = 198.37 KWH solar total
[934 KWH from grid]
April - 1-30: 156.09 + 115.12 = 271.21 [784 KWH
from grid]
May - 1-31: 181.97 + 131.21 = 313.18 KWH
Solar [723 KWH from grid]
June - 1-30: 164.04 + 119.81 = 283.82 KWH Solar [455 KWH
from grid]
July - 1-31: 190.13 + 110.05 = 300.18 KWH Solar [340
KWH from grid]
August- 1-31: 121.81 + 83.62 = 205.43 KWH Solar [385KWH
from Grid]
Sept. - 1-30: 110.68 + 65.09 = 175.77 KWH Solar [564
KWH used from grid]
Oct. - 1-31: 67.28 + 42.55 = 109.83
KWH Solar [1360 KWH from grid -- Renters!]
Nov. - 1-30: 35.70 + 20.79 = 56.49
KWH of Solar [1301 KWH from grid]
Dec. - 1-31: 19.78 + 11.31 = 31.09
KWH Solar [1078 KWH used from grid]
2021
Jan. - 1-31: 25.47 + 18.58 = 44.05
KWH Solar [1185 KWH used from grid]
Feb. - 1-28: 47.18 + 33.22 = 80.40
KWH Solar [1121 KWH used from grid]
Two years of solar!
March - 1-31: 81.73 + 55.22 + 2.2 (DC) = 139.15 KWH
Solar
[1039 KWH grid]
April - 1-30: 161.83 + 112.35 + .44(DC) = 274.62 KWH
Solar
[680 KWH from grid]
May - 1-31: 156.25 + 97.22 + 1.29(DC) = 254.76
KWH
Solar [678 KWH from grid]
June - 1-30: 197.84 + 112.07 + 2.21(DC) = 312.12 KWH Solar
[& 448 KWH from grid]
July - 1-31: 204.35 + 121.21 + 4.06(DC) = 329.62 KWH
Solar [426 KWH from grid; 150(?) KWH used by Nissan Leaf]
August- 1-31: 176.19 + 102.91 + 5.37(DC) = 284.47 KWH Solar [477 KWH
from grid; 165 KWH (est) used by car]
Sept. - 1-30: 94.35 + 51.34 + 3.30(DC) =
152.29 KWH Solar [590 KWH from grid; 155 KWH (est) used by car]
Oct. - 1-31: 77.52 + 41.85 +
4.10(DC) = 123.47 KWH Solar [1066 KWH from grid; 150 KWH (est) used by
car]
Things Noted - October 2021
* Toward the end of the month tree shadows even from across the highway
and from the acreage to the south were seriously interfering with solar
collection. It's another reason there isn't much solar in the winter.
Annual
March 2019-Feb. 2020: 2196.15 KWH Solar [used 7927 KWH from
grid]
March 2020-Feb. 2021: 2069.82 KWH Solar [used 11294 KWH from grid]
(See TE News #156 for the two year writeup... which technicly should
have been two months earlier.)
https://www.TurquoiseEnergy.com
https://TurquoiseEnergy.neocities.com
Haida Gwaii, BC Canada