Turquoise Energy Ltd.News #11
Victoria BC
Craig Carmichael - January 2nd
2009
Contents:
December in Brief (overview...
summary... the short version!)
* or, this TOC is the
Super Short version...
* December was a slow month
for the energy projects.
Electric Hubcap Car Drive Project,
Longwinded Detailed Report
* Cold weather, flu delays
production model prototype tests.
Turquoise Battery Project, Longwinded
Detailed Report
* To get much lower resistance,
more current: compress powders.
(nothing established battery makers didn't already know!)
Electric Hubcap Motor Making Course/Workshop:
Hybridize your car (or other relevant motor project)!
* Workshops are on hold
pending motor road tests - (Hopefully coming this spring)
December in Brief
The changes about
to sweep the whole face of transportation were delayed a bit longer this
month -- just that little bit longer before the day the Electric Hubcaps
and Turquoise Batteries can come "on sale" in a Canadian Tire
flyer to be whisked off by those still driving on gas.
There were no failures, burnouts
or design problems to rework. Indeed, the "production prototype" motor
was completed and tested on the bench. But after a year of concentrated
R & D efforts, December's pace was definitely reduced.
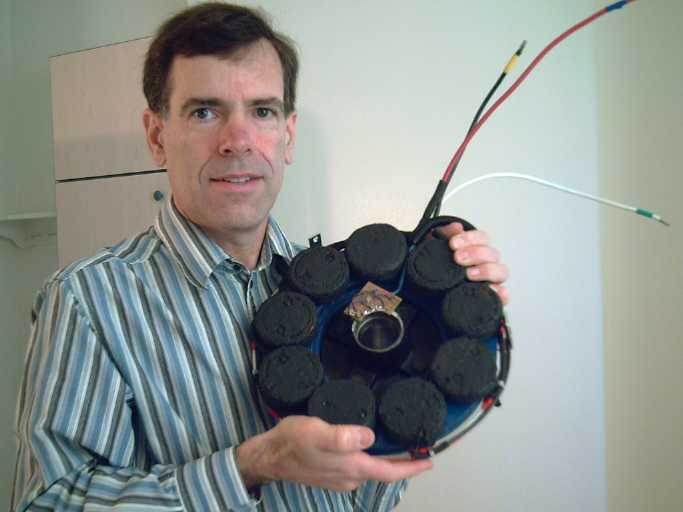
Holding the "production prototype" Electric Hubcaptm
motor stator. Outside are the electromagnet coils and heavy wiring. In
the middle is the bearing hub (standard trailer axle hub) with the "optical
commutator" circuit of LEDs and phototransistors mounted.
I salvaged some supermagnets
off a couple of rotors to make a new 10.25", 18 magnet rotor. That took
a couple of weeks waiting for vinegar (and then Draino) to soften
long hardened epoxy glue.
While that was happening seemed
to be a good time to get to some other things that were being neglected.
There seemed to be lots of time to get the car running sometime during
the month. I fixed my electric sawmill motor which had been busted since
September and milled some logs that should have been cut by fall. Then
cold weather set in... and stayed... and stayed. Perhaps it set some records
for Victoria. I began to think I had somehow moved to the prairies. Then
I got the flu.
With an unheated workshop
and the thought of working on the car outside in the snow being unappealing
(even before the flu), the cold weather seemed to be a good time to concentrate
on the batteries. I did some research, and found an excellent nickel-zinc
alkaline battery writeup where dozens of experimental variations had been
tried (a patent from Sanyo, 1999). A customer that bought some Pacific
Dogwood sent me his masters thesis, on making thin film lithium batteries.
(Gosh, the last guy who ordered dogwood was a retired biochemist
who had also once experimented with battery making!)
Most importantly I figured
out why my batteries have such poor current drive: regardless of chemicals,
the powders are too loose and so the granules are making poor connection
with each other. More strongly compressing them, as in using some sort
of press and mold, should provide perhaps an order of magnitude better
current capacity. A first attempt shows promise.
Best wishes to all for the new year!
The Electric HubcapTM
Vehicle Drive Motor
December Gory Details
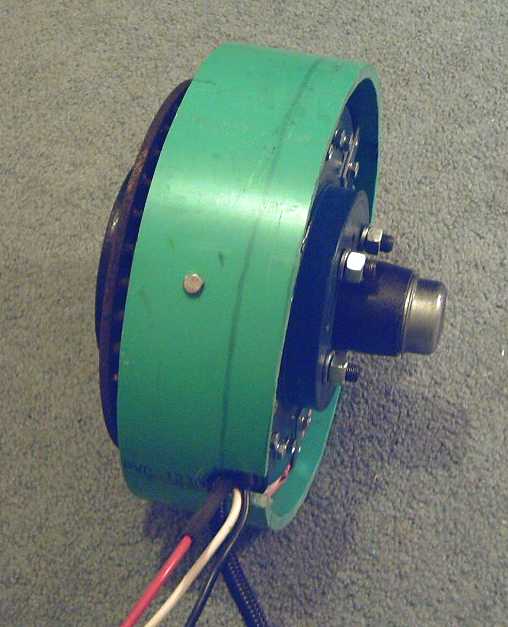
Production Prototype Electric Hubcap Motor
Left: Magnet Rotor Disk - spins, bolts to car wheel's stud bolts
Middle: Outer Housing, a plastic culvert pipe
from which "Turquoise Energy Ltd." derives its name.
Right: Stator Disk (blue), trailer hub & axle
Bottom: the 3 heavy power wires, optical commutator cable.
Some Physical Dimensions and Specs:Diameter:
13" (about 11" plus wiring, case.)Length: 7" (shortest trailer axle is
6")Weight: 46 #.Volts: 36 (nominal battery voltage)Amps: 100 (this and
below are very tentative estimates)Watts: 3600 (in)Efficiency: 95%HP: 4.6
(out)RPM: 0 to 1500
Theoretically, the motor could be 11" diameter by under
3" long with custom rotors, hub and axle and no need to fit it to a car
wheel. Actually the length as shown is about 8" -- the magnet
rotor is sticking out an extra inch for the photo. The plastic housing
will be all but touching the car wheel to keep dirt out. (Stator mounting
arms aren't installed yet in this photo.)
Rotors
When I found a
disk brake rotor (a Honda car rotor) that fit perfectly on the trailer
hub, that solved one side of the motor perfectly. The trouble was, that
same type of rotor didn't quite fit my car wheel. The original rotor fit
the wheel but was a smaller outside diameter. Obviously, every car is going
to be an individual fit.
My first thought was to machine
a bit off the corner of the central hub when I get the metal lathe. But,
hey, as there seem to be an almost endless variety of brake rotor sizes
and shapes, why not search around until I find the "perfect" one for Toyota
Tercels?
On the 27th I phoned a brake
place to make sure they were open Saturdays. They were, so set off with
steel toed boots, gloves and a ruler to search the bins. Well, that
place was open Saturday. They didn't have one the right size, and most
of the others were closed. That's what I get for trying to shop on a Saturday!
Monday I tried Wade's
auto wrecking. Unfortunately, there simply didn't seem to be a better fit
after all. There were a lot more variations of sizes for five lug bolt
rotors than there were for four. But that would mean trying to drill exact
new holes that overlap the original holes in order to match the four bolt
pattern.
I guess I'll be grinding or
machining to fit after all!
Advantages of the Electric Hubcap
Design
Someone sent me
a link to Michelin Tire's Electric Wheel. It's always interesting
to see what others are doing. I don't spend much time looking for myself,
so it's nice to be pointed to some of the most interesting stuff.
After viewing it, I realized
that with trivial changes, the Electric Hubcap (already made of automotive
and trailer wheel/axle parts) could itself be a Motorized Wheel,
ready to install on a new vehicle, somewhat like Michelin's product except
using external suspension. Brake pads would be situated on opposite sides
of the (unused) outer face of the magnet/brake rotor. It would need 14+"
wheels for the rim to clear the motor coils. It's not a market I'm considering
attempting to tap any time soon. However, custom electric vehicles is a
potential use of the Electric Hubcap. One EH should power any sort
of lighter vehicle on pavement.
Michelin's product is
a big wheel (18"?) with a very high power motor. It's being used in some
novel sports cars. The mounting position indicates that the
motor drives a big ring gear on the rim of the wheel. Makers often call
this "direct drive", but like other drives it's well geared down to multiply
the torque so the motor with its lesser torque can turn the car wheel and
move the car, which takes a lot of torque. Figures given indicate about
a 7 to 1 gear ratio. I can't tell from the picture or from the descriptions
I saw whether it's a typical induction motor or a PMSM.
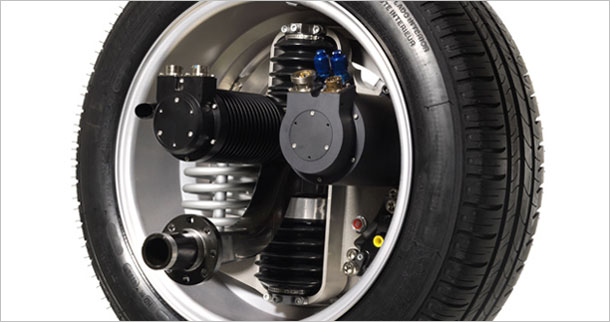
Michelin Tire's Electric Wheel. Their complex offering includes
"active suspension" built in as well as the geared drive motor on the right.
It looks impressive and has some impressive looking specs - but is it best?
The connections seen would be for power, brake hoses, mechanical attachment,
and liquid cooling hoses for the motor.
I took the opportunity
to sort out and write down what the EH has over other electric vehicle
drive motors, including this one - some of which I only gradually came
to realize myself once I was working on it.
Once we humans get used
to seeing something and doing it a certain way, that becomes familiar and
other designs and techniques seem "alien". Any attempt to change it beyond
expected "normal design parameters" will meet with objections from "experts",
who will tell why it will fail -- why it is impractical if not impossible.
They understand in fine detail the familiar design but don't quickly see
that changing that design changes the fundamental rules on which their
objections are based. Yet, often the "familiar" isn't the best - it's usually
just the first way that gave decent results somewhere back in history when
the idea was first being developed. (All the electric motor books I've
found date from the 1930's or earlier.)
The Electric Hubcap motor
was made possible by abandoning the familiar radial flux motor layout -
and also much familiar "normal design" which is actually peculiar to that
layout - for axial flux, and facing the untried and unfamiliar challenges
of designing and constructing such a motor. Unforseen advantages and a
surprising robust simplicity gradually emerged from the trials and errors
of trying and doing. (Considerably more gradually than I'd expected!)
First, the axial flux layout gives it the short "wheel hub" or "hubcap"
shape to sit within or on the outside of a wheel. A radial motor would
stick out a foot or so beyond the fender - it would be impractical.
PMSM has much more low-speed
torque than a similar size induction motor, and the Electric Hubcap has
much more torque again with the axial flux layout giving a much larger
diameter and making room for bigger (and better cooled) coils having no
wasted copper and more useful iron.
One might almost say
it runs an order of magnitude slower than "typical" electric motors, and
has an order of magnitude more torque. These are the torque and speeds
other motors are geared down to achieve.
The individual motor
efficiency increases over "typical" electric car drives are small but but
they are several and cumulative:
-
A Permanent Magnet Synchronous Motor
(PMSM) is inherently more efficient than an induction motor. (No slip losses.)
-
All of the copper wire
in the Electric Hubcap's round donut coils contributes to magnetizing
the iron core, minimizing coil wire length and hence copper losses.
Most motors have straight slots with considerable non-contributing wire
needed in "overhangs" at the ends to cross between the slots. (Typically
perhaps 30-50% extra wire.)
-
My cores, with one-dimensional iron wires,
should in principle have lower induced stray currents and hence lower iron
losses than with typical two-dimensional die cut laminate plates. (Actually
as mentioned before they're just strips of nail gun finishing nails that
seem to have about the right characteristics - they connect poorly and
won't hold magnetism! (varies by brand))
-
No gears, so no gear losses. (and no
transmission oil, no oil seals, no whining noise...)
-
Low speed means low spin energy. The
energy required just to keep the motor spinning (regardless of load) increases
with square of speed (e=mv^2). With a 7:1 gear ratio Michelin's "Active
Wheel" is going 5600 RPM when the wheel is going 800, using 49 times as
much energy just to keep itself spinning. I've heard 10:1 is a typical
gear ratio, so 100 times the spin energy of the EH. This certainly
doesn't mean the smaller, faster, motor is using 100 times as much energy
overall as the EH on the highway, but it is indicative of quite
substantial energy waste at highway speeds.
-
Only weighs 50 pounds each. (Used as
a "motorized wheel", this is also the weight of the wheel per se.)Without
trying here to quantify all the small gains individually, I'll point out
that there's so little wasted energy making heat that the EH is
a simple natural air flow cooled motor instead of pumped
liquid cooled like other in-wheel motors such as the Michelin.
(Of course this remains to be road tested... but I'm expecting it to be
sufficient cooling.) I think it's reasonable to expect an Electric Hubcap
type of drive to give half again better performance per watt than a "typical"
electric car drive, ie:
-
50% more driving range from the same
batteries, or
-
33% less weight of batteries, and
-
33% less energy per Km driven needed
from the power grid to recharge the batteries. And:
-
50% more vehicle performance per motor
horsepower, or
-
33% less power needed to drive the car.
(probably over 40% less than gas.)
It's said it takes
10 HP to keep a car cruising along a level highway. If the EH takes
40% less, that's 6 HP. That's on the edge for one wheel, but two of them
should be sufficient. The high torque should give it more acceleration
at lower speeds than similar power rated gas engines, so it should handle
hills in town okay. What speed it can maintain going up the Malahat with
two is reserved for the trials. For a lighter vehicle not weighted
down by a combustion engine, surely one motor would be plenty for normal
driving.
The Electric
Hubcap is a compact, dead simple, practical, 50 pound motor. The figures,
even as rough estimates, are compelling. The more it's considered, the
more apparent it is that this is the future of vehicle propulsion.
The big, heavy combustion
engine connected to a clunky, inefficient, mechanical transmission suddenly
looks like a primitive dinosaur. They sell by default so far, but they
are ripe for sudden extinction in the new car market, though many new vehicles
will likely retain some smaller petrol engine driving a generator to power
the electrics on long trips. The switch is inevitable, but the EH
motor concept holds the promise of best economy and value for it in every
sense.
Better batteries would
of course also make a very big difference. Batteries that would power a
long day's drive could lead to overnight charging stations on highway routes,
especially for example at motels and campgrounds, and a complete end to
common use of gasoline in vehicles.
Turquoise Battery Project
December Gory Details
Density
I thought specs I'd
seen were suspicious, but measuring and weighing the nickel electrode from
a Ni-MH "AA" cell I cut open verified that the density of the nickel hydroxide
powder had to be over 2.5 - was in fact about 2.8. A battery maker I wrote
to mentions "tap density of 2.1". Mine was never above 1.5, and that was
including the dishsoap liquid. I knew from the ohm meter that the harder
you press a powder together the lower its electrical resistance, and the
higher its density, but somehow I wasn't drawing the proper conclusion
from that.
Finally I took a punch
and die set normally used for cutting sheet metal disks, and filled one
of the dies with nickel hydroxide. Hammering down on the punch compressed
it from 15mm tall to 5.8, with a density of about 1.9. Furthermore, it
went from being a loose powder that would fill the air if you sneezed on
it to a brittle solid object much more like the actual battery electrode.
At that point, it was
obvious that has been a big part of my problem: although the literature
speaks of "powder electrodes", powder per se is too loose to make a good
electrode with good electrical conductivity unless it is very much compacted.
Apparently the densest
thing around is me, for having been ignoring the figures I was reading
and their implications.
I have no doubt that
once I've set things up to compress the powders, I'll obtain at least an
order of magnitude better current capacity -- and start having batteries
that work in practice as well as in theory.
I had an idea for making
a rectangular punch and die to compress the powders, but it suddenly occurs
to me it might be simple to make some jig and compress them right onto
the collector plates using my rolling mill. It's the one piece of equipment
I have that's made to exert that kind of compressive force.
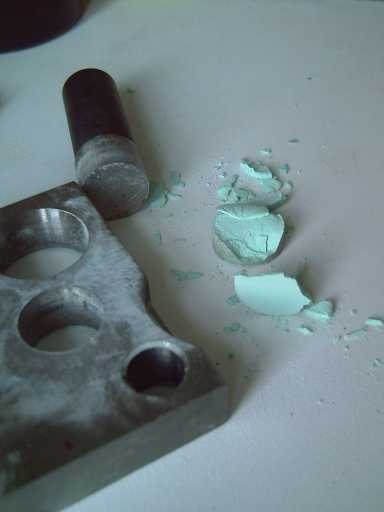
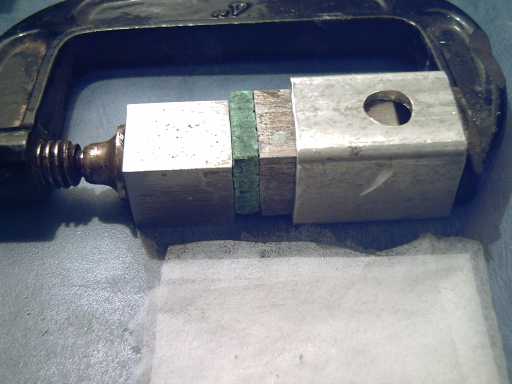
Nickel Hydroxide Powder Compressed
to 1/3 its original volume.
It should be denser yet.
Here's a first
try at making a punch & die type powder compressor. It makes 1" x 1"
squares, here of soap-wetted nickel hydroxide. I don't think it got to
density of 2.0, but it's above 1.5. (I don't have a scale to weigh "ones
of grams" very accurately.) In front is my latest electrode separator sheet...
a few thicknesses of non-woven polyamide "fusable web" cloth.
Then there's chemistry.
I finally decided I must have a mental block against acid electrolyte.
There were a number of things that were suggesting it should be tried.
For one thing, I haven't found tetravalent lanthanum on the web, but lanthanum
is next to cerium on the periodic table and cerium needs acidic - the voltage
runs the other way entirely in alkali. For another, if I'm going to use
ion passing membranes, it seems more likely that something like cellophane
will pass tiny H+ ions (AKA lone protons, obtained in acid solutions) freely
than big OH- ions (obtained in alkali solutions). (Think how helium leaks
out of a rubber balloon much faster than air - oxygen and nitrogen, and
helium is much larger than hydrogen ions.)
To turn the perchlorate
into perchloric acid simply required adding sulfuric acid to the mix. (No,
I don't know how to do these things offhand - I look them up on the web!)
I added about 4cc to 40cc of electrolyte. When I added the acid, the liquid
started to bubble up from the bottom -- to "percolate".
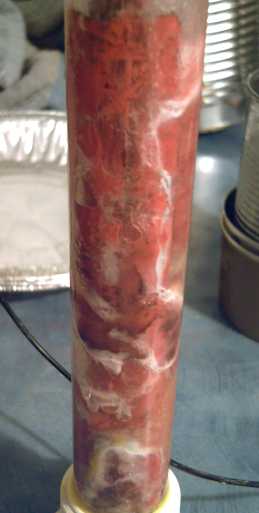
Battery in a transparent plastic tube. All the strange fluff that
has formed with charging is supposed to increase the conductance of the
battery for more amps, but it's not working right at this point.
(Some chlorine ions all somehow
with a valence of -1): Cl - chloride ClO - hypochlorite ClO2
- chlorite ClO3 - chlorate ClO4
- perchlorate
Perchloric acid is so
acidic it's called a "superacid". The PH read as "2" on litmus paper. I
decided that was just a bit much and added potassium hydroxide solution,
KOH, to bring it up to 3:
| KOH added |
PH reading |
| - |
2 |
| 1cc |
1 (what?) |
| 1cc |
1 |
| 2cc |
1 (good grief!) |
| 3cc |
4-1/2 (awg!) |
(And to think me and my partner Werner
used to "ace" all our chem labs in high school! Must have been his doing
after all!)
There were no certain
results apparent. The internal resistance remained very high as in the
other tests since putting cellophane around one electrode.
One soon manifest result
was much lower pressure - about 10 PSI. I'm not sure what it got up to
before, but it was probably 40 or 50 and climbing.
About the end of the
month I looked up cellophane. It turns out that although cellophane is
normally permeable to moisture, special non-permeable types are now common.
Great, I'll bet I have the wrong stuff! That would explain those high resistances.
I also ordered a Kg
of dysprosium to see how it would work and what the voltage would be. I'm
expecting Dy-Zn cells might be around 3 volts. (...or is it just wishful
thinking? If the Dy reaction voltage is too high, it might well not work
at all.)
I found the reaction
I'm looking for, for a lanthanide with perchlorate, forming perchloric
acid, HClO4. It was given for cerium (Ce in three
acids), so I can only guess the voltages for lanthanum and dysprosium.
These areas evidently aren't very well explored: in all this time looking
at reduction/oxidation formulae I hadn't run across it before for any lanthanide;
the same site lists nothing at all for dysprosium.
Ce(ClO4)6--
+ e- <==> Ce+++ + 6ClO4- [+1.70 V]
(How all those ions
can move just one electron I'm not sure, but it appears to balance!)
Ions floating around
in a liquid solution are likely to leak and-or to build up, as in zinc
ions building "dendrites" towards the electrode separator sheet as they
turn into crystals of zinc metal during charging.
The purpose of the Sunlight
dishsoap (it has several interesting chemicals in it), monel and lanthanum
hydroxide burned in bean sauce, polymerized acetal ester, and agar agar
gel, are to solidify or gel the electrodes and chelate the metalic ions
so they don't move around even when they change form with charging and
discharging. The zirconium silicate powder sprinkled on the zinc electrode
is a dielectric to change the pattern of crystal growth and eliminate the
tendency to form dendrites.
I think that should
pretty much solve the problems of limits to battery life, usually caused
by accumulation of small displacements until something goes.
How Rare are the "Rare Earths"?
The "lanthanide
elements", atomic numbers 57 to 70, are each unique but share some common
characteristics. In general - and like aluminum - they react with water
and oxygen, so they are never found in pure metalic form in nature on our
planet. Hence when they were first isolated they were believed to be rare.
Today the most common ones are sold as ingots by the kilogram, not by the
gram. They are often found in ores together, so they are first separated
as a mixed group called "mischmetal" and then usually into individual elements.
Unlike lead, cadmium and mercury, they are not considered to be toxic.
To generalize, they
get less common with increasing atomic number, and also the odd numbered
ones are much less common than the even numbered ones beside them. A good
part of the cost is for separating them from other substances and then
from each other.
The most common ones,
lanthanum (57), cerium (58) and neodymium (60), are about as abundant in
the Earth's upper crust as nickel or copper. Dysprosium (66) is only 1/10th
as abundant, but still perhaps 50 times as abundant as silver. (And, it
has no other special uses I've heard of, so there should be plenty for
all the batteries anybody wants!)
AFAIK they're all a
silver color and can be mistaken for other more commonly used metals. I've
seen some of them described as "Soft, can be cut with a knife." I must
observe here that copper, brass and aluminum are also "soft, can be cut
with a knife." I had to use an angle grinder with a cutting wheel to dissect
the lanthanum ingots. I think it was considerably harder than brass.
First
Proposed Class - Workshop
The fact that the "production prototype" Electric hubcap
still hasn't been road tested keeps us in suspense about how many of them
it will actually take to acceptably run the car, an important point of
planning for the workshops.
I'll repeat last month's disclaimer: that being
all new, none of this equipment has any sort of official sanction by ICBC,
CSA or other bodies. Still, assuming the installation is good and reliable,
changing the type of thrust from noisily burning a flammable liquid to
quiet electric propulsion having safer, easier, driving characteristics
(and no gears to shift), without modifying the car, surely has much less
risk than, say, driving while talking on a cell phone, which is, after
all, not illegal in spite of being a known cause or factor in some accidents.
The Electric Hubcap is not a polished product. More fabrication
and trial of design variants would be of value. The microprocessor controls
aren't ready and motor operation will be quite basic (drive power and forward/reverse,
no regenerative braking or displays...) until they are.
On the other hand, it would seem enough is known now to
make reliable, workable motors that move cars, and if I on my own very
meager resources try to get all the desired things tested alone, it could
take a year or more and meanwhile nobody's driving on electricity, whereas
if workshop participants each make and test a motor or two, much would
be learned before the sessions end, the participants would have electric
drive cars (or other motor project of choice) and know how to make them...
and I would have some funds to continue the R & D for the batteries
and the computer controls, which is otherwise about to go into very low
gear. (When ready the computer controls would be provided at parts cost
to workshop alumni.)
So if anyone is eager to electrify their vehicle, please
let me know! I'd be very pleased to run a workshop series once the "production
model" motor and a more advanced controller have been tested, probably
in February, March or April when about 4 or 5 people are signed up. Here
is a description of the proposed program as I currently see it, details
subject to change (unrevised since last month):
Course Overview
* Instruction session: working
principles of the Turquoise Energy Ltd. Electric Hubcaptm
vehicle drive motor and its ancillary components, as applied to creating
a plug-in hybrid car and other useful applications.
* Motor making workshops as required to assemble
the motors.
* Instruction session: motor controller details;
simple controls details.
* Workshops: assembling the motor controllers and
wiring boxes, and the simple controls.
* Instruction session: various aspects of installing
the motors, and the computer controls.
* Motor installing workshops as required to get
the cars going.
*Additional instruction and workshops as required
to complete projects.
* Followup session(s) when computer controls are
complete: install computer controls.
Participants should be mechanically
inclined. Experience with design, fabrication and installation in any fields
of metal working, mechanical, auto mechanics, electrical and electronics
are assets. Participants are encouraged learn principles of construction
during the workshops and do work on their own if and as convenient. Work
will be inspected and discussed by me and by the other participants. Creative
thought in adaptation to specific vehicles and improvements to systems
is encouraged.
The object of this course
is twofold:
(a) to have the participant
create his or her own Electric Hubcap equipped super efficient
plug-in hybrid vehicle or other similar motor installation of choice, and
(b) without obligation, to
provide a trained nucleus of people to who are familiar with this exciting
and promising new technology, the future of propulsion. They'll
not only save on gas, they'll be engaged with the cutting edge of electric
transportation technology.
I haven't specified the number of workshops for each phase: there's
lots of new things here and it's hard to quantify how long the jobs will
take. We'll continue for one or as many sessions as it takes to satisfy
the class. Installating things in the car is the most time consuming part,
and is likely to vary considerably by vehicle.
There'll be three instructional manuals (or subjects in
one large manual) to accompany the workshop: Making the Electric Hubcaptm
Motor, Making the Electric Hubcaptm Motor Controller,
and Installing the Electric Hubcaptm Drive System
in a Vehicle. Writing of these proceeds apace.
The tuition fee for the workshop program will be $1950
(maybe less), and the parts cost will be $900 per motor. That includes
most everything: the motor, controller, wiring box, and cables. But (what
else is new?): batteries not included.
I think I should order/buy the parts, paid for in advance
by the participants (at cost - but see below). That should bring some quantity
discounts, and the materials would all be on hand when the workshop sessions
commence. Perhaps the money for materials (as well as the tuition fee of
course) can be made tax deductible and PST exempt - that would lower the
costs for participants.
I was surprised the materials for each complete motor installation
cost so much when I added them all up. Anyone who wishes to provide some
of the supplies themself is certainly welcome to do so. I will of course
need to know what you are bringing before I order the parts. Particular
items to provide that can save money are listed below.
Particular items to provide that can save money:
* car disk brake rotors - Honda Civic(?) rotors (10.25" diameter with
a hub of 5.5" inside diameter) appear to be ideal for typical 4
lug bolt wheels. Discount: $75 per motor. Anywhere that does auto brake
repairs should have used rotors going into the garbage can. They don't
have to be in great condition, though a pretty flat face to mount the magnets
on is desirable.
* winding and varnishing/baking your own coils: Discount $100 per motor.
Count on spending a couple of days or more doing them. (Otherwise I'll
make them before the course starts.)
* Finding your own heavy copper wire, 200 amp circuit breakers, motor
capacitors (3 x 7uF 120+VAC "run" capacitors, 3 x 100uF 120+VAC "start"
capacitors), wiring boxes (preferably aluminum for heat dissipation) and
other electrical parts. Heavy #4 battery cables and #6 "cab tire" cables
to the motor cost several tens of dollars per motor. 200 amp breakers for
the motor controller boxes (preferably aluminum boxes for heat dissipation)
all add up. Discount will have to be determined when the parts are known.
http://www.turquoiseenergy.com
Victoria BC


