Turquoise Energy Report #173 - October 2022
Turquoise Energy News Report #173
Covering
October
2022 (Posted November 5th 2022)
Lawnhill BC Canada - by Craig Carmichael
www.TurquoiseEnergy.com
= www.ElectricCaik.com
= www.ElectricHubcap.com
Month In "Brief"
(Project Summaries etc.)
- Climate warming? - Solar Panel Energy Payback - Magnetic
Variable
Torque
Converter: Better than The Best! - Housing/Mountings to put
the
truck on the road - Plastic
Recycling 2.0 Video - New VanMoof (E)-Bicycle - Tom's Solar
Storage
In
Passing
(Miscellaneous topics, editorial comments & opinionated rants)
- The East-West Split in the Ukraine -
Smol
Thots - ESD
- Detailed
Project Reports
-
Electric
Transport - Electric Hubcap Motor Systems
* Magnetic Variable Torque Converter with Planetary Gear: The
Future of the Automotive Industry!
- Ratio of Planetary Gear: I Chose Too Low? - making
housing et al
* New VanMoof (E)-Bicycle (Well, not "E-" unless I go to who knows
how
much work)
Other "Green"
& Electric Equipment Projects
* Gardening: More Fall Harvesting
* Bay Window Garden
* A Nifty Dirt Sifter - Get out Rocks & Weeds, Roots!
* CNC Gardening Machine - Bed Prep Tools (just thoughts)
Electricity
Storage:
Batteries [no
reports]
* Ni-Zn cell gelled with PVA
Electricity
Generation
* Ocean Wave Power: Another Novel Approach? (just thoughts)
* My Solar Power System:
- The Usual Latest Daily/Monthly
Solar Production log et cetera - Monthly/Annual Summaries,
Estimates, Notes
If I didn't think there was global warming, I might
be
persuaded now as I remember October being quite a cold month even
in
Victoria. Then 1989 or 1990 was remarkable: quite warm and sunny
in the
daytime until Thanksgiving (Oct. 8th), and there have been more
like it
since. This year it was warm during the days until mid month even
in
Haida Gwaii (whether sunny or not), which struck me as very nice,
but
again also unusual. There was some rain now and then but I had to
keep
watering things (especially in the greenhouse where it never
rains).
I hoped those in warmer regions weren't still too hot
and
dry into the fall. Mom said Comox (Vancouver Island) had had
virtually
no rain since July up until mid October, fitting the pattern of
almost
world-wide drought interspersed with occasional torrential rains
and
unprecedented floods in places that usually don't get much rain,
like
Soggy Arabia. (It finally rained in Comox near the end of the
month.)
With the droughts crop
losses and livestock liquidations are almost everywhere -- USA and
South America to Europe, Africa, India and China. (Russia however
is
having record grain crops, and apparently Australia is doing very
well.) Of course, much of the climate chaos seems quite logicly
explained by so many jet aircraft creating so many persisting
clouds in
the stratosphere where there usually are few and thin clouds.
The latter half of the month got cooler, but even on
the
29th it was 7° in the daytime. Tomatos (greenhouse) and
strawberries kept coming, even a couple of small new squashes, and
not
rotting before they ripened. On the 30th and on Halloween (31st)
there was frost and it dropped to 3° for the day. November 1st the
ground was frozen and winter seemed to have arrived. The shop was
now
too cold to work in for very long.
Solar Panel Energy Payback
The earliest solar panels were said to have used up
more
energy to manufacture than they would ever produce. That may have
been
arguable
before major increases in efficiency and vast mass production, but
it
is still cited by detractors of solar energy. It was recently
estimated
that the energy consumed to make a solar panel today is 1% of what
it
will produce over a 25 year period. So a panel makes enough
electricity
to
reproduce four more panels in a year.
To those of us getting hundreds or even over a
thousand
kilowatt-hours of electricity per month (in good months or at
lower
latitudes) from say 5 to
50 solar panels on our house roofs (and sometimes just cheap
Chinese
plug-in grid tie inverters requiring no house wiring), such
figures are
no surprise.
Nothing else presently can give the typical homeowner that level
of
power except buying it from the power utility. (Now, if only there
was
some practical way to store several days or weeks worth of it, it
would be even more amazing!)
For my own 18 solar panels energy system, it seems
that with the 3 new panels on the sunniest carport roof (and
following
some DC wiring improvements in March), in April through September
the
solar is providing roughly as much energy as the mains power -
even
more in
June, July and August. Some of my solar power would have gone out
to
the mains, but more would have been used in the house. I have no
way of
telling. That's 6 months of the year when it makes a dent in my
consumption and in the diesel fuel consumption at the power plant
in
Sandspit, and many homeowners having solar would be about the best
thing that individuals could do to reduce the colossal consumption
of
diesel fuel on this island.
With those new panels and the great weather this
month's
solar electricity [October 2022] at 238.62
KWH was about double all previous Octobers. Of course it's a
drastic
drop from September with even less expected through the winter
until
next March.
On an annual basis, it also looks like the system is
making over
double what the Nissan Leaf electric car uses, and I drive around
1000
Km per month. Hopefully I'll get the truck going with the magnetic
variable torque converter soon, and it should use substantially
less
energy per kilometer than the Leaf. (And later the Sprint with
torque
converter still less.)
Magnetic Variable Torque Converter: Better than The Best!
In case I haven't stated it clearly before, this
torque
converter has been proven experimentally to work and charts show
excellent theoretical efficiencies during typical driving, and I
believe it will be an important part of the future of the
automotive
industry.
One simple mechanism with automatic variable
operation can
be optimized for all conditions of any road vehicle's vehicle
speed and
torque, allowing a better choice of ultra efficient electric drive
motors such as axial flux BLDC. Its simpler mechanism replaces an
entire complex automotive transmission with an ultra-high overall
efficiency; over 90% for most driving.
Housing et al to put the truck on the road
 Having
shortened the motor shaft a bit to accommodate a
bearing at the planetary output, I turned it down just a bit near
the
planetary end to hold a ball
bearing race. So it'll have a bearing on each end of the planetary
to
hold everything in place. The shortening also moved the alume disk
rotor up to a fatter zone where the taper lock engages the shaft
properly, making
the rotor much more secure. (Yay!)
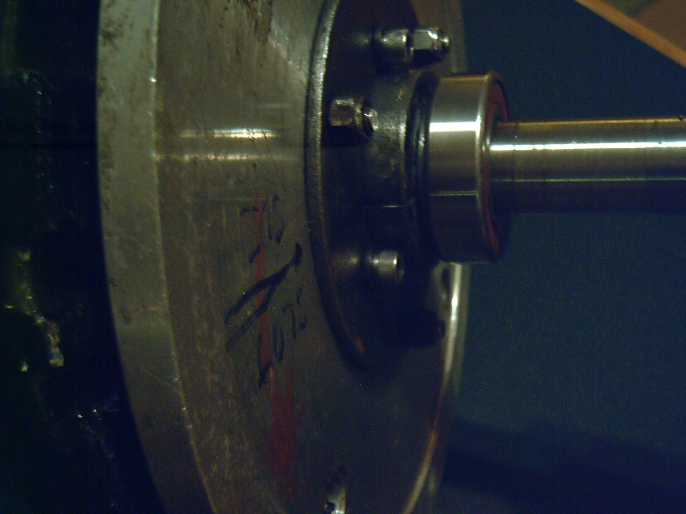
Having
shortened the motor shaft a bit to accommodate a
bearing at the planetary output, I turned it down just a bit near
the
planetary end to hold a ball
bearing race. So it'll have a bearing on each end of the planetary
to
hold everything in place. The shortening also moved the alume disk
rotor up to a fatter zone where the taper lock engages the shaft
properly, making
the rotor much more secure. (Yay!)
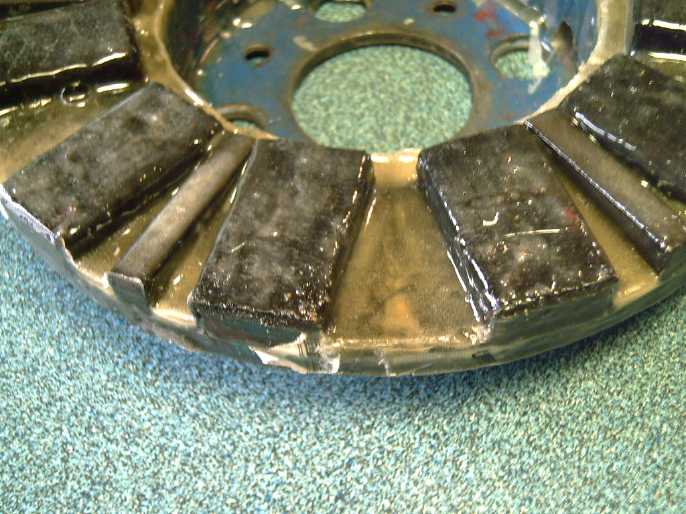
 Then I
put
some coats of epoxy on the magnet rotor until
it was well encased, about 4 or 5 mm thick in the valleys between
magnets. Now I think I can trust the magnets not to fly off it
when
the
truck is underway at highway speeds.
Then I
put
some coats of epoxy on the magnet rotor until
it was well encased, about 4 or 5 mm thick in the valleys between
magnets. Now I think I can trust the magnets not to fly off it
when
the
truck is underway at highway speeds.
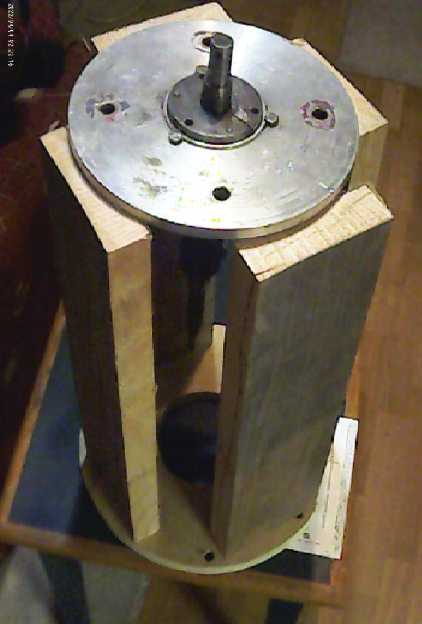 I made a
plywood plate to bolt
to the motor face and cut spruce four 2 by 6's (milled earlier on
my
handheld bandsaw mill, of course), but that was as far as I got on
making the housing. Metal nearby the magnetic rotors would
interfere
with operation (reduce efficiency and get hot), and I thought
epoxying
the boards to a wooden motor plate would be a better bond than
trying
to screw them to metal. (But maybe I should cut another circle of
plywood and epoxy them together to make it 1.5 inches thick
instead of
just .75 inches?) I'll need to do a bit of sculpting on the boards
to
have the rotors fit inside.
I made a
plywood plate to bolt
to the motor face and cut spruce four 2 by 6's (milled earlier on
my
handheld bandsaw mill, of course), but that was as far as I got on
making the housing. Metal nearby the magnetic rotors would
interfere
with operation (reduce efficiency and get hot), and I thought
epoxying
the boards to a wooden motor plate would be a better bond than
trying
to screw them to metal. (But maybe I should cut another circle of
plywood and epoxy them together to make it 1.5 inches thick
instead of
just .75 inches?) I'll need to do a bit of sculpting on the boards
to
have the rotors fit inside.
 A couple more circles
(again plywood) will be needed to hold the bearings on the motor
shaft
(top image) and on the output of the planetary (right).
A couple more circles
(again plywood) will be needed to hold the bearings on the motor
shaft
(top image) and on the output of the planetary (right).
Getting ahead of the story a bit, I got back to the
housing and made good progress on it near the start of November.
Plastic Recycling 2.0 Video: Introduction Plus Casting the
first
Large Plate.
On the 18th the internet went down. Being unable to
watch
depressing videos about the deteriorating state of the world, I
put
together my own video about making the first piece with the (then
new)
large plate mold. It's been almost 6 months since I meant to do
that. I
had so many clips that I dreaded trying to put them together, but
in
the event they
seemed to follow well in order by date and time.
On the 20th I added a general explanation of the
whole
technique at the beginning of the video. I left out the whole part
about the making
of that mold, but it's the longest video I've done, over 25
minutes. A
separate video next about making the mold will be better.
Video: Plastic Recycling 2.0 - Intro - Molding a
Plate: PP rope from Beach https://youtu.be/fuWzqQKodZc
And then of course, getting back to the actual
project,
finishing the large oven and making a bunch of PP plates, would be
great!
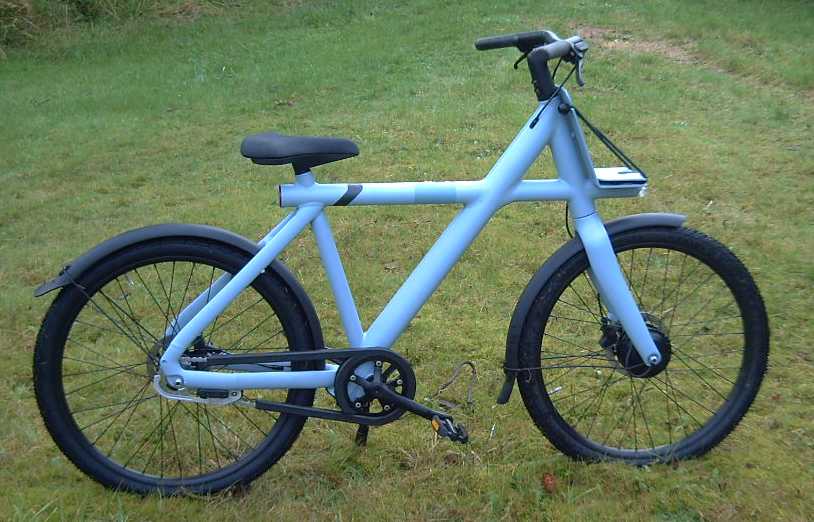
New VanMoof (E)-Bicycle
 To make a
long
story short, someone found it
at the dump in a dumpster. VanMoof, Netherlands: said to be
"better
than the best". "Theft proof." You're
supposed to have the key to unlock it on your cell phone. Without
it
the rear wheel locks up. If one tries to move it, a sign on the
frame
says "theft" then there's the picture of a skull glowing on and
off. It
has strange tapered wheel nuts which obviously take a special
wrench
with 6
'prongs' in a triangle arrangement.
To make a
long
story short, someone found it
at the dump in a dumpster. VanMoof, Netherlands: said to be
"better
than the best". "Theft proof." You're
supposed to have the key to unlock it on your cell phone. Without
it
the rear wheel locks up. If one tries to move it, a sign on the
frame
says "theft" then there's the picture of a skull glowing on and
off. It
has strange tapered wheel nuts which obviously take a special
wrench
with 6
'prongs' in a triangle arrangement.
VanMoof was less than forthcoming to email enquiries
and
finally said it was
stolen. They
offered no support and wouldn't disclose the owner so it could be
returned. So the finders couldn't use it and gave it to me.
I ended up grinding a few of the "anti-theft" nuts
and
bolts so
they could be removed, and I took out the lock.
I can now ride it as a normal
pedal bicycle.
Later I decided that it would be too much work to get
the
electronics and motor going with all the "anti-theft" provisions
and
WiFi in the software. I
removed the battery from inside the frame. The bike is lighter to
pedal
without it.
It was a four-square stack of ten 18650 lithium ion
cells
in series. 36 volts, just like all my solar stuff! The voltmeter
read
40.1V - still well charged! So I have an extra 36V house battery?
But
the pack is just ".504 kilowatt-hours" according to the web site
(making each cell 3.5 amp-hours). My regular 36V battery stacks
are 4.3
KWH.
Well, if nothing else I now have a whole stack of
18650's
to
potentially resurrect cordless drills with defunct batteries with.
(I wrote this little saga up in more detail under Electric
transport
for anyone interested.)
Tom's Solar Storage
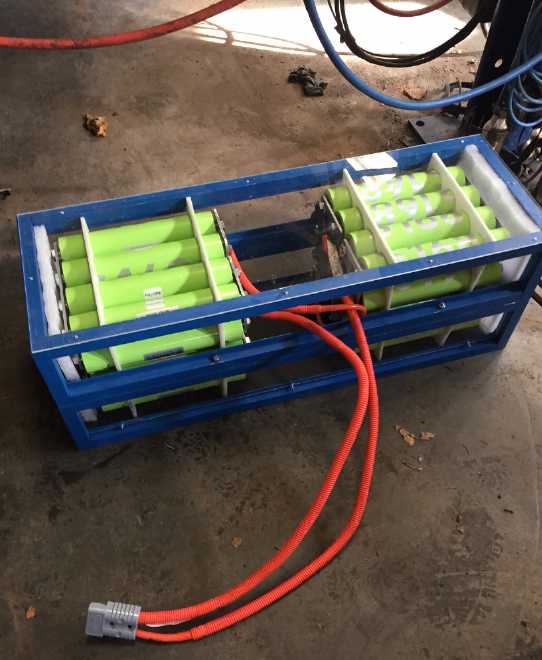 My
friends Tom
and Craig in Victoria have been doing electric car renewals and
battery
storage for solar. Tom has put together some interesting
cylindrical
lithium iron phosphate battery cells into a nicely made 48 volt
pack.
In fact, BatteryHookup.com who sell the cells was wanting
to
put Tom's pictures on their site.
My
friends Tom
and Craig in Victoria have been doing electric car renewals and
battery
storage for solar. Tom has put together some interesting
cylindrical
lithium iron phosphate battery cells into a nicely made 48 volt
pack.
In fact, BatteryHookup.com who sell the cells was wanting
to
put Tom's pictures on their site.
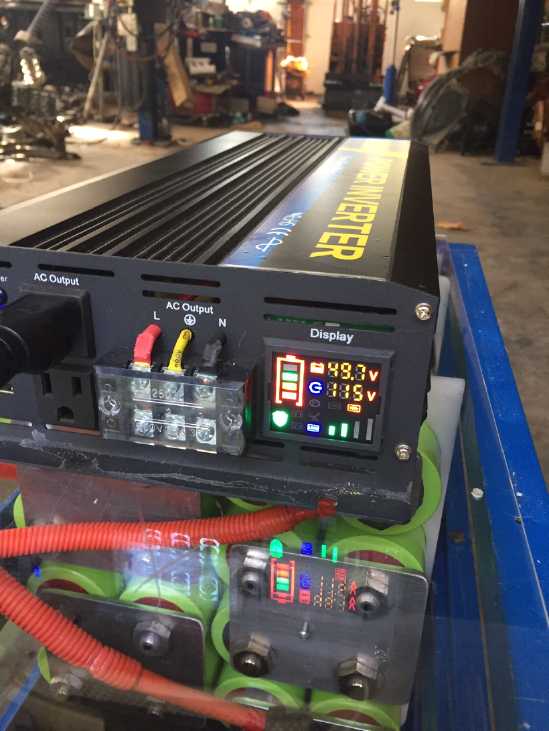 He has used an
inverter, 48 VDC to 120 VAC
for car charging or other appliances. (I should try charging the
Nissan
Leaf with my 36 volt system and an inverter myself. But I expect
that
one should be very careful charging a 24 or 32 KWH car battery
from a 4
or 8 KWH stationary one, not to accidently run it right down.)
He has used an
inverter, 48 VDC to 120 VAC
for car charging or other appliances. (I should try charging the
Nissan
Leaf with my 36 volt system and an inverter myself. But I expect
that
one should be very careful charging a 24 or 32 KWH car battery
from a 4
or 8 KWH stationary one, not to accidently run it right down.)
In
Passing
(Miscellaneous topics, editorial comments & opinionated rants)
Ukraine:
The
East-West
Split
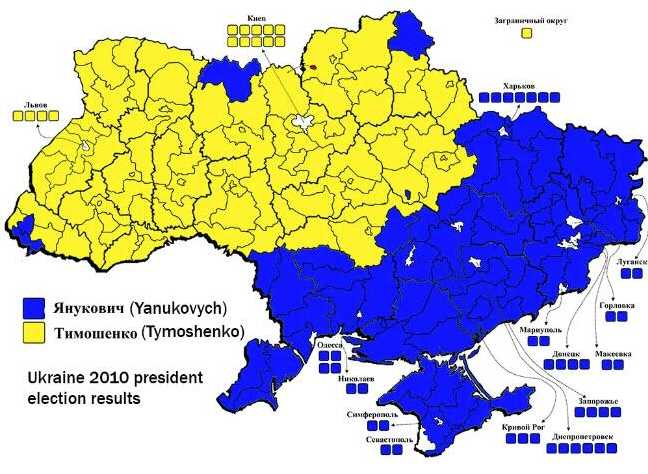 The genesis of the present Ukrainian problem is that the Soviet
Union
mixed different regions and peoples especially including
Russians (southeast), Ukrainians (central), and Polish (west end -
Lvov), and called it all "Ukraine". When the Soviet Union broke up
around 1990 these disparate blocks became a new "country". But it
was
never a unified "nation". It had serious problems from the start,
almost impossible
of resolution. In 2010 for
example the regions where Russian speakers were voted solidly for
Yanukovich,
who became president. Ukrainians and Poles voted almost as solidly
for
Timoshenko. The map shows the distribution of voting. Differing
interests and views of one group or the other were always bound to
be
unrepresented.
The genesis of the present Ukrainian problem is that the Soviet
Union
mixed different regions and peoples especially including
Russians (southeast), Ukrainians (central), and Polish (west end -
Lvov), and called it all "Ukraine". When the Soviet Union broke up
around 1990 these disparate blocks became a new "country". But it
was
never a unified "nation". It had serious problems from the start,
almost impossible
of resolution. In 2010 for
example the regions where Russian speakers were voted solidly for
Yanukovich,
who became president. Ukrainians and Poles voted almost as solidly
for
Timoshenko. The map shows the distribution of voting. Differing
interests and views of one group or the other were always bound to
be
unrepresented.
Yanukovich was ousted in the violent 2014 "Maidan"
uprising/coup,
following
which the Russian language was banned in schools and government
and the
"nazification" proceeded in high gear.
A small group quickly moved to bar the Ukrainian army
at
the narrow neck of the Crimean peninsula (I've been told it was
something akin to a "Hell's Angels" motorcycle group - treat that
as
rumor). It was soon replaced by military personnel from
the Russian naval base in Sevastopol (in Crimea). The Crimean
peninsula
immediately voted to secede from
this new Ukraine - and from a country they had never wanted to be
part
of. Following the massacre of 50 ethnic Russian demonstrators by
ethnic
Ukrainian demonstrators in Odessa, about 1/3(?) of the Ukrainian
military deserted to the Donbass, which effectively separated.
Ukraine
occupied much of the Donbass territory but was unable to invade
the
capital
cities Donetsk and Lugansk, which they have shelled off and on
with
artillery ever since - heavily from mid February this year,
inciting
the Russian "rescue" attack.
One may imagine that Odessa and Kharkov provinces -
rounding out the
blue ethnic Russian majority areas - would naturally be on a
Russian
list of further military objectives as they mobilize larger
forces,
unless USA/NATO/Ukraine decide to negotiate a peaceful settlement
instead of egging Ukraine on and sending arms - and now Polish and
American troops as Ukraine's have been depleted. Russia doesn't
want
the western end unless it refuses to stop attacking. Unfortunately
wars
tend to spread like fires rather than die out.
Smol
Thots
* After having stopped my hair from thinning toward baldness on
top by
killing the common Demodex Folliculorum scalp mites with the
weekly
alcohol rub [followed immediately by a shower - TE News #___], the
thought that keeping the scalp warm
probably helps get follicles working again led me to keeping my
bedroom
warmer at night, but probably not warm enough. (Even subsidized
electricity costs money!) A tuque/beany in the daytime is fine,
but as
a nightcap it kept coming off. Two pillows was awkward. Now I find
that
a towel on the pillow is easily pushed into place and doesn't tend
to
get lost during the night. (Well, I'm a pretty light sleeper and
it
needs to be pushed back into place occasionally during the night.)
...warmth, and brushing a couple of times a day (thin
on
top and short as it is) to stimulate the scalp.
* With the advent of LED lights - plenty of brightness, choice of
color
temperatures and low power - we may hope the "SAD" in far north
lands
with short winter daylight time and low sun (Sweden, etc) is
largely a
thing of the past. (SAD stands for "Seasonal Affective Disorder"
--
depression caused by the lack of daylight in winter in the far
north.
Hmm... Someone who moved to Denmark has written an article about
it on
line.
She has it and doesn't mention LED lights. Hmm: Copenhagen is only
2° farther north than here.)
* "SAD" is not to be confused with "SADS", the new "Sudden Adult
Death
Syndrome" which suddenly appeared in 2021 as shown by statistics
of
astonishing percentages of "excess deaths" (more deaths than
expected
over a given period), which has been taking out seemingly healthy
young
people and old alike. These are not Covid deaths. Discern for
yourself:
what new medical factor appeared beginning in 2021?
* This seems to be a nice example of political duplicity -
tailoring
what is said to the audience of the moment without reference to
truth,
facts or consistency:
- "NATO is not a party to the conflict between Russia and
Ukraine." -
Jens Stoltenberg, Secretary-general of NATO, Sept. 30th.
- "Russian victory in the conflict in Ukraine would be a defeat
for
NATO
and should not be allowed." - Jens Stoltenberg, Oct. 11th.
The writer of these quotes (I trust both
are true and accurate) didn't mention who Stoltenberg's audiences
were.
* Elon Musk suggested that the referendums in Donetsk, Lugansk,
Zaparozzia and Kherson should be conducted again by the UN, and
"if the
citizens vote against Russia, Russia should get out." Fine, but
one
expects the results in any fair plebiscite in
these areas would be pretty much the same with the vast majority
(mostly Russian speaking) preferring Russia over today's Ukraine,
which
is treating everyone who speaks Russian as a third class citizen.
* Speaking of Musk, his purchase of Twitter has brought to light
details of the cozy relationship and monthly meetings between
executives of Facebook, Twitter and the USA's DHS, and shown how
little
regard has been given for freedom of speech. Without that there
can't
be an
informed electorate and democracy can only be a shell and he said
'to
restore free speech' was why he bought Twitter. He's fired the
whole
board that
were shaping the establishment political narrative and says he
will
un-ban many people who whose accounts were frozen because they
said
something "wrong". It remains to be seen whether he will be able
to
bring freedom of speech to social media in the face of strong
oligarchic pressure for censorship.
ESD
(Eccentric Silliness Department)
* WARNING: THIS IS NOT A
DRILL!!!
* A roc is a giant bird. If you throw a stone at a roc it will
catch it
in its beak and swallow it to use as grit for digestion. It is
impossible to kill two rocs with one stone.
* Strange Fakts: Polo is a game played riding on horses. Water
polo is
played riding sea horses.
* Osmium is a unique metal in having a valence state of +8.
Praseodymium is unique in being the only element with +6
syllables.
* With all that wool, why aren't sheep itchy all over?
"in depth reports" for
each project are below. I hope they may be useful to anyone who
wants
to get into a similar project, to glean ideas for how something
might be done, as well as things that might have been tried, or
just
thought
of and not tried... and even of how not to do something -
why
it didn't
work or proved impractical. Sometimes they set out inventive
thoughts
almost as they occur - and are the actual organization and
elaboration
in writing of those thoughts. They are thus partly a diary and are
not
extensively proof-read for literary perfection, consistency,
completeness and elimination of duplications before
publication. I hope they may add to the body of wisdom for other
researchers and developers to help them find more productive paths
and
avoid potential pitfalls and dead ends.
Electric
Transport
Magnetic Variable Torque Converter with Planetary Gear
Ratio of Planetary Gear: I Chose
Too
Low?
[12th] In the last issue I had discovered (assuming my
calculations of
theoretical efficiency are correct) that if the planetary gear
body was
stationary the efficiency was just 50% - half the power went into
moving the vehicle and half into keeping the planetary from
slipping
backward. Somehow this makes sense. Of course this is only a
momentary
condition as the vehicle starts to move, and the efficiency
rapidly
rises with speed, as the slip RPM becomes a smaller and smaller
portion
of the motor's total RPM.
It now occurs to me however that if instead of using
a 5
to 1 planetary gearset one were to choose maybe 10 to 1 (that's
about
as high
as single stage planetary gears go), half as much torque is needed
from
the motor to start the vehicle moving, and the gear body would
immediately
start turning forward with the motor, and at the same 5 to 1
reduction
it would already be
much more efficient. (Without doing the math, I think it should be
67%.
The same slip RPM is only half in proportion to the higher
motor speeds.) Yet being 10 to 1 to start with it would have
higher
reduction ratios at lower speeds, and still head toward 1 to 1
effective
reduction ratio and 99% efficiency as the vehicle speed increased.
And
I would think that it wouldn't need as much magnetic force to
balance
it since it only needs half the input torque. If so it might want
fewer
magnets and perhaps smaller magnetic rotors.
And I noticed in doing the charts that with the 5 to
1, as
vehicle speed increases, the effective gear ratios drop rapidly at
very
low speeds - probably lower than is desirable. A higher reduction
planetary (with less magnetism) would give higher gear ratios up
to
higher speeds, which would surely give more desirable lower speeds
performance -
better acceleration and hill climbing.
So I should think higher ratio planetaries are better
in
all ways for this magnetic torque converter, up to reasonable
limits.
I think - in the matter of the gearsets I chose -
that I'm
a victim of "conventional" thinking of trying to use the lowest
reduction ratio in order to keep motor speeds down. But this is a
variable
torque converter that ends up very near 1 to 1 at higher speeds
regardless. The
question then is at what speeds and torques a given ratio is
reached,
to balance the motor to the vehicle speed and power. With a higher
ratio planetary, effective gear ratios and hence motor speeds at
low
vehicle speeds will be higher and with higher
efficiencies,
while the motor won't go much higher on the highway no matter what
ratio is
used! (Too bad I already bought that 7 to 1 planetary for the
Sprint.
10 to 1 would surely be better!) But all this is in the realm of
best
optimizing the variable converter parameters to the vehicle it is
to
drive.
(Also... a cylindrical body planetary would have less air friction
than
all these typical square ones whose makers never expected the
bodies to
spin!)
 I *could* redo
things and put the 7 to 1 in the truck,
where there's the further 2.2 to 1 reduction at the differential.
That
would surely be better than the 5 to 1, and it would take the
fewest
changes to do right now, before I build the housing (it being
physicly
twice the size). For a day I thought I would do it. Scope creep!
Oh
well, some
extra work to get the best performing vehicle! It looks more
"automotive" size anyway. (Hmm, they also look like they were
probably
made in
the
same factory. But the little one, from Anaheim Automation in
California
was something like twice the price of the big one from a Chinese
store
on
AliExpress.com .)
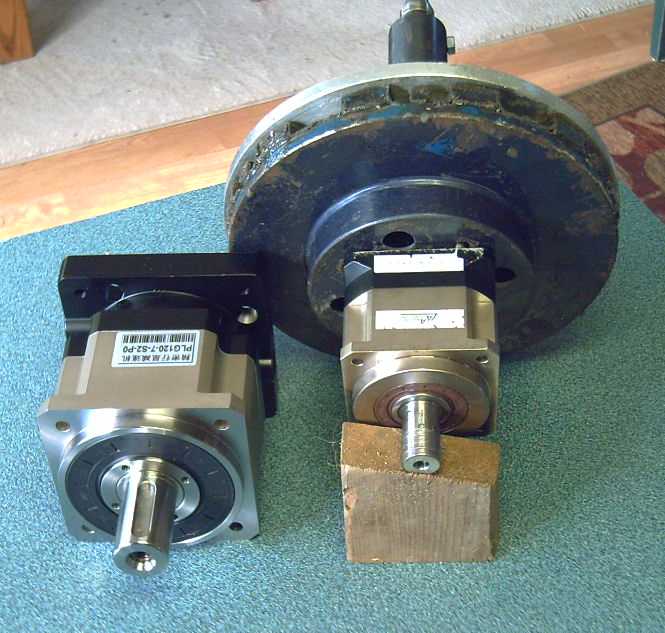
I *could* redo
things and put the 7 to 1 in the truck,
where there's the further 2.2 to 1 reduction at the differential.
That
would surely be better than the 5 to 1, and it would take the
fewest
changes to do right now, before I build the housing (it being
physicly
twice the size). For a day I thought I would do it. Scope creep!
Oh
well, some
extra work to get the best performing vehicle! It looks more
"automotive" size anyway. (Hmm, they also look like they were
probably
made in
the
same factory. But the little one, from Anaheim Automation in
California
was something like twice the price of the big one from a Chinese
store
on
AliExpress.com .)
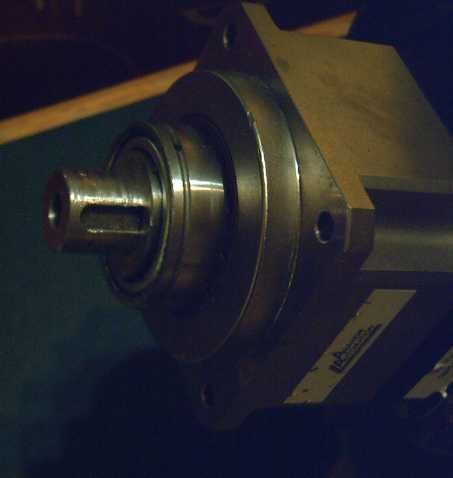
The Housing et al
[10th] September's experiments showed the torque converter works
fabulously, and the
charts indicated very high theoretical efficiencies at most
driving
speeds, loads and conditions. But the mechanism was jury-rigged
together with the shafts having little support, and it wouldn't
last
long on the road. (With the heavy rotors spinning it might even
just
fly apart at "normal driving" speeds.) So the next step is to make
a
housing to hold everything in alignment. I see it needing two
"steady"
bearings, on the motor shaft just before the mechanism, and on the
output shaft at the front end of the drive shaft to the rear
wheels.
Steel or alume of course come to mind, but metals
have
magnetic interactions. They'll hurt the efficiency if used in
proximity
to the magnetic rotors. I haven't finished the oven for recycling
plastics, or some polypropylene parts might be nice. (Maybe.) So I
decided
the torque converter housing should be wood, glued together and
coated
with the fine epoxy I had recently purchased. What wood? Something
fairly hard and dimensionally stable. I'm sure I can't get a dense
tropical hardwood around here. Fir? I looked in the shop and
decided I
should use a bit of the alder I had milled myself in the summer.
It has
a more uniform density and will probably machine better than fir.
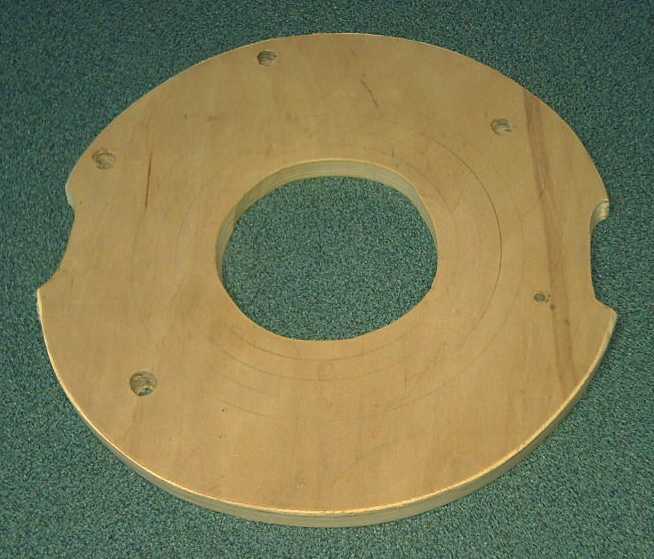 [11th] I cut a piece
of 3/4
inch birch plywood to fit on the motor
plate, complete with alignment and bolt holes.
[11th] I cut a piece
of 3/4
inch birch plywood to fit on the motor
plate, complete with alignment and bolt holes.
[12th] And now I'm going to change the planetary gear from the 5
to 1
to the physicly larger 7 to 1? Good news: The piece I made
yesterday
stays the same!
On disassembling and sizing everything up, I changed
my
mind. Nothing lined up. I would have to cut and turn my motor
shaft. I
didn't have a bearing for the larger output shaft. Yes, I can see
the
project being put off and delayed until...? I think I'll just use
it as
I have it and have a working truck this fall... maybe everything
done
(speedometer, current and voltage monitor, plywood cover, battery
chargers, maybe solar panels on the roof, various little
things...) by
spring.
Hmm... I could buy an 8 or 10 to 1 planetary of the
same
case size as this 5 to 1, and probably get optimal performance.
Well,
Later maybe!
[13th] I turned the
planetary end of the motor shaft down a bit to fit
a one inch (or was it 25mm?) I.D. bearing. I'm sure the planetary
needs
the support on the input side with all the heavy weights flying
around.
I turned a bitty bit at a time, over and over, checking the fit.
Each
time I'd have sworn it was virtually there and I didn't want it
loose.
In the end it was a tight fit and I "pressed" it on with repeated
taps
of a small hammer.
With the shortening of the shaft by about 15mm for
the end
bearing, things had also moved over to where the SDS coupling of
the
alume disk wasn't on the "too small" turned part of the shaft, so
I
could tighten down the taper lock hub instead of just holding it
with
the set screw. That's a big improvement. Everything seemed to fit
together well.
And here is the end
bearing. Just that little stub to attach the rear drive shaft to
and
it's a splined socket, not even a proper fit to this shaft!
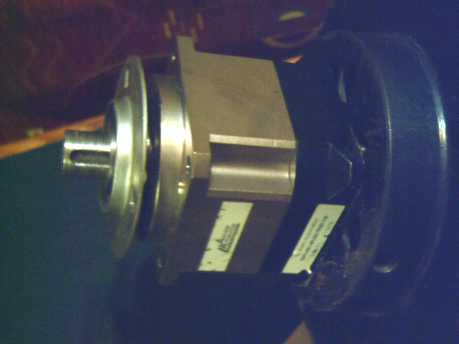 With flange to hold it
to the end plate of
the housing.
With flange to hold it
to the end plate of
the housing.
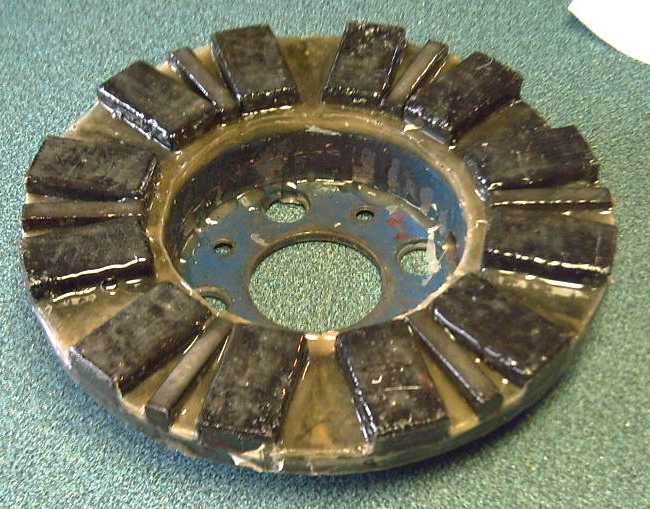
 [17th] Last month when
I
cut some of the epoxied PP off the magnet
rotor to fit the thin sideways "Halbach" magnets, I was disturbed
at
how easily each piece seemed to pop off. I had
bought what is supposed to be better epoxy for gluing, and glued
the
new "sideways" magnets on. Now I decided to really epoxy it up
thickly
before assembling everything again, even several layers. (In
accordance
with the directions on the epoxy I cleaned the
rotor off with paint thinner, and then blew it clean and dry with
compressed air. All this is the sort of thing I tend to gloss
over,
myself! And after all, nothing bad happened in the tests... But
magnets
flying
off the rotor while I'm driving down the highway would be very
bad!)
[17th] Last month when
I
cut some of the epoxied PP off the magnet
rotor to fit the thin sideways "Halbach" magnets, I was disturbed
at
how easily each piece seemed to pop off. I had
bought what is supposed to be better epoxy for gluing, and glued
the
new "sideways" magnets on. Now I decided to really epoxy it up
thickly
before assembling everything again, even several layers. (In
accordance
with the directions on the epoxy I cleaned the
rotor off with paint thinner, and then blew it clean and dry with
compressed air. All this is the sort of thing I tend to gloss
over,
myself! And after all, nothing bad happened in the tests... But
magnets
flying
off the rotor while I'm driving down the highway would be very
bad!)
[18th] Another coat of epoxy. I wrapped some tape around the
rotor,
inside and outside of the magnets, to hopefully stop leaks. Maybe
I can
then just pour quite a lot in next time and more or less "cast"
it.
Otherwise, this might take some days.
[19th] Another day, another coat.
[20th] I peeled off the tape dams. It was at least 1/8" deep all
around
if not 3/16". I decided that was "cast" well enough and while it
was
still tacky I cut off the thin edges that had wicked up onto the
tape,
that would become razor sharp when it was hard.
[30th] I cut some
pieces of 2 by 6 spruce for
the side walls of the housing. Not much progress for 10 more days!
Well, having proven the theory, I don't seem to be in as much of a
hurry to get the truck actually on the road - and there are always
many
things to do that can only be put off so long. But I do want to
get it
on the road -- and to not have it quit somewhere and need towing
home -
with maybe some disassembly before it could even be towed,
depending
what broke and how.
Here is the motor shaft sitting on the boards, which
the
rotors will have to fit between when it's done. There'll be some
carving involved.
It'll all be screwed and heavily epoxied. Maybe some
PP
strapping for more stiffness and strength. And in spite of the
heavy
pieces, maybe I should tie those boards together with more pieces
of
wood for strength.
And somehow the back end has to attach securely to
the
truck frame.
New
VanMoof
(E)-Bicycle
Not something
I was looking for, but... someone found it
at the dump. Looked brand new, in a dumpster. VanMoof: said to be
"better than the best". "Theft proof". You're
supposed to have the key to unlock it on your cell phone. Without
it
the rear wheel locks up. If one tries to move it, a sign on the
frame
says "theft" then there's the picture of a skull glowing on and
off. It
has strange tapered wheel nuts which obviously take a special
wrench
with 6
'prongs' in a triangle arrangement.
The finders contacted the company - in the
Netherlands - who - eventually - emailed back and told them it was
stolen. They turned it in to
the police. The company didn't reply to the police's enquiries to
say
who owned it. Finally the police gave it back to the finders, who
already have e-bicycles. In the absence of any help from the
maker,
they couldn't use it and gave it to me. with a signed piece of
paper
from the police in case anyone should ever say I have stolen
property.
Well,
it has all the parts of an electric bicycle... I thought I could
make
it go
somehow. Would take a lot less power to charge than a car. It
might
come in handy for something? (Oh great! Another project!)
First I took the angle grinder to the wheel nuts and ground out
a couple of flat spots. Then I gripped them with vice-grips and
turned
them off. On one side there was a "thing" with shallow splines
that
seemed to shift the gears (4 gears) electricly. But thinking it
was
part of the wheel locking mechanism I took it off - and cut the
wire
before I
figured it out. On the other side was the lock: a hefty pin
inserting
itself into
a ring with 6 each in and out places. With the wheel off I removed
the
ring so the pin did nothing.
When I put it back together, I could ride it as a
normal
pedal bicycle. The warnings seemed to have gone out and I
suspected the
battery was finally totally dead after who knows how long without
charging, and then a couple more months sitting in the cop shop.
It had
some
strange looking plug to charge it and it didn't show any voltage.
At
this point I had a pedal bicycle. Perhaps I can figure out how to
get
the gears to change with a cable or something. (Do I really care?)
As I checked over this text on November 1st I thought
it
would be
nice to charge the batteries, not let them go to waste. The longer
they
were left, the more discharged they'd be. But I couldn't find the
right
plug for a charger. I decided to pull them out of the frame. I
used the
angle grinder to cut out the middle pin of the annoying torx
screws
(cutting through the plastic chain guard on one side) and got them
out.
It was a metal tube inside the metal frame and inside of that (not
surprisingly) was a four-square stack of ten 18650 lithium ion
cells in
series. 36 volts, just like all my solar stuff! The voltmeter read
40.1V. So much for my expectation that they were becoming
discharged!
Whether it's worth trying to get the wheel motor to
run is
debatable. The security features are considerable, and defeating
the
mechanical ones with an angle grinder may have been the easy part.
Not
knowing much about it... is the motor controller integrated into
the
motor, or is it part of VanMoof's computer system? If it's in the
motor, I could probably bypass everything else. Hmm... to the
website... The motor is just 250-350 watts. (If I was buying an
e-bike
motor I'd get at least 500, probably more.) 25 KmPH? I used to
ride my
ten-speed faster than that! There's no model or anything except
what is
probably a VanMoof part number on the motor, and that's "not
found" in
a web search. the cable coming out says "1C#14AWG, 3C#24AWG"
Having
only one power wire suggests that the motor controller must be
inside
the motor, with the frame being the other power connection. The
other
wires could be hall sensor (RPM), throttle and ground or ???
Well, if nothing else I now have a whole stack of
18650's
to
resurrect cordless drills with. (I have 4 with dead Ni-Cd's or -
after
6-8 years of use - very weak NiMH's.) My horde of 26650's just
don't
fit in the NiCd battery compartments of the drills - 18650's just
might
squeeze in. Or, I have an extra 36V house battery. The pack is
".504
kilowatt-hours" according to the web site. (That would be 3.5
amp-hour
cells.) And the bike is lighter to pedal without the battery.
Other "Green" & Electric Equipment Projects
Gardening
Fall Gardening
[23rd] Aside from various end of season gleanings, which (along
with a
bit of bed preparation) have actually kept me rather occupied, I
finally went to plant the fall garlic - had been meaning to do it
for a
week. In doing so I dug up 3 beds (about 5 by 5 feet) in the
garden by
the house and found one was full of onion bulbs, tops died down
and
hidden in the grass and weeds. (Yes, I had planted various onions
around there.) Some great big ones. I've never grown decent size
onions
before. What did I do differently this time?
Grass and weeds, grass and weeds, roots, roots,
roots.
Rake rake rake, pluck pluck pluck... I kept thinking there were
just a
few onions and sliced up several with the shovel before I realized
the
whole bed hadn't been harvested and was full of them. Must have
been 10
pounds. I had got 6 more dead salmon from Bonnie's small stream
the day
before. I buried two in each bed. Finally I planted four rows of
garlic
cloves in a good place. (Not huge, but I only eat so many!)
Someone
said rats had dug up all their garlic last year, so I put wire
screens
on top. (Good if the chickens get out while they're coming up,
too.
That garden is their favorite place and they'll eat the tender
tops off
as they come up.)
But in doing this I discovered a new way to use the
dirt
sifter I made last year -- and not only eliminate rocks but shake
the
dirt out from weeds and their roots, rather easily. (Second title
below.) This holds much promise, especially if I can't get a
rototiller
or (as I haven't yet) figure out some workable plow/tiller
attachment
for the lawn tractor.
Now, do I plant more onions where they grew so well
this
year, or go
for some crop rotation? When I find a place where something really
does
well, I tend to want to keep planting the same thing there the
next
year.
Bay Window Gardening
I seemed to have too many plants now to fit them
under the
LED lights. Also the livingroom is warmer, and surely natural
sunlight
is better when there is some.
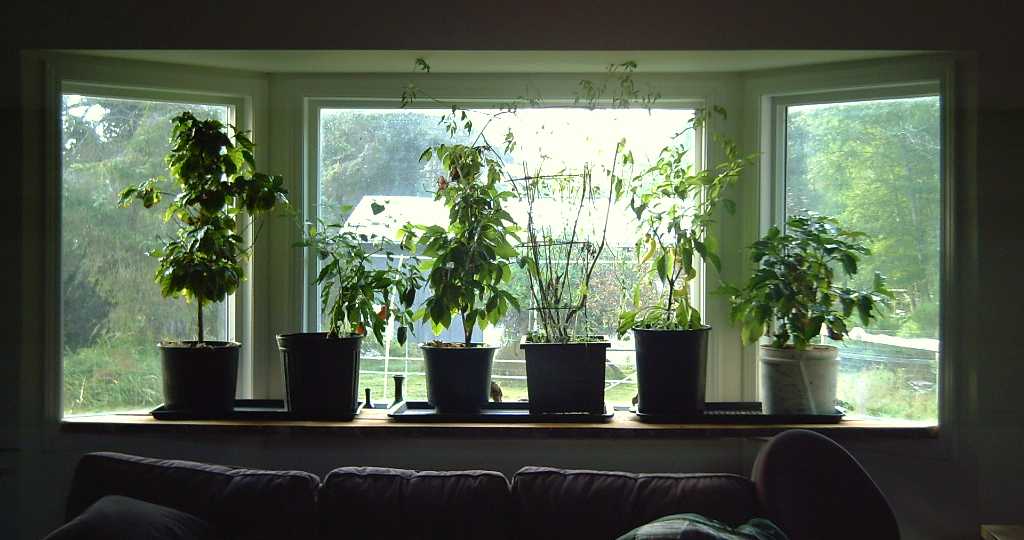 First I simply cut two boards to fit and
set
them on the window sill.
First I simply cut two boards to fit and
set
them on the window sill.
That was great except that it placed the plants higher up than
was
desirable.
 So I made two pillars and moved the boards
down
to those.
So I made two pillars and moved the boards
down
to those.
Later I added two more pepper plants. Now hardly any light seems
to get
through into the room!
It would be nice if there was also a "skylight" over
the
bay window. Oh well. But what I may do for the darkest winter
months is
put my "indoor LED garden" lights on the ceiling over the plants.
There
are a few fruits on the peppers and the odd cherry tomato, but not
many
flowers anywhere. More light might do get them flowering again.
(Then I
have to hand
pollinate them with a small paintbrush. But one winter with the
LED
lights and one big plant I had cherry tomatos all winter.)
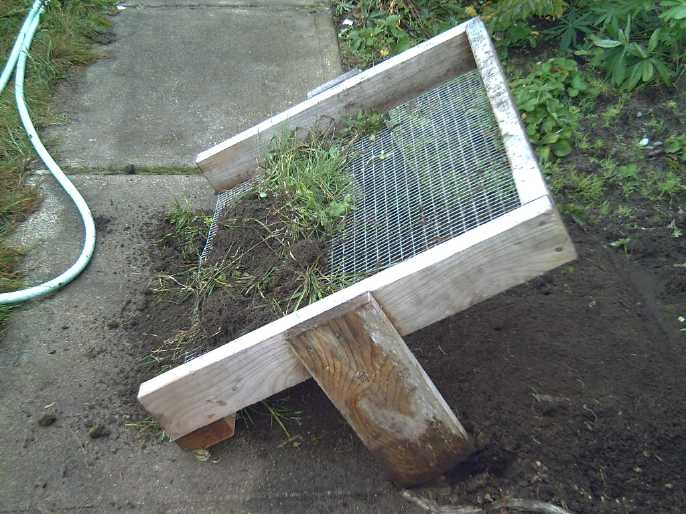
Nifty Dirt Sifter !
Lots of people use hardware cloth or mesh with a
wooden
frame to sift dirt, to get out the rocks. Most of them sit
stationary
and one shovels dirt onto them, then rakes the dirt around with
the
shovel to get the dirt past the rocks to fall through onto the
ground.
Then the rocks are dumped out. This is hard work, and doesn't work
well
if the soil is very damp and clumps up.
Instead of four legs, I made mine with two in the
middle
last year, thinking it could be rocked back and forth to roll the
dirt
off the rocks and have it fall through the screen. It's about 3
feet
front to back and 4 feet wide, with 1/2 inch by 1 inch steel mesh,
and
2 by 4 sides and back. This year I've learned how to use it! Even
with
pretty wet soil. And not just for rocks, but for weeds and their
roots!
One doesn't put in a big load of material, but fills the walled
back
end. And one doesn't gently rock it as I had envisioned.
The best "rocking" motion, by pressing down sharply
on the
front side, tosses the load up into the air and toward the front.
This
really helps separate the dirt even from the weed roots! It's
surprisingly simple and it sifts the entire load at once, not just
a
bit at a time where a shovel disturbs it as with most dirt
sifters. And
even fairly heavy, wet dirt and weeds will work whereas most
sifters
will bog down. (My soil is pretty sandy. It might not work as well
with
heavy clay.)
The forward-toss action can be repeated if it didn't
get
far enough to the front. (If you toss it too hard material is lost
off
the front.) Once it's near the front, picking the front up sharply
tosses it back to the back. Pulling up is not lifting a lot of
weight,
since the main load is supported by the legs - and usually the
mass
isn't too far forward. When this is repeated several times quickly
the
good dirt has mostly fallen through.
Then with the material at the back, give the front a
stronger push down and everything (the roots and rocks) flies
right out
the front, to where you've placed a sheet of plastic or something,
to
be disposed of into the compost bin/pile and or rock collection.
(Here
it lands on the sidewalk.) It lands in front of where the good
dirt is
falling through the screen.
And the sifter is already clear and ready for the
next
load without having to tip it over to dump it.
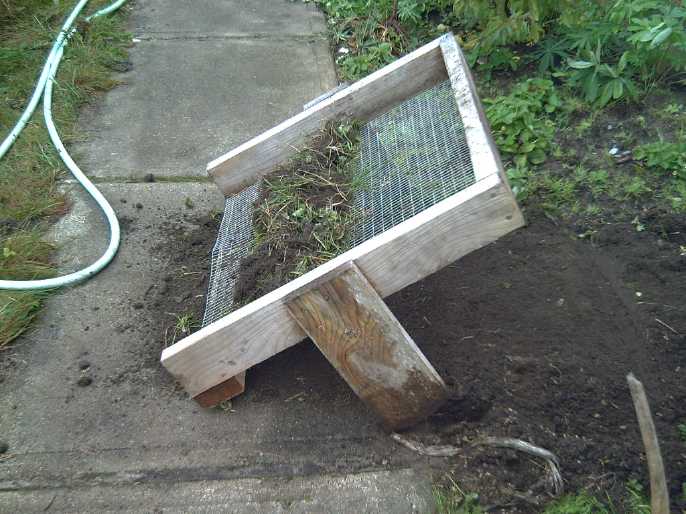 Sifter with a load of dirt and weeds.
Press down on the front side to toss it all forward, shaking the
dirt
from the weeds and rocks.
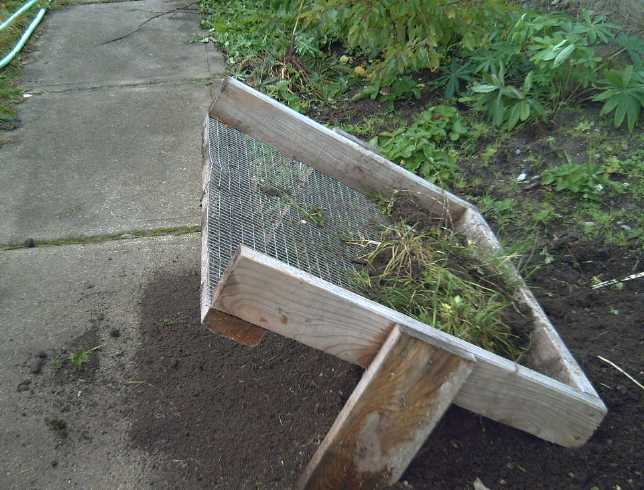 Then pull up to toss it all to the back
again.
Then pull up to toss it all to the back
again.
The good soil falls through the mesh with each toss.
 Tossing too hard loses dirt out the front
 A big toss forward from the back hurls the
debris right out the front!
A big toss forward from the back hurls the
debris right out the front!
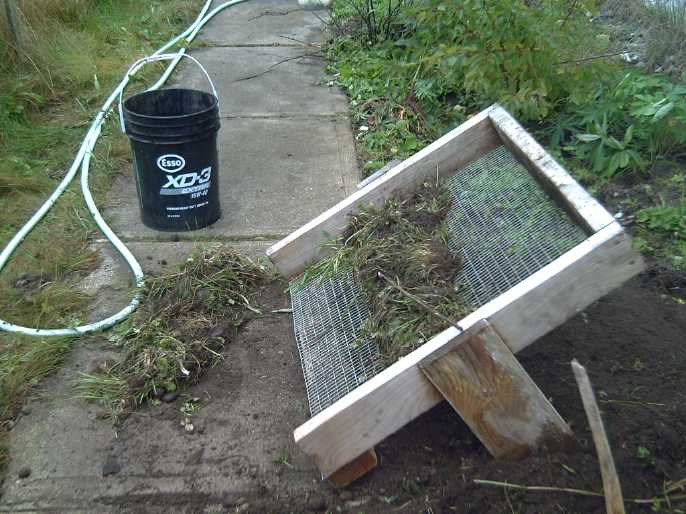 A second batch of weeds & rocks ready
to
toss to the back one more time and then fling right out
A second batch of weeds & rocks ready
to
toss to the back one more time and then fling right out
by the first one, to be shoveled into the bucket (with a square
shovel)
and thrown into the compost.
Potential improvements?
- If the waste can simply be ejected with a swift push
instead of
manually dumped out, could it have a closed front? Then one could
be
less careful when rocking it in the forward direction during
sifting,
without losing any soil out the front. (I'll try putting a board
across
the front and see how it goes.)
- It seemed quite easy to sift this way with this size
screen. I
don't think I would make it too much wider or deeper. Maybe a
little?
CNC Gardening Machine - Bed Prep Tools (just thoughts)
Occasionally - usually while doing some onerous
weed
and grass pulling job trying to prepare a clean bed - I think of
the
CNC gardening machine idea. And more, I think of the tools it
should
wield to make gardening into a light job. One can imagine a heavy
mechanism with some sort of rototiller, but how about something
lighter
that doesn't need railway rail mechanics, but is still able to
turn a
rectangle of lawn into a clear patch of soil over a day or a week,
no
matter how small a bit at a time? It would be great if it could
dig out
the grass and weeds, vibrate and sieve the dirt (keeping the roots
and
rocks on the screen), and go dump them in a bin in the corner. one
little patch at a time. "The longest journey begins with the first
step" and all that.
(Gosh the manual dirt siever above already does a
better,
easier sifting job than anything I've tried before! But to have
something to carry off the weeds, roots and rocks still takes
things to
another level.)
A CNC mechanism with rails, gantry and carriage is
great,
but
unless it has tools to fulfill the tall order of doing the hardest
gardening jobs, it's not worth too much.
Perhaps the "bed prep" job should be done in parts:
1) A large (but cheap) circular saw blade, spinning, cuts slits
through
the grass. Up and down, across and back,cutting the whole plot
into
little manageable squares. I'm not too sure what would happen at
tree
roots or rocks.
They are hard on blades. It may need careful watching on a new
bed.
There will probably need to be some shutoff switch to save the
unit if
something impossible prevents it from doing its job - a big rock
or
root - or mis-programming that tries to move it outside the
bounds?
1b) The tool is then changed for a fairly complex one that
processes
the squares. (down to about the saw blade depth? Described below.)
2) A shovel of some sort can dig up a cube (hopefully digging down
below most of the roots), lift it up, put the screen (sieve)under
it,
and drop it onto the screen. Perhaps it can be a shovel with two
blades
coming in from each side of the square - a "scoop". Or perhaps it
should be two "pitchforks" that grab the cube rather than two
shovel
blades?
3) Sieve it, again probably with considerable vibration to loosen
the
dirt from the roots.
4) Go dump the sieve in the bin in the corner.
5) If desired, a deeper cube can be pulled out to prep the soil
deeper.
Oh, wait... we just dumped the first layer (or what was left of it
with
the roots gone) back into the hole.
Okay, to do two or more layers, instead...
3) Go over to the soil bin in another corner and sieve the dirt
into
that bin.
4) Go to the other corner and dump the roots/rocks into that bin.
5) Go back to the square and dig up the next layer.
6) Sieve that into the dirt bin.
7) Dump the weeds/rocks into the "waste" bin.
8) Go pick up the soil bin and dump it into the hole.
9) Put the soil bin back.
(Pfew!)
Okay, better: the carriage also carries a soil bin and a waste bin
so
it doesn't have to back and forth until it needs to dump its waste
bin
into the big bin in the corner.
Here's yet another worthy project I'll probably never
get
to. I'll just keep gardening the hard way.
Electricity
Storage
Gelled Nickel-Zinc Batteries
Once again it has been
so
long since I tried any battery experiments that continuity has
been
lost. I had decided to try polyvinyl alcohol (PVA) as a gel
instead of
agar. Gelled electrodes seem to last forever, but I've mostly been
having poor results with agar. (When I had a good result it may
have
been by impregnating it with KCl salt when I gelled it. That's
something else I could try again.)
[26th] I got out the piece of plywood I use for a lab workbench
and set
it across the washer and dryer. And (being unable by any means to
get
an arborite/melamine countertop) I found a piece of rubber to put
on
top and make a better work surface.
I found the pieces of the cell done in May, looked it
up
in TE News #169 to
refresh
my memory, and got things together. I had destroyed both the
graphite
"+" current collectors getting the cell apart so I would have to
redo
them.
I decided to glue the 'top' side of the cell with
beeswax
instead of ABS cement so I could open it easily. I will only trust
this
not to pop open because of the external clamp holding the cell
closed.
 [27th] I
put in the
'bottom' graphite felt current collector and layed
the broken pieces of nickel hydroxide/oxyhydroxide on it.
[27th] I
put in the
'bottom' graphite felt current collector and layed
the broken pieces of nickel hydroxide/oxyhydroxide on it.
Then a
sheet of parchment paper, painted with Sunlight dishsoap and
samarium oxide. The paper had been carefully cut to the size of
the
cell but it expanded when wetted. I still stuffed it in.
 Then I mixed
1/2 a teaspoon of PVA and a pinch of zirconium silicate and filled
the
50cc beaker with saturated potassium chloride (in distilled water)
solution. I cut a piece of parchment paper to wrap around the
double
sided zinc electrode. The solution didn't seem to be mixing well
so I
put it in the magnetic stirrer. It needed to be kept in the
stirrer as
something, presumably the zircon, would settle to the bottom. (and
why
should zircon dissolve? Actually the PVA wasn't dissolving much
either.) I painted the electrode and both sides of the
parchment paper with it. It beaded up on the paper and only after
a
couple of minutes was it soaked in.
Then I mixed
1/2 a teaspoon of PVA and a pinch of zirconium silicate and filled
the
50cc beaker with saturated potassium chloride (in distilled water)
solution. I cut a piece of parchment paper to wrap around the
double
sided zinc electrode. The solution didn't seem to be mixing well
so I
put it in the magnetic stirrer. It needed to be kept in the
stirrer as
something, presumably the zircon, would settle to the bottom. (and
why
should zircon dissolve? Actually the PVA wasn't dissolving much
either.) I painted the electrode and both sides of the
parchment paper with it. It beaded up on the paper and only after
a
couple of minutes was it soaked in.
 Then I did the
Sunlight
and
samarium oxide onto another piece of paper and set it on top of
that,
and put some more pieces of nickel hydroxide on that. These pieces
I
hadn't charged to "oxy". Oh well. The 'top' graphite current
collector
went on that followed by a plastic spacer.
Then I did the
Sunlight
and
samarium oxide onto another piece of paper and set it on top of
that,
and put some more pieces of nickel hydroxide on that. These pieces
I
hadn't charged to "oxy". Oh well. The 'top' graphite current
collector
went on that followed by a plastic spacer.
Then I put the beeswax
on the heater to melt. I painted the beeswax onto the edges of the
sides of the
cell and the lid, and of course it froze quickly after each
brushstroke. But I had a plan. I set the cover on it, put a steel
weight on top and melted the wax again with a hot air gun.
I went to look for instructions on gelling the PVA,
which
I had seen before was done by freezing it several times, and for
some
reason
I searched on youtube instead of a general web search. I realized
that
as I was typing, but continued. I didn't expect much, but there
were a
number of videos about PVA. One was Polymer Gel Electrolyte
for
Batteries -- using PVA. Well, duh! His mix - for a strong
alkaline
battery - was 300cc H2O, 10g KOH and 20g PVA.
He put the beaker on a magnetic stirrer to mix it,
and he
heated it up to 90°C to help the PVA dissolve. Then he poured some
into a big petri dish and left it a while. It hardened all by
itself
into a tough rubbery gel. I think the alkalinity "set" the
PVA gel. Since I'm using KCl instead of KOH, I'll continue with
the
freezer gelling method. But next time maybe instead of painting it
onto
a separator paper, I'll pour it right into the cell(?) (Why pour
it
into a petri
dish and then have to rip it out and cut it to size and shape?)
Also, he put the KOH into the liquid before stirring and gelling
so it
was embedded in the gel. I think that may have been my problem
with the
agar -- not putting the electrolyte into the mix and expecting the
gel
to absorb some from the surrounding liquid. ...And then not
realizing
what it was that I had done that achieved success the one time I
had
done so. But hey, isn't the idea of gelling to stop ions from
migrating? Zinc++ ions are the target, but I guess it stops the
salt or
hydroxide too, the K+ ions. After all, potassium is atomic weight
39,
not all that much less than zinc at 65.
I guess the only ions that are supposed to go through
the
gel are hydroxide OH-. or chlorine Cl-.
I wonder if I should also be impregnating the
Sunlight
dishsoap gel for the positive electrodes with salt? Hmm, maybe
that's
been one of my major problems - poor ion conductivity through the
dishsoap because electrolyte doesn't penetrate it well?
The video author specificly mentioned nickel-zinc as
a
chemistry it should be good for, and some useful comments beneath
showed that some knowledgeable people had watched it. It would
seem I'm
not alone in the methods and techniques I've been trying to work
out.
Now where was I? Oh yes, how long do I leave it in
the
freezer, and how cold should it be? Back to the web! Ah:
1. prepare solution 10-15 wt% PVA in water (don't forget the
salt!)
2. freeze for 24 hours at -20°c
3. Warm to 23°c for any period
4. Repeat: about 5 times total.
This time most instructions I saw for gelling PVA
were to
heat it and crosslink it using optionally an acid, and an alkali.
It
seems remarkable that someone figured out PVA would also gel by
the
unusual process of repeated freezing and thawing - and equally
that I
found out about it.
I put the cell in the coldest freezer (-20 to -23 or
so)
to sit overnight. [28th] out of freezer 10:30 AM PDT. I put it
back in
at 15:00 when I got home. [29th] Not wanting to have 5 freezings
creep
up to over a week, I decided "24 hours" was just a convenient
number
for someone and that 20 was surely long enough. As I was going out
again I took it out at 11:00. Now I had the thought that I should
also
take some of the solution and gel it in a petri dish where I could
examine the end result, so I poured some in and put it in the
freezer
too. (What, I have petri dishes?!? Some clear plastic ones with
lids.
Must have been cheap and I bought them on spec from Westlab when I
ordered other stuff.) Sigh! 25:00 I forgot until I was going to
bed to
put it back in the freezer! [30th] Out at 21:30, in 24:00. [31st,
1st]
Ditto.
On November 2nd I realized it had been 6 days and 6
freezings instead of 5. Somehow it didn't seem like so many. I
pulled
it out about 18:00. The petri dishes weren't well mixed. I think I
should have heated the mix to dissolve the alcohol like in the
videos.
Oops. Oh well, it was painted into the separator paper in the
cell, and
onto the zinc electrode, and the PVA couldn't sink to the bottom
like
in the dishes.
To be continued...
Electricity
Generation
Ocean Wave Power: Another Novel Approach? (Just thoughts)
[20th] I thought of a new way to harness ocean waves near the
shore.
Wave crests only come along every 10 or 15 seconds and it's hard
to
make good use of them, so it can be hard
to harness very much of their energy.
Imagine a rectangular trough, just for example maybe
10
feet wide and 100 feet long and a meter tall. It sits with its
bottom
at the water line,
parallel to the shore. On the inshore side and on one end is a
solid
wall. On the ocean side is a wall made of
flaps/louvers that
only open inward. Maybe 2, 3 or 4 rows of shorter flaps rather
than one
tall set, to capture the most water. Or maybe narrower vertical
slit
flaps would work well? (Hardware cloth or something along
the louvered wall would be needed to keep out debris and seaweed.)
Now when a wave crest comes along, it comes in
the flaps but can't get out again, so it fills the trough and has
to
flow toward the open
end. At that end is some sort of "paddle wheel" with a
generator that won't let the water leave without turning it.
(Yourbrook
Energy is presently experimenting with improved "paddle wheel"
type
turbines.) So now we have the wave crest coming past and in one
second
filling the trough, which then becomes a river starting out up to
a
meter deep, for the 9-14 seconds until the next wave refills it
and
momentarily stops the paddle wheel (unless it has a good
flywheel?).
The turbine is sized and electricly loaded such that it will
utilize
most of the water but not
run out before the next wave.
[21st] Another thought is to have the turbine open to the shore
side
instead of right on the end. (It might even be in the middle at
the
back.) The wave crests break into the trough and the water will
never
rise up much past the bottom of the turbine on the shore side, so
it
will generate
continuously. (This presupposes that once the water is out of the
trough it is able to dissipate sufficiently around the ends or
underneath and not build up outside the exit.)
The attractiveness of this design is the fact that it
is
generating power for the whole wave period, not just when a crest
comes
along. And it pretty much harnesses all the power of the wave if
it
isn't deeper than the trough. (Of course with waves the power of a
single unit will always
fluctuate.) It has the additional benefit of being simple and
understandable. Anyone will immediately grasp how it works. A demo
unit
would of course also be helpful.
I haven't got exact thoughts so far about how this
trough will be held at the right height as the tides go in and
out. A
floating structure could be made to work and would be simplest,
but
when a wave beings in a load of water, it's going to drop down
substantially unless it has far more flotation than the weight of
the
water it is suddenly carrying. But that same flotation can't raise
it
up too much when it's empty, or the waves will hit it below the
walls.
With solid posts to the sea floor at the corners,
various
mechanical monstrosities may be conceived of to crank up and down
to
adjust and keep the unit at the best height for the conditions.
They
will need to be very strong, but very large waves will simply wash
right over the structure and submerge it, so unless they are
carrying
logs for "battering rams" and get in some good strikes, it should
survive. Perhaps sufficient weight inside the unit (ie, when it
has a
lot of water in it) - or floats on the inside - can activate cams
that
will prevent it from
dropping, but which will release and allow it to float up to its
best
level when it has little or no water inside. Then each wave coming
along would latch the legs
just as the trough started to fill, and it would stay at the top
after
the crest passed.
Once again, unless such a unit was so small as to be
portable and taken up after each session of experiments, one would
need
approval to utilize the foreshore for this purpose. Getting that
might
be the biggest challenge. (Another potential way of making power
I'll
probably never try!)
I once saw on line a unit something like this. I
think one
actually got built rather than being just an idea. It was round
and
floated in the ocean. Waves would go over any side and run out
through
a turbine through the floor in the center. But I haven't seen it
again.
Sometimes a reasonably good idea just doesn't get developed, but
in
this case I suspect the performance wasn't very inspiring.
One problem as noted above is that a floating unit
will
sink down from the weight of the water admitted and lose much of
the
power. That's why I thought of mine as being used on a shoreline
with
solid mountings of some sort or other. The other problem is that
with
its solid walls it wouldn't admit water as easily as walls full
of inward-opening louvers, again reducing the power captured.
My
Solar
Power
System
The Usual Daily/Monthly/Yearly Log of Solar
Power Generated [and grid power consumed]
(All times are in PST: clock 48 minutes ahead of local sun time,
not
PDT which
is an hour and 48 minutes ahead. (DC) battery system power output
readings are reset to zero
daily (often just for LED lights, occasionally used with other
loads:
Chevy Sprint electric car, inverters in power outages or other 36V
loads), while the
grid tied readings are cumulative.)
Daily Figures
Notes: House Main meter (6 digits) accumulates. DC meter
now
accumulates until it loses precision (9.999 WH => 0010 KWH),
then is
reset. House East and Cabin meters (4
digits) are reset to 0 when they get near 99.99 (which goes to
"100.0")
- owing to loss of second decimal precision.
New Order of Daily Solar Readings (Beginning May 2022):
Date House, House, House, Cabin => Total KWH Solar [Notable
power
Usages; Grid power meter@time] Sky/weather conditions
Main
DC East
September
30þ 4015.44, 4.81, 32.57, 70.69 => 12.51 [85Km; 99666@19:00]
some sun, light overcast.
October
01st 4017.04, 4.89, 33.55, 71.44 => 3.41 [50Km;
99700@19:00] Clouds & drizzle. Summer definitely over.
02nd4022.42, 4.98, 38.14, 74.83 => 13.46 [99725@19:00] Quite a
bit
of
sun, but cold after sundown.
03rd 4028.41, 5.06, 43.69, 78.57 => 15.46 [99768@18:30] Mostly
sunny
04th 4029.12, 5.13, 44.01, 78.86 => 1.49 [50Km;
99787@18:00] Clouds & drizzle
05th 4034.13, 5.24, 48.92, 82.64 => 13.81 [50Km; 99819@18:30]
Pretty
sunny!
06th 4040.04, 5.33, 52.30, 84.98 => 11.72 [99845@19:00] Sunny
day!
Lost ~~3 KWH: o/d circuit brkr. blown (to house-east &
cabin).
07th 4046.17, 5.40, 56.96, 89.28 => 15.16 [90km; 99877@19:00]
Totally
sunny! (Persisting jet trails late in day)
08th 4052.17, 5.47, 61.72, 93.39 => 14.94 [80Km; 99902@18:30]
Sunny,
later
obscurring jet trails covered sky, then fog before dark.
09th 4054.77, 5.54, 63.69, 94.58 => 5.83 [99922@18:30]
clouds, later drizzle.
10th 4059.16, 5.62, 67.01, 2.52 => 10.31
[99947@18:30]
Some sun.
11th 4062.86, 5.71, 70.07, 4.72 =>
9.05 [99971@18:30] More light cloud than sun.
12th 4068.82, 5.81, 74.69, 8.75 => 14.71 [55Km;
00002@18:30] Sunny (a few drifting jet trails). Hydro meter
overflowed.
13th 4069.92, 5.92, 75.33, 9.29 => 2.39
[00033@18:00] Overcast. Fair shower in PM.
14th 4071.17, 6.00, 75.98, 9.87 => 2.56
[85Km;
00078@18:30] Overcast, fog. drizzle.
15th 4074.37, 6.09, 78.43, 11.75 => 7.62 [55Km;
00106@18:30] Fog. Cleared to sunshine in some places but not here.
16th 4079.28, 6.17, 81.81, 14.29 => 10.91 [45Km; 136@18:30] Fog
AM,
then it cleared off.
17th 4080.55, 6.26, 82.53, 14.92 => 2.71
[166@18:00]
Rain.
18th 4081.61, 6.34, 83.20, 15.45 => 2.34
[202@18:00]
Rain, wind, internet failed. (Turned off bitcoin miner/600W
heater.)
19th 4083.73, 6.43, 84.66, 16.60 => 4.82 [50Km;
220@17:30] Internet back, clouds, drizzle. Starry night, red
sunrise,
then...
20th 4085.46, 6.53, 85.61, 17.42 => 3.60
[264@18:30]
...more clouds & drizzle. Had fire on most of the day &
overnight.
21st 4089.60, 6.63, 89.16, 19.98 => 10.25 [90Km; 299@17:00]
Alternate periods hard rain/overcast, and sun. Fire is on for the
season now, I expect, so I turned bitcoin miner off.
22nd4093.25, 6.71, 93.02, 22.71 => 10.33 [320@17:30; 55Km]
Quite a
bit of sun!
23rd 4095.71, 6.80, 94.83, 24.09 => 5.74
[342@18:00]
Drizzle on and off
24th 4099.17, 6.88, 98.65, 26.59 => 9.91 [55Km;
373@17:30]
Put bitcoin miner on in Travel Trailer
25th 4102.41, 6.97, 3.11, 28.62 => 8.47
[402@18:00] Alt. drizzle and sun.
26th 4103.40, 7.07, 3.61, 29.04 => 2.01
[435@17:30] Lite rain (more than drizzle!)
27th 4106.13, 7.23, 6.08, 30.92 => 7.16
[465@18:00] more rain than sunny spots.
28th 4107.22, 7.35, 6.95, 31.50 => 2.66
[90Km; 535@17:30] mostly drizzle & rain
29th 4109.14, 7.47, 8.38, 32.45 => 4.42
[55Km;
606@18:00] Ditto - Not quite as dark
30th 4111.39, 7.58, 10.67, 33.79 => 5.99
[667@17:30]
Some spots of sun here and there - otherwise mostly rain - some
heavy.
31st 4113.40, 7.67, 12.68, 35.15 => 5.47 [35Km;
733@17:30] Some sun, some clouds, rain. 3° - down from 7°+
until today.
November
1st 4116.57, 7.79, 16.30, 37.28 => 9.04 [55Km; 791@17:30]
Mostly
sunny. (Maybe all day except earlier AM.) 0 to 3°.
2d 4117.87, 7.97, 17.10, 37.93 => 2.93 [851@17:00]
Clouds.
1°. Brr!
3rd 4119.10, 8.10, 18.37, 38.70 => 3.40 [914@17:30] Cloudy. A
bit
warmer.
4th 4121.54, 8.21, 20.44, 39.90 => 5.82 [90Km; 983@17:30]
similar
5th 4122.42, 8.35, 21.63, 40.28 [1047@17:30] Snow AM. 1°
Chart of daily KWH from solar panels.
(Compare OCTOBER 2022
(left) with August 2022 & with September 2021 - but note
number of
solar
panels differs.)
Days of
__ KWH
|
October 2022
(18 solar panels)
|
September 2022
(18 solar panels)
|
October 2021
(12 solar panels
then 2 added.)
|
0.xx
|
|
|
1
|
1.xx
|
1
|
1 -- (Long Power Fail)
|
3
|
2.xx
|
6
|
|
5
|
3.xx
|
2
|
|
5
|
4.xx
|
2
|
1
|
8
|
5.xx
|
4
|
1
|
6
|
6.xx
|
|
1
|
3
|
7.xx
|
2
|
3
|
|
8.xx
|
1
|
|
|
9.xx
|
2
|
2
|
|
10.xx
|
4
|
3
|
|
11.xx
|
1
|
1
|
|
12.xx
|
2
|
4
|
|
13.xx
|
1
|
1
|
|
14.xx
|
3
|
|
|
15.xx
|
|
|
|
16.xx
|
|
|
|
17.xx
|
|
1
|
|
18.xx
|
|
3
|
|
19.xx
|
|
2
|
|
20.xx
|
|
2
|
|
21.xx
|
|
2
|
|
22.xx
|
|
2
|
|
23.xx
|
|
|
|
Total KWH
for month
|
238.62
|
406.02
|
123.47
|
Km Driven
on Electricity
|
1043.2 Km
(~143 KWH)?
|
1190.3 Km
(~165 KWH?)
|
973.6 Km
(~150 KWH?)
|
Km = Nissan Leaf electric car drove distance, then car was
charged.
Things Noted - October 2022
* As the sun gets lower in the sky, by sunny November 1st the
clear
view to the south and 45° south slope facing of the 3 new panels
on
the carport roof (plus the 2 on the pole that probably didn't do
much)
really began to tell: they made more than the 6 panels at a poor
angle
(15° south slope) on the house roof (plus the 3 on the lawn at a
steep angle that were probably mostly in shade) - 3.62KWH versus
3.29KWH.
Monthly Summaries: Solar Generated KWH [& Power used
from
grid KWH]
Month: House system (+ DC system at house) + Cabin system = KWH
made
[used from grid]
2019
March 1-31: 116.19 + ------ + 105.93 = 222.12 KWH - solar [786 KWH
used from
grid] (10 solar
panels
total)
April - 1-30: 136.87 + ------ + 121.97 = 258.84 KWH [608 KWH]
May - 1-31: 156.23 + ------ + 147.47 = 303.70 KWH [543 KWH]
(11th
solar panel connected on lawn on 26th)
June - 1-30: 146.63 + 15.65 + 115.26 = 277.54 KWH [374 KWH] (36V,
250W
Hot Water Heater installed on 7th)
July - 1-31: 134.06 + 19.06 + 120.86 = 273.98 KWH [342 KWH]
August 1-31:127.47 + 11.44+91.82+(8/10)*96.29 = 307.76 KWH [334
KWH]
(12th solar panel
connected
on lawn Aug.
1)
Sept.- 1-30: 110.72 + 15.30 + 84.91 = 210.93 KWH [408
KWH]
(solar includes 2/10 of 96.29)
Oct. - 1-31: 55.67 + 13.03 + 51.82 = 120.52 KWH solar
[635 KWH used from grid]
Nov. - 1-30: 36.51 + 6.31 + 26.29 =
69.11
KWH solar [653 KWH used from grid]
Dec. - 1-23: 18.98 + .84* + 11.70 =
31.52
KWH, solar + wind [711 KWH + 414 (while away) = 1125 from grid]
2020
Jan. - 6-31: 17.52 + ------* + 10.61 = 28.13
KWH,
solar+
wind [1111 KWH from grid]
Feb. - 1-29: 56.83 + ------* + 35.17 = 92.00
KWH,
solar + wind [963 KWH from grid]
* The solar DC system was running the kitchen hot
water
tank. Now it's only running a couple of
lights - not (usually) worth reporting. So there's just the 2
grid tie
systems:
house and "roof over travel trailer" (AKA "Cabin").
One year of solar!
March - 1-31: 111.31 + 87.05 = 198.37 KWH solar
total
[934 KWH from grid]
April - 1-30: 156.09 + 115.12 = 271.21 [784 KWH
from grid]
May - 1-31: 181.97 + 131.21 = 313.18 KWH
Solar [723 KWH from grid]
June - 1-30: 164.04 + 119.81 = 283.82 KWH Solar [455
KWH
from grid]
July - 1-31: 190.13 + 110.05 = 300.18 KWH Solar
[340
KWH from grid]
August- 1-31: 121.81 + 83.62 = 205.43 KWH Solar
[385KWH
from Grid]
Sept. - 1-30: 110.68 + 65.09 = 175.77 KWH Solar
[564
KWH used from grid]
Oct. - 1-31: 67.28 + 42.55 =
109.83
KWH Solar [1360 KWH from grid -- Renters!]
Nov. - 1-30: 35.70 + 20.79 =
56.49
KWH of Solar [1301 KWH from grid]
Dec. - 1-31: 19.78 + 11.31 =
31.09
KWH Solar [1078 KWH used from grid]
2021
Jan. - 1-31: 25.47 + 18.58 =
44.05
KWH Solar [1185 KWH used from grid] (1
solar panel moved to DC system only -- 11 panels)
Feb. - 1-28: 47.18 + 33.22 =
80.40
KWH Solar [1121 KWH used from grid]
Two years of solar!
March - 1-31: 81.73 + 55.22 + 2.2 (DC) = 139.15
KWH
Solar
[1039 KWH grid]
April - 1-30: 161.83 + 112.35 + .44(DC) = 274.62
KWH
Solar
[680 KWH from grid]
May - 1-31: 156.25 + 97.22 + 1.29(DC) =
254.76
KWH
Solar [678 KWH from grid]
June - 1-30: 197.84 + 112.07 + 2.21(DC) = 312.12 KWH
Solar
[& 448 KWH from grid]
(Connected
12th solar panel -- 13 panels total but one goes to DC
system
only.)
July - 1-31: 204.35 + 121.21 + 4.06(DC) = 329.62
KWH
Solar [426 KWH from grid; 150(?) KWH used by Nissan Leaf]
August- 1-31: 176.19 + 102.91 + 5.37(DC) = 284.47 KWH Solar [477
KWH
from grid; 165 KWH (est) used by car]
Sept. - 1-30: 94.35 + 51.34 +
3.30(DC) =
152.29 KWH Solar [590 KWH from grid; 155 KWH (est) used by car]
Oct. - 1-31: 77.52 +
41.85 +
4.10(DC) = 123.47 KWH Solar [1066 KWH from grid; 150 KWH (est)
used by
car] (2 new panels on
pole
making 14 --
but they are mostly in shadows all winter.)
Nov. - 1-31: 34.69 + 18.92 + 3.82 =
57.43
KWH Solar [1474 KWH from grid (ouch!); 140 (est) used by car]
Dec. - 1-31: 24.00 + 5.22 + 3.76 = 32.98 [1589 KWH from grid (ouch
again! Must be the -10°'s); 120 KWH used by car] (New switches allow
switching
some panels
between AC and DC as needed, so all 15 are productively
employed.)
2022
Jan. - 1-31: 32.83 + 20.54 + 4.57 = 57.94 KWH Solar [2556
from
grid] Double ouch! Trailer 400W heater, Perry's RV 500W heater,
bedroom
heat, car using extra power (100 KWH with less driving)... and so
little
sun!
Feb. - 1-28: 66.63 + 32.09 + 3.42(DC) = 102.14 KWH Solar
[1118
KWH from grid; 130 (est) used by car]
Three years of solar!
March - 1-31: 128.53 + 82.29 + 3.66(DC) = 214.48 [1124 KWH from
grid;
160 KWH (est) used by car]
April - 1-30: 251.29 + 149.87 + 3.01(DC) = 404.17 KWH
Solar
[911
KWH; est. 170 KWH used by car]
May - 1-31:
255.01(house)+6.46(DC)+140.46(carport)+145.91(cabin)=547.74
KWH Solar [933 KWH from grid;
140 KWH (est) used by car; Bitcoin miner using extra power from
22nd
on.] (3 new solar
panels
on carport roof
-- sunniest location around -- total 18)
June - 1-30: 234.54 + 2.10 + 160.70 + 139.18 = 536.52 KWH
[from grid: 864 KWH - dang bitcoin miner!]
July - 1-31: 232.12 + 4.57 + 143.03 + 139.65 = 519.37
KWH Solar [from power grid: 710 KWH; 165 KWH (est) used by car]
August-1-31: 205.57 + 4.20 + 157.88 + 137.47 = 505.32 KWH Solar
[from
grid: 561 KWH; 145 KWH (est) used by car]
Sept. - 1-30: 165.52 + 3.97 + 132.24 + 104.29 = 406.02 KWH Solar
[from
grid: 856 KWH; car used (est): 165 KWH]
Oct. - 1-31: 97.96 + 2.86 + 78.76 + 59.04 = 238.62 KWH
Solar [from grid: 1067 KWH; car used (est): 143 KWH]
Annual Totals
1. March 2019-Feb. 2020: 2196.15 KWH Solar [used 7927
KWH
from
grid]
2. March 2020-Feb. 2021: 2069.82 KWH Solar [used 11294 KWH from
grid]
(More electric heat - BR, Trailer & Perry's RV)
3. March 2021-Feb. 2022: 2063.05 KWH Solar [used 10977 KWH from
grid]
4a. March 2022-August 2022: in (the best) 6 months, about 2725 KWH
solar
- more than in any previous entire year!
4.
Money Saved or Earned - @ 12¢ [All BC residential elec.
rate] ; @
50¢ [2018 cost of diesel fuel to BC Hydro] ; @ 1$ per KWH [actual
total
cost to BC Hydro
in 2022 according to an employee]:
1. 263.42$ ; 1097.58$ ; 2196.15$
2. 248.38$ ; 1034.91$ ; 2069.82$
3. 247.57$ ; 1031.53$ ; 2063.05$
It can be seen that the benefit to the society as a
whole
on Haida Gwaii from solar power installations is much greater than
the
cost savings to the individual user of electricity, thanks to the
heavy
subsidization of our power
owing to the BC government policy of having the same power rate
across
the entire province regardless of the cost of production. And it
can be
insurance: With some
extra equipment and a battery, sufficient solar can deliver
essential
power in
electrical outages however long.
https://www.TurquoiseEnergy.com
Haida Gwaii, BC Canada