Turquoise Energy News #195 - August 2024 Report
Turquoise Energy
News Report #195
Covering
Research & Development Activities of August 2024
(Posted September 5th 2024)
Lawnhill BC Canada - by Craig Carmichael
[Subscribe: email to CraigXC at Post dot com ; request
subscription]
Website: TurquoiseEnergy.com
Month In
"Brief" (Project Summaries etc.)
* Cabin - "DC Appliance"=AC Appliance+Attached Inverter? - Battery
R & D
In Passing
(Miscellaneous topics, editorial comments & opinionated rants)
* An Inhabited Planet?
- Detailed
Project Reports -
Electric Transport - Electric Hubcap Motor
Systems (no reports)
Other "Green" &
Electric Equipment Projects
* Cabin Construction & 36V DC Wiring
* Gardening: Fall harvests
Electricity Storage:
Batteries
* More experiments - Need for double or triple axis compaction of
powders?
Electricity
Generation
* My Solar Power System: - The Usual Latest Daily/Monthly
Solar Production log et cetera - Monthly/Annual Summaries,
Estimates, Notes
Cabin
I ordered interlocking metal siding pieces to be cut
at the building supply store. (Actually it's supposed to be metal
roofing, but I'm not the first to use them for siding.) In a
couple of weeks they were ready, and near the end of the month I
finally finished siding the last half of the last outside wall.
Yay! I seem to recall framing the first wall in 2019.
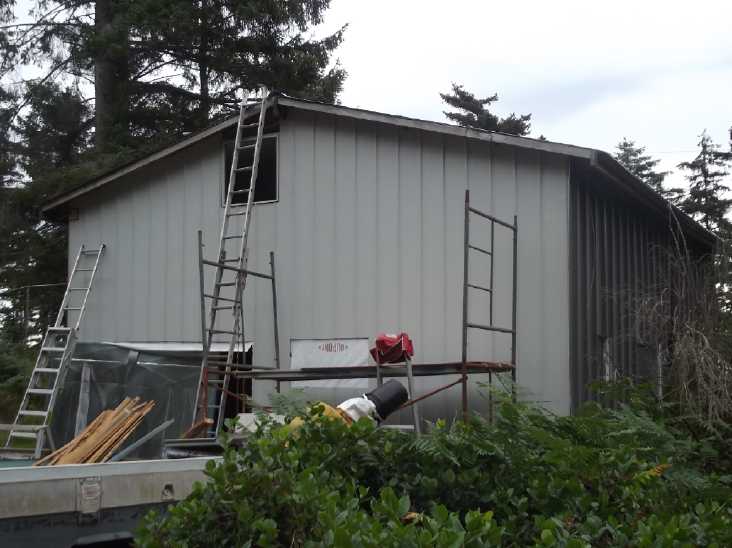
On July 15th I had started sleeping there -- my new
mattress arrived barely an hour after I had just cleaned up most
of the construction clutter and vacuumed it. At that point there
was no glass in the window yet and it was like camping (biting
bugs), but I soon had the window in. It was pretty warm most of
the summer. Indeed there were some days in August when the
afternoon sun beating in the window raised it to 80°F (27°C) -
rather warm for a nap. But the last week got pretty cool at night,
and in the last few days [28th on]I took out one and then a second
electric heater (~150W + ~80W making about 250W) and ran them off
the 36V battery supply at night. With the low power, no insulation
on the floor and two walls (at pretty much outdoor temperature)
the two only raised the temperature by about two degrees C, but it
definitely felt warmer than without. And of course it was "free"
solar power. Good enough for September, I hope.
With the sun beating through the south windows it was
definitely warmer inside the cabin than out notwithstanding the
wide open (garage) door and other major leaks, and notably warmer
up the stairs (even 'hot'?) than down. Then the closed-off bedroom
was just a little cooler until the sun hit the bedroom west
window. At night, inside wasn't warmer than outside but the
bedroom was a bit warmer, and of course moreso with heat on.
On the 27th friends mentioned they were selling some
beautiful, thick, interlocking flooring tiles, still in boxes, for
less than half the new price and someone was coming to look at
them. I said I needed flooring, if he didn't take them all I'd buy
the rest. They also mentioned that birch plywood can look really
nice as interior walls. I actually had the roof racks in the car
and had been about to buy some gyproc. The birch was about the
same price and I bought a few sheets of it instead. (It would
certainly be easier to lift up the 12 foot walls and the even
higher end walls!)
I had been wondering all along what kind of crappy
floor I might end up with. On the 29th they called and said the
potential customer hadn't bought them and I could buy them all. It
sounded like enough to do much of the cabin floor, but when I
worked it out, the 32 boxes were exactly enough to do the
entire cabin, even the bedroom. (not the garage of course.) Wow! I
was thrilled! Now all it needs is the main floor built to put them
onto. But there are other things that need to be done first.
Inside walls. Windows. A garage door mechanism. More 36V Wiring.
Insulation. Plumbing.
Another friend asked if I wanted a good toilet they
were discarding, and dropped it off. Yay again! I have most of the
materials it needs. All I need now is lots more time to put it all
together.
"DC Appliance" = AC Appliance + Attached Inverter?
In the building supply store I met someone who said
someone on this island is attaching DC to AC inverters to 120 V AC
appliances and calling them "DC appliances" - such as
fridges, freezers and washing machines. This blurs the line
between DC versus AC units and reduces the need for AC wiring.
Instead, the AC electric field is local to the appliance itself
and not running across the building. Unless (eg) a freezer is next
to a wall with a bed or sofa on the other side, it's field
probably won't have much effect on the occupants. A disadvantage
is that inverters are always using power themselves. Some I have
use around 15 watts even when idling ...more than most LED lights,
and they're not always on ...adding up to 360 watt-hours per day.
Each such appliance will have that bit of continual drain. (I gave
away an older 1700 watt inverter. It used 50 watts: 1.2 KWH per
day, about as much as my kitchen fridge!) Still, AC appliances are
what are most available today without a huge extra price tag and a
custom order.
I'd much rather have proper DC appliances with highly
efficient BLDC motors, and they are probably coming, like washing
machines and the 24V BLDC well pump I bought a while back (but
haven't installed). In the meantime the idea makes DC house wiring
that much more workable. (BTW the DC to DC converters use a couple
of watts too, making for 50 WH/day. That's not much even if the
power is solar/batteries, unless there are a lot of them.)
On September first I took a table, a 600W inverter
and my 'antique' iMac out to the 'Faraday Cage' cabin and started
finishing this newsletter out there. I mean, in here. There seems
to be a bit of EMF field from the power cord, and teh inverter has
a noisy fan that runs much of the time.
The 19 V DC notebook computer, run with a silent 5$
DC to DC down converter from the 36V supply, seemed much better
(except for the tiny display, crappy keyboard and touchpad
'mouse').
Battery R & D
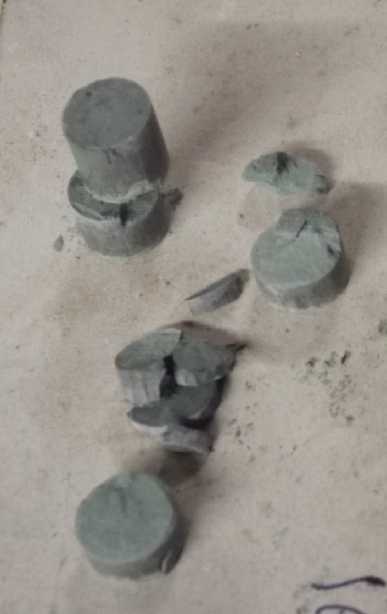 I
tried some things to compact the powder substance in "+"
electrodes better. I'm pretty sure insufficient connection between
particles is the main problem I've been having. But even with tons
of pressure, performance continued to suck, to deteriorate rapidly
once running. I compacted some NiO mix cylinders. They didn't
crumble, but broke easily across into sections, even "coins".
Then I realized that however hard, I was only
compacting the powder in one dimension, "Z", while it remained
uncompressed on the X and Y axes. That almost surely explains it.
There's no compaction from the inside to the outside, from the
carbon rod to the exterior surface, and so probably very poor
conductivity. (I should be able to verify this with an ohm meter
but have just thought of that.)
So the next step is to figure out how to get
compaction in at least two, preferably three dimensions. One plan
is to compact them end-wise (as shown), then use a shallow cone
shaped insert, rotating, with an oval profile instead of round, to
press the powder outward as it is inserted farther and farther.
When it is withdrawn, there's a hole for the carbon rod. But the
piece would somehow have to be prevented from crumbling or
expanding verticly while reaming it out.
Or maybe a spikey-end punch to push material
sideways, and then refill the holes and do it again 2 or 3 times,
then ending with a flat face punch for the last press.
But with many other things to do, I haven't had a
chance in a week to even glance at it.
In
Passing
(Miscellaneous topics, editorial comments & opinionated rants)
Scattered Thots
* With the amazing power of the James Web Space Telescope,
astronomers have found light on the night side of planet "Proxima
Centauri B". Proxima Centari is the closest star to our sun and
one of the three stars in the Alpha Centauri system which orbit
each other. Why should the night side be lit? The best speculation
(we assume that light from any of the three stars was
ruled out) is that it is coming from city lights, and so Proxima B
would seem to be inhabited.
The Urantia Book says that "the oldest
inhabited world" (of 619 in our local administrative system,
Satania), "is lit by the differential light of three suns". It
certainly fits. If true, could we have discovered that world, and
by chance it's the closest extra-solar world to us? That might
explain why the celestial authors chose to reveal this particular
little factoid. Since its writing early in the 20th century, the
Urantia Book has had an excellent record of predicting later
scientific discoveries on a wide range of topics.
ESD
(Eccentric Silliness Department)
* I've heard of non-sequiters, but what is a sequiter? Related to
a sequin?
* On some whim I thought I'd travel down the virtual highways of
Gran Canarias on Google street views to the Museo de Barranco
Guyadique, but I got lost on the winding mountain roads.
* Terminal Morraine: When the flooding gets deep enough to wash
away the town, and still morraine is coming.
* I don't know why, but for me a 50-50 chance of getting something
right seems to be (usually) about the same as "fat chance!"
"in depth
reports" for each project are below. I hope they may be useful to
anyone who wants to get into a similar project, to glean ideas for
how something might be done, as well as things that might have
been tried, or just thought of and not tried... and even of how
not to do something - why it didn't work or proved impractical.
Sometimes they set out inventive thoughts almost as they occur -
and are the actual organization and elaboration in writing of
those thoughts. They are thus partly a diary and are not
extensively proof-read for literary perfection, consistency,
completeness and elimination of duplications before publication. I
hope they may add to the body of wisdom for other researchers and
developers to help them find more productive paths and avoid
potential pitfalls and dead ends.
Electric
Transport
No
Reports
Other
"Green" & Electric Equipment Projects
Cabin
Construction
There's a lot of
overlap between the topics of "Cabin Construction", "DC Wiring"
and "Tinnitus Amelioration" [via elimination of AC electric
fields]. Of course wiring the cabin is part of building it and
'everlasting' tinnitus is related to wiring & power. And
work and experiments with all three are interwoven through the
days. But there's enough quite dissimilar content to at least
separate them into two reports, "Cabin Construction" and
"36V DC Wiring & Power - & Tinnitus Amelioration".
One day at the refuse station I scored a door, some
cedar siding that I could rip into trim pieces for inside, and
what I thought was a small set of lightweight scaffolding... which
I was told was a metal bunk bed frame! All free. Cool! The next
day I spent all but 1000$ on my orders of siding for the second
half of the last wall and some flashing for the bottoms of the
walls.
I put the door on the bedroom at once. I had been
unable to buy a simple interior door. One side had metal nailed
onto it, as if it had been used as an outside door. So, a little
odd on the staircase side, but a perfect fit!
[13th] I did get a start at the siding on the last half of the
last wall, putting up [most of] the remaining slats to screw it
to.
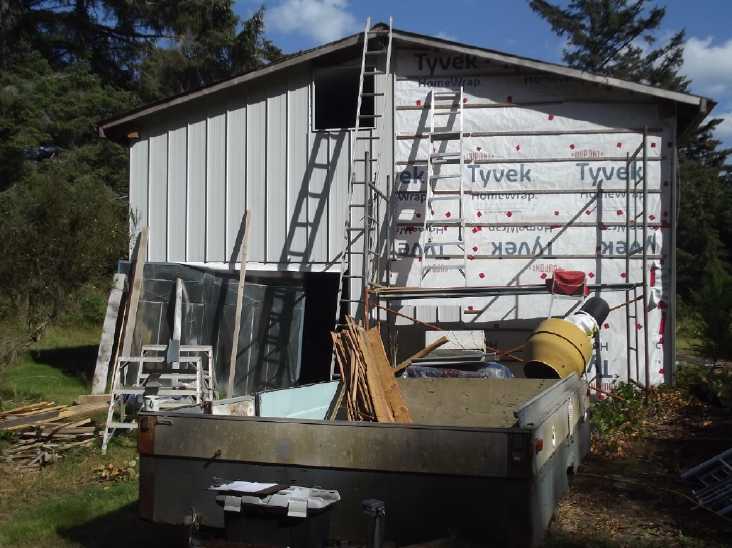 Having
finally got the center siding panel up on the cabin west wall, I
put up the three more sheets under the window [16th], then the
three above [17th]. The center piece at the peak of the roof was
the hard one. It had both slopes at the top with a notch for the
ridge rafter, and needed a cutout for the upstairs window on the
left (including a too-small diagonal vent above it) and for the
downstairs window on the right. Except for the pieces under the
lower window I tried to measure for the building supply to add a
couple of extra inches to the pieces to allow for whatever errors
I might make. I looked forward to not having to cut the
under-window pieces with the angle grinder, but somehow I had made
them 2-1/2 inches too long. Instead, somehow the upper ones were
just long enough, with exactly zero to spare. If I thought I was
leaving a couple of inches extra, it's a good thing I did! But I
had to cut those to the roof angle anyway - no saving on angle
grinding.
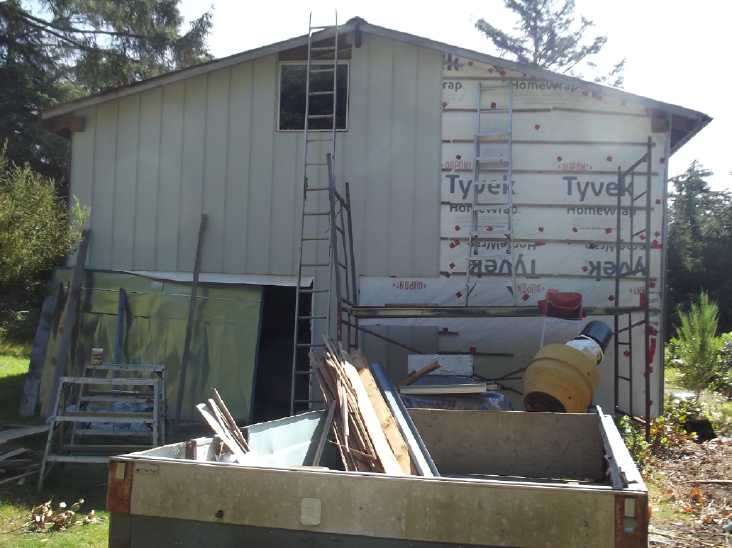 In the
following days I added more siding bit by bit
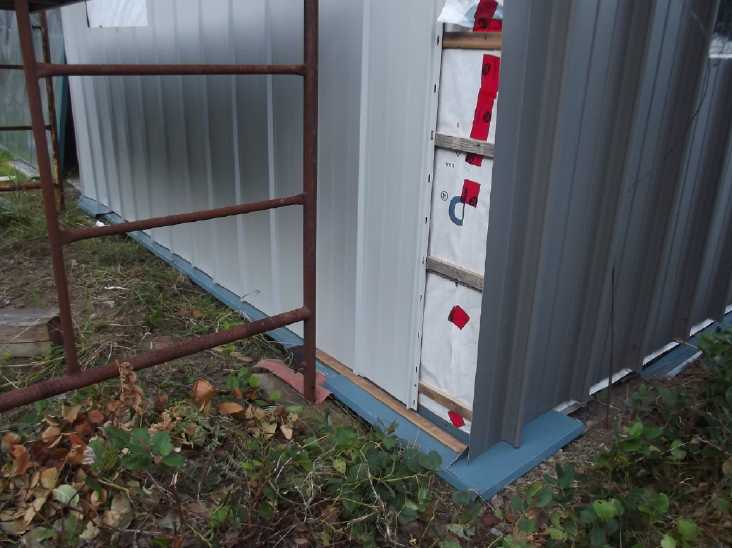 This time I put some
flashing for rain deflection at the bottom.
(I have a lot to redo for this on the other walls - at least the
east side,
facing the winds and the ocean, is getting soaked from the
bottom.)
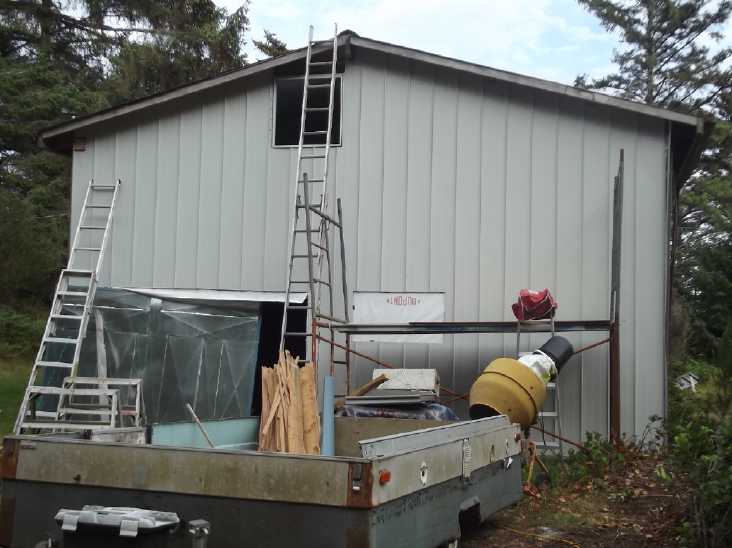 I finished on the 24th.
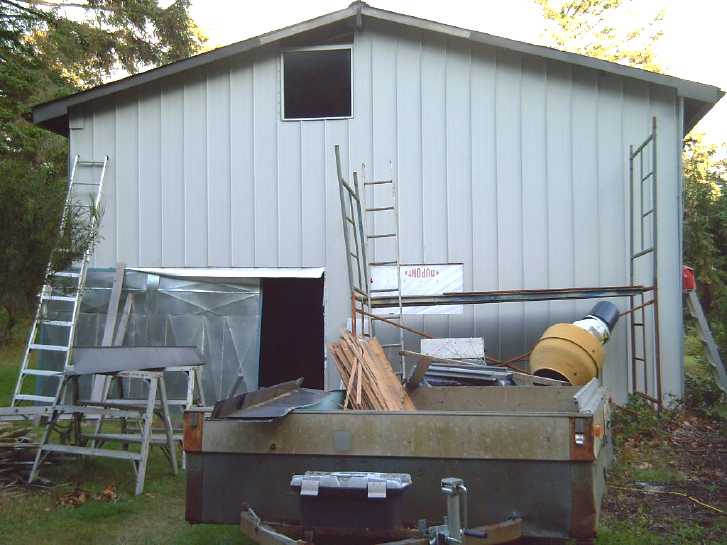 Later I put up a bit of trim
and flashing to cover a gap (upper end right),
wooden bits and gable ends. But I didn't quite finish at the
top-center in August.
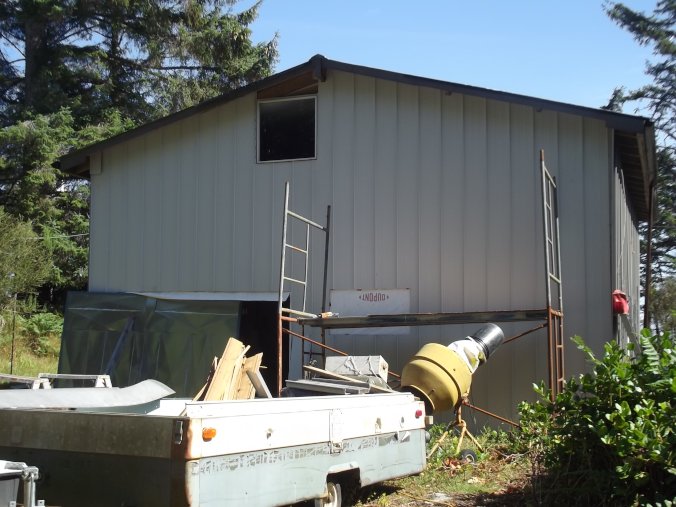
On September 3rd I finally completed it. I noticed the metal
roof didn't quite
cover over the edge - it was cut a trifle too short. So I ended
up putting up flashing
at the roof edge and the job took several hours. (Yay, I didn't
fall off a ladder!)
(Yay, I can take the scaffolding away at last!)
Five windows remain to be done or finished. And... about that
garage door?
36V
DC
Wiring
&
Power - & Tinnitus Amelioration
[12th] I wired up a 20 amp DC to DC converter with a typical DC
round output plug/socket and a T-Plug input, set it to 19 volts
with a jewellers screwdriver, and used it to plug my old Acer
"notebook" computer into 36 VDC. This was the quick way to turn
the ACer into a DCer get a computer out into my new room in the
cabin. It seemed to work well. The converter's heatsinks got
slightly warm.
Then I did more body voltage measurements, in the room. The DC to
DC converter and the laptop seemed to add nothing to the
insignificant AC field in the cabin.
Plugging in the AC power with its four feet of cord inside the far
door likewise did little or nothing. Body voltages were under or
around 5 mV so far. Then I plugged in the grid ties - 80 mV! Why
should the outdoor cord have almost no effect, but two five foot
cords so much? It occurred to me the first one was lying directly
on the gravel floor, the grid tie cables were up in the air
--antennas! [That wasn't it]
An AC power
cord shielded with alume tape plus a short copper wire wrapped
inside, and
wrapped around the ground pin. (Shields should only be grounded
at one end of a cable.)
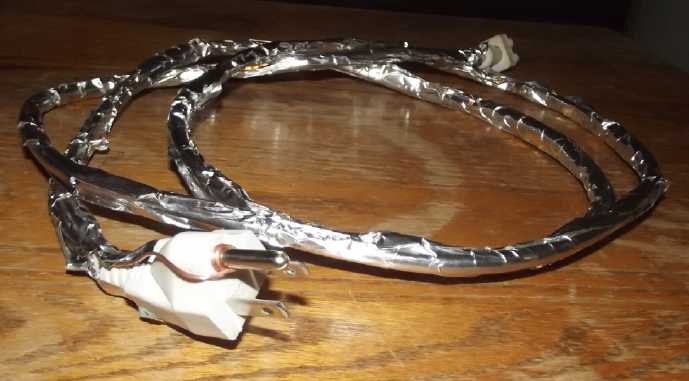 I had some adhesive
alume tape. I took the 4 foot cord and wrapped it, with a piece of
bare wire (9 inches?) wrapped in at the plug end. I wound the end
of the wire around the ground pin. This dropped my body voltage -
way across the building - to 55-60mV. (There seems to be a lot of
variability. I've measured now anywhere from 20 (at night?
Standing) to 80 mV (lying down) with the grid ties plugged in.
Some of it depends on your own exact position. Shielding the
second cord didn't seem to have much effect; it might have dropped
it by 5mV. I turned off the grid ties. Wow! Back to 5 mV!
Next I hung a 6 foot unshielded cord in the vicinity,
plugged into the same outlet as the grid ties. It went up but just
to 6 or 7 mV. The cords, across the buildng as they were, actually
had very minor effects. The grid ties themselves were creating
oodles of AC noise in their operation. That explained the
day-night difference and the variablilty.
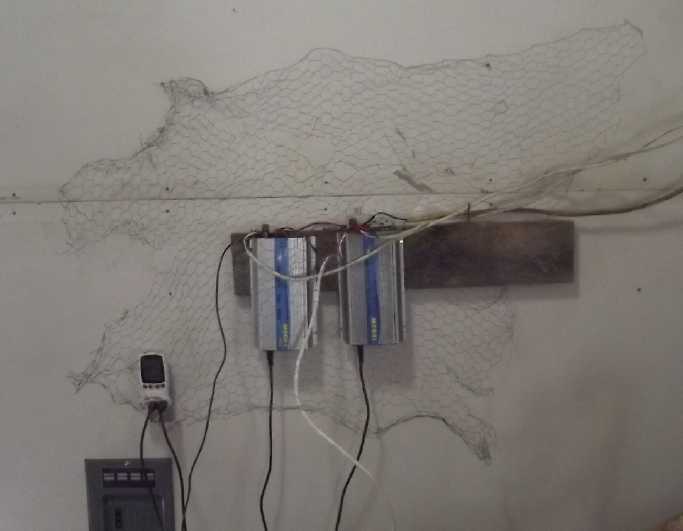 I put an
old piece of chicken wire over the inverters. It dropped it to
35-40 mV. Then I grounded that with alligator clip leeds and it
went UP a bit instead of dropping to a low value! I went back to
"building unplugged" and tried everything again. Similar results.
But I noticed the bare wire in the cable that ran across the floor
to the DC charge controller touching the case of the grie tie it
attached to. Apparently the alume case, which is the heat sink,
has considerable AC induced into it from within, and that
transferred to the long wire running across the building. Pulling
that away (still with the chicken wire covering the inverters)
took the problem from 80mV to 15mV. Good enough! (And that was
lying down along the length of the field. Sitting at this computer
it's only 5mV. And at night with the grid ties not operating, it
should be lower... I think.)
I guess that's what I get for using a bare ("ground")
wire to double up the black "minus" wire and not insulating the
exposed section. I PVC taped it up.
At dusk I checked again and sure enough my body was
down to about 3 mV. The inverters made no AC noise if there was no
power from the solar panels.
That was certainly a lot
of testing and fiddling (up and down, up and down the stairs) for
what was just expected to be "shield the cords" -- if anything.
I'm sure glad I found a way to measure the effects (AC induced
body voltage), or I'd have blithely assumed everything was fine
and that I was just in the house too much and the cabin not
enough, when in fact my ears were still being assaulted by
electric fields everywhere in varying degrees. I'll use the
shielded cords in the house where I'm sitting near them.
Now, back to... Oh ya, I need to design & 3D
print cases for these DC to DC converters. Vented cases!
[13th] After all that I measured my body voltage in the house
sitting at my "modern" computer where I access the internet from.
FOUR AND A HALF VOLTS! Yuk! I had sensed it must be bad, but I
might as well be standing outside under the power line! Small
wonder tinnitus improvement has been so little regardless of
sleeping in the cabin! I discovered that the farther I got from
that wall, the lower it was, until almost the middle or the room.
There it was down to about 1 volt. Probably there were wires under
the floor that kept it from being less, including 240 V to the
dryer not far past the wall. I dragged the desk out there. With
extending the AC cables to the desk, the middle went up to one and
a half volts. That's still in the "extreme exposure" range, but
just a third of what it was. It's likely to make a difference,
since I'm on line a lot.
Doing my typing out here where there's almost no
field should help a lot too. But when the nights start getting
colder I'll be forced back to sleeping in the house. Unless I've
insulated the cabin and put in the woodstove by then. Ha ha.
And I designed the case for the DC to DC converters. I tried to
print it, but the filament snapped part way through printing.
(Does filament have a "best before" date? It was never left in the
sun.) Then I broke a little threaded piece on the end of the
extruder feed tube trying to get the filament out. I ordered a new
piece, but it'll be who knows how long until it arrives. There was
enough printed that I found a couple of important corrections for
next time.
[14th] What is in my Tinnitus?
The ringing in my ears has been changing since I
started trying things to reduce my exposure to AC electric fields.
Sleeping in the "faraday cage" cabin, it changes from morning to
night, then again during the night. Overall I'd say it gets
quieter. Of course lying in bed in the quiet of the morning is
when it's most noticeable and it Seems louder. (One person says
"It's loudest then".) But I think it's the opposite. Since moving
my computer desk to a lesser (but still "extreme" according to
GreenHomeInstitue) field yesterday it was different again this
morning.
The main tone this morning lying in bed was a fairly
loud high pitch whistle vaguely around 7500 Hz, apparently mainly
in my left ear. My left ear has the worst hearing loss, evidently
making it the most susceptible. Recently by morning the whistle
had been "degrading?" to more of a "white noise". Why it should be
a whistle again after a day of somewhat less exposure I'm not
sure. Before knowing about electricity as the driver and taking
steps, it was really loud (since moving here) and always a
whistle. When I was younger it was a higher pitch, say 12000 Hz,
but now I can hardly hear 8000 Hz.
The second component, also in my left ear, was a low
tone, around 350 Hz. Not very loud, but still clearly audible.
The third, in my right ear only and quite quiet,
sounded like Morse code at about 1000 Hz - on and off tone in
short dits and dahs. I have heard such since my youth, even two or
three at a time with different pitches, but since moving to Haida
Gwaii until recently it was being drowned out by the louder, high
pitch, steady tone. (Which was in both ears but is now mainly in
the left? Progress?) I can't make out the content. It's pretty
quiet, not very distinct, and by the time I think I recognize one
letter, two more have gone by since I've never practised reading
Morse code. It's also possible there are two stations superimposed
on each other, or even that it isn't actually Morse code at all.
(This may be another good argument against metal tooth fillings?
When AM radio stations used to broadcast at 50,000 watts, some
people with metal fillings living nearby could hear them - the
music and words. Lower broadcast power was legislated.)
I had stayed home most of three days, so I didn't get the adverse
effect of driving under the power lines. This was about as quiet
as it ever got. On such best mornings after eight hours
"unexposed", the intensity of the high pitched tone was reduced
and it varied with my pulse, decreasing in between heartbeats. And
sometimes it became less of a whistle and more just high-piched
"white noise". Other times there were new but quieter whistling
tones especially in my right ear. In short, getting out of AC
electric fields for some hours each day made it highly variable
instead of a fairly steady, intense, very high pitched whistle.
But it's only after the whole night of sleep, 7 or 8 hours away
from EMF fields that the changes really start to become manifest.
But it always got rapidly worse after I got up and
entered the higher EMF fields nearer the power lines and in the
lavishly wired house.
This next day I drove into town (under the 14,400V
power lines all the way of course). I forgot my conductive fibers
tuque. I visted two people who were both very near power lines,
maybe 4 hours of pretty strong AC power fields exposure. The rest
of the day and even into the next my ears were ringing much worse.
[18th?] I had put down an old chunk of 2 inch chicken wire on the
floor under my computer desk and grounded it about 4 days ago.
This had cut the EMF field from 1.5 volts AC to .15, a ten times
improvement. Apparently there were power wires right under the
floor, probably including 240V to the dryer across the wall and
for the baseboard heaters.
It didn't lie flat. I put some small carpets over
some of the edges temporarily. But now the inevitable happened:
the wire caught my shoe. I tripped and I fell down. No harm, but
definitely time to really "install" it.
[19th] It fit under the 9x12 foot carpet. I washed the carpet. I
sat down and checked my body voltage: Almost zero! What? I lifted
my feet- 200mV! The carpet was still a little damp, connecting my
feet (socks) through to the ground underneath. Next day that
didn't happen, and I got out a grounding pad and set it at my
feet, plugged into ground. It seemed to have some effect even with
thin socks on - sweaty feet I guess. It didn't work the next day,
or if I had shoes on, so I put the pad on the desk. At least when
I was typing the heels of my hands would be grounded.
[24th] I tried running the vacuum cleaner off 36V CD again, this
time with an AC power monitor on the inverter's output. In the
high position ("5 lights on") it was around 950 watts and in
fourth, 800W. There it was 1100 volt-amps with a power factor in
the high 70's. The voltage was about 115. After a couple of
minutes the 20 amp breaker blew; also the "fault" light came on on
the inverter. (The previous time at full power when the "fault"
light came on, the breaker didn't seem to have blown... but it
still may have been a power glitch from the breaker or the balance
charger cut-out that triggered it, since that is only rated for 30
amps. I'm exchanging it for a 150 amp one.) 800W/38V=21 amps.
With "three lights" the power was only 360W, ~600 VA
with a lower power factor in the 60's. And oddly the output AC
voltage was only 104V. (I had this low voltage from this inverter
running a "microwave" oven. The microwave sounded normal, but when
the coffee should have been hot, it was barely warm. The
microwave's heating effect seemed highly voltage dependent.) It
was definitely quieter, but it still seemed to suck adequately.
At the end of the month it started getting cold at
night and I put the 250W of heat on in the cabin bedroom. I had to
start shutting the grid ties off if it was cloudy to make sure the
DC got a good charge. On September 5th, after the night heating
and also running the computer some hours, it didn't get there.
We'll have to see what will happen as the sun goes south for the
winter. I might want to bring the four solar panels up to six, but
the cabin isn't the best spot for panels, especially in winter
when tree shadows from the neighboring acreage cover it.
Perhaps my next step should be to put in a ~38V, 20A
DC power supply on the AC in that far corner to keep the 36V
battery half charged when there's not enough sun to charge it.
Gardening
Fall Harvests!
My pepper plants in pots continued to produce for
their second year.
At least one coffee plant flowered heavily in the
greenhouse and is growing a thick new batch of seeds.
None of my cabbages did well. (I may still get a
small head or two from the greenhouse.)
None of my squashes did well. Except for one zucchini
on one plant, it was a wipeout. A couple started and then rotted,
lots of flowers and growth but too late in the season. A yellow
zucchini, planted late, has a couple starting, but I fear they
will rot before getting big enough to use.
I got corn! Probably a dozen cobs, albeit only a
couple were really a decent size. I'll seal up the air gaps around
the box edges better next year to keep them warmer in the spring.
About 750g of peas from a single 10 foot row, and a
kilo of green beans (green, yellow, purple), all in the freezer.
Oodles of tiny cherry tomatos with tough skins, but
nothing ripe yet of larger size. Ug.
One and two bite carrots, and rather small onions,
both smothered by weeds, which I plucked out in armloads too late
to help the crops much. (The earlier carrots planted indoors in
egg cartons were nothing special, but there were at least a few
decent ones.
The three surviving sunflowers are growing well, but
flowered late and aren't ready to pick yet. (The rooster scratched
out my fourth one when it was tiny.)
Poor blueberry and strawberry crops. (The blueberries
are being choked out by fast growing and spreading mint [why did I
plant it there?]) The chokeberry bush had lots of flowers but no
berries. (Does it need a special pollinator?) Lots of black
currants and josta berries. Too many raspberries to pick them all!
Several containers of them in the freezer. The wild salal looks
really good this year but I don't seem to have got around to
picking any. I might still manage a small bag or two.
Finally! good crops of apples off two trees, but so
small they might as well be crab apples. I haven't picked them
yet, but they don't look like they're growing much. Zero pears for
the 8th year, now from three trees.
The 'carpathian' english walnut and the little black
walnut (still in a pot) - this time watered every second day,
summer or winter - are growing well.
With letting the chickens out daily in the late
afternoons, slugs were a much lesser problem this year, but after
planting I couldn't let them in the gardens. Expanding the garden
by the house has gone well but all the gardens need edges to keep
grass from growing in from outside. (concrete "footings" around?
Big recycled plastic plates dug in?)
So, a rather disappointing summer for some things but not without
bright spots. I'm sure I need to get some things started earlier
indoors. And I have to do something about weeds. Maybe rototill
twice?
It's time to move the potted plants back into the
house. I'm not sure I have enough room for all of them, and the
three coffee bushes are getting pretty tall.
Electricity Storage
The
Copper Oxyhydroxide
Nickel-Manganates
Nickel Hydroxide
Nickel Oxide - Zinc Zincate Cells
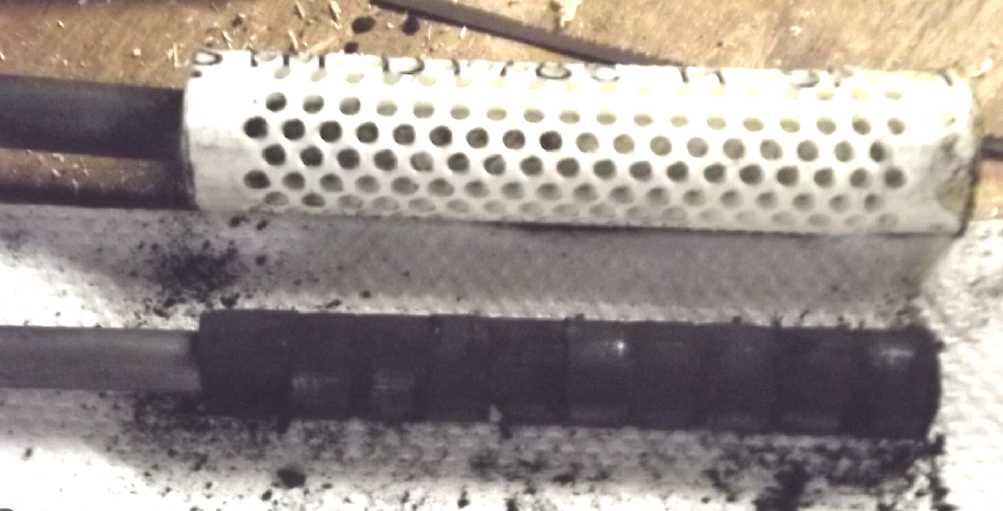
A perforated electrode tube, and end compacted nickel oxide mix
beads on a carbon rod to go in the tube.
Compactor
[10th] I suddenly got a new inspiration for a compacting tool for
perforated tube trodes. A bit more elaborate. Instead of making
short donuts with fairly thin pipes, make long half donuts - a bit
less than half a circle with half a hole - with heavy steel parts
for the mold. The pieces might be 1/2 the height of the tube, or
even the whole length.
Since they are a tiny bit less than half a circle,
two of them should slip easily into the electrode tube to fill
both sides. Then inserting the graphite rod will push them apart
and against the separator paper. So the substance should make good
contact with the rod. The separator paper isn't stressed because
nothing slides across it with any force. A piece of thin ABS
plastic can be slid into the gap to occupy the slit opened up on
one side and leave practicly nowhere for the substance to
decompact into.
This technique would require several tons of force in
the pressing and good solid chunks of steel, and distributing the
powder in the mold for an even pressing might be a bit tricky, but
it should solve all the other problems. How to build it?
[11th] In fact, I don't see how it could press evenly, so I gave
up the idea. Darn! I made a new tube, with bigger holes - 9/64
inch instead of 7/64. I ironed polypropylene cloth into five more
pieces of separator paper that were already cut and toluene
treated and then soaked them in SDBS.
[12th]In the evening I drilled out a battery electrode tube. I
used a 9/64 inch drill instead of 7/64 and should have a bit more
inerface area for higher current capacity, although the holes had
to be farther apart. 15 columns of 18 holes instead of 20 columns
of 18, but I calculated 29 sq.cm of interface surface instead of
26.
[15th] Now the hard part. I had qualms about the doability but was
unable to see an easy way around. Having prespared the separator
paper the previous evening I went to try to put it all into the
tube. First I tried putting the paper into the tube and then
inserting the shishkebab of NiMn2O4 beads. It was obvious they
would crumble going in. So then I took the paper and wrapped it
around the beads. The gap barely closed - no overlap at all. But
it did, so I tried inserting it. It started in easily enough, but
was pretty tight. Anyway if I could get it in, the material
certainly couldn't expand outward! That's a good thing. It went
about 3/5 of the way and wouldn't go any farther. the paper just
mushed as I pushed. So close! The paper was still slightly damp
from soaking in SDBS the previous evening. I set the whole thing
in the sun to dry hoping it would become stiffer and could be
insterted the rest of the way.
It occurs to me that if the tube was slightly
tapered, it should go easily in to the end. But wait, then the
string of beads would have to be tapered to match, or the top ones
would be loose and would expand! That would require multiple size
beads, multiple size compactors. as well as custom molded or
reamed-out tubes. Probably not a practical solution. It did give
me the idea to ream out the tube with a 5/8 inch drill bit. The
tubes were between 9/16 and 5/8 inside. It was tough going by hand
with the drill bit in a vise. I'd have wrecked the tube using
power. I went 3/5 of the way in, and the paper assembly went in
just that far. So I went in again as far as I could, most of the
way to the bottom. The paper wouldn't go in any farther than that.
I decided to just fill the few still unpapered bottom holes - and
now a few top ones - with heat glue.
I fear the beads may have some bit of room to expand
now. I liked the original diameters. I'm not satisfied, but I'll
give it a try and see if it's better than previous "+" trodes.
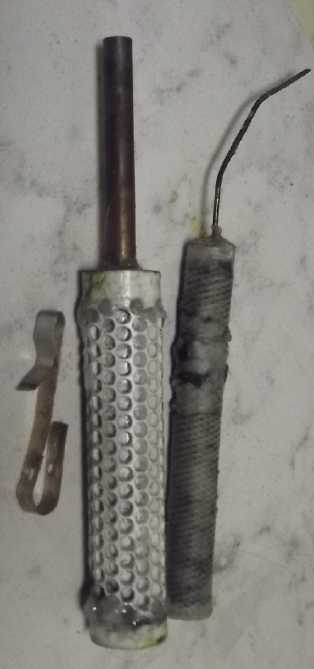
Having one to all this trouble, I decided to gold
plate a 6 inch carbon rod for better contacts. I put it into a
test tube where it wouldn't take cups of gold plating solution to
do it. It wasn't long before I could see some color change on the
rod. Surely, the thinnest plating would do? (Hmm, the slight gold
sheen is hardly visible in the foto.)_

 [15th]
(continued) I mixed fresh electrolyte, filled the cell and turned
on 1.60V charge. It started charging at ~170mA! (@ 12:05 AM, an
hour before noon) This certainly seemed like more current than
previous "+" trodes. But it dropped pretty quickly. Rats! I
conceive that the slower the current drops, the more material is
in good contact and being charged.
I turned it up to 1.7V to see what would happen
(12:20), but it only went up from 35mA to 50. I left it there.
Soon it was down to 35mA again, and in half an hour to 15.
1' load test w. 50 Ω
1:05 1.470 V
2:42 1.482 V -- hmm, it seemed to be dropping voltage much
slower than at 1:05.
4:42 (down to 10mA charge current!) 1.458 V -- Huh?
30" @ 10 Ω
2:47 1.170 V
4:47 1.075 V
Well, these results do not appear to indicate the
cell charging but rather, I imagine, the NiMn2O4 bead material
finding enough room to expand out, both inward toward the rod and
outward toward the PCV tube and decompact into. (I knew I didn't
want to drill out the tube so it would go in easier! But I had to
to get it in, intact.)
What, then? Can I insert something to take up space?
- without wrecking it? Or is it already too late if it has
expanded?
The rod was a bit loose. So, the beads at least
hadn't expanded inward. I opened it up, took out the rod, and
funnelled another gram of NiMn2O4 substance into the hole. Then I
tipped it sideways and tapped it and rolled it around to
distribute the powder evenly, then twisted the rod back in. It
went in harder than it came out. Currents were up a little.
1', 50 Ω
5:10 PM, 1.500 V
7:05, 1.530 V
That seemed at least somewhat promising. Voltage started out
higher - at about 1.6 V the second time. But it still dropped at
about the same rate. More charging, then a longer test?
7:10, 1.241 V -- 10 Ω for 30"
Better but not good. I decided to double down and add another gram
of so of powder (~2g). and taper the end of the rod to push it
outward. It was much harder pressing it in, and in fact I think
I'm lucky I didn't break it. Charging at 14mA now (IIRC)
7:44, ~1.54 V -- 50 Ω 1' -- more charging helps too.
8:15, 1.554 V -- 50 Ω 1' --Looking promising!
8:20, ~1.33 V -- 10 Ω 30"
10:22, Chj. 10mA (At least it's not 3 or 4 mA!) / 13.92 V -- 10 Ω
30"
10:27, 1.562 V -- 50 Ω 1'.
11:11, Chj. 11mA / 1.580 V -- 50Ω 1' ...highest yet
11:26, 1.372 V -- 10Ω 30" ... Hmm, that's DOWN from the last one.
11:40, After 5' of discharge into 50Ω, the voltage was still
1.515V. Considering the previous NiMn2O4 trode hardly even ran 5'
with the same mix of the same chemicals, I think I've demonstrated
that the level of compaction makes a huge difference - seemingly
THE difference.
Momentary short circuit current was a little over an amp.
---
Later a new idea occurred to me: instead of a solid
plastic tube with holes, I could make the "beads" on a carbon rod,
wrap separator paper around them with a disk for a bottom (or just
heat glue?), and wrap the whole thing up tightly with several
turns of heavy PP cloth. This could be melted with a hot air gun
or just the seam sealed up. That might hold the whole thing
together just as well, and it would solve the problem of getting
the trode into the tube without wrecking it or having it too
loose, allowing the constituent powder to decompact.
[16th] Overnight charge current dropped to 6mA. In a longer 50 Ω
load test the cell ran down to 1.300 V in 35'. At its best point
it was still dropping over 6 mV/' . Higher compaction is helping,
but not enough. It's still milliamp-hours rather than amp-hours. I
think it needs to be pressed still harder, and kept pressed
better. (No wonder dry cells are in metal cases!) I'm now
expecting this trode to deteriorate owing to the slight space the
beads have to expand into.
[16th] cont late By evening the cell seemed to have a lot of self
discharge. It was "charging" at 25mA just to stay up. Turning off
the charge was the same as running a load. What brought this on?
One suspects that changing the electrolye would fit it, but the
jar holds a lot of it, and I only have so much pure sodium
sulfate. I suppose I should change it to see what happens.
[18th] After that fine first test and another good one (7') at 10
Ω, it only ran about 6' per test at 50 Ω. This evening I pulled
out the rod (it came out more easily than it went in) and poured
another 2g of mix at an angle, hopefully spread along the sides,
and pushed the rod back in. Again I counted myself lucky it didn't
break with the pressure I employed, leaning heavily on the tube
with the rod pressed against the counter.
Now... Would it work better? Way better? A little
better? Oh... that edge where the separator paper didn't overlap
itself? There was powder coming out that whole line of holes. I
guess the extra powder, twice, had expanded the tube, or at least
the beads and the paper inside it, until the paper didn't cover
the holes all the way around. That also means the beads probably
weren't increasing in compaction, just expanding outward.
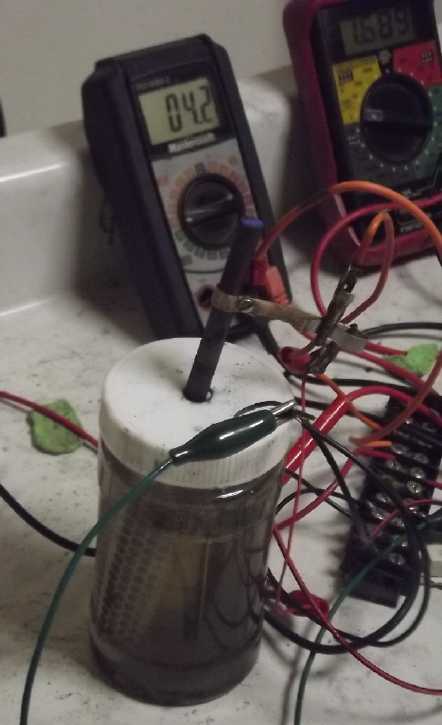 Looks better with lid on
jar, but doesn't actually change the chemistry
[19th] My nickel oxide having arrived I mixed a new batch of
"Ovonics" nickel mix (TE News #194, #186), with NiO instead of
Ni(OH)2. I thoughtlessly added .4g of zinc powder instead of zinc
oxide powder. Then I added .4g of ZnO anyway. I hope that doesn't
make much difference. Then I mixed it all in acetone to form the
epitaxial 'doped' crystals. I slopped in about 3-5 times more
acetone than needed. That's going to take some time to evaporate!
I also forgot to add graphite powder or conductive
carbon black to make the mix more conductive. Oops!
[21st]Still using the previous NiMn2O4 trode, If decreasing
performance was due to swelling of the electrode and hence loss of
conductivity between the powder particles, shrinking it might
restore cohesion. I decided to try wrapping the electrode tightly
with string, hoping to decrease the diameter of the tube slightly.
If it worked it could demonstrate that poor compaction was the
problem. If it didn't it probably meant the pressure wouldn't
compact the pipe, rather than proving compaction wasn't the
problem.
First I covered the leaking column of holes with heat
glue. Then I used about 35 feet of thin, waxed string. I tied one
end and wound tightly from the other, and finally tied it off.
Although I had dried off the outside of the tube, I thought that
if the tube was squeezed down a bit, electrolyte would drip out.
It didn't happen. And the performance didn't improve. It would
still just run a 50 ohm load for a few minutes. I expect all that
pressure didn't compact the PVC pipe at all.
BTW the waxed string was probably a spool left over
from around 1978(?) or prior, before someone invented plastic
cable ties to bundle groups of wires together, now commonly called
"zip ties" and used for many other things as well. Before that
they were wrapped up and stitched together with loops of
continuous waxed string or lace. Learning to lace bundles of wires
was part of learning electronics.
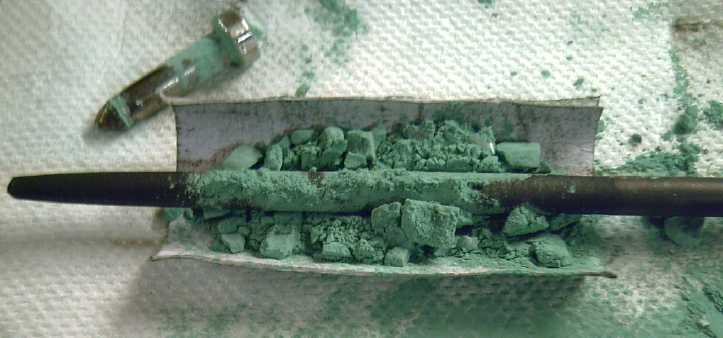 [23rd] I put together
a NiO electrode. Unlike the nickel-manganese oxide, the 'beads'
wouldn't come off the bolt nicely. Instead they crumbled when I
tried to pull them off. So instead of solid beads, I had little
chunks - something like when I made an electrode from commercial
dry cell nickel hydroxide, only crumblier. I half rolled up a
separator paper and sprinkled on some chunks, set a graphite rod
on that, and added the rest of the chunks, about 15 grams.
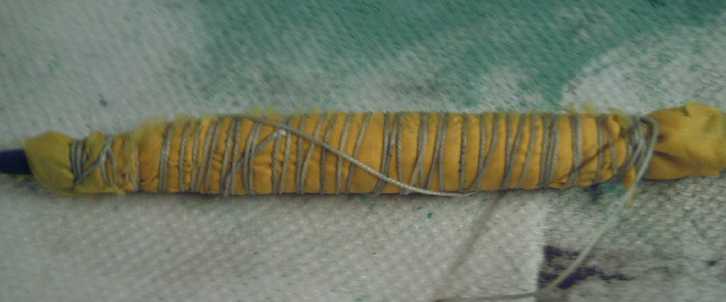 Then I
rolled the paper tighter, breaking down some chunks. Then I
wrapped it all in "100% nylon" cloth, several turns as tightly as
I could manage. Then I took a cue from the previous effort and
wrapped the whole thing up with waxed string to tighten and hold
it. I tried to wrap it tightly to the rod at the top and bottom.
I confess I wasn't very
optimistic about the prospects for good performance. But I put it
in the cell. This time, after a few hours and it would still only
run for about 6', I checked and found after a bit, this time, the
zinc side was losing voltage faster than the nickel.
 I'm
not surprised because the zinc electrode tube was visibly falling
apart. The PVB tube had broken entirely and the whole trode was
getting taller, just the copper screen and some zinc holding it
together. The chemistry might last 'forever' - and indeed I've
been using the same tube for months now - but PVB seems to
eventually disintegrate in alkaline solution. But I probably
probably too much zinc powder in this one. I found out after a
while that it should only be filled about 1/2 full because the
zincate [Zn(OH)4--, discharged] takes up much more room than the
zinc metal [Zn, charged]. The disintegration of the electrode is
probably why the electrolyte had again become all dark colored. I
pulled it out. So much for PVB! Anyway, I ran out of PVB printer
filament a while back. I can try ABS again... when the part
arrives for the 3D printer.
Realizing the zinc was a problem gives me more hope
that the nickel oxide will perform well. ...And I wonder if the
deteriorating performance of the nickel-manganates was in fact
owing to the zinc side. Certainly nothing I did to it seemed to
make any difference.
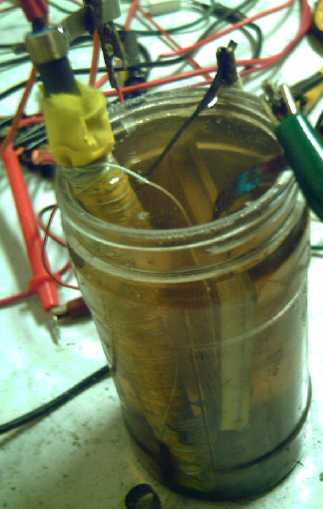 I still
had the square zinc trode in the box cell. (It's the last one
until someday my new osmium powder arrives.) I took it and put it
in the jar. Suddenly charging current was substantially higher,
and soon so was short circuit current, hitting about 1/2 an amp
instead of 1/5th. By now it was late and I left it to charge
overnight. This zinc trode, having sat for (?)3 or 4 months now
and only partly immersed in electrolyte, was clearly quite
discharged.
[24th] Morning confirmed that this zinc trode was very weak and
that the rapid voltage drops under load were mostly on the "-"
side, the "+" being at least somewhat stronger. I guess sitting
only partly immersed, much of the zincate would have dried out and
converted to zinc oxide, which is hard or impossible to recharge.
There's probably not much more I can do until my osmium powder
arrives and I can make another zinc trode.
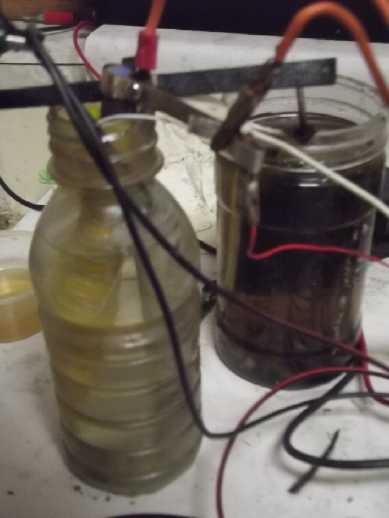 In the
evening I had the thought that there was the manganese electrode
tube, which had been sitting almost immersed in electrolyte in a
bottle for ages. It hadn't seemed to work back then. Then I
remembered from long, long ago that Mn didn't work at pH 14. Was
the pH too high? Now I had a nickel oxide plus trode that seemed
to be working and zinc that didn't. I checked the pH in the Mn jar
- around 11. I put the NiO trode and the Mn one [oops, it was
actually another zinc tube] in the bottle and removed whatever the
other two were. It needed topping up and I added some new
electrolyte, This brought the pH up to 12 or 12.5. That seemed
ideal. And I didn't quite bring it up to the level of the copper
terminal wire, since that would bubble hydrogen.
I set it on charge at 2.3V. It started out at 200mA
with the (surely) utterly discharged Mn electrode. According to
the graphite foil reference electrode the NiO had a horrendous
1.3XX V on it and the Mn just .8XX. On charge the Mn slowly gained
and passed .9 V where the crappy zinc had been. In maybe 1/2 an
hour the cell started discharge (into 50 ohms) at over 2 V, 36 mA.
It didn't last, but it was lasting better than either of the two
zincs.
I've been using copper wire terminals for negatives and carbon
rods for positives, so I assumed the tube with the copper wire was
the manganese. Now I looked at a piece of masking tape on the
carbon rod of one of the others two tubes. It said "Mn -". What?!?
I had the wrong tube. I must have used carbon on the Mn tube
hoping to reduce or eliminate bubbling of hydrogen. So the tube I
had must be a zinc one! And as it charged, the voltage compared to
the reference electrode seemed about right for zinc. The NiO
voltage OTOH seemed much too high for a nickel electrode. I
suspect some of it may be charging right up to NiO2. It seemed to
be working, but I would never have knowingly tried charging Ni-Zn
up to 2.3 volts. While it dropped pretty rapidly down to maybe
1.8V, it started its discharge from 2.1 or 2.2V. This zinc seemed
much stronger than the other two, maybe about as strong as the
nickel oxide side. It ran for about 5' twice. Time for an
overnight charge.
Double or Triple Compaction!

[25th] The most I ever seem to get is 20' load time at 50 ohms.
(2.2 volts dropping to 1.6.) It's pathetic. If the NiO was going
to crumble into pieces, why did I need to try making 'beads' with
holes? This time I got out my jewellers sheet metal punch. I used
the smallest, 1/2 inch, and pressed the powder at first to 5, then
to 6-1/2 tons. The little cylinders still crumbled, but I noticed
that now they strongly tended to slice into 'wafers' or 'coins'.
Okay, I had compacted them very stongly, but only in one
direction! In the other two planes they were no
smaller than when they were loose powder.
I think I hit a key point there. The powder should be
compacted in all three directions. Or maybe at least two. I put
bits back into the punch/die sideways, or at least at random,
trying to get them more on edge, and compacted them again. They
still split easily into 'coins', but they're probably much better.
I need to prove that. Now, how do I incorporate crumbly little
cylinders into a porous electrode with some sort of graphite
current collector connecting everything well? I broke them up and
put an electrode together with graphite fiber for a current
collector.
[25th Ctd.] In the evening the NiO
presently under test ran for only 13' (@50Ω) instead of 21 - the
usual deterioration from pathetic to more and more pathetic.
I measured the largest cylinder of "double
compressed" NiO. It was 12.8mm O.D, 12.0mm long, and weighed
4.35g. That's 1.54 cc and 2.8 g/cc density. So the double
compaction had yielded a slightly lower density than Ovonics
(~2.9, 3.0) but higher than most in the literature (~2.1 2.2). It
would seem to be in the right range.
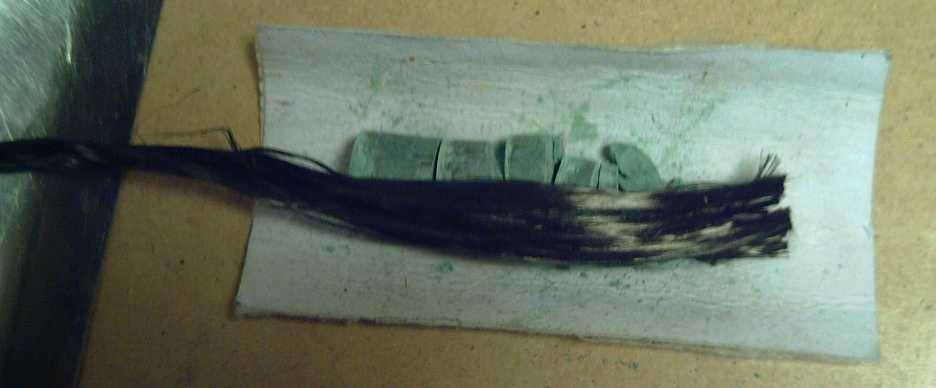 Putting together an
electrode with cylinders of NiO, graphite fiber and not much
solid form
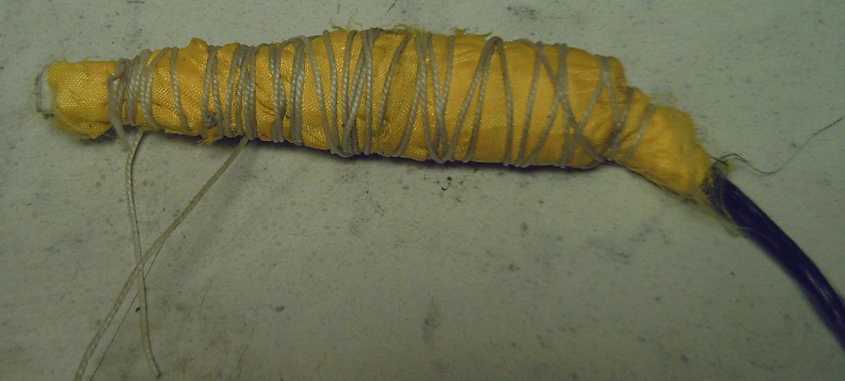 When
it was finished I traded the NiO trodes. I forgot to weigh the
cloth and the string. I estimate that there's about 12 g of NiO
mix in it. It started out with little charge and charged at just
3mA. Hmm, maybe it takes a while to wet the insides of the dense
NiO cylinders?
Oog! Electrolyte has wicked up the carbon fiber,
wetting the alligator clips. My, there go those test leeds!
[26th] It worked like crap. It was
here I finally remembered that I hadn't added any graphite to make
it more conductive. Did it need it? Ovonics hadn't used it. But
since my process simply incorporated the cobalt hydroxide instead
of making it into (conductive) spheres around the other
ingredients, it might need the graphite. But then the previous
trode was the same mix and much better than this one. I have a
feeling that the connections to the fiber aren't much good
compared to carbon rods.
I also wondered if there was some way to stick a thin
wedge into the middle of the cylinders, compacting them outward at
the same time as making a hole in the middle for a carbon terminal
rod. Just when I think it's hopeless and I should give up and get
more winter firewood - and or get the open loop air heat pump
system working - before I'm freezing, I keep thinking of some new
twist that just might make a battery that really works... so I
have to go back to work on it. (Well, I did go do other things for
the rest of the month and into September. Methinks I should buy
some firewood.)
Electricity
Generation
My Solar Power System
The Usual Daily/Monthly/Yearly
Log of Solar Power Generated [and grid power consumed]
(All times are in PST: clock 48 minutes ahead of local sun
time, not PDT which is an hour and 48 minutes ahead. (DC) battery
system power output readings are reset to zero daily (often just
for LED lights, occasionally used with other loads: Chevy Sprint
electric car, inverters in power outages or other 36V loads),
while the grid tied readings are cumulative.)
Daily Figures
Notes: House Main meter (6 digits) accumulates. DC meter
now accumulates until [before] it loses precision (9.999 WH =>
0010 KWH), then is reset. House East and Cabin meters (4 digits)
are reset to 0 when they get near 99.99 (which goes to "100.0") -
owing to loss of second decimal precision.
Km = Nissan Leaf electric car drove distance, then car was
charged.
New Order of Daily Solar Readings (Beginning May 2022):
Date House, House, House, Cabin => Total KWH Solar [Notable
power Uses (EV); Grid power meter@time] Sky/weather
Main
DC East
(carport)
After 5 full years (March 2019 to February 2024), I
am no longer recording solar collection figures daily.
(Frequently, and surely monthly.) For the chart, a figure for "n"
days will usually be divided by "n" and taken evenly as "n" [more]
days of whatever the result is. Oh... now with the DC system
running an electric heater at night (From April 11th 2024), I'm
interested to do daily again for now.
July
31st 1802.52, 1.24, 84.21, 61.00 => 9.32 [55Km;
16162@23:00]
August - Wow, suddenly, sunny days!
1st 1809.67, 1.37, 89.72, 66.98 => 18.77 [16167@20:30]
Changed a couple of grid ties - carport & cabin should
increase slightly.
2d 1819.11, 1.49, 96.04, 74.75 => 23.65 [85Km;
16182@20:00] found a grid tie turned off at house, midday!
3d 1830.54, 1.63, 6.03, 82.68 => 25.53
[55Km; 16196@21:00; 50Km]
4th 1841.88, 1.81, 11.80, 90.56 => 25.17 [45Km;
16208@21:30]
5th 1852.83, 1.88, 18.25, 97.78 => 24.69 [16213@21:00]
6th 1863.92, 1.98, 24.80, 7.39 => 25.13
[16218@20:30]
7th 1872.92, 2.13, 30.96, 13.51 => 21.43 [55Km;
16228@21:00] Foggy AM. Ate first corn cob!
8th 1883.93, 2.27, 36.81, 21.15 => 24.64 [16236@21:00]
9th 1889.64, 2.40, 40.50, 24.67 => 13.05 [85Km;
16254@20:30] Not sunny. (Was great while it lasted!)
10th [est. 10.50]
11th 1905.37, 2.56, 50.13, 35.00 => [est. 15.35] 25.85 [105Km;
35Km; 16282@20:30] 2 Days. Sunny again!
12th 1908.47, 2.60, 56.53, 42.06 => 16.60 [16290@20:00] ??? I
must hav copied "house main" reading down rong.
13th 1917.80, 2.69, 57.98, 42.71 => 11.52 [16296@20:30] ???
14th 1926.65, 2.74, 63.60, 48.43 => 20.24 [55Km; 16310@23:00]
15th 1933.88, 2.80, 68.95, 53.72 => 17.93 [16314@20:00] (2
house-main ties OFF for an hour or two around noon.)
16th 1944.77, 2.83, 74.94, 61.06 => 24.25 [90Km; 16328@20:00]
17th 1955.46, 2.88, 80.45, 68.29 => 23.48 [55Km; 16337@20:00;
50Km]
18th 1965.69, 2.92, 85.73, 74.87 => 22.21 [35Km; 16356@20:30]
19th 1970.66, 2.97, 89.42, 78.34 => 12.08 [16362@ 20:00]
20th 1974.11, 3.01, 91.74, 80.45 => 7.92 [55Km;
16378@21:30] 1st day this month under 10 KWH.
21th 1982.89, 3.04, 97.87, 86.42 => 20.91 [16383@20:00]
22d 1991.37, 3.27, 4.86, 92.04 => 19.19
[15391@'24:30']
23rd 1996.35, 3.30, 8.26, 95.16 => 11.53 [90Km;
16405@20:30]
24th 2002.98, 3.34, 12.62, 4.04 => 15.07 [55Km;
16420@20:00; 50Km]
25th 2004.82, 3.37. 13.65, 4.88 => 3.74
[35Km; 16440@20:00]
26th 2009.37, 2.56, 16.91, 7.68 => 10.80
[16448@20:30]
27th 2014.54, 2.59, 20.45, 10.78 => 11.84 [60Km; 16460@20:00]
28th 2017.09, 3.65, 22.02, 11.52+1.2*=> 6.12
[16469@21:30] *From here I've been running 150 or 250W heat in
cabin on 36VDC at night, so less is going to the grid. The cabin
36V isn't being recorded, so I'm estimating based on 8+ hours of
heat at 150 or 250 W = 1200+ or 2000+ WH. This assumes (without
proof) that the batteries are fully charged by the end of the next
day.
29th 2023.38, 3.69, 26.22, 14.23+1.20=>14.44 [85Km; 16486@20:30
(250W overnight, 8.5Hrs)]
30th 2025.49, 3.73, 27.46, 14.87+2.13=> 6.14 [85Km;
16508@19:30] Rain, dull.
31th 2034.51, 3.87, 32.79, 19.73+1.25=>20.60 [55Km;
16520@20:00;50Km]
September
1st 2036.95, 3.90, 34.32, 20.07+1.10=> 5.44
[45Km; 16546@19:30]
2d 2041.58, 3.94, 37.12, 21.69+2.10=> 11.19
[16553@19:30] Actually the DC didn't completely recharge until
3rd, so maybe ~1KWH too high, making 3rd ~1KWH too low. I'm not
going to try to guess and apportion it. (The 3rd was sunny and I
shut off the grid ties part of the day to make sure it recharged.
It was charging at up to 20 amps, 800 watts. With 250W of heat, it
takes just 1 hour of that to make up for 3 hours of nighttime
heating, but of course charging slows once the max, 39.9V, is
reached.
3rd 2050.26, 3.98, 42.62, 23.83+1.20=> 17.56 [45Km;
16565@20:30] Owing to the unrecharged battery I ran only 150W
heater. It was cold and the room got down to 15°C before morning.
But the 3rd was quite warm.
4th 2059.86, 3.01, 48.46, 26.25+2.00 => 19.89 [55Km;
16577@21:00] Another glorious warm day after a chilly night.
5th +1.8 (so far)
Chart of daily KWH from solar panels. (Compare August 2024 with July 2024 & with
August 2023.)
Days of
__ KWH
|
August 2024
(18 Collectors)
|
July 2024
(18 C's)
|
August 2023
(18 C's)
|
0.xx
|
|
|
|
1.xx
|
|
|
|
2.xx
|
|
|
|
3.xx
|
1
|
|
|
4.xx
|
|
|
1
|
5.xx
|
|
|
1
|
6.xx
|
2
|
2
|
|
7.xx
|
1
|
3
|
1
|
8.xx
|
|
|
1
|
9.xx
|
|
3
|
1
|
10.xx
|
2
|
3
|
1
|
11.xx
|
3
|
|
2
|
12.xx
|
1
|
5
|
|
13.xx
|
1
|
1
|
3
|
14.xx
|
1
|
3
|
2
|
15.xx
|
2
|
1
|
|
16.xx
|
1
|
1
|
1
|
17.xx
|
1
|
2
|
1
|
18.xx
|
1
|
|
3
|
19.xx
|
1
|
|
2
|
20.xx
|
3
|
2
|
3
|
21.xx
|
1
|
|
|
22.xx
|
1
|
2
|
5
|
23.xx
|
2
|
2
|
2
|
24.xx
|
3
|
|
|
25.xx
|
3
|
1
|
|
26.xx
|
|
|
|
27.xx
|
|
|
1
|
Total KWH
for month
|
524.56
|
444.56
|
518.00
|
Km Driven
on Electricity
|
1420.2 Km
180 KWH
|
~1265.8 Km
165 KWH
|
995.5 Km
(130 KWH?)
|
Things Noted - August 2024
* Weather very nice - great solar power!. It's a record for this
year. Changing a couple of grid ties at the start of the month
doubtless helped, but the house section, with no changes, also
made record power for the year.
Monthly Summaries: Solar Generated KWH [& Power
used from grid KWH]
As these tables are getting long, I'm not repeating the log of
monthly reports. The reports for the first FIVE full years (March
2019 to February 2024) may be found in TE News #189, February 2024.
2024
Jan KWH: 31.37 + 3.14 + 16.85 + 16.82 = 68.18
[grid: 909; car (very rough estimates): 160]
Feb KWH: 96.52 + 2.36 + 49.67 + 52.98 = 201.53 [grid: 791;
car: 130]
FIVE full Years of solar!
Mar KWH 150.09+ 1.63 + 93.59 + 92.50 = 337.81 [grid: 717;
car: 140]
Apr KWH 181.89+35.55 +123.50+142.74 = 483.68 [grid: 575; car: 140]
May KWH 129.23+67.38 +109.6 +126.32 = 432.53 [grid: 405;
car: 145]
Jun KWH 152.54+51.02+118.99+141.17 = 463.72 [grid: 420; car:
190]
July KWH 174.22+30.53+111.19+128.62 = 444.56 [grid: 386; car: 165]
Aug KWH 221.99+ 2.63+142.49+151.67+5.78 = 524.56 [grid 358;
car 180]
Annual Totals
1. March 2019-Feb. 2020: 2196.15 KWH Solar [used 7927
KWH from grid; EV use: -] 10, 11, 12 solar panels
2. March 2020-Feb. 2021: 2069.82 KWH Solar [used 11294 KWH from
grid; EV use: - (More electric heat - BR, Trailer & Perry's
RV)] 12 solar panels
3. March 2021-Feb. 2022: 2063.05 KWH Solar [used 10977 KWH from
grid; EV use ~~1485 KWH] 12 solar panels, 14 near end of year.
4a. March 2022-August 2022: in (the best) 6 months, about 2725 KWH
solar - more than in any previous entire year!
4. March2022-Feb. 2023: 3793.37 KWH Solar [used 12038 KWH from
grid; EV use: ~1583 KWH] 14, 15, 18 solar panels
5. March 2023-Feb. 2024: 3891.35 KWH Solar [used 7914 KWH from
power grid; EV use: ~1515 KWH] 18 solar panels
Money Saved or Earned - @ 12¢ [All BC residential elec.
rate] ; @ 50¢ [2018 cost of diesel fuel to BC Hydro] ; @ 1$ per
KWH [actual total cost to BC Hydro in 2022 according to an
employee]:
1. 263.42$ ; 1097.58$ ; 2196.15$
2. 248.38$ ; 1034.91$ ; 2069.82$
3. 247.57$ ; 1031.53$ ; 2063.05$
4. 455.20$ ; 1896.69$ ; 3793.37$
5. 466.96$ ; 1945.68$ ; 3891.35$
It can be seen that the benefit to the society as a
whole on Haida Gwaii from solar power installations is much
greater than the cost savings to the individual user of
electricity, thanks to the heavy subsidization of our power owing
to the BC government policy of having the same power rate across
the entire province regardless of the cost of production. And it
can be insurance: With some extra equipment and a battery,
sufficient solar can deliver essential power in electrical outages
however long. (Feb 28th 2023: And it's probably well over 1$/KWH
by now the way inflation of diesel fuel and other costs is
running.)
It might also be noted that I never went into this in
a big way. Instead of installing a whole palette load of 32 solar
panels, I have 18, and my grid ties aren't the best, and I would
be hard put to give an accurate total of my installation costs.
All in all the grid tied part probably cost me (with all my own
'free' labor) around 7000$. At the actual "total savings to all"
figures, they have paid for themselves twice over in five years.
The 36V DC system largely cost a couple of thousand dollars for
batteries. The solar panels were up. The charge controller,
circuit breakers, DC combo meters [V, A, W, WH], 36V compatible
LED lights and wiring cost were a few hundred dollars at most. (I
did have to make my own T-Plug cables & 3D printed wall
plates.) The battery cost has come down substantially in recent
years and will come down a lot more if I can get cheap, "forever
cycle" batteries working.
http://www.TurquoiseEnergy.com
Haida Gwaii, BC Canada


 I
tried some things to compact the powder substance in "+"
electrodes better. I'm pretty sure insufficient connection between
particles is the main problem I've been having. But even with tons
of pressure, performance continued to suck, to deteriorate rapidly
once running. I compacted some NiO mix cylinders. They didn't
crumble, but broke easily across into sections, even "coins".
 Having
finally got the center siding panel up on the cabin west wall, I
put up the three more sheets under the window [16th], then the
three above [17th]. The center piece at the peak of the roof was
the hard one. It had both slopes at the top with a notch for the
ridge rafter, and needed a cutout for the upstairs window on the
left (including a too-small diagonal vent above it) and for the
downstairs window on the right. Except for the pieces under the
lower window I tried to measure for the building supply to add a
couple of extra inches to the pieces to allow for whatever errors
I might make. I looked forward to not having to cut the
under-window pieces with the angle grinder, but somehow I had made
them 2-1/2 inches too long. Instead, somehow the upper ones were
just long enough, with exactly zero to spare. If I thought I was
leaving a couple of inches extra, it's a good thing I did! But I
had to cut those to the roof angle anyway - no saving on angle
grinding.


 I had some adhesive
alume tape. I took the 4 foot cord and wrapped it, with a piece of
bare wire (9 inches?) wrapped in at the plug end. I wound the end
of the wire around the ground pin. This dropped my body voltage -
way across the building - to 55-60mV. (There seems to be a lot of
variability. I've measured now anywhere from 20 (at night?
Standing) to 80 mV (lying down) with the grid ties plugged in.
Some of it depends on your own exact position. Shielding the
second cord didn't seem to have much effect; it might have dropped
it by 5mV. I turned off the grid ties. Wow! Back to 5 mV!
 I put an
old piece of chicken wire over the inverters. It dropped it to
35-40 mV. Then I grounded that with alligator clip leeds and it
went UP a bit instead of dropping to a low value! I went back to
"building unplugged" and tried everything again. Similar results.
But I noticed the bare wire in the cable that ran across the floor
to the DC charge controller touching the case of the grie tie it
attached to. Apparently the alume case, which is the heat sink,
has considerable AC induced into it from within, and that
transferred to the long wire running across the building. Pulling
that away (still with the chicken wire covering the inverters)
took the problem from 80mV to 15mV. Good enough! (And that was
lying down along the length of the field. Sitting at this computer
it's only 5mV. And at night with the grid ties not operating, it
should be lower... I think.)

 [15th]
(continued) I mixed fresh electrolyte, filled the cell and turned
on 1.60V charge. It started charging at ~170mA! (@ 12:05 AM, an
hour before noon) This certainly seemed like more current than
previous "+" trodes. But it dropped pretty quickly. Rats! I
conceive that the slower the current drops, the more material is
in good contact and being charged.
 [23rd] I put together
a NiO electrode. Unlike the nickel-manganese oxide, the 'beads'
wouldn't come off the bolt nicely. Instead they crumbled when I
tried to pull them off. So instead of solid beads, I had little
chunks - something like when I made an electrode from commercial
dry cell nickel hydroxide, only crumblier. I half rolled up a
separator paper and sprinkled on some chunks, set a graphite rod
on that, and added the rest of the chunks, about 15 grams.
 Then I
rolled the paper tighter, breaking down some chunks. Then I
wrapped it all in "100% nylon" cloth, several turns as tightly as
I could manage. Then I took a cue from the previous effort and
wrapped the whole thing up with waxed string to tighten and hold
it. I tried to wrap it tightly to the rod at the top and bottom.
 I'm
not surprised because the zinc electrode tube was visibly falling
apart. The PVB tube had broken entirely and the whole trode was
getting taller, just the copper screen and some zinc holding it
together. The chemistry might last 'forever' - and indeed I've
been using the same tube for months now - but PVB seems to
eventually disintegrate in alkaline solution. But I probably
probably too much zinc powder in this one. I found out after a
while that it should only be filled about 1/2 full because the
zincate [Zn(OH)4--, discharged] takes up much more room than the
zinc metal [Zn, charged]. The disintegration of the electrode is
probably why the electrolyte had again become all dark colored. I
pulled it out. So much for PVB! Anyway, I ran out of PVB printer
filament a while back. I can try ABS again... when the part
arrives for the 3D printer.
 I still
had the square zinc trode in the box cell. (It's the last one
until someday my new osmium powder arrives.) I took it and put it
in the jar. Suddenly charging current was substantially higher,
and soon so was short circuit current, hitting about 1/2 an amp
instead of 1/5th. By now it was late and I left it to charge
overnight. This zinc trode, having sat for (?)3 or 4 months now
and only partly immersed in electrolyte, was clearly quite
discharged.
 In the
evening I had the thought that there was the manganese electrode
tube, which had been sitting almost immersed in electrolyte in a
bottle for ages. It hadn't seemed to work back then. Then I
remembered from long, long ago that Mn didn't work at pH 14. Was
the pH too high? Now I had a nickel oxide plus trode that seemed
to be working and zinc that didn't. I checked the pH in the Mn jar
- around 11. I put the NiO trode and the Mn one [oops, it was
actually another zinc tube] in the bottle and removed whatever the
other two were. It needed topping up and I added some new
electrolyte, This brought the pH up to 12 or 12.5. That seemed
ideal. And I didn't quite bring it up to the level of the copper
terminal wire, since that would bubble hydrogen.

 When
it was finished I traded the NiO trodes. I forgot to weigh the
cloth and the string. I estimate that there's about 12 g of NiO
mix in it. It started out with little charge and charged at just
3mA. Hmm, maybe it takes a while to wet the insides of the dense
NiO cylinders?