Turquoise Energy News
Report #199
Covering
Research & Development Activities of December 2024
(Posted January 9th 2025)
Lawnhill BC Canada - by Craig Carmichael
New: Now at craigcarmichael.substack.com
***
[Subscribe: email to CraigXC at Post dot com ; request
subscription]
Website: TurquoiseEnergy.com
Month In "Brief"
(Project Summaries etc.)
* Faraday Cage Cabin: Insulation, Interior walls - Rewinding Motor to
36V for Sprint Car
In Passing
(Miscellaneous topics, editorial comments & opinionated rants)
* Ganymede in Stereo (followup to last month) - Scattered Thots
- Detailed
Project Reports -
Electric Transport - Electric Hubcap Motor Systems
* Induction Motor Conversion to 36 Volts for Chevy Sprint
Other "Green" & Electric
Equipment Projects
* Low EMF Cabin Construction
Electricity Storage:
Batteries (no reports)
Electricity Generation
* Power Outage: Running Freezers Off-Grid & Measurements
for Tinnitus
* My Solar Power System: - Latest
Daily/Monthly Solar
Production log et cetera - Monthly/Annual Summaries, Estimates,
Notes
Wow, busy times. Where to start?
Ganymede
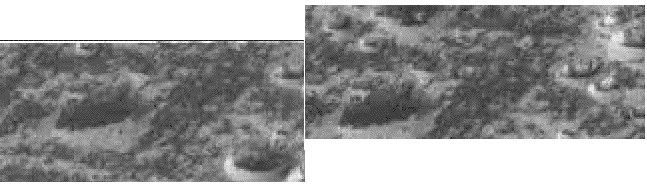
I did a few more stereo images of the fascinating
scenes from Ganymede. (It's the largest world orbiting Jupiter, 5260 Km
in
diameter. For comparison Mars is 6787 Km.) There seem to be a lot of
the incredibly tall trees with bare trunks and dense blobs of foliage
up
at the top, growing in dense rows, rings and patches. To help show
them, I lightly "colorized" the first three "trees" that, in stereo,
jumped out at me from what seemed like just an odd patch of lines on
the ground. These first ones helped me interpret more of these
features.
I write of trees and forest, but there are dark lines in
and on the ground as well as the high density of the "foliage", and the
scenes are increasingly reminding me of corals underwater. But these
are gigantic corals, and above ground with no liquid in sight.
And in the 'detailed article' I
wrote a little blurb on viewing stereo images for those
unfamiliar.
 The monchrome stereo images of
the grove of
huge trees.
The monchrome stereo images of
the grove of
huge trees.
 The colorized version.
Although the southernmost image is also rightmost, and should
theoreticly be on the right as here,
in these low-rez images I'm not convinced the "3D" effect isn't better
the other way around, as in the top image.
Perhaps oddly, although the spacecraft moved more south-north between
frames than
east-west, viewing stereo top-bottom by rotating each image 90° looks
pretty flat to me.
More below.
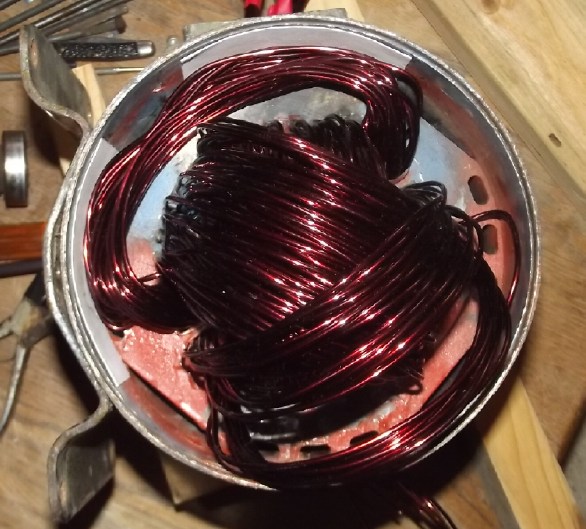
Rewinding Induction Motor to 36V for Sprint Car
I started in on this by cutting and ripping out the
original wires
while not damaging the varnished papers insulating and enclosing the
slots. I was pleased to find that nine winds of #11 AWG magnet wire fit
into each slot. Originally it had the equivalent of #12. I reasoned
that with heavier wire copper losses would be lower, and I had a big
spool of #11 wire. In order to not have to redo the papers in the slots
(which I would have had to order and hope I was getting the right
sizes), I threaded the wires directly through them.
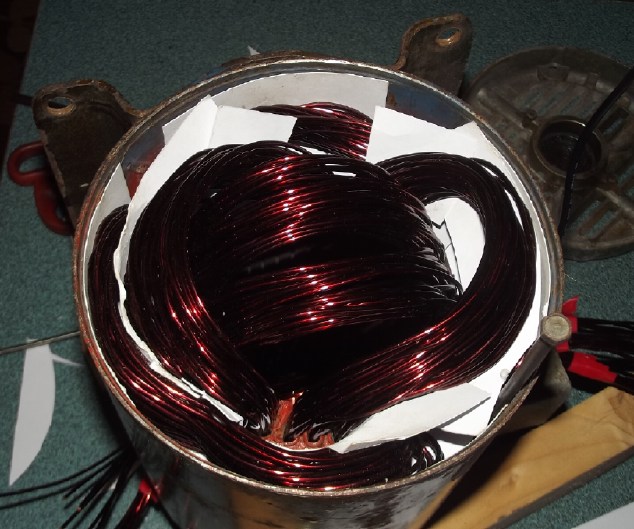
That was a tedious job compared to winding around a
spool. But I didn't know what I was in for. Fitting the wires in the
slots was the easy part! The "overhangs", the parts of the coils
outside the slots, had to be bent around and fitted into the space
available, and with the fat wires it was hardly enough. I ended up
trying to push the wires into smaller spaces than they wanted to go
into with a thin stick of very hard wood, hoping I wasn't damaging the
insulation. Over a number of sessions I managed to get the shaft end
wires of all three phases so they would (just) miss the spinning fan
and (just) out of the way so the rotor could be inserted.
Then there was the other end. It's where all the wires
connect. It just has to fit inside the case and luckily just be out of
the way of the end bearing, not the whole rotor diameter. I'm now
somewhat hopeful of being able to make it work... but still not
finished
bending them all into places that work. (one phase is done)
Measuring and discovering that over 2/3 of all
the wire is in the overhangs making no contribution to the magnetic
strength, and how motors are so heavy because of all the extra
laminated iron and extra copper, I started thinking what a crappy
design the "standard" type of motor is, and that there must be
a better way to make motors!
Oh ya... my own axial flux "Electric Hubcap"
motors, for example. The
toroidal coils are wound around nearly lossless iron powder cores with
no other iron required, and
all the wire contributes to the magnetism. But "regular" varnished iron
motors have the big advantage that all the materials can take quite
high temperatures, well over water's boiling point. The plastics and
resins in my motors can't take much heat, and this limits their
performance except in short bursts.
This got me started
on motor design again... and then the idea of making wooden bodies.
Lightweight. Higher temperature than plastics. And needing no molds for
plastic required eliminates the big bottleneck to making one! Should I
switch to building the motor I've really been wanting to make for SO
long? That idea is under "Motor Design" in the detailed
report.
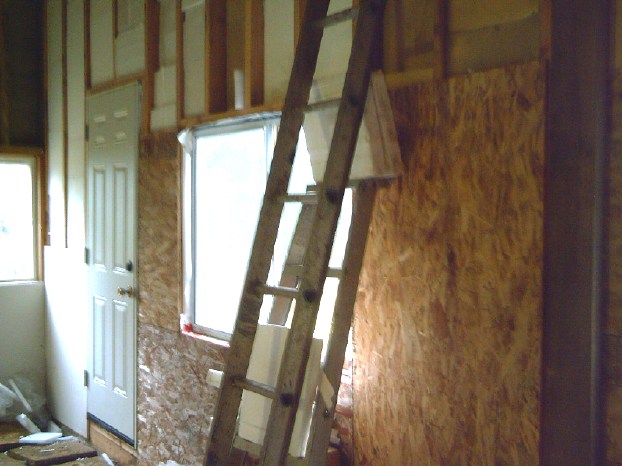
Faraday Cabin Construction
Construction ambled along, a work session in the cabin now
and then. At least it was mostly inside out of the dreary cold, wet
weather.
The first item was locks on the doors, after having scared
off a probable intruder before he got to the building. Nice that it
worked out that way instead of losing a bunch of tools & stuff
before I learned my lesson!
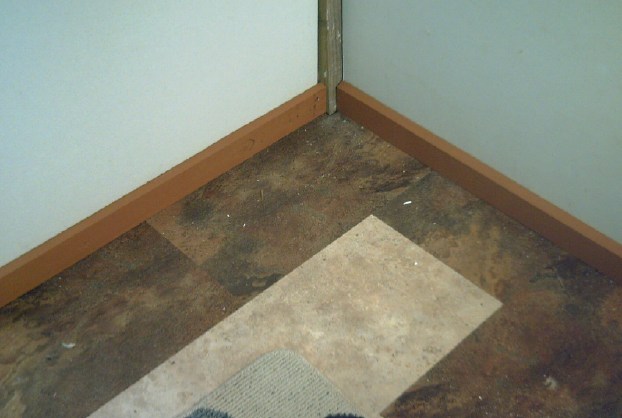 Then I
finished, painted and installed the baseboards in the upstairs room.
Almost civilized except for those 6 by 6 posts sticking out of two
corners!
Then I
finished, painted and installed the baseboards in the upstairs room.
Almost civilized except for those 6 by 6 posts sticking out of two
corners!
 Then, having
started insulating with plastic foams I started getting into it. It was
too slow cutting the plastic with a knife when there were so many cuts.
It took me hours to fill in half of two tall stud spaces. On New Year's
Day (my 70th birthday) I made a hot wire plastic cutter in an hour in
the morning and finished filling the two spaces much faster. It's
fabulous! But that's for the next report - January 2025, TE News #200.
Still much more labor intensive than fiberglass batts, but now "doable".
Then, having
started insulating with plastic foams I started getting into it. It was
too slow cutting the plastic with a knife when there were so many cuts.
It took me hours to fill in half of two tall stud spaces. On New Year's
Day (my 70th birthday) I made a hot wire plastic cutter in an hour in
the morning and finished filling the two spaces much faster. It's
fabulous! But that's for the next report - January 2025, TE News #200.
Still much more labor intensive than fiberglass batts, but now "doable".
 Then I put
down a plastic fiber mat preparatory to starting the floor in the
southwest quarter. This separates inside from outside without having to
lay a concrete "skin". At the start of January a few floor joist boards
went in. I had a bunch of 4 inch thick blocks I was going to put under
the joists here, there and everywhere so they span four or six feet
instead of twelve. I would put shims on top of them to match the
height. But the end I started on was less than four inches underneath.
I had thought I would dig them down into the sane if that was the case
-- but I forgot that wouldn't be possible once the plastic was down.
I'll have to make thinner blocks - just a week after having cut some
wide but thinner (and dried) log side slices I had been saving with the
lumber plies into firewood! Rats!
Then I put
down a plastic fiber mat preparatory to starting the floor in the
southwest quarter. This separates inside from outside without having to
lay a concrete "skin". At the start of January a few floor joist boards
went in. I had a bunch of 4 inch thick blocks I was going to put under
the joists here, there and everywhere so they span four or six feet
instead of twelve. I would put shims on top of them to match the
height. But the end I started on was less than four inches underneath.
I had thought I would dig them down into the sane if that was the case
-- but I forgot that wouldn't be possible once the plastic was down.
I'll have to make thinner blocks - just a week after having cut some
wide but thinner (and dried) log side slices I had been saving with the
lumber plies into firewood! Rats!
Gardening
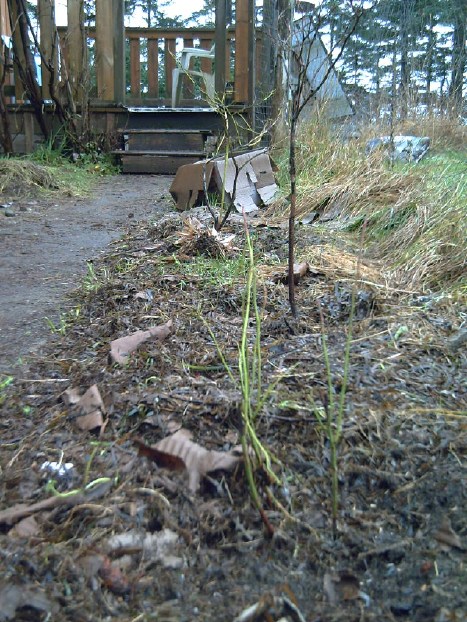 Outdoor
gardening in dreary, cold December was limited to transplanting three
blueberry bushes. They were in the main garden by the fence but were
being swallowed by the profuse raspberries. I decided to just let the
raspberries take over the whole northeast quarter and transplant the
blueberries to the recently opened space on the other side of the
sidewalk in the house-south-wall garden, across the sidewalk from the
other blueberries. The little green one closest I bought last summer.
Surely a different variety.
Outdoor
gardening in dreary, cold December was limited to transplanting three
blueberry bushes. They were in the main garden by the fence but were
being swallowed by the profuse raspberries. I decided to just let the
raspberries take over the whole northeast quarter and transplant the
blueberries to the recently opened space on the other side of the
sidewalk in the house-south-wall garden, across the sidewalk from the
other blueberries. The little green one closest I bought last summer.
Surely a different variety.
Except for that ugly box (why do I notice these things
After I take a picture?) I had it all nice with eel grass mulch, but
the chickens keep scratching it away and onto the sidewalk. (I might as
well let them in in the winter to do some weeding and fertilizing. I
covered my garlic patch and strawberry plants with wire mesh.)
I lay out cardboard also to kill the grass and weeds that
try their best to make it back into lawn. I need to do more.
 Indoors things just kept
chugging along. But no cherry tomatos despite having several plants -
ug! I've been watering them, but I guess not pollinating the
surprisingly few flowers.
Indoors things just kept
chugging along. But no cherry tomatos despite having several plants -
ug! I've been watering them, but I guess not pollinating the
surprisingly few flowers.
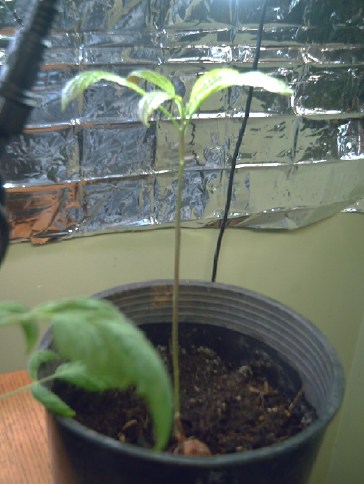
In the fall while digging up compost I ran across a buried
avocado pit. It had sprouted a tap root and a stem way under the
ground. I put it in a pot and brought it into the house. I had to keep
rubbing aphids off the stem. In December it sprouted some leaves. It
soon started looking tall and spindly, so I put it right under an LED
light. It seems a stretch to think I might actually get any avocados,
but I never really expected to get coffee beans when I started three
pots, either. Now one of them is loaded, headed for the ceiling, and
I've just given it a bigger pot. So far I haven't used the handful of
coffee beans I got months or a year ago. They're drier than they were.
In
Passing
(Miscellaneous topics, editorial comments & opinionated rants)
Ganymede
In
Stereo
(Followup from
What NASA Missed at Ganymede,
TE News #198)
Carl Sagan once put turtles in a desert and photographed
them from high in the sky to see if they were visible. But when one
looks down on the Amazon rainforest on Earth to
look for "life", does one see monkeys, sloths, jaguars, harpy eagles
and crocodiles? At almost any scale, one sees
the almost featureless jungle canopy and broad geological features. The
tiny
specks of animal life are hidden in these much larger features.
We only have the distant views of Ganymede. The "3D"
nature of its surface which by appearance and other data readings
("fluffy surface layer", "polycyclic aromatic hydrocarbons") indicates
profuse and gigantic vegetation clearly sets it apart from
dead "desert" worlds like Earth's moon, Mars and Venus.
Without stereo images to provide depth perception, one
could potentially decide from the few low-rez, monchrome images of an
unfamiliar world that whatever the feeble and confusing visual clues,
the patterns seen must (surely?) all lie more or less flat on the
ground. But as is
more visually apparent in stereo, the fact that features in one row are
in
slightly different pixel positions relative to one another in images
taken from slightly different viewpoints constitutes proof that some
pixels are closer and must indeed be features sticking
way up above the adjacent pixels, rather than an object lying more or
less flat on the surface.
[Late Breaking:] Below I write of "trees" and "forests", but I'm
starting
to think a lot of the surface is more reminiscent of coral reefs -
gigantic,
above ground corals of some sort. For example, this top down image from
last month really looks much more like some kind of coral reef than
forest canopy. (and either way, certainly more like biology than dead
geology!) And on an airless world bombarded daily by maybe a million
micrometeorites hitting at raw, interplanetary speeds, having some sort
of "coral" protective layer above vulnerable tissues makes sense.
 No doubt others too have been
perplexed by this
"close up" (28 meters/pixel) view of Ganymede's surface.
No doubt others too have been
perplexed by this
"close up" (28 meters/pixel) view of Ganymede's surface.
Now it occurs to me that it resembles a coral reef more than a forest.
But it's in empty space, not liquid.
This is a very alien world!
Note: Viewing Stereo "3D" images
Stereo "3D" image viewing requires two images that
overlap,
looking at the same features from slightly different viewpoints,
just as each eye has a slightly different view. The right image of the
same scene
is taken with the camera more to the right. In these sets the vertical
angle in the overlap areas seems almost the same in both
images, while
the horizontal components have offset views, so they can be nicely
lined up side by side for the "binocular" effect. Perhaps some have
seen
those "toy" stereo viewers with two eyepieces where a cardboard wheel
is inserted where one may click through dozens of cartoon images in
stereo?
Tips for viewing stereo images:
1. The object of the exercise is to look as if into the distance until
the right eye view of the right image and the left eye view of the left
image merge. Once your eyes "lock on",
the depth perception effect becomes obvious.
Ganymede is
nothing like "flat"!
2. If it is difficult to get the views to merge, reduce the image
size,
eg, to 85% or 50% so the features are closer together. Often the closer
the
like features are together, the easier it is for the eyes to "fuse"
them, and if they are farther apart than your eyes are it's almost
impossible. (Some browsers or other image viewers will shrink or expand
the
page or image using
CTRL-Thumbwheel.)
3. Put on magnifying glasses to help focus close up while aligning eyes
as if looking far away. There is such a thing as a "close up" (4
inches) pair of
stereo image viewing glasses, once used with aerial photos, but I
haven't seen any in over 50 years, and no doubt they work better with
paper fotos than on a video screen. (In the straight-down images of
northern Alberta, Canada I viewed back then, the camera views were
rather far apart and the pine trees looked 10 times taller than they
really
were!
4. The eyes must be level so that left-right image features line up
horizontally.
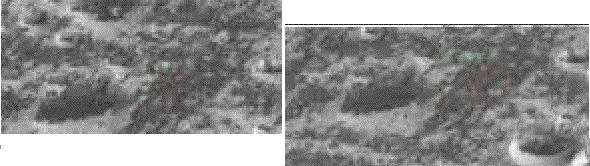
The closest trees of the grove of trees to
the right seems to cast shadows toward the front
of the picture - south-southwest. But there are only two "shadows" from
the three trees - ?
Instead, there seem to be (?)vines growing along the ground. The ones
aligned to this direction
cast the most notable shadows along their length, to the extent that I
was deceived about
the whole direction of shadows in the images.
 Making the images smaller (closer together)
often makes it
easier to adjust the "cross the eyes" for the stereo view..
Making the images smaller (closer together)
often makes it
easier to adjust the "cross the eyes" for the stereo view..
 Here is another stereo image of Ganymede's
bizarre - and gigantic - vegetation.
Here is another stereo image of Ganymede's
bizarre - and gigantic - vegetation.
Here I am much less confident about the shadows.
Logicly the lower, rightmost image should be on the right, but perhaps
because of the low resolution, either way seems to give a similar
stereo
effect.
Here I have given the three (?)"trees" that jumped out at me a bit of
color (retaining their brightness levels) to help clarify them.
One can see there are others similar in the same grove.
There are also dark lines flat on the ground that do not appear to be
shadows,
in the grove and elsewhere, in fact in many images. I don't know what
they are.
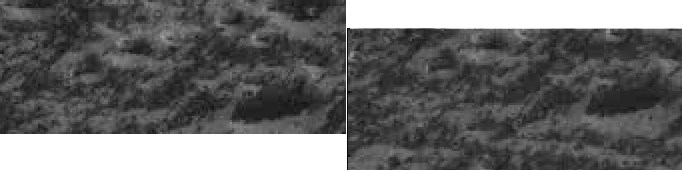
The more one looks, the more one notices rows - and rings, and patches
- of dark trunks with brighter,
dense foliage at the tops, as if flowers with cut stems, but at a
gigantic scale, hundreds of meters tall.
I mostly chose
from the bottom
three images from around 55° north because they seemed the most
interesting and because the image quality seemed
poor moving north to the 65° top images with a lot of jpeg artifacts.
But here are a couple of better ones from about 60° N. I didn't double
the size of these, so one is looking at a broader area with finer rez
than the others. Here the vegetation, while apparently following the
land contours more closely, seems as solid and dense as corals
in a reef.
Hmm... maybe it really is something more akin to coral than to forest?
I had trouble figuring out visually from the grainy images
which view should be on the left and which right. Finally it occurred
to me that logicly, in the image viewing the scene farther left, the
spacecraft would actually be farther left (west). So the image that
went below the overlap area and to the right should be on the right.
But when I checked out the figures, the spacecraft had
moved only around .04 degrees in latitude between images, but .15
degrees in longitude. That would mean there should be more stereo
effect up-down than left-right, but that was the opposite of what I
saw. It seemed there was little visible stereo effect if I turned the
images sideways. OTOH, tree trunks are more vertical than horizontal
and the vertical difference would show up mainly as different tree
heights, which are probably much less discernable than shifted
positions of the trunks.
| 6142r |
<-diff.-> |
6139r |
<-diff.-> |
6135r |
Image name |
| 35.632 |
.133 |
35.499 |
.178 |
35.321 |
Sub Spacecraft
Lat. |
| 186.434 |
.033 |
186.467 |
.048 |
186.515 |
SS Long. |
|
|
|
|
|
|
| 57.291 |
.426 |
56.865 |
.565 |
56.300 |
Image Center Lat. |
| 172.352 |
.355 |
172.707 |
.400 |
173.170 |
IC Long. |
I had to invert the images to see them "right way up". It
occurred to me that they might still not be facing north-south. And in
fact, while the scenes are ~20 degrees north of the spacecraft/camera,
they are also ~14 degrees east of it. So we're looking northeast or
north-northeast, not straight north, and straight up isn't straight
north in the images. (Explains a couple of things I didn't quite "get".)
For those interested, Galileo spacecraft
images and metric data are available at
pds-imaging.jpl.nasa.gov/search
As for the chemistry of the bizarre life on Ganymede I
finally have one speculation: while there can be no liquid in a vacuum
and there's no atmosphere of any pressure to speak of, it is known that
there is a tenuous oxygen "exospere'. Here on Earth plants use the mere
.04% CO2 gas in photosynthesis. Is the minute amount of oxygen at
Ganymede sufficient to fill some analogous enabling role to the minute
amount of CO2 in Earth's atmosphere? What else is "fluid" or "moving"
there? (besides the magnetic field and auroras.)
Scattered
Thots
* Ah, working on old cars... The front
right brake in my Toyota Echo was sticking and I bought new front brake
pads. I watched a video to refresh my memory. "Toyota Echo 2001-2005:
Change Brake Pads in Ten Minutes." Promises, promises! If it had been a
"Like New" clean car like his... instead nothing went smoothly. I
finally took the whole thing off the car, put it in a vise in the shop,
filed out rustiness in the recesses so the spring clips would fit, put
the clips and pads in, then took it all back to the car and reassembled
it. Over 3 hours. (counting 1/2 hour looking for my 17mm box end
wrench).
I was going to do the other side while I was at it. Forget
that! Why did I start a "ten minute" job so late at night?
* Social Media / Comment Sections: "Democratic" Censorship?
A much discussed topic on social media after lately finding that people
and important information have been and probably are still being hidden
from us, has been what sort of dialog, information or person goes too
far and should be censored? Everybody should be able to freely voice
their honest opinions and spread their valuable knowledge and
expertise, but perhaps we don't
want free circulation of instructions for how to abduct children or how
to make nuclear bombs, "let's all mob together and rob Wallmart at
10:00 AM tomorrow morning!", etc, etc?
I've just seen a platform that now allows upvoting and downvoting of
comments. Someone said it works like this: If a comment gets enough
downvotes, its text becomes light shaded. If it gets still more, it is
deleted entirely. It seems to me that is, at least, censorship by
grassroots public opinion and user friendly. Users don't have to worry
that those running the platform will aritrarily censor something they
don't like - or that someone in a government doesn't like. And those
running
it won't have to have extra staff to keep arbitrary watch over
everything being said!
It's not a perfect system. Someone with a new idea that
goes against present widely held beliefs might be right but is likely
to still get downvoted. Galileo finding four new planets orbiting
Jupiter might have found his on-line announcements of such a novel
discovery banned from both religious, university and astrological
discussion.
ESD
(Eccentric Silliness Department)
* At the front of the Atlas is the Table of Continents
*
"in depth reports"
for each project are below. I hope they may be useful to anyone who
wants to get into a similar project, to glean ideas for how something
might be done, as well as things that might have been tried, or just
thought of and not tried... and even of how not to do something - why
it didn't work or proved impractical. Sometimes they set out inventive
thoughts almost as they occur - and are the actual organization and
elaboration in writing of those thoughts. They are thus partly a diary
and are not extensively proof-read for literary perfection,
consistency, completeness and elimination of duplications before
publication. I hope they may add to the body of wisdom for other
researchers and developers to help them find more productive paths and
avoid potential pitfalls and dead ends.
Electric
Transport
Induction
Motor
Conversion
to
36
Volts
for
Chevy
Sprint
 [5th] After
finishing and posting #198, I cleaned the motor (yet more
sawdust!) and in the evening started winding it. I estimated each coil
of nine winds in each slot would take about 18 feet of #11 AWG magnet
wire. I cut a piece that length. I tried bending the overhangs around
into good places but ended up scratching the insulation. I finished
winding it anyway and found it was a little short, so after that they
were 20 feet. I used the first one as a measure.
[5th] After
finishing and posting #198, I cleaned the motor (yet more
sawdust!) and in the evening started winding it. I estimated each coil
of nine winds in each slot would take about 18 feet of #11 AWG magnet
wire. I cut a piece that length. I tried bending the overhangs around
into good places but ended up scratching the insulation. I finished
winding it anyway and found it was a little short, so after that they
were 20 feet. I used the first one as a measure.
For each insertion I pushed the existing wires toward the
center and pushed the new one through at the outside. By the time I was
doing coil #9 they started getting harder to push through and I was
glad there weren't any more winds. They mostly weren't too bad anyway,
except the last wire of the fourth pair of slots was quite difficult. I
guess some wires were laced around each other. I think it's more mass
of copper stuffed in there than there was originally since it was #12
(or equivalent) before. That should reduce copper losses for cooler
running and high horsepower without overheating.
 [6th] In the
morning I finished one phase; six slots. Two more to go!?!
I began to wonder if there was room for #11 wire after all. They fit in
the slots and there wasn't much room for them to vibrate around in, but
they sure made for a fat mass of overhangs at each end that all need to
be bent out of the way of each other, the rotor and the fan. And was I
leaving about the right length of overhangs anyway? If they were too
short or too long they might be impossible to fit in.
[6th] In the
morning I finished one phase; six slots. Two more to go!?!
I began to wonder if there was room for #11 wire after all. They fit in
the slots and there wasn't much room for them to vibrate around in, but
they sure made for a fat mass of overhangs at each end that all need to
be bent out of the way of each other, the rotor and the fan. And was I
leaving about the right length of overhangs anyway? If they were too
short or too long they might be impossible to fit in.
For 36 volt operation, the six coils of each phase are in parallel
instead of in series (230V / 6 = 38.33V), so instead of the wire from
one slot pair proceeding into the next, the ends of all six wires are
brought out together. (Instead of 25 amps for 7.5 HP, it should be
about 150 amps - at 3600 RPM. I anticipate 250 amps & 12 HP at 6300
RPM, 90 Km/Hr.)
 I
got more and more concerned about the motor rewinding.
Perhaps #11 wire was just too thick to fit in? It wasn't that it didn't
fit into the slots; they fit and filled the slot spaces great. Rather
it looked almost impossible that the overhangs could be bent over and
shaped to fit inside the case and without hitting the rotor. But I
really won't know until it's all wound and I try to bend it all around
to fit.
I
got more and more concerned about the motor rewinding.
Perhaps #11 wire was just too thick to fit in? It wasn't that it didn't
fit into the slots; they fit and filled the slot spaces great. Rather
it looked almost impossible that the overhangs could be bent over and
shaped to fit inside the case and without hitting the rotor. But I
really won't know until it's all wound and I try to bend it all around
to fit.
Each wind of coil had 2 * 4.5 inches running through the
slots, * 9 winds = 81 inches of actual working wire... less than 7 feet
out of each 20/23/26 feet of copper wire (depending on phase)
contributes to thrust - 2/3 of it doesn't help! And my huge 40 pound
"lifetime supply" spool of #11 wire was definitely shrinking. Yikes! I
am staggered by seeing the actual amount of wasted copper in a
'regular' radial flux motor with laminated iron and slots for the
wires. There must be a better way to make motors!
Oh ya, there is! the round toroid coils of my own
"Electric Hubcap" motors, where All the wire except the end connections
contributes to the magnetic field! That's Way less wire to achieve
similar levels of performance. Well, that's not this project!
[12th] After a few days pause for other
things and two of the three
phases (12 of the 18 coils) wound, I got onto the third phase. Each
phase seemed a little harder than the one before. The wires sometimes
wanted to come out from the slot threading through other wires where
they didn't belong, and the #11 magnet wire was so stiff I sometimes
had to pull it with a little metal hook to get it bending a bit to come
out the right place. I left some extra length seeing that the overhangs
would be longest, but I wound the first coil and the wire ends were a
little too short. [13th] So I pulled it out and cut another piece a
couple of feet longer - about 26 feet. I threaded that in, and then I
realized I had it in the wrong slots - not a pair. I often operate on
autopilot just at the beginning when I most need to be thinking just
what I'm doing. Out it came again. Third try was better "luck". I did
one more, and later a third coil.
 [15th]
I
wound
the last three coils. My originally 40 pound spool of
#11 magnet wire was down to about 23 pounds, but I didn't weigh it
before so that doesn't mean much except to note that it took a Lot of
wire.
[15th]
I
wound
the last three coils. My originally 40 pound spool of
#11 magnet wire was down to about 23 pounds, but I didn't weigh it
before so that doesn't mean much except to note that it took a Lot of
wire.
 That was the easy part. Next,
trying to bend
all those wires around to
That was the easy part. Next,
trying to bend
all those wires around to
places where they wouldn't hit the rotor or the fan, but still inside
the end bell.
 It got harder with each phase.
At one point I bent the second phase back and redid the first.
I don't think it really helped.
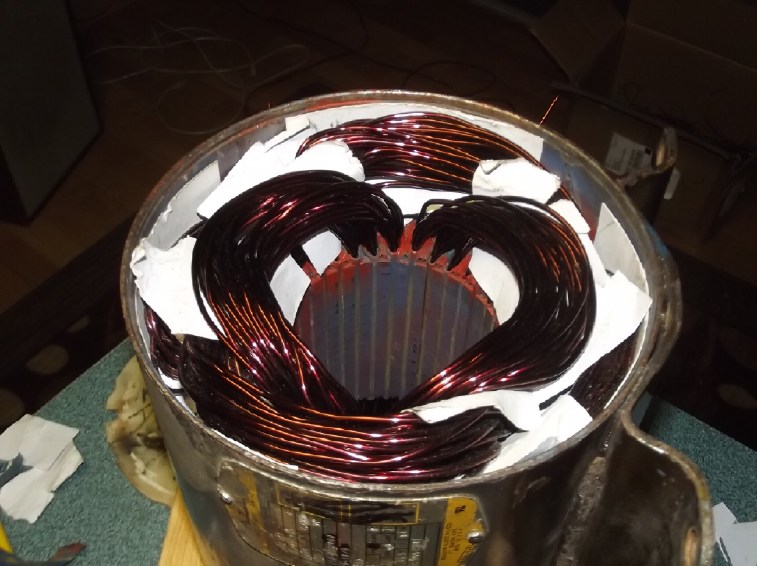 Finally I think I had the shaft
end done.
Barely clears.
Finally I think I had the shaft
end done.
Barely clears.
I'm leery of the spinning fan so close to the wires.
The other end still isn't done.
Motor Designs
I measured the lengths and realized that over 2/3 of all
the wire is in the overhangs. For the 6-pole stator less than 1/3 is
actually in the slots contributing to the magnetic strength! What a
waste of pricey copper! Yet this is the typical and traditional way of
making motors. And with all the extra iron and extra copper, they're
extra heavy. If the motor is made 12-pole, less copper is wasted, but
RPM (per hertz) is halved, the effective magnetic field per amp is
reduced, and the motor needs to be larger overall. The more I work with
this, the dumber it seems. There must be a better way to make motors!
Oh ya... my own axial flux "Electric Hubcap" motors, for
example. The toroidal coils are wound around nearly lossless iron
powder cores, and all the wire contributes to the magnetism. But
"regular" varnished iron motors have the big advantage that all the
materials can take quite high temperatures, well over water's boiling
point. The plastics and resins in my motors can't take much heat, and
this limits their performance except in short bursts.
Hmm... Perhaps I could change from epoxied iron powder to
some sort of sintered iron powder toroidal cores that can withstand
high temperatures. But what to do about the cases? They can't be metal
- except perhaps the end wall behind the Hallbach configured magnet
rotor - because the magnet fields would induce currents, make heat and
kill the efficiency. I need to find a higher temperature plastic or
other material that can take more heat. Bakelite? Even wood? Hmm...with
a high temperature paint? Wood isn't noted as a "high temperature"
material, but it won't soften like plastic. As long as it doesn't get
to where it starts to char it should work, which is definitely hotter
than most plastics.
Say, if I use wood I also don't need to make molds for the
motor bodies - just cut the pieces and fit them out on the CNC router
table! Perhaps one steel end plate could help stiffen the motor. Fins
on the back side of the rotor would position it farther from the steel
end and make for a whopping big cooling fan. A huge bottleneck to
making the first motor disappears and suddenly the Unipolar Electric
Hubcap motor looks a lot closer than it did, even "within reach"! In
fact, it's tempting to run out and start measuring things. ...and even
to abandon this well made, heavy motor with its clunky old design in
mid stride, and go for the new one instead! I should find some
appropriate pieces of wood and dry them thoroughly in an oven at low
temperature or by the woodstove. Dare I use plywood for the end plates?
Other
"Green"
&
Electric
Equipment
Projects
Low
EMF
Cabin
Construction
It being December I worked mostly inside the cabin.
[9th] At 7 PM I was walking out to the cabin and I saw someone next
door, where the owners were away, with a car interior light on and
walking around with a flashlight. He stopped. That seemed odd. I shone
my flashlight at him and he left. It gradually dawned on my slow brain
that he was up to no good.
[11th] I fitted in various bits of wood and insulation and used a four
foot level with a long bar of alume to mark the height of the tops of
the floor joists.
[12th] I had thought the intruder was going to break in next door. It
finally occurred to me it was more likely he was planning to go into
my cabin with no locks, and help himself to my power tools or whatever
he decided to fancy. By driving to next door and walking over, he was
close to the cabin at the far side from my house, me and my gated
driveway.
I dug through my selection of old door knobs and things
and discovered that while there were plenty of knobs, there were almost
no latches for them to activate. Furthermore, although keys were in
knobs, almost none of them would turn! I managed to find one dead bolt
with keys and one knob set with latch and fitting key. That was enough
to lock the two doors. I put a gate bolt onto the garage door to hold
it shut from the inside.
Too bad - it was much easier to get in carrying a load of
whatever with just a push-down lever, then push the door open by foot
and step in. I now I need a place to set everything down so I can get
the keys out of my pocket and turn the knob, then pick it all up again
and go in. I suppose that in most areas I would have had to keep
everything under lock and key from the beginning - probably even my
building materials. The Urantia Book says that without our lowest 10 or
20% strata of defective, degenerate and antisocial stocks, our world
would experience an immediate leap in social culture. Instead we always
have to be tending to the former and on the lookout for the many and
various schemes of the latter.
I started
picking things up off the floor in the SW
quarter with a view to putting in the floor in that section. I soon ran
across the neglected baseboard strips for the bedroom. The real way to
deal with these would be by finishing them and installing them.
Accordingly I got out the planer and belt sander, smoothed them off,
and painted them with decade(?) old "cedar stain". (In spite of a power
stir rod
on a drill, there were still lots of lumps when I gave up and painted
them anyway.) The stain took at least overnight to dry and smelled for
a week, but looked nice.
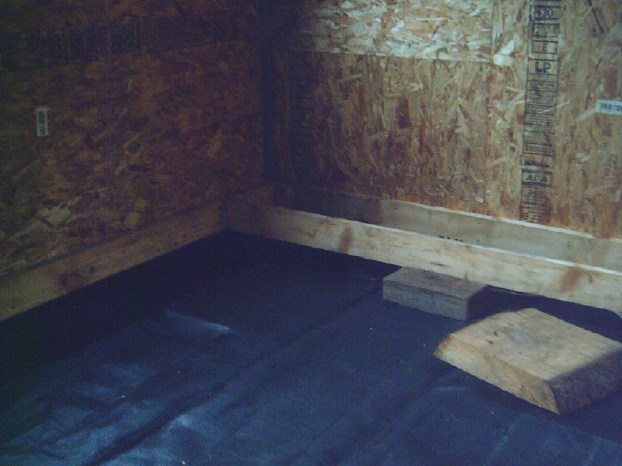
[13th] I cut the baseboards to length and installed them. Now it looks
almost civilized.
Door & Lock
At the refuse station Ralph mentioned that someone had
brought in three doors. (He tries to save useful stuff for people
instead of
tossing it straight into the bin. Why send useful things to the
landfill?) Two were a nice set of French doors, but not what I wanted.
The third was a metal exterior door, but one that I could use for the
garage interior door that I did still need. As a bonus it came with a
"Smartkey" deadbolt lock. I had another one the same on the house front
door, which I never use since I put in a combination lock on the house.
Since I didn't have the right key, I had to take it almost completely
apart, but finally I got it to take my key. I put them both on the
cabin, so now both regular doors have the same lock and take the same
key. I put a gate bolt on each side of the garage door. It has to be
unlocked from the inside. I put the original deadbolt back on the
house. I don't use it anyway so I don't need to carry around an extra
key. And I replaced the knob with the lever handle since that's not the
lock now.
After that construction ambled along, a work session in
the cabin now and then.
Foam Insulation
 I started
getting into the insulating with plastic foams. It was too slow cutting
small pieces of plastic with a knife when there
were so many cuts. It took me hours to fill in half of two tall stud
spaces. On New Year's Day (my 70th birthday) I made a hot wire plastic
cutter in an hour in the morning and finished filling the two spaces
much faster. It's fabulous! But that's for the next report - January
2025, TE News #200. Still much more labor intensive than fiberglass
batts, but now "doable".
I started
getting into the insulating with plastic foams. It was too slow cutting
small pieces of plastic with a knife when there
were so many cuts. It took me hours to fill in half of two tall stud
spaces. On New Year's Day (my 70th birthday) I made a hot wire plastic
cutter in an hour in the morning and finished filling the two spaces
much faster. It's fabulous! But that's for the next report - January
2025, TE News #200. Still much more labor intensive than fiberglass
batts, but now "doable".
Star of Southwest Floor
Then I put down a PP plastic fiber mat over the sandy ground
preparatory to starting the floor
in the southwest quarter. This separates inside above from outside
under without
having to lay a concrete "skin". At the start of January a few floor
joist boards went in. I had a bunch of 4 inch thick blocks I was going
to put under the joists here, there and everywhere so they span four or
six feet instead of twelve. I would put shims on top of them to match
the height. But the end I started on was less than four inches
underneath. I had thought I would dig them down into the sane if that
was the case -- but I forgot that wouldn't be possible once the plastic
was down. I'll have to make thinner blocks - just a week after having
cut some wide but thinner (and dried) log side slices I had been saving
in the lumber plies into firewood! Rats!
Electricity Storage
Copper Oxyhydroxide
or Nickel Oxyhydroxide
or Nickel-Manganese Oxides
& Zincate Cells
(No Reports - maybe next winter I'll get back to it.)
Electricity
Generation
Power Outage: Running Freezers Off-Grid & Measurements for Tinnitus
[Christmas] Overnight and
through the morning there was a huge storm, a real gale. The power went
off maybe 8 AM. The phone line was dead too. I figured even several
trees might well have blown over on the power lines, so it might be off
as long as a day or so. I got out the 2500 watt inverter and started
running the freezers and the fridge in sequence with a 50 foot
extension cord, one at a time for 40 minutes each. I wanted to run them
during the day when solar power would keep the battery charged, then
let them "coast" overnight if necessary, but it was again dull and
gloomy and there was almost no solar power coming in. (No AC power in
December has always been my greatest concern for running things on
solar. If the outage lasted for days and they were all dull and the
battery got too low, I could put the inverter on my second system in
the cabin and run a very long extension cord to the house. After that I
would have to invoke the gasoline generator.)
When I got to the fridge, it occurred to me first that I
was sitting by a coiled up 50 foot 120V AC extension cord, and then to
check induced body voltage levels while only the single inverter AC
electricity source was on. The inverter itself caused only "moderate"
exposure even in close proximity. The extension cord was "extreme" in
close proximity to "moderate" within around 10 feet anywhere along its
length. The refrigerator was a real culprit: it made "extreme" EMF
exposure within a 10 foot radius and "moderate" out to 20 feet. I had
to go way across the house to get below the tinnitus threshold. The
smaller freezer was over 2 volts at close range and "moderate" to about
10 feet. At 15 feet or more it wasn't much. The larger freezer gave
"only" about 1.3 V AC in close proximity.
(Power consumption readings were 70 W for the small
freezer, 60 W for the larger one, and 125 W for the fridge. The fridge
was the only one that shut itself off before the 40 minute time limit.
The inverter itself uses around 15 watts.)
Once again I conclude that the real way to deal with AC
induced EMF voltages and tinnitus is to eliminate AC power in
dwellings, or (until 36 V DC appliances become widely available), at
least in the usual living and sleeping areas. If the house is (like
most) too near power lines, a grounded metal roof will help.
Induced body AC voltage classification according to
greenhomeinstitute.org
except the 20 mV is my own rough estimate, based only on my own
experience.
Induced Body
Voltage (AC)
|
Effect on Human
Wellbeing
|
0-9 mV
|
"No exposure"
|
10-99 mV
|
"Mild Exposure"
|
(20 mV
|
Tinnitus threshold)
|
100-999 mV
|
"Moderate exposure"
|
1 volt or more
|
"Extreme exposure"
|
Induced body voltage is measured with an
AC voltmeter by wetting the fingers and touching one meter probe, and
grounding the other probe (without touching it), while not moving.
Ground can be moist ground, any grounded wire, the ground pin in a
socket. etc. (I've just found that touching a screw slot on a wall
plate is a ground if the paint is flaked off, which it often is.)
The power came back on around 7 PM. So it was only off
about 11 hours. I saw several downed trees by the roads next time I
took a drive. Days later a big triple-trunk butt was still leaning on
the telephone lines, dragging them down almost to the ground and
tilting the poles. I'm glad the phones were working anyway.
My
Solar
Power
System(s)
The Usual Daily/Monthly/Yearly Log
of Solar Power Generated [and grid power consumed]
(All times are in PST: clock ~48 minutes ahead of local sun
time, never PDT which is an hour and 48 minutes ahead. (DC) battery
system power output readings are reset to zero daily (often just for
LED lights, occasionally used with other loads: Chevy Sprint electric
car, inverters in power outages or other 36V loads), while the grid
tied readings are cumulative.)
Daily Figures
Notes: House Main meter (6 digits) accumulates. DC meter now
accumulates until [before] it loses precision (9.999 WH => 0010
KWH), then is reset. House East and Cabin meters (4 digits) are reset
to 0 when they get near 99.99 (which goes to "100.0") - owing to loss
of second decimal precision.
Km = Nissan Leaf electric car drove distance, then car was charged.
New Order of Daily Solar Readings (Beginning May 2022):
New notation (from Sept. 2024): Same solar panels running grid ties +
DC battery system are grouped with "+" sign instead of just comma
separators. Nothing actually changes.
Date House+House, House, Cabin+Cabin => Total KWH Solar [Notable
power Uses (EV); Grid power meter@time] Sky/weather
Main AC + DC, (carport),
AC + DC
Nov
30th 5.94, 8.30 => .54 [55Km; 18794@2030]
December
1st 6.45, 8.88 => 1.09 [18829@20:00]
2d 7.13, 9.04 => .84 [18851@17:00] (Battery in
cabin is now much better charged)
3rd 7.44, .93 => 1.24 [55Km; 18880@17:00]
4th 7.72, 1.48 => .83 [18915@21:00]
5th 8.11, 1.88 => .79 [18960@17:30]
6th 8.89, 2.43 => 1.33 [90Km; 18996@17:30]
7th 9.31, 2.43 => .42 [105Km; 19050@'25:00']
8th .99, 3.22 => 1.78 [19072@16:00]
9th 2.25, 4.80 => 2.84 [19134@17:00] Started using electric
heat instead of wood stove. (& in cabin, & in travel trailer)
(Ug!)
10th 2.98, 5.71 => 1.64 [70Km; 19232@17:00]
11th 3.43, 7.58 => 2.32 [19270@17:30]
12th 4.53, 8.35 => 1.87 [19349@20:00]
13th 5.47, 9.03 => 1.62 [19408@17:00]
14th 6.91, .00 => 1.54 [55km; 19493@20:30; 50Km]
15th 8.34, 1.22 => 2.65 [19551@17:00]
16th 9.19, 1.57 => 1.10 [19625@17:00]
17th .10, 1.57 => .10 [19712@19:00 Of all
the dark days, definitely the darkest day this year! None of the
electric heat will be coming from the solar/batteries until they get
some recharge. (Also: Someone has pointed out that when one exceeds
1500 KWH (or 1.5 MWH) of electricity use in a 2 month billing period,
the price goes up from 12¢/KWH to 22¢. I had forgotten about that since
I have never used that much. I wonder how long I can afford the luxury
of not continually feeding firewood into the stove in the winter?)
18th .88, 2.12 => 1.33 [19797@20:00]
19th 1.00, 2.44 => .44 [19876@20:30] Another dark day -
hardly 20 watts from 2500+ watts of solar panels. Both sets.
20th 1.18, 2.72 => .46 [85Km; 19950@17:30]
21st 1.38, 3.12 => .60 [75Km; 20019@18:00]
22d 1.60. 3.41 => .51 [20101@21:00]
23rd 2.23, 3.86 => 1.08 [55Km; 20156@17:30]
24th 3.20, 4.06 => 1.17 [20232@21:30; 10Km]
Xms 3.50, 4.41 => .65 [20265@23:30] BIG storm midnight
until noon. Power out 8AM to 7 PM. Ran freezers & fridge with
inverter, 1 at a time, during daylight hours, but there wasn't a lot of
daylight (solar), as usual. House battery well under 39V by 4:30 PM.
26th 4.64, 5.00 => 1.73 [20307@19:00] Some sun - Both batteries
pretty much recovered
27th 5.42, 5.54 => 1.32 [20368@17:00]
28th 6.21, 5.91 => 1.14 [65Km; 20440@20:30]
29th 6.52, 6.51 => .91 [20490@17:30]
30th 7.25, 6.51 => .73 [95Km; 20562@17:30]
31st 7.81, 6.99 +> .94 [60Km; 20660@17:00]
What a pile of dull days and rain this month has been!
January 2025
1st 8.07, 6.99 => .26 [?] Yet more dull, dull days
2d 8.33, 6.99 => .27 [90Km; 20757@20:00]
3rd - - - - - - - - - .29 (est. 1/2 of .59)
4th 8.92, 6.99 => .30 [105Km; 20916@23:00] (est.
other 1/2 of .59)
5th 10, 7.19 => 1.28 [20970@17:00]
Unattentive with all the dull days, I didn't think to reset the house
meter. I HATE that it goes from "9999 WH" to " 10
KWH", losing THREE decimal places of precision. It could be anywhere
from 1.08 to 2.07 KWH. Going to "10.00 KWH" would be far more helpful.
6th .33, 7.68 => .82 [21047@17:30]
7th .99, 8.45 => 1.43 [21114@18:00] A bit of sun
8th 2.24, 9.23 => 2.03 [21177@18:00] Some actual sunshine!
Clouds from mid PM.
9th 2.72, .61 => 1.09 [21242@17:00]
Chart of daily KWH from solar panels. (Compare November 2024 with October 2024 & with
November 2023.)
Days of
__ KWH
|
December
2024 (18 C's,
Batteries only)
|
November 2024
(18 C's)
|
December 2023
(18 Collectors)
|
0.xx
|
13
|
4
|
9
|
1.xx
|
15
|
9
|
3
|
2.xx
|
3
|
6
|
5
|
3.xx
|
|
4
|
6
|
4.xx
|
|
2
|
5
|
5.xx
|
|
3
|
3
|
6.xx
|
|
|
|
7.xx
|
|
1
|
|
8.xx
|
|
|
|
9.xx
|
|
1
|
|
10.xx
|
|
|
|
11.xx
|
|
|
|
12.xx
|
|
|
|
13.xx
|
|
|
|
14.xx
|
|
|
|
Total KWH
for month
|
37.13 (batts. only now
& horribly cloudy!)
|
84.69
|
79.97
|
Km Driven
on Electricity
|
919.6 Km
~120 KWH
|
778.8 Km
~110 KWH
|
793.1 Km
(120 KWH)?
|
Things Noted - December 2024
* 6th: It might seem that because the grid ties were gone I wasn't
utilizing the solar panels very well. But in fact, it was one gloomy
day after another and the batteries of both systems were alway under
full charge - what little the panels were supplying. The house system
often barely kept up with the livingroom LED lamps (ON most of the day
owing to the gloom). Only occasionally did I turn on a heater to supply
a bit of the bedroom
heat.
* If just 7 watts is coming from over 2000 watts of panels in the
morning, that's under .35% of full sunlight. (Cloudy West coast
winters, especially this far north. & l o n g tree
shadows.) Dull as the days are, there's
light to see by. For an interesting contrast, Jupiter/Ganymede gets 4%
as much solar energy as Earth, so morning here can actually be duller -
just
1/10th that amount. Ganymede never has clouds. The latest spacecraft to
Jupiter area is solar powered. Saturn's moon Titan would be duller tho,
since Saturn gets just 1% of Earth's light intensity and the atmosphere
of Titan is said to block 90% of the light, making it just .1%. It
would still be just about enough daylight to see in, but we would get
SADS there pretty fast.
Even in the gloomy clouds both systems generally get up to
tens of watts or 100 watts of charging later in the morning and early
afternoon. That's 5%. One bright midday sunny stretch does wonders for
recharging the batteries on the rare occasion there has been one one.
The 20th was the darkest. At 10 AM after a morning walk,
there was 1W and .7W from the two separate systems each of over 2500W
of panels. Definitely darker than Titan!
* The cabin system, now with the carport (3) and pole (2) solar panels
as
well as the cabin roof itself (4; total 9) was charging better than the
house
system (total 10), doubtless owing to the carport panels getting less
shade through the day than any others.
Looking over past years stats, adding the three carport
roof solar panels probably doubled collection in Decembers and
Januarys, with the other panels being mostly in the shade most of the
day. (And even with them, the shadow of the chimney travels slowly
across them through the heart of the day, preventing full utilization.)
Location is everything! And I think there are more tree shadows now -
two trees have been cut down in the last few years, but all the rest
are just getting bigger.
Monthly Summaries: Solar Generated KWH [& Power used
from grid KWH]
As these tables are getting long, I'm not repeating the log of monthly
reports. The reports for the first FIVE full years (March 2019 to
February 2024) may be found in TE
News
#189,
February
2024.
2024
Month: HouseAC + DC +Carport+Cabin[+DC] (from Aug 2024)
Jan KWH: 31.37 + 3.14 + 16.85 + 16.82 = 68.18 [grid
power used:
909; car (very rough estimates): 160*]
Feb KWH: 96.52 + 2.36 + 49.67 + 52.98 = 201.53 [grid: 791; car:
130]
FIVE full Years of solar!
Mar KWH 150.09+ 1.63 + 93.59 + 92.50 = 337.81 [grid:
717; car:
140]
Apr KWH 181.89+35.55 +123.50+142.74 = 483.68
[grid: 575; car: 140]
May KWH 129.23+67.38 +109.6 +126.32 = 432.53
[grid: 405; car: 145]
Jun KWH 152.54+51.02+118.99+141.17 = 463.72
[grid: 420; car: 190]
July KWH 174.22+30.53+111.19+128.62 = 444.56
[grid: 386; car: 165]
Aug KWH 221.99+ 2.63 +142.49+151.67+ 5.78 = 524.56 [grid: 358;
car:
180]
SeptKWH 120.98+ 2.49 + 83.50 + 19.10+ 39.95 = 266.02 [grid: 662
(yowr!); car: 155*]
Oct KWH 78.48+ 7.29 + 64.39 + 7.52 + 40.75 = 198.43
[grid: 711; car: 120*]
Nov KWH 19.63+12.19+ 23.90 + 3.35 + 25.62 =
84.69 [grid: 900 (ACK!);car: 110*]
Now solar is charging
batteries only. 2
systems: house, cabin.
Dec KWH 20.37+16.76 = 37.13 [grid: 1866 (using electric
heat!); car: 120*]
* Car consumption comes from solar and or grid: it does not add to
other figures. (Just from grid as of Nov. 18th.)
Annual Totals
1. March 2019-Feb. 2020: 2196.15 KWH Solar [used 7927 KWH
from grid; EV use: -] 10, 11, 12 solar panels
2. March 2020-Feb. 2021: 2069.82 KWH Solar [used 11294 KWH from grid;
EV use: - (More electric heat - BR, Trailer & Perry's RV)] 12 solar
panels
3. March 2021-Feb. 2022: 2063.05 KWH Solar [used 10977 KWH from grid;
EV use ~~1485 KWH] 12 solar panels, 14 near end of year.
4a. March 2022-August 2022: in (the best) 6 months, about 2725 KWH
solar - more than in any previous entire year!
4. March2022-Feb. 2023: 3793.37 KWH Solar [used 12038 KWH from grid; EV
use: ~1583 KWH] 14, 15, 18 solar panels
5. March 2023-Feb. 2024: 3891.35 KWH Solar [used 7914 KWH from power
grid; EV use: ~1515 KWH] 18 solar panels
Money Saved or Earned - @ 12¢ [All BC residential elec. rate] ;
@ 50¢ [2018 cost of diesel fuel to BC Hydro] ; @ 1$ per KWH [actual
total cost to BC Hydro in 2022 according to an employee]; or maybe it's
62 ¢/KWH
[according to BC Hydro at Renewable Energy Symposium Sept. 2024]:
1. 263.42$ ; 1097.58$ ; 2196.15$
2. 248.38$ ; 1034.91$ ; 2069.82$
3. 247.57$ ; 1031.53$ ; 2063.05$
4. 455.20$ ; 1896.69$ ; 3793.37$
5. 466.96$ ; 1945.68$ ; 3891.35$
It can be seen that the benefit to the society as a whole
on Haida Gwaii from solar power installations is much greater than the
cost savings to the individual user of electricity, thanks to the heavy
subsidization of our power owing to the BC government policy of having
the same power rate across the entire province regardless of the cost
of production. And it can be insurance: With some extra equipment and a
battery, sufficient solar can deliver essential power in electrical
outages however long. (Feb 28th 2023: And it's probably well over
1$/KWH by now the way inflation of diesel fuel and other costs is
running.)
It might also be noted that I never went into this in a
big way. Instead of installing a whole palette load of 32 solar panels,
I have 18, and my grid ties aren't the best, and I would be hard put to
give an accurate total of my installation costs. All in all the grid
tied part probably cost me (with all my own 'free' labor) around 7000$.
At the actual "total savings to all" figures, they have paid for
themselves twice over in five years. The 36V DC system largely cost a
couple of thousand dollars for batteries. The solar panels were up. The
charge controller, circuit breakers, DC combo meters [V, A, W, WH], 36V
compatible LED lights and wiring cost were a few hundred dollars at
most. (I did have to make my own T-Plug cables & 3D printed wall
plates.) The battery cost has come down substantially in recent years
and will come down a lot more if I can get cheap, "forever cycle"
batteries working.
http://www.TurquoiseEnergy.com
Haida Gwaii, BC Canada