Turquoise Energy News Report #179
Covering April
2023 (Posted May 3rd 2023)
Lawnhill BC Canada - by Craig Carmichael
(CraigXC at Post dot com)
www.TurquoiseEnergy.com
= www.ElectricCaik.com
= www.ElectricHubcap.com
Month In "Brief"
(Project Summaries etc.)
- Volunteer Citizen Grievance Panels (recap) - Magnetic Variable
Torque Converter - Copper Peltier Heat Transfer Elements - Acoustic
Heat Pumping - End of EV Adoption?
In
Passing
(Miscellaneous topics, editorial comments & opinionated rants)
- Safer Tree Cutting? - Journalism: Shoot the Messenger!
- Scattered Thots - ESD
- Detailed
Project Reports
-
Electric
Transport - Electric Hubcap Motor Systems
* Magnetic Variable Torque Converter with Planetary Gear: The
Future of the Automotive Industry!
Other "Green"
& Electric Equipment Projects
* Peltier Module Cooler: Copper Heat Transfer Parts
Electricity Storage:
Batteries [no report]
Electricity Generation
* My Solar Power System: The Usual Latest Daily/Monthly
Solar Production log et cetera - Monthly/Annual Summaries,
Estimates, Notes
Volunteer Citizen
Grievance Panels
Last month in In Passing I wrote up a proposal for this, a new institution of governance by
the people. I wish here to stress its "game changing" importance.
Today we have no organized feedback channel from individuals and the
public to our institutions. As a result, our major institutions have
over the decades become "feral", less and less in touch with the
society they exist to serve. Mostly they have become self serving
while begrudging whatever service they have to provide to justify their
existence.
Grievance panels will provide that feedback and forever
change our relationship with our institutions. One reason drivers
behave well - and learn to behave well - is that nobody likes being
honked at. The fact of the public having a horn to honk with will very
much help bring institutions in line with public expectations and
requirements. Once they are set up in localities everywhere, a group of
impartial volunteers is able to judge actions or inactions by
institutions/organizations in response to individual complaints and if
appropriate demand individual redress from the institution, in a single
regular session. Just as
importantly, responding to the realization of that, the whole attitude
of those making and implementing policies in our institutions will
become more reasonable and responsive - more caring.
It does need to be approved in legislation. Most
institutions/organizations would just laugh at panel judgements if they
carried no official or legal weight. I sent a copy on paper to my MP,
who is
certainly one of the more active and dynamic members. Whether our
ossified institutions of government are capable of implementing any
important change to "the way things work" before they collapse remains
to be seen, but the idea is now "out there" for the future, in small
now but spreading circles I trust.
Just think... If Dennis hadn't told me, out of the blue at
lunch one day in (?)1978, about his experience with an overbearing
Vancouver city official and then the Vancouver Board
of Variance (last example in my writeup), I'm sure I would never have
thought of this. An unsuspected
link in the chain of social progress!
Thanks Dennis, (? - 1979) RIP!
Magnetic Variable Torque Converter
I was unable to get pure alume unless I wanted to pay a
crazy price for a whole sheet - probably over 2000$ plus shipping. or
1100$ plus shipping for 1/8 of a sheet. At that point I thought that
since copper was better anyway, I should use it instead. Since I had
copper bits but not a copper plate, I thought I would cast a copper
disk. Having the metal melting furnace, it sounded simple enough.
Except for the furnace not being able to hold enough copper. IIRC:
copper 401
pure alume 243
alume alloy 167
With pure alume not available, copper was 401/167 = 2.4
times more conductive than the alloy. Even a 7mm (1/4 inch) thick
copper rotor, closest to the magnets, should be substantially better
than the ~10mm present alloy alume rotor. In fact, headed for twice as
good.
After practicing on the parts for the Peltier module
camping cooler, I went to cast the rotor. I had learned that the
furnace actually could melt copper and that if copper was cast in two
or more pieces, they did seem to "glue" together (however imperfectly),
unlike alume. I
thought I could cast the disk in three 1Kg melts instead of having to
figure out how to melt 3 Kg of copper at once.
If I made it 10 inches diameter instead of my preferred
10.5, it would fit on my lathe, and I had a 10 inch steel rotor for an
"Electric Hubcap" motor that was just right as a pattern, so I used
that. I made a plywood box big enough to cast it on the flat and put in
some "greensand" mix (fine sand, 10% bentonite clay, and just the right
amount of water, per youtube videos. I threaded 3 bolts into the bolt
hole in the disk so I could lift it out without disturbing the sand.
Then I pressed in the steel disk and and padded some more sand around
it and in the center hole. But I had to cut into the sand around the
edges with an exacto knife to keep the sand from coming up when I
lifted the disk out.
 I'd like to be
careful and take it slowly, but you only seem to get 2-3 seconds to
pour the copper before it starts hardening as "slag" as it comes out of
the crucible. I wanted the rotor to be 1/4 inch thick, and liquid
copper seems to have enough surface tension that it wants to be roughly
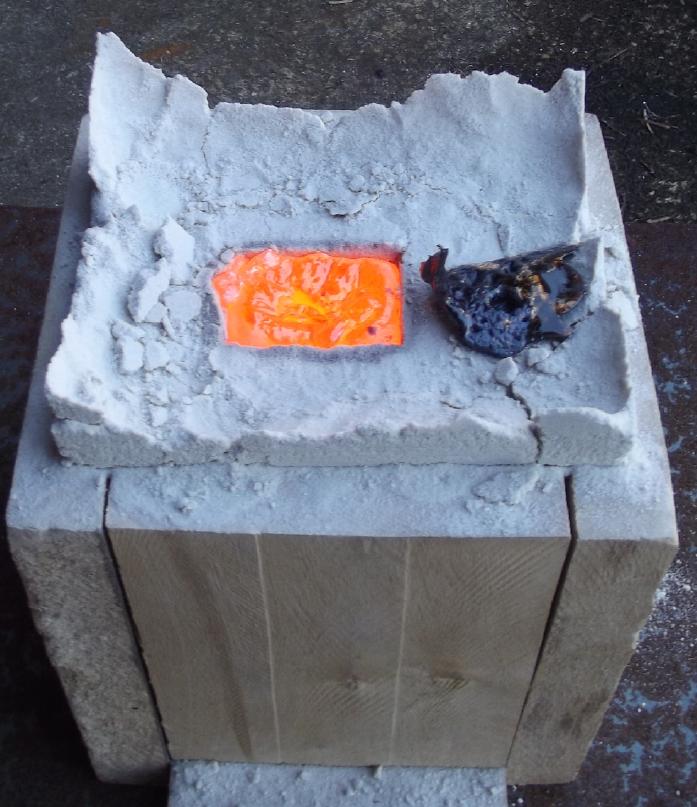
that thick rather than flow farther. The first cast (900g of copper)
seemed pretty good, if a bit rough at the edges.
I'd like to be
careful and take it slowly, but you only seem to get 2-3 seconds to
pour the copper before it starts hardening as "slag" as it comes out of
the crucible. I wanted the rotor to be 1/4 inch thick, and liquid
copper seems to have enough surface tension that it wants to be roughly
that thick rather than flow farther. The first cast (900g of copper)
seemed pretty good, if a bit rough at the edges.
 Things went
downhill from there and it
got really ugly. Only the thought that I could grind off and then mill
off all the excess metal on the lathe kept me from starting over.
Things went
downhill from there and it
got really ugly. Only the thought that I could grind off and then mill
off all the excess metal on the lathe kept me from starting over.
 For the second cast (1Kg, no
picture - the 3rd cast is partly on top of the second here), I thought
I would follow the outside edge and then it wouldn't matter if the
drying sand around the edge crumbled. With the copper not flowing as
freely as I expected and my shaky hands (worse and worse as I get
older), there were a bunch of gaps around the edge. Oh great, now I had
a bunch of little voids to fill instead of one big area!
For the second cast (1Kg, no
picture - the 3rd cast is partly on top of the second here), I thought
I would follow the outside edge and then it wouldn't matter if the
drying sand around the edge crumbled. With the copper not flowing as
freely as I expected and my shaky hands (worse and worse as I get
older), there were a bunch of gaps around the edge. Oh great, now I had
a bunch of little voids to fill instead of one big area!
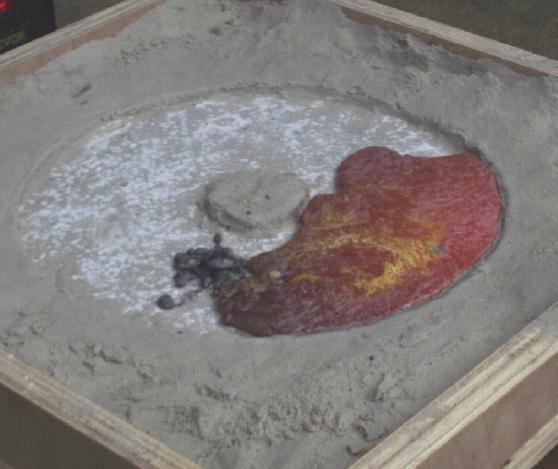
The third cast (1Kg) filled in the remaining big void area
toward the center -- leaving more smaller voids. This time I sprinkled
some borax flux on the rotor to help the new stuff bond to the old.
(What is with this camera?)
 A fourth and
fifth cast (500g, 540g) filled in some of the voids. But the whole
thing had warped without me noticing and wasn't sitting flat in the
sand, so a bunch of the metal went through the voids and made new lumps
underneath. At least that bottom face should have ended up nice and
flat, but no!
A fourth and
fifth cast (500g, 540g) filled in some of the voids. But the whole
thing had warped without me noticing and wasn't sitting flat in the
sand, so a bunch of the metal went through the voids and made new lumps
underneath. At least that bottom face should have ended up nice and
flat, but no!
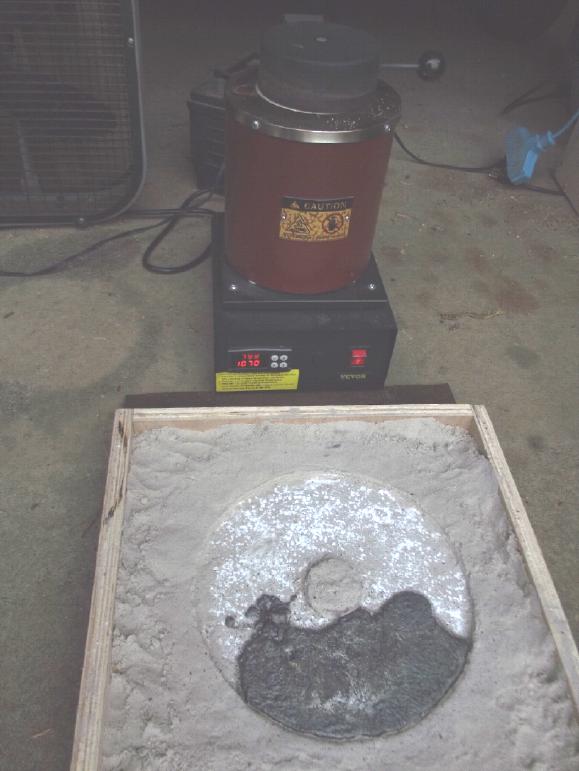
There were just another little spot and a couple of major
cracks I wanted to fill, but after 3 days of hour long waits for copper
to melt and then donning protective gear and then pouring, I was pretty
much fed up and left it. (and it was also the end of the month.) The
warp flattened easily with a big hammer. If only I had noticed to do it
earlier before making the flat side lumpy. It's going to be a heck of a
machining job.
Someone suggested using (HCl) acid to clean the copper
off. No doubt the joins would be more solid and I'll try it for the
last cast(s).
Now that I've tried casting I'm sure it would have been
much simpler to order a 10x10 inch square of copper plate, cut it
round, and turn it on the lathe. I may yet end up doing that. But it
also would have been much easier if the crucible held enough copper to
cast it in one pour. (Might I have cast it as four 1/4 circles and then
joined them with a pour to fill the four joins?)
Copper Peltier Cooler Heat Transfer
Elements
 In order to practice casting copper, I decided to remake the heat
transfer block and the heatsinks for the Colman Peltier cooler in
copper. I made the heat transfer block (hot cast block shown), but it
seems sand casting of heatsinks is beyond my skill level and maybe not
really doable at all. If you sink the original heatsinks into sand or
casting plaster to make the pattern, the media sticks between the fins
when it's pulled out.
In order to practice casting copper, I decided to remake the heat
transfer block and the heatsinks for the Colman Peltier cooler in
copper. I made the heat transfer block (hot cast block shown), but it
seems sand casting of heatsinks is beyond my skill level and maybe not
really doable at all. If you sink the original heatsinks into sand or
casting plaster to make the pattern, the media sticks between the fins
when it's pulled out.
 The heat transfer block with the
Peltier face
milled smooth
The heat transfer block with the
Peltier face
milled smooth
 Making tapered slots for heatsink
fins in
"greensand" casting mix.
Making tapered slots for heatsink
fins in
"greensand" casting mix.
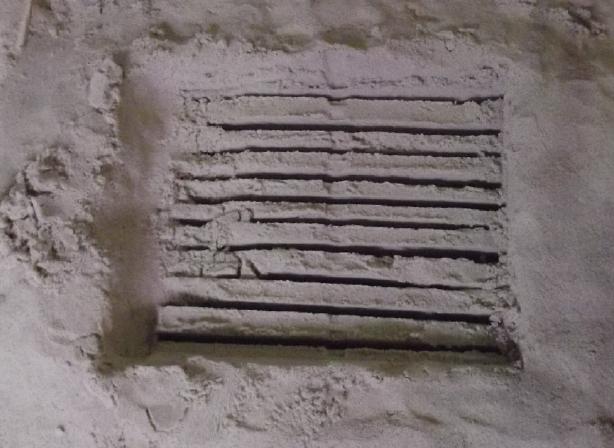
 Result, fins side. There should
be 10 equal,
well shaped fins.
Result, fins side. There should
be 10 equal,
well shaped fins.
 Bottom side. It took two pours,
which if
nothing else proved the two casts would basicly stick together.
Bottom side. It took two pours,
which if
nothing else proved the two casts would basicly stick together.
 The result was disappointing. Some fins were wider, and the copper
filling them had pushed other channels closed. It didn't seem usable
(and would take hours to smooth the face!)
The result was disappointing. Some fins were wider, and the copper
filling them had pushed other channels closed. It didn't seem usable
(and would take hours to smooth the face!)
So Instead I hope to solder a copper plate I had to the
bottom of the hot side heatsink, and solder the heat transfer block to
the cold side heatsink. (Soldering alume, TENews176) Assuming the
sodlering goes okay, the copper facings should improve the heat
transfer in and out of the Peltier module, achieving most of what
copper heatsinks would have.
So far I've cut and polished the plate.
If I ever do make a copper
heatsink (and if I can solder a copper block to an alume heatsink, is
there any real reason to?), it will probably be by soldering copper
sheet fins to a copper plate base.
Acoustic Heat Pumping
I saw an interesting video on this topic, which I had
never
heard of. It was well presented and explained. Sound waves
hitting an object make a momentary pressure, which makes a momentary
heat, with a corresponding momentary drop in pressure nearby. This
occurs at the frequency of the sound, so a 200 Hz sounds hits the
object 200 times per second. In a closed tube a resonance frequency
amplifies the effect at the ends of the tube, and heat collector "fins"
near an end of the tube can get warmer or cooler - or both at opposite
ends - depending on the size, placement and resonance.
The presenter got 14°C difference between warm and
cold temperature sensors with an 8 inch "subwoofer" speaker, he said at
200 Hz resonance. (But I heard it as treble clef C# - 518 Hz.) He
noted that he could connect the 'collectors' at each end thermally in
series and double the temperature difference (to 28°).
The one vital parameter that wasn't touched on was how
much power was driving the speaker. One can get those
temperature spreads with a peltier module. Which technology
would use less power? Could acoustic cooling be as low or lower power
than refrigerant pumping? Then again, the thing I like most about
Peltier modules is that they're silent. Still, acoustic heat pumping
seems an interesting
phenomenon.
Acoustic Cooling & How To Manipulate Heat With Sound
(Thermoacoustics Part 2)
https://www.youtube.com/watch?v=kkBBkQ8jFRY&ab_channel=NightHawkInLight
End of EV Adoption?
Sales of new gasoline powered vehicles peaked in 2017 and
have been dropping since. In 2022 EVs (PHEV, BEV) accounted for 13% of
new car sales. In China the figure was 25%.
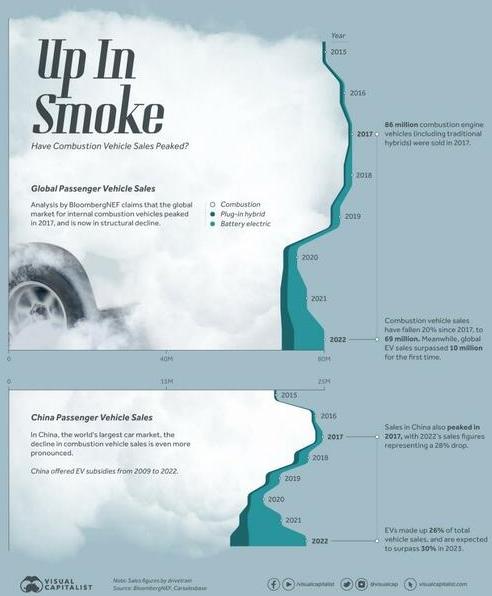 2019
-
2.5%
2019
-
2.5%
2020 - 4.2%
2021 - 8.3%
2022 - 13.0%
Of course, as more and more high quality oil reserves are
located in easier and easier places to get to and to pump out on this
smallish world, there will be abundant fuel for tens of thousands
of
years
of future driving by hundreds of billions of people, liquid fuels will
become ever cheaper
and infernal internal combustion vehicles are bound
to make a comeback. And the
environment will be just fine.
Right now there are a couple of video
titles being suggested to me on youtube explaining why "EV's aren't the
answer". The absence in such videos of alternative "answers" to our
ever more serious problems with non-renewable fuels
implies the authors consider them to be somehow eco-friendly and long
term sustainable - somehow renewable or infinite in supply. Our present
problems are apparently just the result of bad policies and
manipulative governments, not a badly depleted resource that has been
largely squandered and will be unavailable to all future generations.
And after all, lithium use, mining and prices are
apparently
shooting up and up, not dropping and prices falling as
statistics are presently showing, partly with Australia's new refining
technique that extracts twice as much lithium from the ore. And
there are
no other kinds of good batteries like Ovshinsky's NiMH ones that were
in use for
EV's
in the 1990s, and none of the cheaper high energy types under
development will ever succeed. (Sodium Ion batteries have just hit the
market in some new EV's.) Even EV car bodies take five times as
much energy to produce as the same body for a petroleum vehicle. And I
keep hearing the usual song about how much coal your EV burns
regardless of
your electrical utility's power sources or the number of acres of solar
panels you put up. (Funny how with just 18 panels on my house roof here
on the cloudy north coast I
make 3x as much electricity as my EV car uses annually in 12 megameters
a
year driving, actually reducing total fossil fuel usage in this area.)
Maintenance
costs are horrific. (Why, I myself have
needed new rear brake disks & calipers and new tires over several
years of winter-salted/graveled highway driving. Of course I'd never
have needed those or anything else [like oil, filters, PbPb cranking
batteries...] on a gasoline
vehicle.) Even insurance is more, and when eventually you need a new
main battery it will cost more than the whole car. Surely EV's will be
as
dead as dodos within the next few years, another bizarre eco-lie fad
foisted on us by the "woke left" (or is it the "neocon right"?), doomed
to be cast aside as sanity returns. Anything else is just Russian
propaganda and
misinformation. Or
so say those still pushing petroleum vehicles.
In
Passing
(Miscellaneous topics, editorial comments & opinionated rants)
Safer Tree Cutting?
There are two cases (well,
among many) for for felling a tree. One is where there is an open place
where it is a solid tree likely to land safely. The other is where it
has a good
chance of destroying something valuable when it falls. In that case,
either a risk of
damage is taken or someone has to climb the tree and disassemble it
from the top down until it is short enough to fell safely - sometimes
almost to the ground in a built up area. That is certainly not without
risk to the climber. A hollow or dead, rotting tree is even more
dangerous. If there's room for a bucket truck and the tree
isn't too tall, the cutter could stand in the bucket - still not
without hazard, and costly.
It occurs to me that having a saw operated by remote
control that could cut high up the tree with everyone standing at a
safe distance would be much better. My first thought was a flying drone
with a chainsaw. Then I thought that would be pretty hard to control
accurately and to press the saw against the tree. And if the saw jammed
even slightly the drone
and saw would be stuck up a half sawn tree. And the blades might get
caught in branches.
An accordian type extension with the saw assembly at the
top might be good for 15 or 20 feet. (Or else a fixed tower that the
saw can ride up on.) But it might be necessary for the first cut to be
made higher up.
Okay: how about making it so the top of the assembly where
the saw is
can latch onto the tree trunk? There's the stability for cutting. The
bottom of a much shorter accordian extension or tower - maybe 6 or 8
feet - can also grip the trunk. So the top extends and then grips the
trunk, and the bottom lets go. The accordian closes taking the bottom
up the tree. The bottom grips on then the top lets go. The accordian
extends again and the unit inches its way up the tree. Either the
branches are cut along the way up or the grips must be flexible enough
to
go around them. Hmm... if the branches aren't cut on the way up, when
the top part is felled it might hang up in the branches. So that's
probably a good idea anyway.
Or, a shorter assembly is pulled up the tree by getting a
rope up over a high branch and pulling down. Then the assembly clamps
itself to the tree and cuts where it has been pulled up to. That was
starting to sound simpler until I had the thought that it would saw
below the
branch that was holding it. How about the rope is attached closer to
the middle of the unit, below the saw?
Or what about making the saw assembly so it can climb a
ladder? Probably not climb the rungs, but drive up the side rails?
Extension ladders come up to about 40 feet long. That might be high
enough for most situations. Put up the ladder, then attach the heavy
saw mechanism at the bottom and let it climb up and latch onto the tree
itself.
There's still the chance of getting the saw stuck, but at
least there's some leverage to push or pull on it. Something like this,
albeit
it would be a specialty tool, would seem far more desirable than the
hazards associated with the present methods, which now, thinking of a
potentially better way, seem "primitive" and "reckless". This is just
some first
thoughts. I have a number of trees that would hit my house roof or
other things if they fell toward it, but there is no other clear
direction for them to fall - they would get hung up in other trees. It
would be more than cool to be able to bring them down safely by felling
the top half first, while standing at a distance.
Journalism:
Shoot
the
Messenger!
* I had read that journalists/reporters were being murdered by the
dozen. 67 last year IIRC - and that's ones known to have been
murdered, not those "missing" or died of unknown causes or killed
without being recognized as being a journalist. When anyone tells a
real
story from their own viewpoint about any dispute or issue, one side or
the other doesn't like
them, and tolerance for airing of dissenting views continues to reach
new lows. I think the worst is for those who deviate from the American
propaganda as broadcast ad nauseum on US mass media, but there are
slain bloggers on both sides in the Russia-Ukraine conflict, and
probably many more in Sudan where the even larger war with far
more civilian casualties is ongoing.
In an interview someone noted that journalists have become
more of a target for assassination than politicians. He had little
sympathy for those who commit such
crimes. If someone would murder with planned and malice
aforethought an innocent, law abiding person just because they express
views or expose facts or truths they (or their employer) don't like
aired, is it
not just basic and vital for society to protect itself by eliminating
such murderous types before they take even one more productive,
innocent life?
Allowing the hateful and conniving to carry on their
business, perhaps
after a fine or a prison sentence, is not "compassion for those who had
a poor home
life" or mercy. It is a prime reason our society has grown into the
sad state it has over the last century and is about to collapse. Among
a long and distressing list of other things that have been done to us
all by such people,
think of a world war started by a man whose life was spared after his
violent coup attempt. For him prison was just a 'time out' to plan more
carefully how to go about seizing power next time.
* On top of those assassinated in 2022 Harpers magazine says there were
363 journalists imprisoned. (Again neither Russia nor Ukraine seems to
have much tolerance for adverse reporting.)
* That's not even counting Julian Assange who for some reason "doesn't
qualify" as a journalist. How many others who "don't qualify" for the
count are in jails around the world?
* The hypocrisy of persecuting Assange for two decades for no crime,
while none of those who committed the war crimes his work exposed are
investigated or prosecuted, is surely apparent. "Shooting the
messenger" is still very popular.
* Likewise someone who recently leaked damning US documents proving the
government has been lying to the US public is in trouble, while those
guilty of the crimes exposed will never be charged.
* In 2012 after sending an email to Wikileaks that he would soon
release an exposé on the CIA, journalist Michael Hastings' car
was boobytrapped. But his death was never investigated. Those who
committed this heinous crime and those who ordered it still walk the
streets, while Hastings is still dead. In a sane society [if such a
thing could ever have happened in a sane society], those involved would
have been quickly
rounded up, tried fairly, and the ringleaders treated with the same
compassion they had shown to
Hastings, never to murder again. Betrayal of Public Trust in
itself would be a capital crime. Instead, we are left to suspect that
Hastings is just one that came to light among a trail of innocent
bodies - mostly journalists - both before and since.
The gangsters running Washington only want their own
narratives to be aired on TV or printed in establishment papers and
magazines, and they pay the mass news outlets really well to ensure
their cooperation. Nothing embarrassing or contradictory is
permitted. But in spite of various measures, they are having a hard
time censoring the internet and the public is very gradually waking up
to its own naivety.
* Nobel prize winning and long respected journalist Seymour Hersh
finally broke the story whose main feature everyone was already pretty
sure of. Inside sources told him in detail about the US government's
blowing up of the Nordstream Gas Pipelines, running under the Baltic
Sea between Russia and Germany. (And after all, Biden said months in
advance that he would "end it".) It was the world's biggest
terrorist act. Hersh's story has apparently now been banned on youtube.
An official UN investigation wanted by Russia seems to have been
blocked, and American intelligence agencies have been busy concocting
alternative "explanations" for the pipeline explosions and feeding them
to the propaganda machine to confuse the issue.(Norway did it... It was
Ukrainian sympathizers...) Will Hersh too somehow soon be dead,
or is he too high profile?
* Now Tucker Carlson, by far the most watched journalist on mass media
television, who has been boldly tackling head-on some of the biggest
issues of our time on his Fox News Network show Tucker Carlson
Tonight, has been abruptly fired, without explanation. Apparently
one or some or maybe all of his "truth bombs" were finally too much
for elitist owner Rupert Murdoch and friends, notwithstanding that
Carlson was the main thing keeping Fox popular. According to Megyn
Kelly (another former Fox star now with her own show on youtube),
Fox viewership has immediately fallen by half. She had actual figures
for various timeslots, like 3 million viewers down to 1.2 million. Most
people don't wonder that he was canned, they wonder how he got away
with reporting truth in the mass media for so long, contrary to the
narrative and covering awkward topics that people were supposed to just
forget about or go along with. And because Carlson was a member of the
US mass media his stories were never blocked on youtube. Now, who
knows? Perhaps like many others (eg, Greg Hunter, onetime CNN
anchor) he will have to find an alternative media platform such as
Vimeo or Rumble.
Scattered
Thots
* Late in the month Yujeny Prigojan, head of "Wagner PMC" fighting for
Russia, who has gained public stature and has been saying some strange
things lately, ordered "no more prisoners" in Bakmut.
This is truly shocking. Prisoners have to be fed and guarded, and
troops and resources have to be allocated to them for this. But "No
prisoners"
hearkens back to TE Lawrence ("Lawrence of Arabia") and the first world
war, and more especially to the Malmedy massacre at the start of the
"Battle of the Bulge" in WWII, when the Germans shot 50 unarmed
American
service (non-combat) troops who had surrendered, so they wouldn't slow
them down. This became known (a couple escaped) and the result was that
from then on the
allies fought to the death rather than surrender.
In Ukraine it comes at a time when an increasing trickle
of Ukrainians have been
starting to surrender or even switch sides. As at
Malmedy, this will make them fight to the last instead. Shooting
prisoners is truly a
war crime -- and it can't possibly work out well. I hope someone higher
up in the Russian military was or is able to veto his crazy and
inhumane order.
* A "SciShow" video said we have UV filters in our eye lenses. Those
with lenses removed, usually due to cataracts, and without an
appropriate artificial lens with a filter, we can apparently see in UV
colors. But these higher frequency and higher energy rays are damaging
to the retina, so UV filters in both real and artificial lenses would
be standard.
And under certain circumstances with lasers, we can see a whole
octave of IR below the visible spectrum octave.
Another factoid: generally we have 3 types of cone cells
in our retinas: RGB. But a few people have 4 types. They might be able
to identify more colors than the rest of us. But the fourth types are
not
of
the same wavelength in all those who have them. The Urantia Book says
that as civilization and evolution progress humans will eventually be
able to see the "midwayers", semi-material beings between humans and
angels. I wonder if this is related? (One person said he used to see
them when he was little, and he wondered who were those people that
came to family meals but never spoke, sat down, or ate with the family,
and who everyone else at the table completely ignored.
But he lost the ability. As an adult eventually he was able to enter a
trance state and contact them - when and if they wanted to converse.)
* I was looking at plants in a store. There was one called
"chokeberry". I didn't know what that was, but somehow I just had to
buy it. Looking it up later I found that many berries have a substance
that helps prevent or reverse eye cataracts, and chokeberries have
substantially more of it than any other. Unlike "chokecherry" they have
no pit. The name "choke" is because they are very tart in the raw.
ESD
(Eccentric Silliness Department)
* Silvergate, Silicon Valley, Signature and Credit Suisse banks
collapsed almost all at once, sparking fears of widespread problems in
the
financial sector with banks that start with "S". (This follows that
100% of space shuttles with names starting with "C", but no others,
were doomed to crash.)
What I should do is unclear. Do I need to get out of
Island Savings, or does the "I" on the front insulate the "S" in
"Island"? (It's a silent "S", after all.)
Wait, now "First Republic" bank? That doesn't start with
"S"! (Who's next!?!)
* They call them "intelligence" agencies. Might they be better
denominated "intransigence" agencies?
* Referee: The one referred to by the referer.
Refuree: The one whose parka was refurred by the refurer.
* Top soil, arable land, coral reefs, forests, peatlands, swamps...
even the deserts are being threatened. That's quite the achievement.
-- "harrisonhopson" (video comment)
"in depth reports" for
each project are below. I hope they may be useful to anyone who wants
to get into a similar project, to glean ideas for how something
might be done, as well as things that might have been tried, or just
thought
of and not tried... and even of how not to do something - why
it didn't
work or proved impractical. Sometimes they set out inventive thoughts
almost as they occur - and are the actual organization and elaboration
in writing of those thoughts. They are thus partly a diary and are not
extensively proof-read for literary perfection, consistency,
completeness and elimination of duplications before
publication. I hope they may add to the body of wisdom for other
researchers and developers to help them find more productive paths and
avoid potential pitfalls and dead ends.
Electric
Transport
Magnetic Variable Torque Converter with Planetary Gear
[14th] I was given a price of 1100$ for
a 2x2 foot piece of 1/4 inch pure alume. That seemed ridiculous. Copper
would be better and cheaper.
Steel Molds for Casting Rotors?
I had never heard of using a steel mold for casting
copper. always heard "sand casting" or "plaster & silica". So I
assumed that one couldn't use steel because the copper would bond to it
and the part wouldn't come out. or something. (It seems it might be
dangerous. I'm not sure why.)
But in further looking up the subject of casting copper, I
found a video titled Melting Copper Casting Copper Coins with
Homemade Steel Mold by channel bigstackD casting. He said
himself it was an experiment and he didn't know how it would turn out.
He poured maybe 1/4 inch thick, 2-1/2 inch diameter "coins" in an
open
top cylinder he had turned on a lathe.
Contrary to my initial expectation (and perhaps his), when
the piece had solidified he dumped it right out! He cast seven coins in
succession from the 1+ Kg of copper in his crucible. They weren't
perfect: the copper "balled up" in the middle some and left the edges
thinner and uneven, but not as badly as I thought they would be.
The
tops were rippley and the bottoms had some grooves and voids - but were
essentially flat. They looked quite good enough for me.
MAGNIFICENT!
That revolutionizes the whole picture. A disk rotor is
just a bigger coin. I need to find a brake drum the right size and turn
it smooth on somebody's larger lathe then mine. Then I'll turn whatever
little piece(s) it needs to fill in the center about how I want it
before machining it exactly. I'll still need more than 1Kg of copper,
hopefully in a single melt & pour. (Refuse station's open tomorrow!)
Wait... 1.086 Kg made 7 coins of 2.5 inch
diameter... 1/7 * 1.086 Kg = 155 g for each coin
Area = π * D^2
So a 10.5 inch diameter rotor the same thickness would need:
(10.5^2 / 2.5^2) * 155 g = 2734 g.
If I just cast the ring to spin in the vicinity of the
magnets, to
bolt to the alume disk behind, then the center 5.5 inches could be void.
(5.5^2 / 2.5^2) * 155 g = 750.2 g less. 2734 - 750.2 = 1983.8 g.
Hmm... that's down to 2 Kg. Not triple but still almost double what the
crucible for the electric furnace holds.
[15th] There were hardly any brake drums. Hundreds of brake disks. I
guess it's all "four wheel disk brakes" on all the newer cars. But
Steve who sold me the scrap copper also had a stainless steel pot just
the right size!
At this point I decided to practice casting some smaller
bits of copper first, and I chose to do heatsink parts for a Peltier
module camping cooler. This turned into quite a project in itself
(next article below), but I learned a few things about casting copper.
One important
one was that if I cast something in the stainless steel pot, I could
probably do it in 2 or 3 castings, because (unlike alume) newly poured
pieces seemed to bond to the already solid ones to make a single solid
object.
[17th] I had a thought for casting the rotor. Making it a copper ring
(to bolt to the alume rotor) would reduce the amount of copper from 3Kg
to 2Kg. The crucible holds 1Kg of copper bits, but they will liquify
and then maybe another 200 grams can be added, so 1200 grams. That
allows for the "extra" needed for casting 1 Kg. Then it could be cast
as two 1/2 rings, each pour needing only about 1000 grams. These could
be silver soldered together. This may be the most practical and safest
way. (No funny stuff like melting 2.5 to 3+ Kg of copper in the bottom
of a propane cylinder "crucible" of uncertain reliability in the
mini-kiln, and having to make tools to hold and pour from that.)
Hmm, hmm... maybe an inside ring and an outside ring? Then
they would be solid complete rings. Maybe this is all getting silly.
Anyway, I didn't do it.
Just before the end of the month I figured I was about
ready to cast a copper disk or ring for the torque converter. Then I
decided
that the thin metal pot wasn't like the heavy steel mold the guy used
for the 'coins'. It would doubtless warp badly with the heat from the
molten copper. So in the absence of some heavy steel mold for the big
rotor it looked like I would have to do a sand mold after all. And
apparently it's safer. Any explosive gasses or steam can escape through
the pores in the sand.
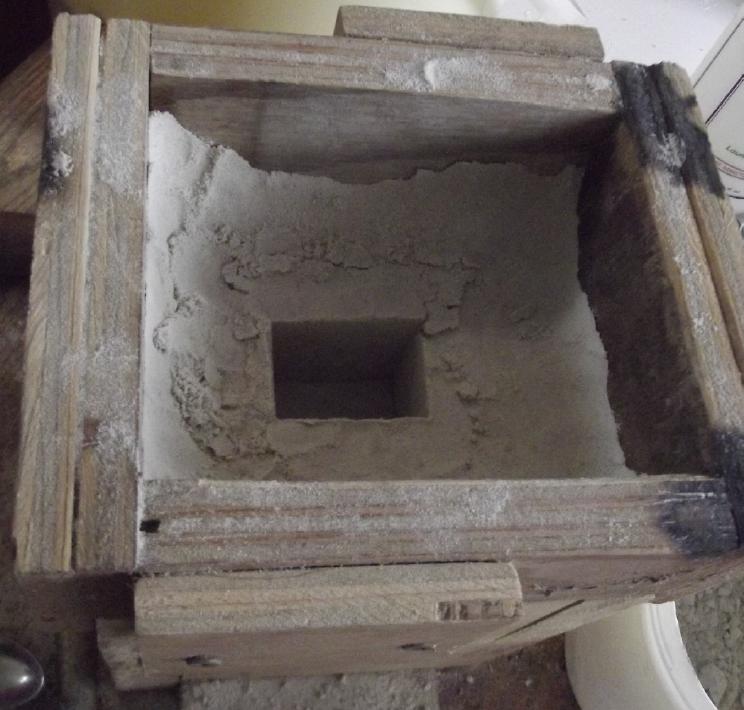
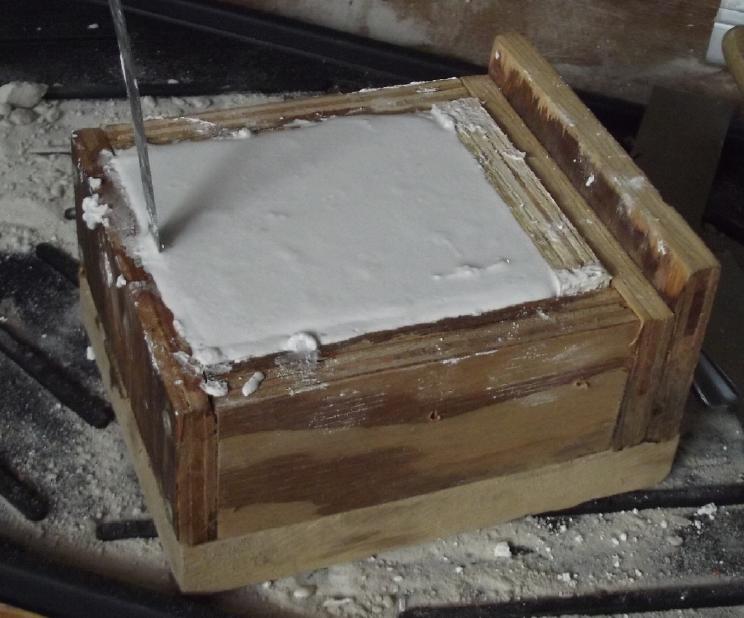
[27th] I made a shallow
plywood box 16 inches square, put in some sand,
sprinkled on some talcum powder and put a 10 inch diameter, 5/16 inch
thick "Electric Hubcap" rotor into it. I didn't have anything 10.5
inches. Hopefully the electromagnetic coupling will be about right. I
built up the edges and pressed them down. To get them to stay
relatively intact as I drew out the disk, I had to "cut" around the
edges with an xacto knife and brush the sand away. Without that, some
outer edges crumbled and the whole center "island" came right out with
the rotor. (And I had hoped to cast heatsinks with closely spaced fins?
Hoh! But a polished disk instead of rough wouldn't have caught the sand
on vertical edges.)
I
loaded
the crucible with 900 grams of coppers - to the
brim until I shook them in a bit - and put the furnace on at 1070°C
with a timer set for 70 minutes. After 55 I looked and it seemed well
melted. I set the box in place, donned my protective gear and put on
the fan (another ~ten minutes), then poured the copper. It only filled
about 1/4 of the mold rather than 1/3. I guess it'll be four pourings,
then! Hopefully I can aim the rest better, but you have to pour fast.
(Although, 1070° did seem to work better than 1060°.) It being
evening and not wanting to do another pour after dark, I left the box
for 30 minutes to cool and then picked it up carefully and took it into
the shop.
Later I looked at some of
the copper pieces. In the first
couple of handfuls I had checked, there was only one piece dated after
1991, when it had become zinc with a copper plating instead of 98% or
95% copper, 2% or 5% zinc. Mostly they were from the 1970s. So I had
quit checking. In the ones I now checked, there were quite a lot of
zinc ones. It won't take a lot of 99% zinc pieces to turn copper into
brass! This probably explained why the heatsink casting looked rather
brassy color instead of coppery. From now on I'll have to go through
and fish all those out. Later: But looking at an actual piece of yellow
brass, I see my castings are much more coppery with only slight shades
of yellow.
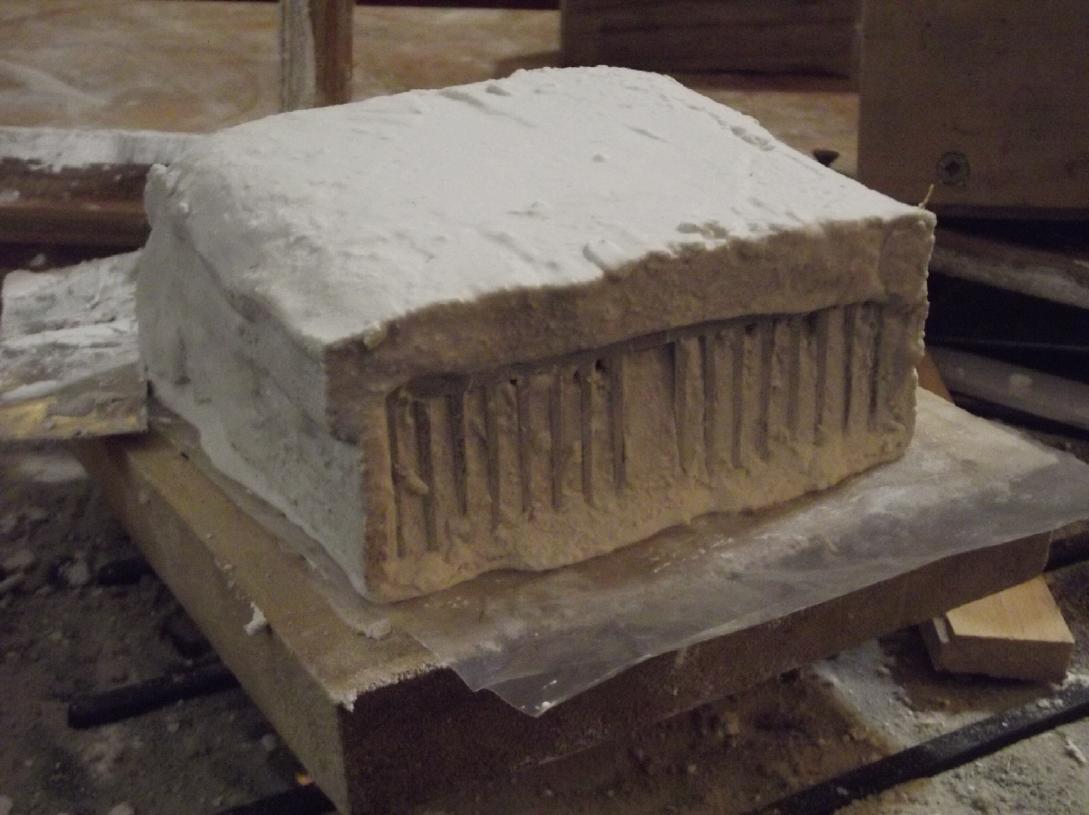
[28th] I tried to pour the next (1000g)
batch around the outer rim.
That way I figured the outer sand could crumble later without affecting
anything. Instead, with only 3 or 4 seconds to pour before it
solidifies, with my increasingly shaky hands as I get older and it
didn't
flow as far as I expected, it only contacted the outer rim in some
places, leaving multiple little gaps to fill around the edge.
Yuk! And then it was solid, so I put it back in the furnace for 10
minutes. But it was hardly liquid when I tried to pour it again. Even
messier. (I guess it had become "slag"? ...oops, no picture)
I did a third
1Kg pour, which went just as badly. I had to
put some back in the furnace again, and that poured badly. I put
the rest back for another 10, but it came out in a soft but solid blob
even right away. (It looked like a little "ladle".) Now it has lumpy
copper everywhere and lots of tiny gaps to fill - all within 3 or 4
seconds of pulling out the crucible??? I'm tempted to just start over,
but it might be little better and just more work.
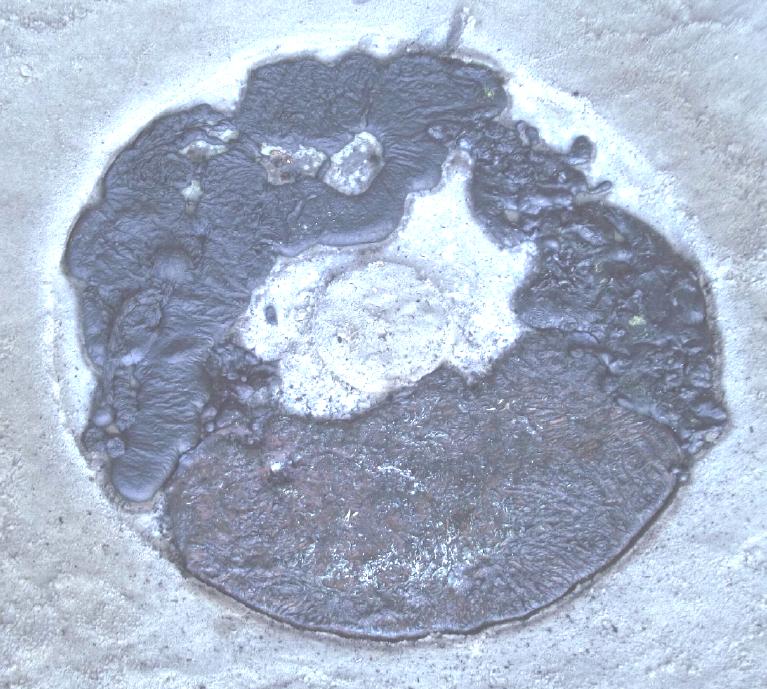
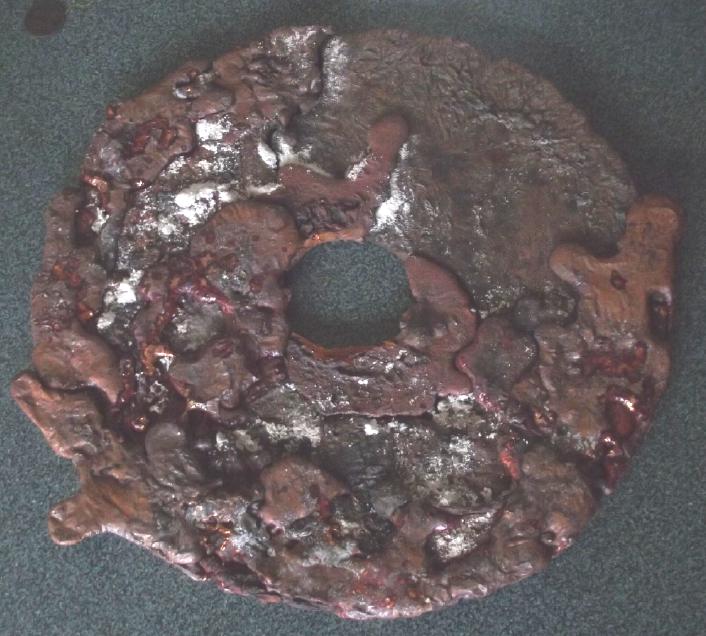
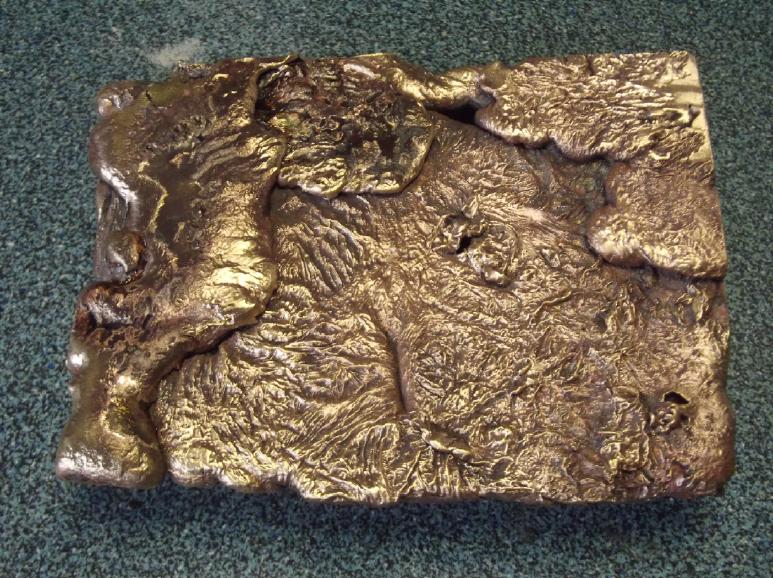
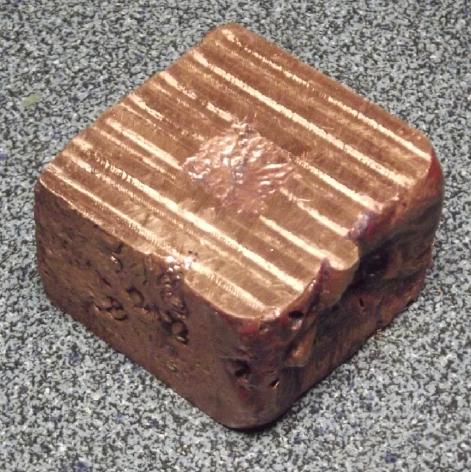
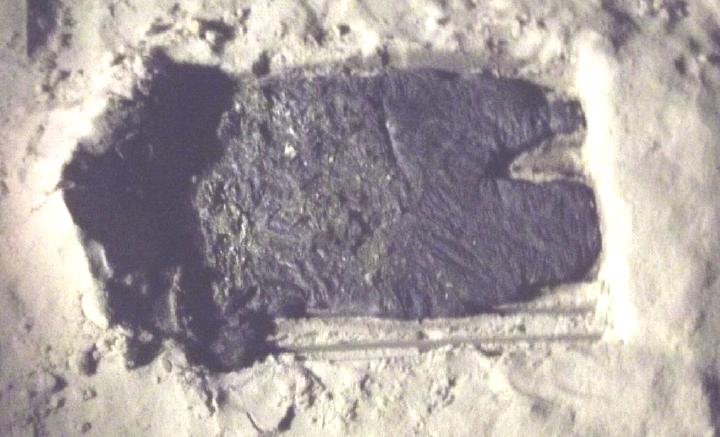
Ugly disk after 5 castings
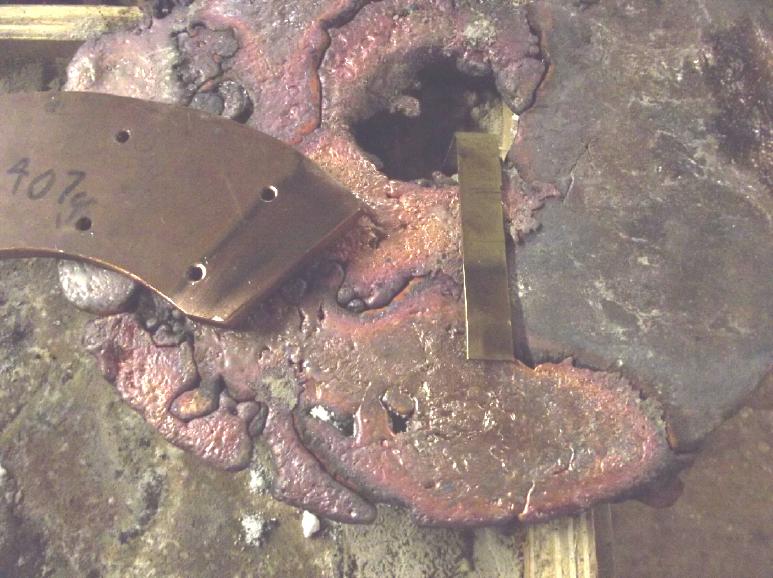 Bottom of Rotor with Various
colors.
Bottom of Rotor with Various
colors.
With a chunk of "copper" (probably has a little zinc in it)
and a piece of actual yellow brass.
I now have the theory that the smoky (?)flame I see when I
open the hot furnace is the zinc boiling and maybe burning off. The
boiling point of zinc (907°C) is lower than the melting point
of copper (1086°). When the zinc is reduced or gone, the melting
point of the copper goes up and 1070° isn't hot enough to melt it
any more. So by leaving it in longer, maybe I'm not ensuring that it's
hot enough but instead causing it to need to be hotter. If I use the
original pieces (and don't leave it in too long), 1070° is good,
but to remelt any, it is surely purer copper and it looks like it has
to be about at the furnace's design maximum, 1100°. At least,
that's my theory.
The things nobody told you when they said "brass is an
alloy of copper and zinc"! That sounded quite simple. Ah...
Wikipedia... The melting point of brass (which is often Cu:Zn 66%:34%)
is between 900 and 940°C. Brass that is more than 15% zinc used in
wet places has to have other things in it (lead, tin...) to prevent the
zinc from leaching out and leaving porous copper.
More than I wanted to know. But I was told pure copper was
hard to cast ("could turn to jelly" - as seemed to) and that I should
add a
little zinc to it. And the pieces came with 2%/5% zinc anyway. All very
tricky, sigh!
Other "Green" & Electric Equipment Projects
Peltier Module Cooler: Copper Heat Transfer Parts
To do the rotor for the
magnetic torque converter, I had decided to cast a copper disk or ring
for maximum electromagnetic interaction with the hallbach configured
magnet disk. First I was going to experiment with casting some smaller
things. What better to cast than the heat transfer block and heatsinks
for a peltier cooler? I had recently measured a table of figures for
the cooling of the Coleman peltier cooler with the alume alloy
heatsinks [TE News #174],
and
I
have
been
saying
it
would get colder with pure alume -- or even
better, copper. Copper is about 2.4 times as conductive (both heat and
electricity) as alume alloy.
 [16th] Simplest first: the
little cube from the camping cooler. Kamile
told me the copper would shrink 5-6% as it cooled. It needed to be full
size so I couldn't just use the original alume block as a form. (The
peltier module couldn't stick out over the edges (x, y) and it had to
make it though the side of the cooler (z). So I had made a slightly
larger one from wood a few days ago. I mixed the "green" sand (90% fine
white sand, 10% bentonite clay, a TEENY bit of water in a few
mistings). I put the block in the bottom of the mold sticking out a
quarter inch, and tamped in the sand. I worked it out to make sure I
could. One wall of the sand broke, so I did it again, successfully.
When I went to do the top, the clay didn't part cleanly where the flour
was supposed to keep it from sticking. After about 3 tries I gave up
and decided to just pour copper into an open cube pit and the top
wouldn't be square and even. I put the drag back on top anyway and
built up some sand around the edges so any excess copper wouldn't hit
the wood and catch it on fire.
[16th] Simplest first: the
little cube from the camping cooler. Kamile
told me the copper would shrink 5-6% as it cooled. It needed to be full
size so I couldn't just use the original alume block as a form. (The
peltier module couldn't stick out over the edges (x, y) and it had to
make it though the side of the cooler (z). So I had made a slightly
larger one from wood a few days ago. I mixed the "green" sand (90% fine
white sand, 10% bentonite clay, a TEENY bit of water in a few
mistings). I put the block in the bottom of the mold sticking out a
quarter inch, and tamped in the sand. I worked it out to make sure I
could. One wall of the sand broke, so I did it again, successfully.
When I went to do the top, the clay didn't part cleanly where the flour
was supposed to keep it from sticking. After about 3 tries I gave up
and decided to just pour copper into an open cube pit and the top
wouldn't be square and even. I put the drag back on top anyway and
built up some sand around the edges so any excess copper wouldn't hit
the wood and catch it on fire.
The temperature crept up
slowly after 1050°C.
Wikipedia said copper melted at 1084.68° so I was waiting, but I
opened the top at about 1070° (and 60 minutes since I turned it on)
and the 540 grams was already fully melted. I guess that 2% zinc lowers
the melting point noticeably. I hope it doesn't affect the thermal
conductivity very much.
Suddenly I was
in a rush! safety glasses, coveralls,
leather boots, welding helment (non-darkened - just face & head
protection), vent fan ON (the fumes are toxic warned Kamile and
others), and (...came with the furnace: leather gloves, tongs for the
crucible), position the mold on the steel plate on the concrete next to
the furnace. I dumped in a teaspoon of borax, closed the lid again and
grabbed the tongs. By this time it was already up to 1098°, which
was probably a bit hotter than it should be. (Next time I'll set the
furnace to 1060° instead of 1100°.) I opened the top, grasped
the crucible with the tongs, and carefully but rapidly poured the
copper into the hole. It seemed to just barely fill it (glad I added an
"extra" 90 grams of copper), then a solidified chunk of (?)slag,
instead of pouring, just fell out and landed next to the piece on the
mold. (the extra 90 grams?) I think the crucible is empty now! ...still
holding it in the tongs... I figured the best thing to do with it was
stick it back in the furnace and let it cool slowly.
The copper piece was probably solid quickly. Over some
minutes it went from yellow to orange to dull red to black. It appeared
successful. Rather than work with the hot stuff I decided to just let
it sit until it was much cooler.
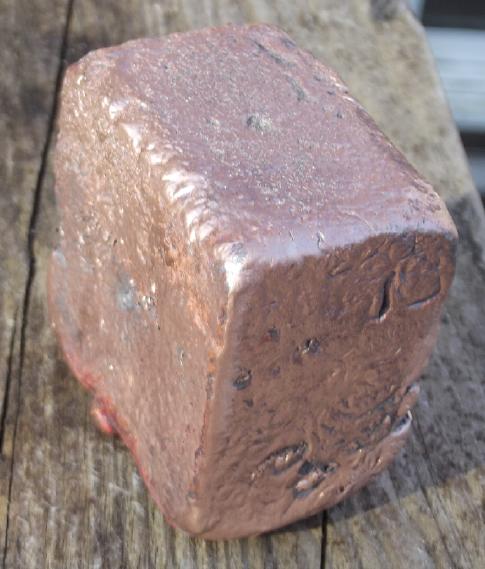
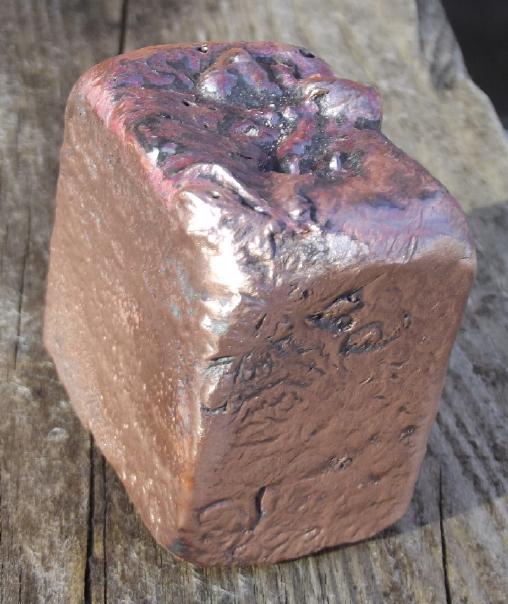
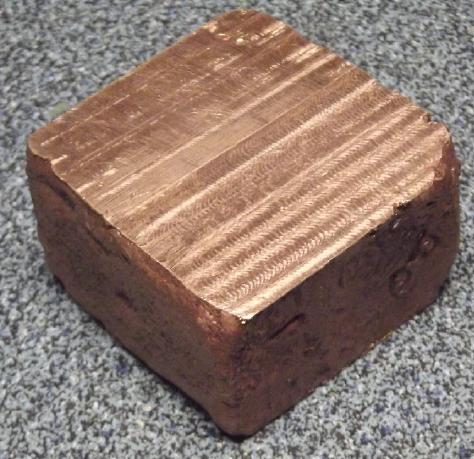
 The copper heat transfer block,
as cast and
after milling the heat contact faces flat.
The copper heat transfer block,
as cast and
after milling the heat contact faces flat.
The whole 40x40mm Peltier module has to touch on the one side,
but a dip in the middle of the heatsink contact wasn't important on the
other,
so I didn't mill it any thinner.
After a couple of hours the piece was just warm. I dug it
out of the sand and used the wire brush on the bench grinder to brush
off the black oxide. 489 grams. The two faces that have to be flat
shrank in in the middle, concave. Oops, I was expecting shrinkage, but
EVEN shrinkage. One face has to be perfectly flat and smooth for the
peltier module. The other needs to contact the inner heatsink over a
considerable area, but it doesn't have to be 100%. I can work with it,
but the peltier side is going to need and awful lot of
grinding/filing/sanding/polishing. Wait! I should mill the faces flat
with the milling machine! Is it working? 'Click!' Nothing. Didn't last
time I tried it, either. Maybe I need to bring it into the house where
it's warm for a week? 50-50 that'll work. Fickle machine!
[17th] For some reason I went out to the shop at 10 PM and tried the
milling machine. It decided it would run. Maybe because I had unplugged
it yesterday, but I've tried leaving it plugged in or out before and
there seems to be no rhyme nor reason. In spite of the lateness I
couldn't pass up the opportunity and I spent 2 hours flattening the
ends of the copper block with a 4 flute end mill. I had to go pretty
deep on one face because of the dished-in middles. But I made it flat,
and in spite of the rounded corners it was just big enough to fit the
peltier module across the flat face.
The other face I allowed the dip in the middle to remain.
It had to contact with a metal heatsink and it wasn't vital that the
entire flat faces touch, only the majority. It would still be 99% as
effective.
It ended up 2mm thinner than the original after the
machining - 4mm thinner than the wooden block that made the mold. Those
dishes in the middle were the killer. But I think it'll work okay.
(Later: I will be adding a 7mm thick copper plate under the other
heatsink. I may actually have to make it still thinner to compensate.)
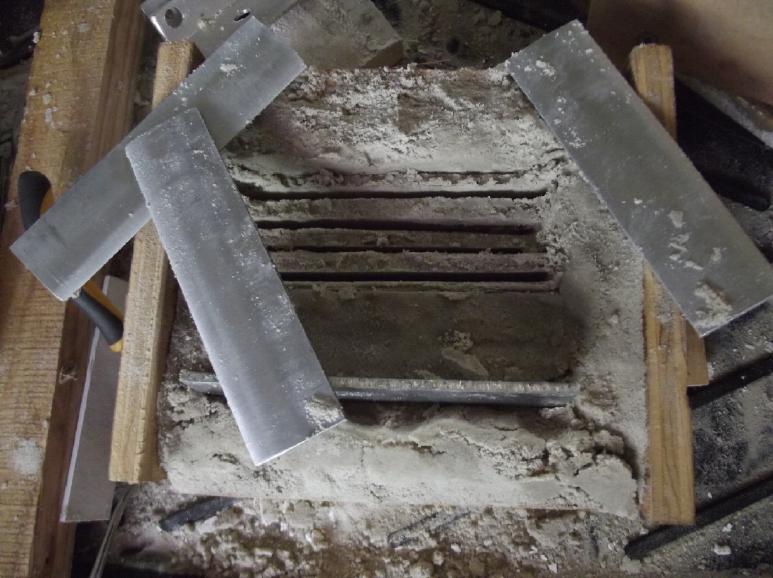
[18th] Trying to cast the heatsinks turned out to be a totally
different proposition. The fins are too tall, too straight and too
close together, and much of the sand loosens and even pulls out with
them when I try to remove them, instead of staying packed in place.
regardless of orientation. If the alume was polished instead of rough
it should help, but probably not enough. Should I just forget the
camping cooler "practice pieces" and get on with the ring for the
torque converter? Then it occurred to me I could push individual "fin"
strips of something slippery into the sand and work/pluck them out
carefully one at a time. That should leave the requisite fin stripes in
the sand. I could also make them somewhat thinner, since copper
conducts heat better than alume but is quite heavy. (And I could, in a
rough way, make any heatsink shape I liked.)
[20th] I cut some pieces of nickel-brass to insert to make fin slits.
Each one disturbed the one next to it, and the sand tended to come
right out with the piece, even without another fin coming out and the
sand being between two. I decided I could probably make heatsinks if
the fins were twice as far apart as the one I was trying to copy.
 There was one
other chance. Instead of sand, one can mix
casting plaster and silica, about 50-50, to make a high temperature
mold "for brass or glass". or copper I presume. Unlike sand with a bit
of clay, this sets solid. There was a chance I could do a mold, let it
set, and pull the old heatsink out by the end without wrecking it. I
tried to make the mold as small as possible and managed to pour it with
the heatsink at one end of the box without quite using all of it. My
level of confidence was not high.
There was one
other chance. Instead of sand, one can mix
casting plaster and silica, about 50-50, to make a high temperature
mold "for brass or glass". or copper I presume. Unlike sand with a bit
of clay, this sets solid. There was a chance I could do a mold, let it
set, and pull the old heatsink out by the end without wrecking it. I
tried to make the mold as small as possible and managed to pour it with
the heatsink at one end of the box without quite using all of it. My
level of confidence was not high.
 [21st] The plaster was
still limp and wet. I managed to remove it from
the wooden box (pasting some pieces back in as I went) so it would have
air around it to dry faster. It was still like that and not dry in the
evening. (I could have put it by the woodstove, I suppose.) My
confidence for pulling the heatsink out without shattering the mold is
very low. (Sure enough, it broke and the strips between the fins had to
be scraped out into powder.)
[21st] The plaster was
still limp and wet. I managed to remove it from
the wooden box (pasting some pieces back in as I went) so it would have
air around it to dry faster. It was still like that and not dry in the
evening. (I could have put it by the woodstove, I suppose.) My
confidence for pulling the heatsink out without shattering the mold is
very low. (Sure enough, it broke and the strips between the fins had to
be scraped out into powder.)
[23rd] I went back to the
idea of poking single heatsink fins into
sand. But the sand was breaking up. Instead of putting in thin pieces
of metal and moving them back and forth to make a wedge shape, which
seemed to break up the sand, I cut cut thicker alume pieces (about .1")
and sanded them into wedge shapes, then polished them smooth. They
weren't perfect wedges, rather convex curves. But they seemed to work.
Sinking them into the sand in the box seemed much more promising: push
them in - all ten of them in lines - and tamp down the sand between
them. Then wiggle them a bit to loosen them, and then pull them
straight out of the sand one by one with small pliers. The trenches in
the sand looked like they should be workable if carefully doctored up,
brushing off the loose sand and evening them out with a (?) spatula.
 But
the
box seemed too small, so I made a larger area one
from some bits of plywood. I wasn't sure the heavy copper would pour
into the grooves and I wanted it to flow in from one side rather than
pouring it straight on top. better still would be to have an enclosed
"cope and drag" mold with the space on end, with a "regular" sort of
pour hole leading near the bottom and air vents. If I could manage to
set it up, with those fragile slots. I decided that would be beyond my
skill.
But
the
box seemed too small, so I made a larger area one
from some bits of plywood. I wasn't sure the heavy copper would pour
into the grooves and I wanted it to flow in from one side rather than
pouring it straight on top. better still would be to have an enclosed
"cope and drag" mold with the space on end, with a "regular" sort of
pour hole leading near the bottom and air vents. If I could manage to
set it up, with those fragile slots. I decided that would be beyond my
skill.
I did up the mold, on the flat with the base up and the
fins sticking into the sand.
 Then I took it
out and started the
furnace. IIRC I had put in 900 grams of copper and the flask was almost
full. By 40 minutes when I opened the lid "lazy" flames and smoke were
coming out, but I could still see the copper pieces. In 50 minutes
still smoke & flame (I don't remember that from the first time) but
the copper was shrunk into the crucible. In 60 minutes still a bit of
flame & smoke, but the copper seemed to have melted. I couldn't see
it inside somewhere down in the bottom. Had it all burned up? I had
donned protective gear and I poured it into the mold. As I had
surmised, there wasn't enough. A good portion of the base didn't fill,
and who knew about the fins.
Then I took it
out and started the
furnace. IIRC I had put in 900 grams of copper and the flask was almost
full. By 40 minutes when I opened the lid "lazy" flames and smoke were
coming out, but I could still see the copper pieces. In 50 minutes
still smoke & flame (I don't remember that from the first time) but
the copper was shrunk into the crucible. In 60 minutes still a bit of
flame & smoke, but the copper seemed to have melted. I couldn't see
it inside somewhere down in the bottom. Had it all burned up? I had
donned protective gear and I poured it into the mold. As I had
surmised, there wasn't enough. A good portion of the base didn't fill,
and who knew about the fins.
I guess this will be the test to see if a second pour will
adhere to the first (unlike alume) to finish the casting. If it works
I'll know I can cast the torque converter rotor in 3 or 4 pours rather
than trying to melt a larger "bottom of a propane tank" flask in the
mini-kiln. That will be good info. I'd rather deal with small
quantities of dangerously white hot melted copper anyway, even needing
multiple sessions, rather than try to lift and pour a heavy pot of it
while holding it at arms length with my shaking hands.
 [24th] The next pour didn't
go very well. I only used 500 grams of
copper so I shortened the time by 10 minutes. I don't think it was hot
enough. It seemed to solidify almost as I poured it, and I put it back
in the furnace for a few minutes. But it was little better and a last
big chunk poured out on top as a glowing solid piece.
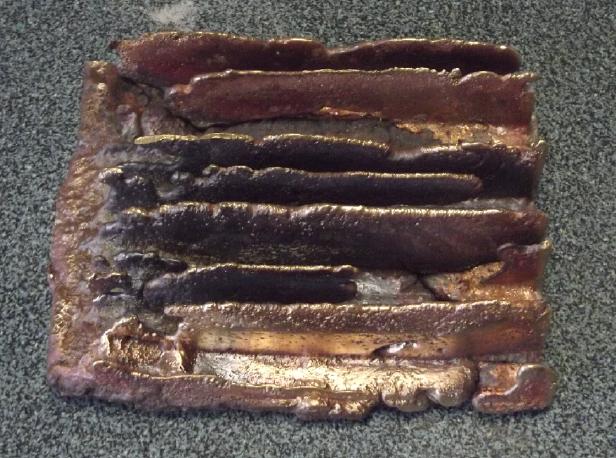
[24th] The next pour didn't
go very well. I only used 500 grams of
copper so I shortened the time by 10 minutes. I don't think it was hot
enough. It seemed to solidify almost as I poured it, and I put it back
in the furnace for a few minutes. But it was little better and a last
big chunk poured out on top as a glowing solid piece.
Even after
cutting some bits off with the angle grinder and wire brushing it off,
it was pretty ugly. Heavy liquid copper had pushed some grooves open
wider, which closed off other grooves. I decided it wasn't
usable. Also for some reason it had something of a brassy color instead
of coppery, which doesn't bode well for high thermal
conductivity.
But in spite of all that, the multiple pours seemed to
hold together fairly well. It wasn't going to break apart at the seams.
It would be better if I could pick up and wire brush off the
first piece(s) nice and clean before casting the next one(s) - I
couldn't in this sand mold because I would surely break it up.
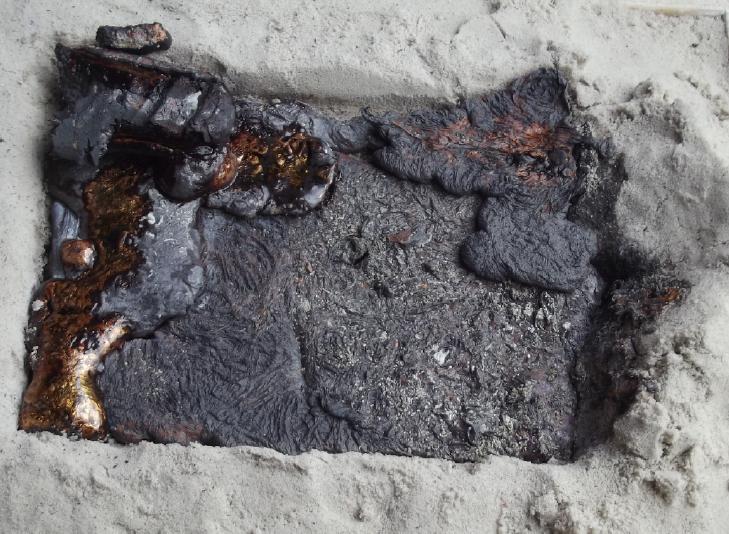
The bottom. It would take a lot
of milling to
flatten this!
(Looks as much like brass as copper!)
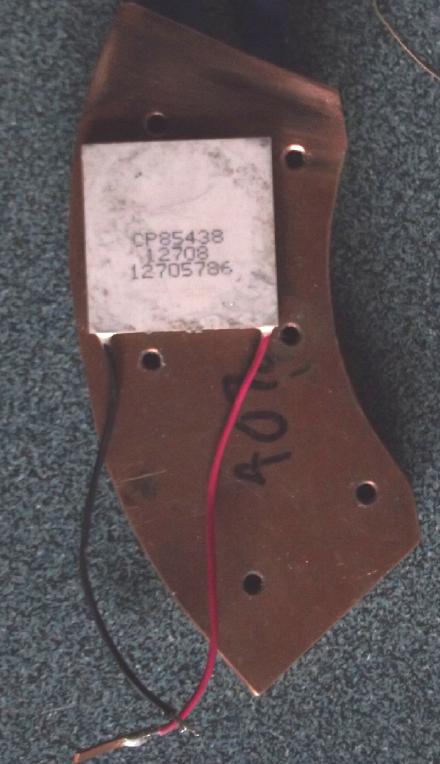
[26th] my plan now for the heatsinks is with the original alume ones,
but copper Peltier module contacts: The copper block is a good
contact for the cold side. Having learned how to
solder to alume, I'll solder the other face of the copper block to the
cold side alume heatsink. The heat transfer should be excellent.
For the hot side, I'll cast a copper plate about 6 by 6 cm
and solder it to the underside of the hot side heatsink. (If I had a
piece of copper plate about 4mm thick I could just use that. Fat chance
finding any around here!) The 4 by 4 cm peltier module will conduct its
heat into the copper which will spread it out, so instead of a 16 sq.cm
peltier connect to the alume, it will be the 36 sq.cm. of the copper.
That should at least pull a lot more heat away from the immediate
vicinity of the module.
Or so is the plan with simplified casting, at the end of
the month. If the heatsink still fits with a (4mm?) copper plate under
it. (Ah, there's a hole larger than 6x6cm through the cooler wall under
it - it will fit!)
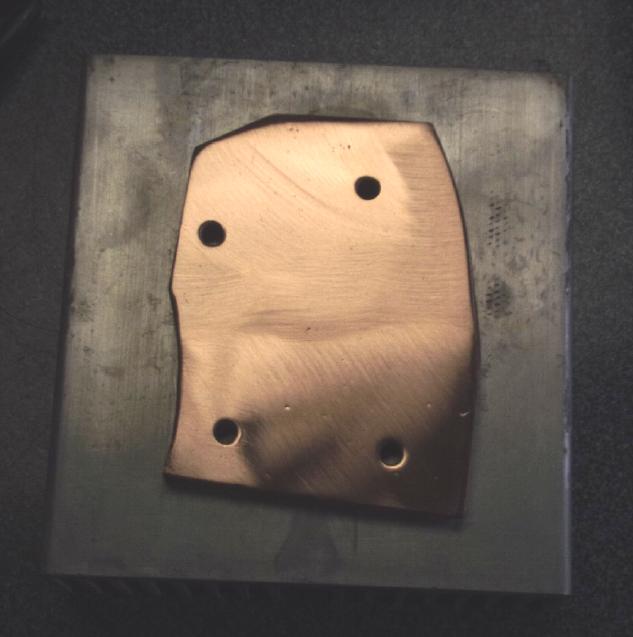
Finally I
decided to use a piece of 1/4 inch (7mm) copper plate that I had
instead of casting. It wasn't quite the square size, shape and
thickness I wanted, but I saw the Peltier would fit between some
annoying existing holes and it could be cut down to fit in.
Cu cut to fit in the cooler
space, here as I
intend to solder them together.
(4 useless holes in the copper.) Two new bolt holes need to be drilled
& tapped.
Long 1/4 inch nylon bolts clamp the entire Peltier assembly together.
Electricity
Storage
New Chemistry Batteries
I had a NiMn2O4 - Zn cell
almost ready to go near the end of March.
Instead of finishing it the next day, I got onto cutting trees
for firewood (before too much sap was flowing) and other things, and it
sat for 2 weeks.
[13th] I managed to get out a 'glue brush' for the epoxy. Then,
sidetracked again!
[19th] Epoxied the cell shut.
I decided to put a little sodium dodecylbenzenesulfonate
into the electrolyte as a "gelled" electrolyte. But I didn't get to it.
Finally I decided not to work on it this month, with too
many things to do. Once it's running, I'm repeatedly spending an hour
or two running tests. The better it works, the more the tests, the less
time for other things. Apologies to anyone waiting.
Electricity
Generation
My Solar Power System
I think maybe I like "photo panes" as a (somewhat) short
form for "solar panels", or "panes" for "panels". That would be
somewhat unambiguous as people usually speak of "windows" rather than
"window panes". And they are, mostly, a pane of glass.
The Usual Daily/Monthly/Yearly Log of Solar
Power Generated [and grid power consumed]
(All times are in PST: clock 48 minutes ahead of local sun time, not
PDT which
is an hour and 48 minutes ahead. (DC) battery system power output
readings are reset to zero
daily (often just for LED lights, occasionally used with other loads:
Chevy Sprint electric car, inverters in power outages or other 36V
loads), while the
grid tied readings are cumulative.)
Daily Figures
Notes: House Main
meter (6 digits) accumulates. DC meter now
accumulates until [before] it loses precision (9.999 WH => 0010
KWH), then is
reset. House East and Cabin meters (4
digits) are reset to 0 when they get near 99.99 (which goes to "100.0")
- owing to loss of second decimal precision.
Km = Nissan Leaf electric car drove distance, then car was charged.
New Order of Daily Solar Readings (Beginning May 2022):
Date House, House, House, Cabin => Total KWH Solar [Notable
power
Uses; Grid power meter@time] Sky/weather
Main
DC East Cabin
March
31st 4442.07, 2.47, 4.11, 31.78 => 16.01 [90Km; 6726@19:00]
April
01st 4448.62, 2.54, 8.64, 35.60 => 14.97 [55Km;
6758@19:30] Frost overnight, decent - calm*, then snow, sun, snow,
drizzle.
* Put up/replaced 3rd solar pane
on
carport roof on
this morning opportunity.
02d 4457.97, 2.62, 15.92, 41.57
=> 22.68 [6784@19:30] Sunny but cold. (High 6.5°?)
03rd 4464.26, 2.70, 20.83, 45.45 => 15.16 [6813@19:00]
04th 4467.39, 2.78, 22.26, 47.03 => 6.22 [25Km;
6848@19:00]
05th 4470.00, 2.85, 23.39, 48.36 => 5.14 [60Km;
6874@19:00] Cold, drizzle, strong wind, big waves & misery. Not
working outside.
06th 4473.05, 2.93, 24.82, 50.02 => 6.22 [65Km;
6906@19:30] Drizzle. Wind finally calmed by evening.
07th 4479.48, 2.99, 29.40, 54.06 => 15.11 [90Km; 6931@19:30]
Worthless bitcoin miner/travel trailer heater OFF, maybe for the
summer? (not that it's
anything like warm out!)
08th 4483.25, 3.07, 31.42, 56.16 => 7.97 [6947@19:30]
More wind, clouds & such crap
09th 4489.78, 3.15, 36.28, 60.16 => 15.47 [10Km; 6966@20:00]
10th 4495.51, 3.22, 40.13, 63.67 => 13.16 [6977@19:30] +7° seems
balmy.
11th 4503.07, 3.34, 46.31, 68.55 => 18.74 [55 Km; 7002@19:30; 55Km]
Driving at night - ug! Counted 5 deer on hwy. shoulders.
12th 4507.68, 3.42, 49.04, 71.12 => 9.99 [20Km; 7032@19:30]
13th 4513.45, 3.53, 52.43, 74.86 => 13.01 [7045@19:39] rain.
14th 4515.95, 3.64, 54.02, 76.11 => 5.45 [90Km; 7077@21:00]
15th 4523.30, 3.72, 59.11, 80.59 => 17.00 [60Km; 7094@19:30]
16th 4529.39, 3.79, 63.42, 84.44 => 14.32 [7109@20:00]
17th 4537.74, 3.89, 69.52, 89.07 => 19.18 [7133@20:00]
18th 4546.35, 4.02, 76.09, 95.33 => 21.67 [55Km; 7148(?)@20:00]
19th 4553.74, 4.11, 82.44, 5.32 => 19.15 [7166@20:00]
20th 4558.80, 4.15, 86.15, 8.74 => 12.25 [7187@20:00]
21st 4564.82, 4.30, 89.90, 12.24 => 13.42 [55Km; 7209@20:00]
22d 4569.02, 4.43, 92.16, 14.61 => 8.96 [105Km;
7234@20:00]
23rd 4574.56, 4.51, 95.37, 17.73 => 11.95 [35Km; 7259@19:30]
24th 4579.97, 4.65, 3.61, 21.18 => 12.61 [7277@20:00] Lotsa
dull days!
25th 4584.97, 4.72, 6.58, 23.98 => 10.84 [55Km; 7302@20:00]
somewhat dull, then overcast, rain and wind. Still around 7 or 8°.
26th 4593.63, 4.80. 13.14, 29.79 => 21.11 [50Km; 7322@20:30] Nice
day! Hit 10° (first time this year I think) Wow!
27th 4596.48, 4.92, 14.70, 31.26 => 6.00 [7345@19:30] Less
nice. 8°.
28th 4606.22, 5.04, 21.92, 37.56 => 23.38 [7358@20:00] More nice
except for an awful lot of jet trails.
29th 4612.99, 5.11, 26.39, 41.55 => 15.30 [100Km; 7388@20:30] Hit
12°!
30th 4618.64, 5.18, 29.95, 44.79 => 12.52 [7402@19:30]
May
1st 4629.70, 5.26, 38.49, 52.53 => 27.41 [7412@20:00] Real Sunshine!
(Some jet trails)
2d 4640.40, 5.33, 46.19, 59.59 => 25.53 [55Km; 7429@19:30;
50Km] Hit about 13°, similar to yesterday
3rd 4650.31, 5.40, 54.07, 66.20 => 24.47 [7447@20:30] Nice again.
More jet trails
Chart of daily KWH from solar panels.
(Compare APRIL 2023
(left) with March 2023 & with April 2022 - but note number of
solar panels.)
Days of
__ KWH
|
April 2023
(18 solars - rep-
aired last carport
pane Apr. 1st)
|
March 2023 (15
then 17 solar
panels after
repairs - 22nd)
|
April 2022
(15 s. panels)
|
0.xx
|
|
|
|
1.xx
|
|
3
|
|
2.xx
|
|
1
|
1
|
3.xx
|
|
|
1
|
4.xx
|
|
2
|
1
|
5.xx
|
2
|
2
|
|
6.xx
|
3
|
4
|
1
|
7.xx
|
1
|
|
1
|
8.xx
|
1
|
2
|
|
9.xx
|
1
|
4
|
3
|
10.xx
|
1
|
1
|
2
|
11.xx
|
1
|
4
|
|
12.xx
|
3
|
1
|
3
|
13.xx
|
3
|
2
|
1
|
14.xx
|
2
|
1
|
3
|
15.xx
|
4
|
|
|
16.xx
|
|
1
|
3
|
17.xx
|
1
|
|
1
|
18.xx
|
1
|
|
2
|
19.xx
|
1
|
|
5
|
20.xx
|
|
3
|
1
|
21.xx
|
2
|
|
|
22.xx
|
1
|
|
|
23.xx
|
1
|
|
|
Total KWH
for month
|
408.83
|
298.14
|
404.17 (was
a new record)
|
Km Driven
on Electricity
|
1038.7 Km
(160 KWH?)
(ODO: 94576)
|
954.9 Km
(~140 KWH?) |
1054.8
(~170 KWH?)
|
Things Noted - April 2023
* There were definitely not as many sunny days this April as last year.
So notwithsanding having 3 more PV panes at a good angle in the
sunniest place, collection was only similar.
Monthly Summaries: Solar Generated KWH [& Power used from
grid KWH]
As these tables are getting long, I'm not repeating the log of monthly
reports. The reports for the first four full years (March 2019 to
February 2023) may be found in TE
News #177, February 2023.
2023 - (House roof, lawn + DC + Cabin + Carport, Pole) Solar
Jan KWH: 40.57 + 3.06 + 28.31 + 21.85 = 93.79 Solar [grid: 1163; car
(rough est): 130]
Feb KWH: 59.19 + 2.70 + 38.10 + 32.47 = 132.46 Solar [grid: 1079; car:
110]
Four years of solar!
Mar KWH: 149.49 + 2.72 + 53.85 + 92.08 = 298.14 Solar [grid: 981; car:
140]
Apr KWH: 176.57 + 2.71 + 121.21 +108.34 = 408.83 [grid: 676; car: 160]
Annual Totals
1. March 2019-Feb. 2020: 2196.15 KWH Solar [used 7927 KWH
from grid]
2. March 2020-Feb. 2021: 2069.82 KWH Solar [used 11294 KWH from grid]
(More electric heat - BR, Trailer & Perry's RV)
3. March 2021-Feb. 2022: 2063.05 KWH Solar [used 10977 KWH from grid]
4a. March 2022-August 2022: in (the best) 6 months, about 2725 KWH
solar - more than in any previous entire year!
4. March2022-Feb. 2023: 3793.37 KWH Solar [used 12038 KWH from grid]
Money Saved or Earned - @ 12¢ [All BC residential elec.
rate] ; @
50¢ [2018 cost of diesel fuel to BC Hydro] ; @ 1$ per KWH [actual
total
cost to BC Hydro
in 2022 according to an employee]:
1. 263.42$ ; 1097.58$ ; 2196.15$
2. 248.38$ ; 1034.91$ ; 2069.82$
3. 247.57$ ; 1031.53$ ; 2063.05$
4. 455.20$ ; 1896.69$ ; 3793.37$
It can be seen that the benefit to the society as a whole
on Haida Gwaii from solar power installations is much greater than the
cost savings to the individual user of electricity, thanks to the heavy
subsidization of our power
owing to the BC government policy of having the same power rate across
the entire province regardless of the cost of production. And it can be
insurance: With some
extra equipment and a battery, sufficient solar can deliver essential
power in
electrical outages however long. (Feb 28th 2023: And it's probably well
over 1$/KWH by now the way inflation of diesel fuel and other costs is
running.)
https://www.TurquoiseEnergy.com
Haida Gwaii, BC Canada