...plus Radio Controlled "Test Model"
(was "Waterski" Boat)
 Adding feedback by
others to my conception of the "waterski" catamaran boat I wrote of
last month, the revised design concept has become a cross between my
previous Ground Effect Vehicle conception, a Hovercraft and a Catamaran
Boat.
Adding feedback by
others to my conception of the "waterski" catamaran boat I wrote of
last month, the revised design concept has become a cross between my
previous Ground Effect Vehicle conception, a Hovercraft and a Catamaran
Boat.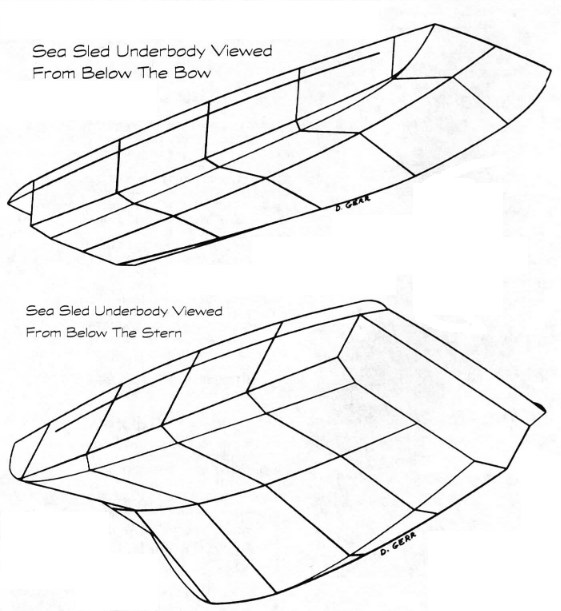 In particular, Marc's bringing to my
attention an early 1900's boat design called the "sea sled" led me to
thinking about trapping air bubbles under the craft which would reduce
friction with the water. The Sea Sled's underside was hollow at the
front and gradually became flat at the back, trapping air and achieving
higher speeds with lower power than other boats.
In particular, Marc's bringing to my
attention an early 1900's boat design called the "sea sled" led me to
thinking about trapping air bubbles under the craft which would reduce
friction with the water. The Sea Sled's underside was hollow at the
front and gradually became flat at the back, trapping air and achieving
higher speeds with lower power than other boats.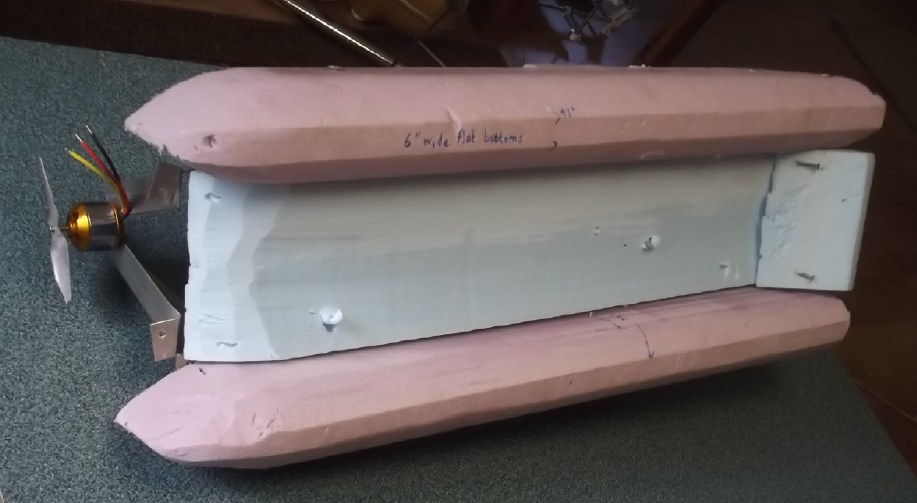
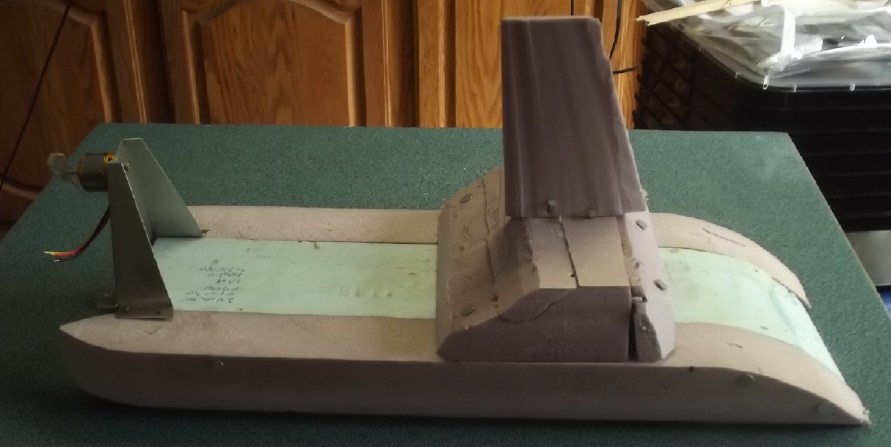
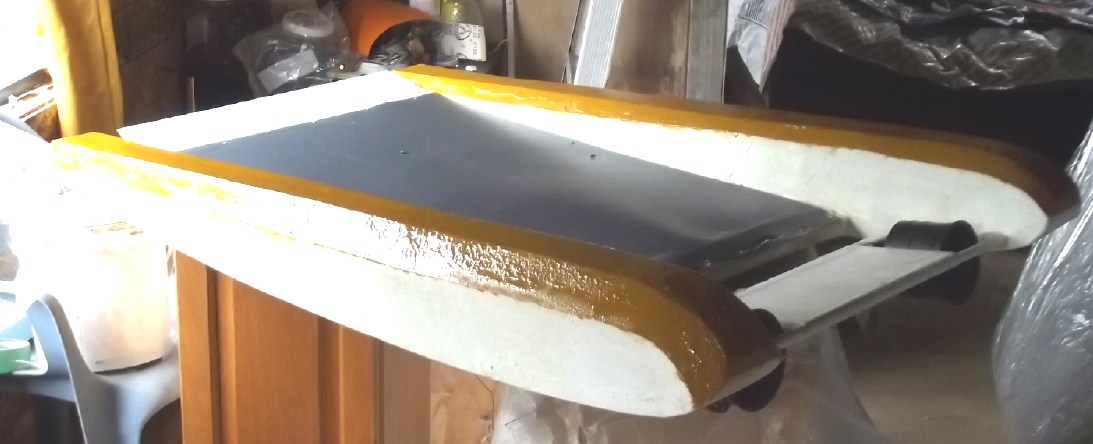 To help test some of the concepts I modified the radio controlled model
of the ground effect craft made some years back, making it rather
similar underneath. [TE News #???] The take-off "step" in each hull was
removed to provide the flat bottom, and the sides of the bottom were
trimmed off at 45 degrees to make them thinner. The rear "elevator",
which I fixed in place when the canard took over the attitude control,
was adjusted down to be even with the hull bottoms. It lifted better
that way than when it was an inch or so higher. In fact, the air from
the ducted fans lifted the rear end of the 4-1/2 Kg model off the floor
with 3 Kg of books placed on top at the rear.
To help test some of the concepts I modified the radio controlled model
of the ground effect craft made some years back, making it rather
similar underneath. [TE News #???] The take-off "step" in each hull was
removed to provide the flat bottom, and the sides of the bottom were
trimmed off at 45 degrees to make them thinner. The rear "elevator",
which I fixed in place when the canard took over the attitude control,
was adjusted down to be even with the hull bottoms. It lifted better
that way than when it was an inch or so higher. In fact, the air from
the ducted fans lifted the rear end of the 4-1/2 Kg model off the floor
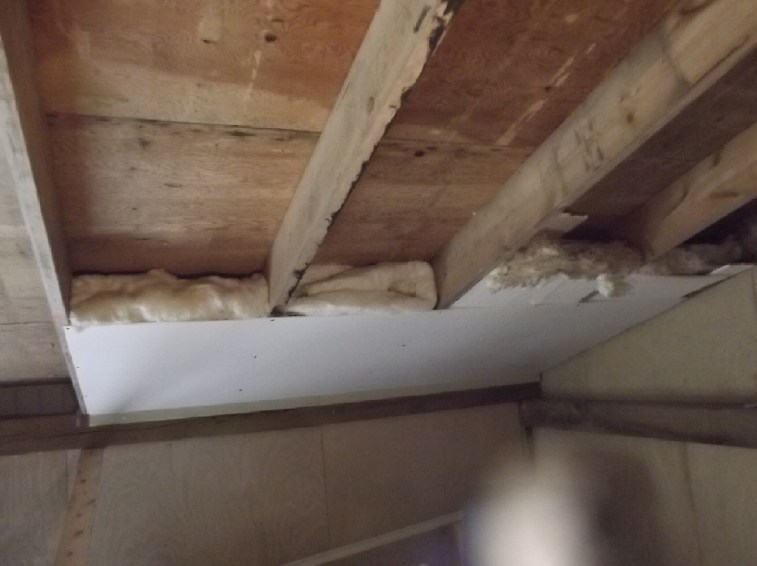
with 3 Kg of books placed on top at the rear.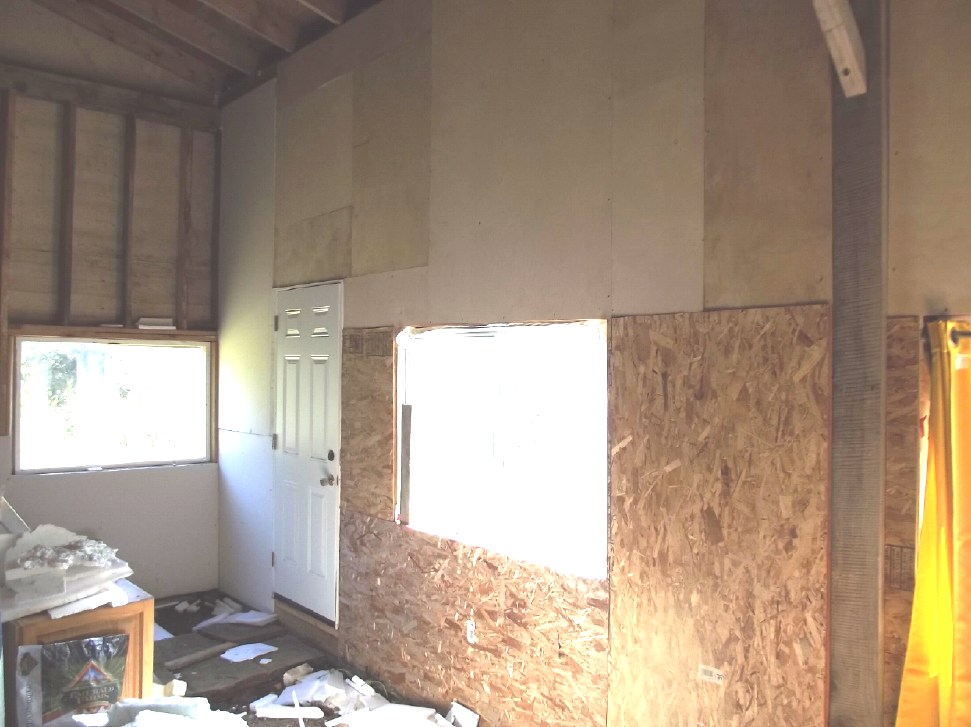 I finished covering the south wall - with scraps of birch plywood.
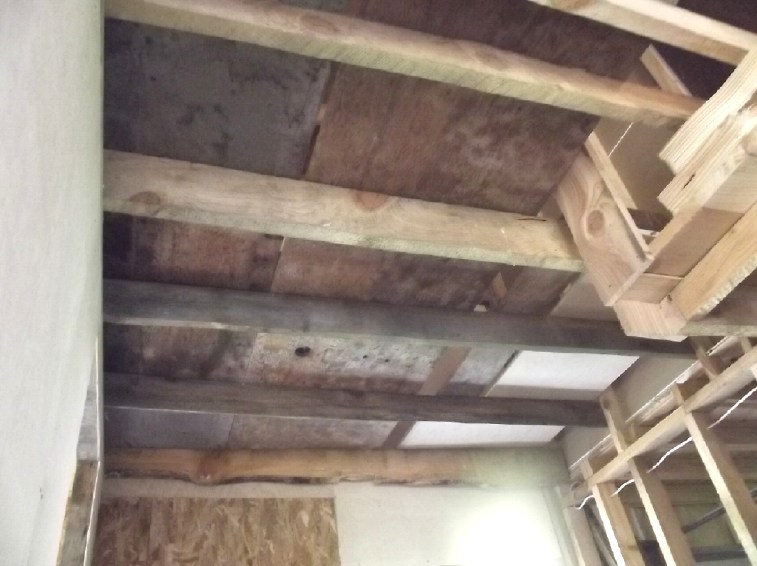 Then I put up scaffolding and
did a section of the "cathedral" ceiling, with partly styrene foam and
partly fiberglass insulation, including most of the ugly foam from the
beach and finishing off the open bag of the horrid old fiberglass.
That's 3 sections out of 8 now, each of which needs its own scaffolding
arrangement to reach way up to the 12-16 foot ceiling. If I do a
lowered ceiling for the other half, then I just need to scaffold one
more section so I can do it without endangering myself.
Then I put up scaffolding and
did a section of the "cathedral" ceiling, with partly styrene foam and
partly fiberglass insulation, including most of the ugly foam from the
beach and finishing off the open bag of the horrid old fiberglass.
That's 3 sections out of 8 now, each of which needs its own scaffolding
arrangement to reach way up to the 12-16 foot ceiling. If I do a
lowered ceiling for the other half, then I just need to scaffold one
more section so I can do it without endangering myself.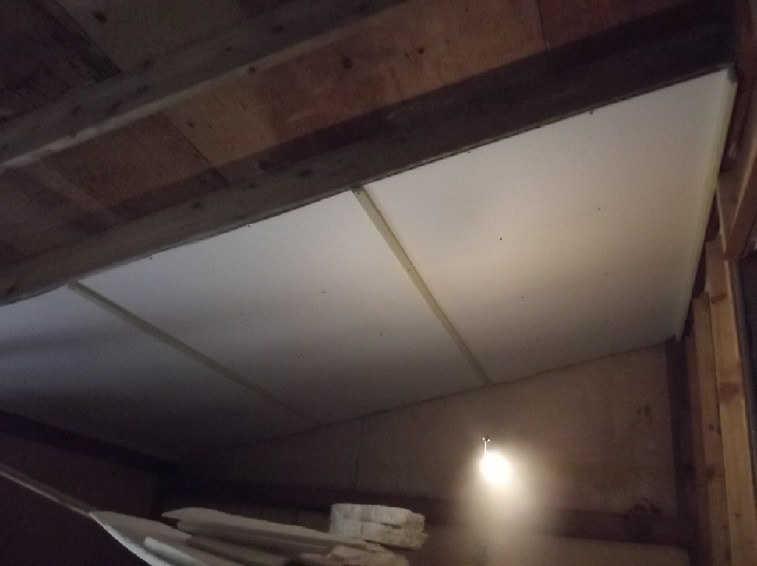 The job also included cutting up, painting
and installing trim boards to cover the gaps between coroplast sheets,
incluing in the bedroom where it also hadn't been done yet. The walls
are one thing, but I'm really glad I'm not trying to lift gyproc sheets
up to the ceiling. The featherlight coroplast can be held in place with
one screw near the middle while I go check the fit around the edges.
The job also included cutting up, painting
and installing trim boards to cover the gaps between coroplast sheets,
incluing in the bedroom where it also hadn't been done yet. The walls
are one thing, but I'm really glad I'm not trying to lift gyproc sheets
up to the ceiling. The featherlight coroplast can be held in place with
one screw near the middle while I go check the fit around the edges.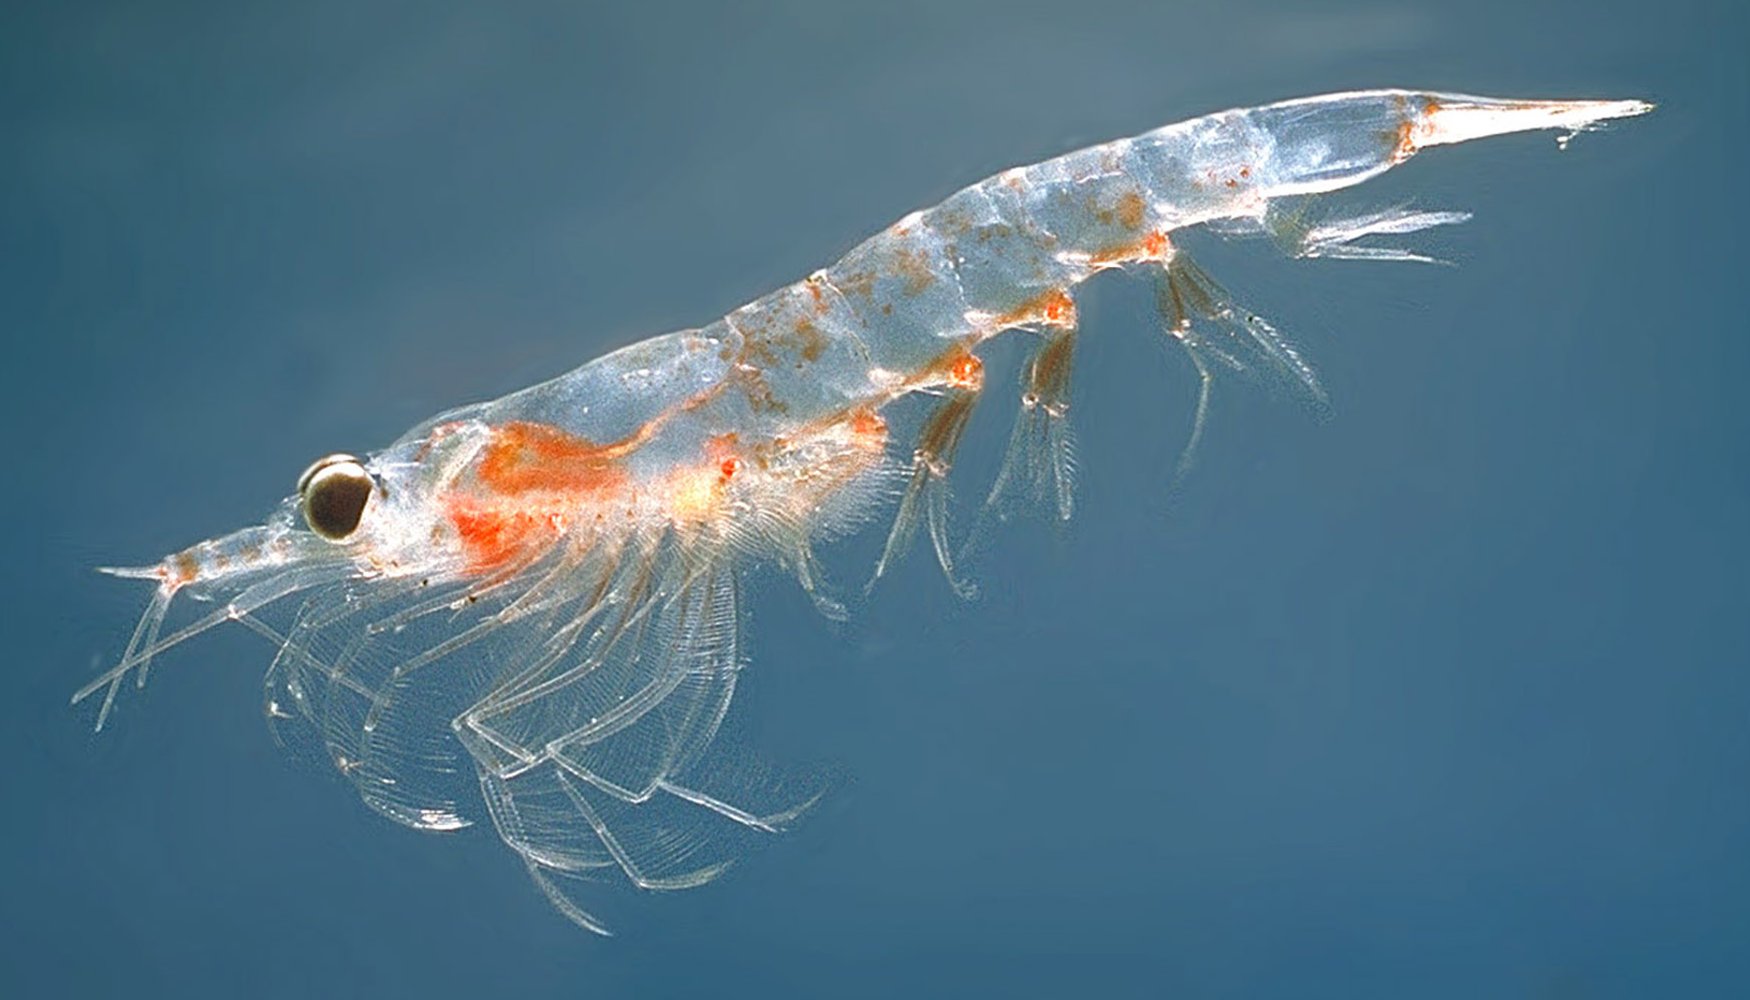 * Gray whales have been dying in
abundance on the Pacific coast of North America this spring, often
beaching themselves. I saw a huge carcass on the beach at Miller Creek.
In the past (1990-2000?) whales have died from poisoning by toxic
polychlorinated biphenals (PCB's) discarded in the ocean in "50 years
guaranteed canisters" in the 1970's. (The whole idea seemed incredibly
short sighted to me even as a high school student. What was supposed to
happen after 50 years?) That plague seems to be over. Without waiting
for this year's autopsies, in the last decade or more they and other
marine creatures have been starving to death in increasing
numbers. Krill, the chief food source for the whole marine life
chain including whales, many fish species and many sea birds, have
been harvested in great abundance, especially as feed for fish
farms. Krill mostly eat phytoplankton, the tiniest of plants floating
around in the oceans. Without managing to dig up any relevant figures,
I expect the moral of the story is that you can't take vast quantities
of the second lowest rung of the food chain from the oceans without
starving and depleting stocks of every species above that level. Enter the "Sea Sled", a boat whose hull shape
traps air underneath when it travels rapidly, somewhat akin to a
hovercraft, and so it partly rides on that cushion of air, using less
power to go faster than other boats.
* Gray whales have been dying in
abundance on the Pacific coast of North America this spring, often
beaching themselves. I saw a huge carcass on the beach at Miller Creek.
In the past (1990-2000?) whales have died from poisoning by toxic
polychlorinated biphenals (PCB's) discarded in the ocean in "50 years
guaranteed canisters" in the 1970's. (The whole idea seemed incredibly
short sighted to me even as a high school student. What was supposed to
happen after 50 years?) That plague seems to be over. Without waiting
for this year's autopsies, in the last decade or more they and other
marine creatures have been starving to death in increasing
numbers. Krill, the chief food source for the whole marine life
chain including whales, many fish species and many sea birds, have
been harvested in great abundance, especially as feed for fish
farms. Krill mostly eat phytoplankton, the tiniest of plants floating
around in the oceans. Without managing to dig up any relevant figures,
I expect the moral of the story is that you can't take vast quantities
of the second lowest rung of the food chain from the oceans without
starving and depleting stocks of every species above that level. Enter the "Sea Sled", a boat whose hull shape
traps air underneath when it travels rapidly, somewhat akin to a
hovercraft, and so it partly rides on that cushion of air, using less
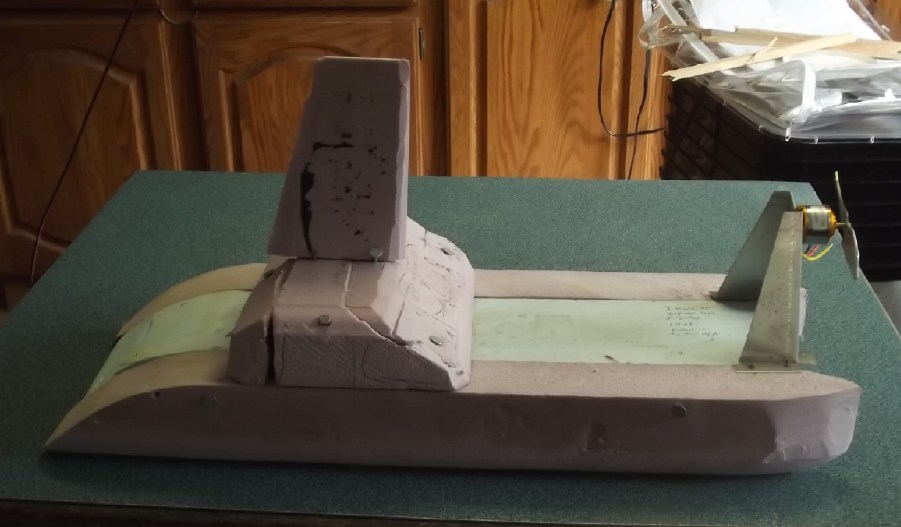
power to go faster than other boats. Then it seemed to have an awful lot in common with the ground effect
craft RC model I made some years back. I modified that to test out some
aspects. The chief discovered concern seems to be to keep the front end
up. The "boxed in" rear rises out of the water surprisingly easily,
pointing the front end down. With the model being 4.5 Kg instead of 3
Kg owing to the heavy batteries, the nose can even dig down into the
water if the fans aren't aimed upward. (Dive, dive!) The fans threw up
a spray of green water.
Then it seemed to have an awful lot in common with the ground effect
craft RC model I made some years back. I modified that to test out some
aspects. The chief discovered concern seems to be to keep the front end
up. The "boxed in" rear rises out of the water surprisingly easily,
pointing the front end down. With the model being 4.5 Kg instead of 3
Kg owing to the heavy batteries, the nose can even dig down into the
water if the fans aren't aimed upward. (Dive, dive!) The fans threw up
a spray of green water.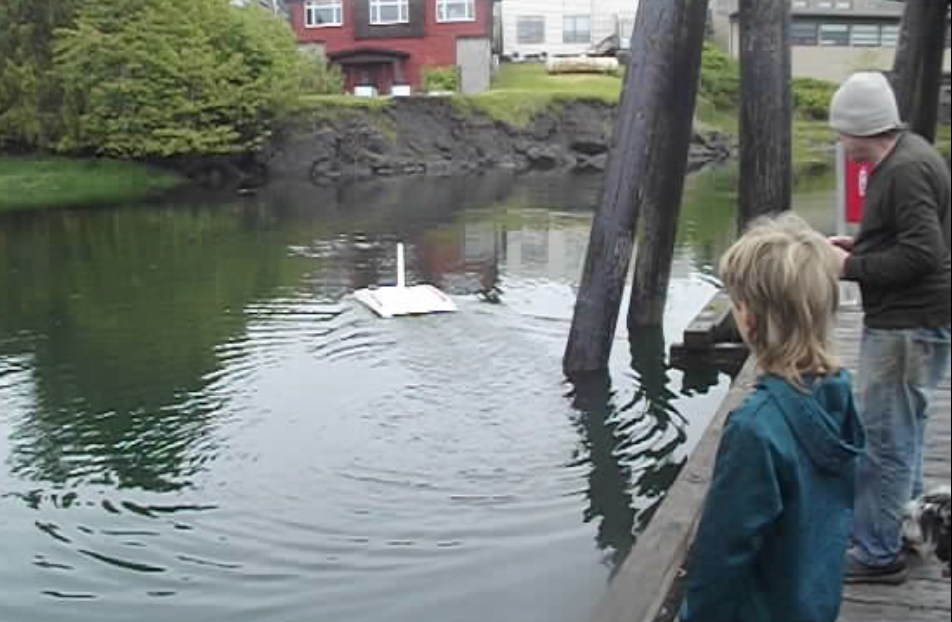 [11th]
Seeing my plan last month, TE News reader Marc emailed me about the
"sea sled", an early 1900's "sort of" tunnel hull design said to be
very fast per horsepower. [drawing repeat] Marc has dug up some great
old designs that were experimental or are long since out of use! But
"sea sleds" were made up until (IIRC) the 1970's.) This sent me on a
quest looking at hull profiles. Then Laird, seeing my model, suggested
I extend the cabin front and rear to trap more air underneath and
provide more lift for keeping the craft on top of the water.
[11th]
Seeing my plan last month, TE News reader Marc emailed me about the
"sea sled", an early 1900's "sort of" tunnel hull design said to be
very fast per horsepower. [drawing repeat] Marc has dug up some great
old designs that were experimental or are long since out of use! But
"sea sleds" were made up until (IIRC) the 1970's.) This sent me on a
quest looking at hull profiles. Then Laird, seeing my model, suggested
I extend the cabin front and rear to trap more air underneath and
provide more lift for keeping the craft on top of the water.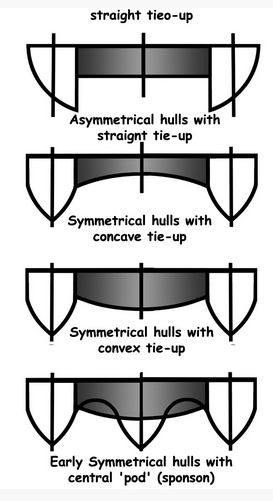 Taking the feedback to heart I thought I'd change the "tunnel hull"
profile to the second one in this diagram with the concave underside
center "wing" profile, and extend the center fore and aft, thus going
back to the "tunnel hull" idea. Perhaps the whole thing including the
cabin could be more streamlined and it would certainly be strongest.
That eliminates the aimable "canard" elevator, but the propeller could
still be aimed up and down. I would make the hulls symmetrical but
retain the narrow flat bottoms, my key "water skis" feature. (Probably
a flat underside instead of concave would be just as good, and easier
to make.)
So a key reason for the change to "tunnel hull" is so air can be
scooped and pushed underneath between the hulls. A downward
flap?/transom? at the back will help trap the air underneath to
increase the pressure. If this is extended down to, or near to, the
flat hull bottoms, it should be rather similar in effect to both the
Sea Sled, a hovercraft and my ground effect vehicle design, where the
trapped air was intended to help lift to get it airborne. The air will
have higher pressure, lifting the whole boat from underneath and
bubbling out to the sides and at the back all around, like a
hovercraft. The flat hull bottoms (and a similarly flat rear bottom
section) will tend to hold the lifting air underneath instead of the
weight pushing it immediately off to the sides. Air flowing underneath
the hulls will reduce friction with the water. The concave bottom of
the center section will help scoop in the most air. I expect it would
be sufficient.
Taking the feedback to heart I thought I'd change the "tunnel hull"
profile to the second one in this diagram with the concave underside
center "wing" profile, and extend the center fore and aft, thus going
back to the "tunnel hull" idea. Perhaps the whole thing including the
cabin could be more streamlined and it would certainly be strongest.
That eliminates the aimable "canard" elevator, but the propeller could
still be aimed up and down. I would make the hulls symmetrical but
retain the narrow flat bottoms, my key "water skis" feature. (Probably
a flat underside instead of concave would be just as good, and easier
to make.)
So a key reason for the change to "tunnel hull" is so air can be
scooped and pushed underneath between the hulls. A downward
flap?/transom? at the back will help trap the air underneath to
increase the pressure. If this is extended down to, or near to, the
flat hull bottoms, it should be rather similar in effect to both the
Sea Sled, a hovercraft and my ground effect vehicle design, where the
trapped air was intended to help lift to get it airborne. The air will
have higher pressure, lifting the whole boat from underneath and
bubbling out to the sides and at the back all around, like a
hovercraft. The flat hull bottoms (and a similarly flat rear bottom
section) will tend to hold the lifting air underneath instead of the
weight pushing it immediately off to the sides. Air flowing underneath
the hulls will reduce friction with the water. The concave bottom of
the center section will help scoop in the most air. I expect it would
be sufficient.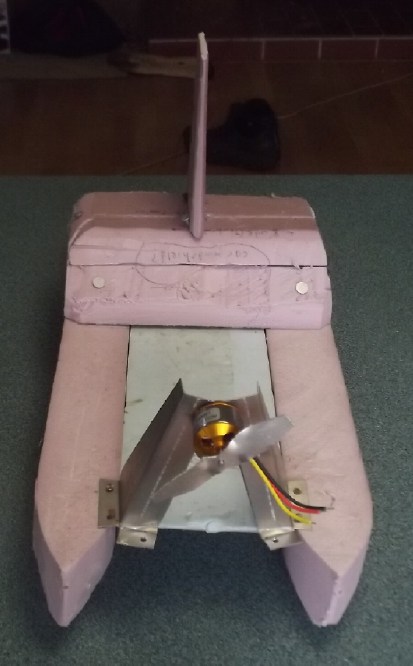
 [14th]
I pulled the ground effect vehicle off its shelf where (even on its
side) it occupied a fair bit of space, thinking to dispose of it. I
thought "I have no use for this now. The Waterski Boat is better." And
I had no plans for making a working model of that. Then I started
noticing how similar the underside lines were. They were both tunnel
hull in form with flat bottom hulls. If I cut off the slope that made
for the take-off step on each hull, it would have similar long flat
hulls. Then if I cut into the sides at the bottoms, at a 45 degree
angle, they would become much thinner along the bottom, more akin to
the long, thin "water skis" hull design.
[14th]
I pulled the ground effect vehicle off its shelf where (even on its
side) it occupied a fair bit of space, thinking to dispose of it. I
thought "I have no use for this now. The Waterski Boat is better." And
I had no plans for making a working model of that. Then I started
noticing how similar the underside lines were. They were both tunnel
hull in form with flat bottom hulls. If I cut off the slope that made
for the take-off step on each hull, it would have similar long flat
hulls. Then if I cut into the sides at the bottoms, at a 45 degree
angle, they would become much thinner along the bottom, more akin to
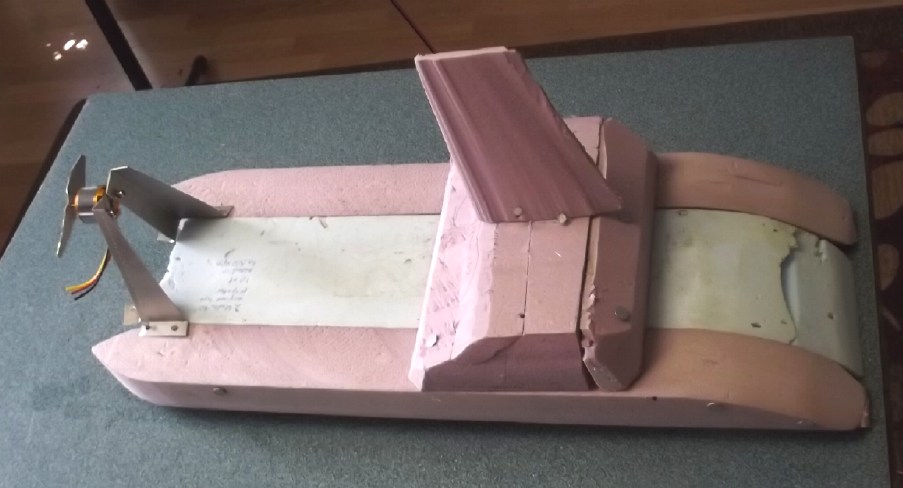
the long, thin "water skis" hull design.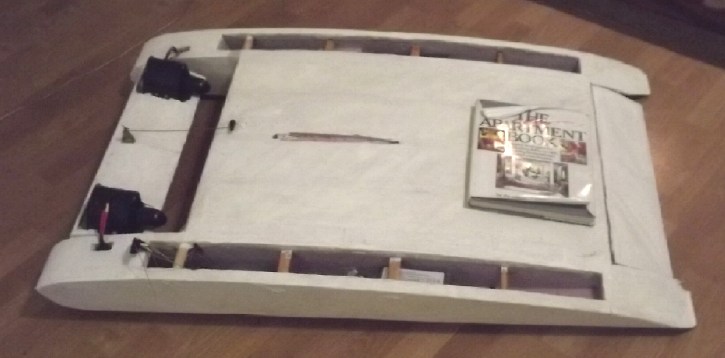 But it seemed the rear end lifted off much more easily than the front,
which never got off the floor. Perhaps too much weight was still toward
the front? Also of course the front was the open end, and the craft
wasn't moving forward rapidly to scoop the air in. I set a heavy book
on the rear; 1.5 Kg.
But it seemed the rear end lifted off much more easily than the front,
which never got off the floor. Perhaps too much weight was still toward
the front? Also of course the front was the open end, and the craft
wasn't moving forward rapidly to scoop the air in. I set a heavy book
on the rear; 1.5 Kg.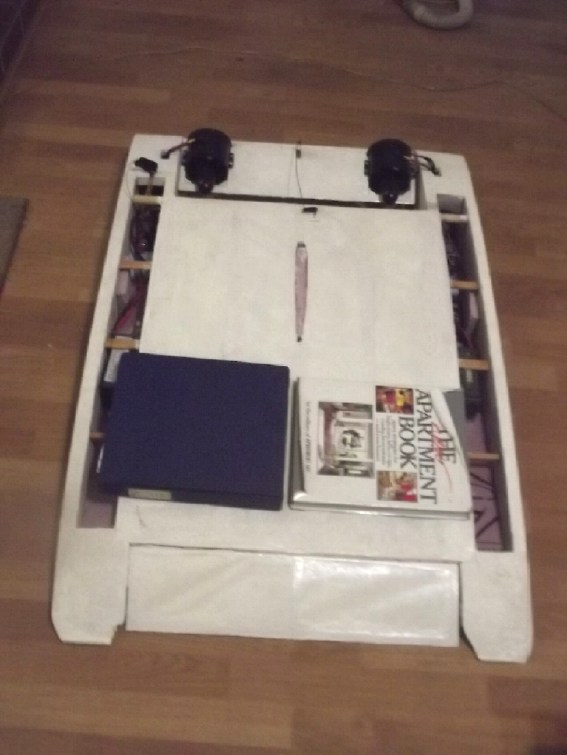 It
hardly seemed to make a difference. Last I got a binder, also 1.5 Kg,
and set them both on it near the back. This time it worked harder, but
if the air was aimed under, the rear still rose and it slid forward. I
was pleased that it would move with that much extra weight, with just
one fan running. (The craft itself is over 4.5 Kg, with the batteries
being 1/3 of the total, so the total with books was 7.5 Kg.)
It
hardly seemed to make a difference. Last I got a binder, also 1.5 Kg,
and set them both on it near the back. This time it worked harder, but
if the air was aimed under, the rear still rose and it slid forward. I
was pleased that it would move with that much extra weight, with just
one fan running. (The craft itself is over 4.5 Kg, with the batteries
being 1/3 of the total, so the total with books was 7.5 Kg.)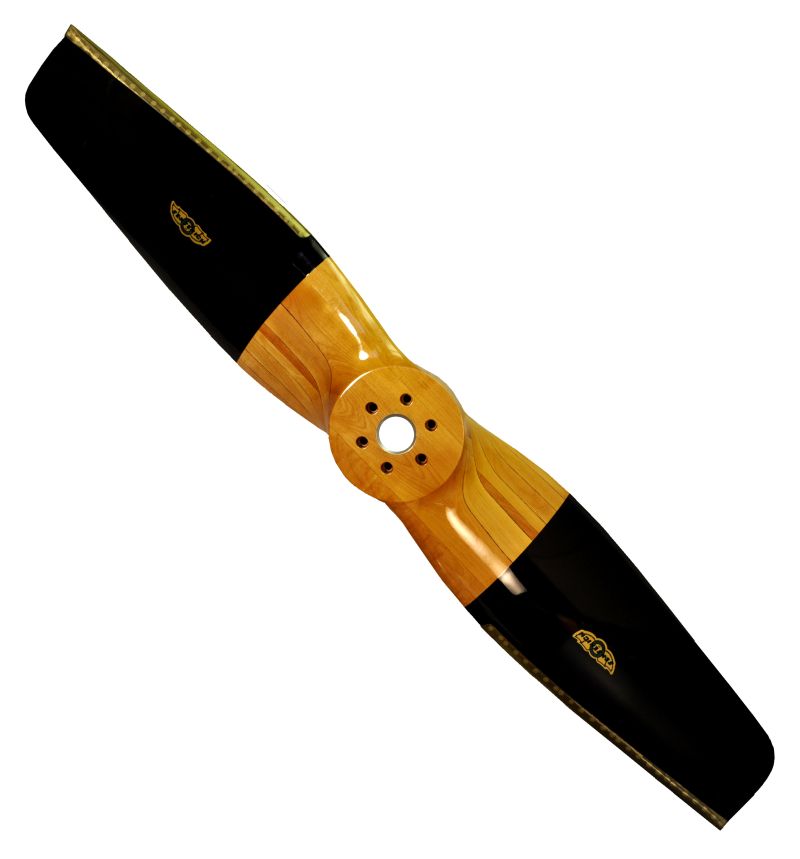 I'm now thinking
that it shouldn't need the fan to tilt and blow air underneath.
Sufficient air should get trapped as speed increases without that. If
possible I'd rather have the fan (a) at the very front, (b) mounted as
high as possible to get the airstream above the cabin and keep the
mechanism away from the salt water, (c) and solidly mounted, with
pivoting vanes behind for directional control. It's just more robust
that way. My idea of a good propeller for this is a fat 40 inch fixed
two blade model something like this image. [Sensenich propellers]
I'm now thinking
that it shouldn't need the fan to tilt and blow air underneath.
Sufficient air should get trapped as speed increases without that. If
possible I'd rather have the fan (a) at the very front, (b) mounted as
high as possible to get the airstream above the cabin and keep the
mechanism away from the salt water, (c) and solidly mounted, with
pivoting vanes behind for directional control. It's just more robust
that way. My idea of a good propeller for this is a fat 40 inch fixed
two blade model something like this image. [Sensenich propellers]
 [7th] After some days of
insulating with styrene foam and cutting plywood, I finally finished
covering the east side of the south wall in the cabin. I decided I just
wasn't going to go into town and buy more plywood, so I finished the
wall with scraps. I suppose I'll probably end up wallpapering over
them, since they don't look like much anyway.[19th] I had thrown up some 2 by 6'es with one end resting
on the washroom roof and the other on the unsheathed wall outside the
bedroom. Now I screwed them to the wall studs so they couldn't fall
over. Then I threw up some plywood and screwed it to these boards to
make a floor. Then I took off one of the railings of the landing at the
top of the stairs. Now I have a scaffold over half of the southwest
quarter accessed by going up the stairs. (It would be simple to turn it
into another "upstairs" area, but I don't need the space - and would
rather finish the rest than add a new job!)
[7th] After some days of
insulating with styrene foam and cutting plywood, I finally finished
covering the east side of the south wall in the cabin. I decided I just
wasn't going to go into town and buy more plywood, so I finished the
wall with scraps. I suppose I'll probably end up wallpapering over
them, since they don't look like much anyway.[19th] I had thrown up some 2 by 6'es with one end resting
on the washroom roof and the other on the unsheathed wall outside the
bedroom. Now I screwed them to the wall studs so they couldn't fall
over. Then I threw up some plywood and screwed it to these boards to
make a floor. Then I took off one of the railings of the landing at the
top of the stairs. Now I have a scaffold over half of the southwest
quarter accessed by going up the stairs. (It would be simple to turn it
into another "upstairs" area, but I don't need the space - and would
rather finish the rest than add a new job!)
 [20th]
I put some foam insulation at the lower end, filling the spaces. Then I
put up a piece of coroplast ceiling. I had already decided I should do
the trim boards along with this, but rain kept me from starting... for
almost a week now.
[20th]
I put some foam insulation at the lower end, filling the spaces. Then I
put up a piece of coroplast ceiling. I had already decided I should do
the trim boards along with this, but rain kept me from starting... for
almost a week now.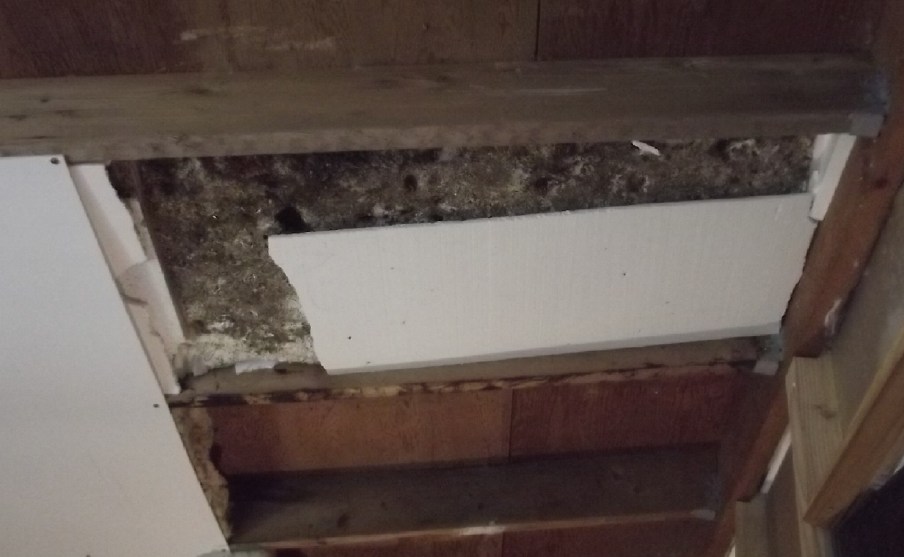 [26th]
I filled the 8 feet of the one section with ugly foam slabs from the
beach, then added some "nice" but thin foam under that to get to 5, 6
or 7 inches of insulation. I pinned loose pieces up to previous pieces
with nails. (They push in easily by hand.) I made sure the seams didn't
line up between layers. I broke off little pieces and stuffed them into
the gaps. For a few larger gaps I sliced pieces to size with the hot
saw. It doesn't have to be perfect to (surely!) be better overall than
fiberglass. Little air spaces have their own insulation value. (or else
fiberglass wouldn't work at all!)[28th] I filled the rest of the spaces with foam, then put
up the last ceiling panel. I ran out of big, thick slabs of foam
(however ugly) and had to start using 1/2 inch thick pieces that
weren't big enough to cover the width. Yikes! I had it easy with the
big slabs! I used a lot of nails to pin lots of the thin pieces
together, and several times major portions fell out and had to be
redone. The thin pieces would have been much better used in walls or an
attic space than in a ceiling being filled from underneath. My utility
trailer where the foam still was "stored" started emptying out
surprisingly quickly.
[26th]
I filled the 8 feet of the one section with ugly foam slabs from the
beach, then added some "nice" but thin foam under that to get to 5, 6
or 7 inches of insulation. I pinned loose pieces up to previous pieces
with nails. (They push in easily by hand.) I made sure the seams didn't
line up between layers. I broke off little pieces and stuffed them into
the gaps. For a few larger gaps I sliced pieces to size with the hot
saw. It doesn't have to be perfect to (surely!) be better overall than
fiberglass. Little air spaces have their own insulation value. (or else
fiberglass wouldn't work at all!)[28th] I filled the rest of the spaces with foam, then put
up the last ceiling panel. I ran out of big, thick slabs of foam
(however ugly) and had to start using 1/2 inch thick pieces that
weren't big enough to cover the width. Yikes! I had it easy with the
big slabs! I used a lot of nails to pin lots of the thin pieces
together, and several times major portions fell out and had to be
redone. The thin pieces would have been much better used in walls or an
attic space than in a ceiling being filled from underneath. My utility
trailer where the foam still was "stored" started emptying out
surprisingly quickly. I had recently found a sign in a video,
posted at the base of a "5G" tower. I looked at it again in a viewer.
"up to several hundred feet" It was on a pole right between two
adjacent apartment buildings, right outside everybody's windows! Sure
enough, there it was in black and white: "Tinnitus"! Along with a list
of worse maladies. Of course in 1990 there was no internet or cell
phones, so UHF was something used in "microwave" (actually centimetric
wavelengths) ovens and for military aircraft radio, not something one
might be exposed to all day at close range. If radio and even UHF
frequencies also cause tinnitus, today I would probably NEVER have got
away from ALL the tinnitus causes even once in my life! (And here I've
been telling people I didn't think WiFi and cellphones could be causing
tinnitus! And if power lines and UHF both cause tinnitus, then
presumably so must All the radio frequencies in between: LF, AM, HF,
SW, VHF... ANY oscillating electricity radiating an external EMF field!)
I had recently found a sign in a video,
posted at the base of a "5G" tower. I looked at it again in a viewer.
"up to several hundred feet" It was on a pole right between two
adjacent apartment buildings, right outside everybody's windows! Sure
enough, there it was in black and white: "Tinnitus"! Along with a list
of worse maladies. Of course in 1990 there was no internet or cell
phones, so UHF was something used in "microwave" (actually centimetric
wavelengths) ovens and for military aircraft radio, not something one
might be exposed to all day at close range. If radio and even UHF
frequencies also cause tinnitus, today I would probably NEVER have got
away from ALL the tinnitus causes even once in my life! (And here I've
been telling people I didn't think WiFi and cellphones could be causing
tinnitus! And if power lines and UHF both cause tinnitus, then
presumably so must All the radio frequencies in between: LF, AM, HF,
SW, VHF... ANY oscillating electricity radiating an external EMF field!)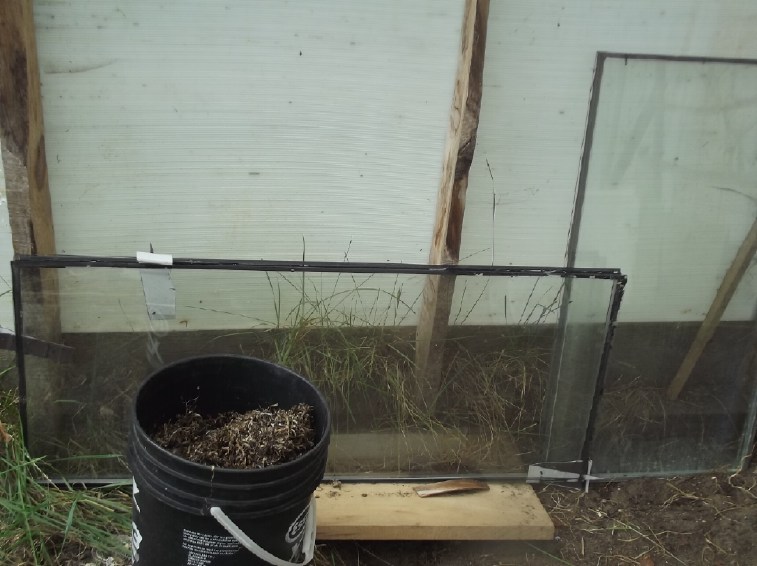 Mike replaced his house windows and gave me
the old ones. Sometime I started separating the double panes by
inserting a thin knife blade, then some thicker things, and very
gradually pushing them apart until the black butyl tape finally gave
way. I didn't really care if it took days or a week to get them apart,
but I'd rather do it without breaking them. The first two that fit went
on the greenhouse south/outer door, replacing some almost opaque
"Solexx" coroplast. I'm sure the squashes just inside appreciate it.
Mike replaced his house windows and gave me
the old ones. Sometime I started separating the double panes by
inserting a thin knife blade, then some thicker things, and very
gradually pushing them apart until the black butyl tape finally gave
way. I didn't really care if it took days or a week to get them apart,
but I'd rather do it without breaking them. The first two that fit went
on the greenhouse south/outer door, replacing some almost opaque
"Solexx" coroplast. I'm sure the squashes just inside appreciate it.
| Days of __ KWH |
May 2025 (18 Collectors, DC/ Batteries.) |
April 2025 (18 C's - DC/ batteries only) |
May 2024 (18 C's - Grid Ties & DC) |
| 0.xx |
|||
| 1.xx |
|||
| 2.xx |
1 |
||
| 3.xx |
|
||
| 4.xx |
|||
| 5.xx |
2 |
||
| 6.xx |
2 |
5 |
|
| 7.xx |
1 |
5 |
|
| 8.xx |
3 |
4 |
|
| 9.xx |
7 |
8 |
|
| 10.xx |
5 |
4 |
|
| 11.xx |
3 |
||
| 12.xx |
5 |
1 |
|
| 13.xx |
3 |
||
| 14.xx |
2 |
||
| 15.xx |
|
||
| 16.xx |
|||
| 17.xx |
|||
| 18.xx |
|||
| 19.xx |
|
||
| 20.xx |
|||
| 21.xx |
|||
| 22.xx |
|||
| 23.xx |
|||
| Total KWH for month |
333.32 |
246.61 |
|
| Km Driven on Electricity |
1159.3 @7.9 kw/kwh = 150 KWH |
799.1 (@8.0 Km/KWH) = 100 KWH |